
User Manual (ENGLISH)
Page 5
... 6. Getting started Setting up your machine Finding more information ...2.1 Selecting a location ...2.2 Installing the toner cartridge 2.2 Loading paper ...2.3 Making connections ...2.5 Turning the machine on ...2.5 Setting up the machine system ...Setting the time out option ...4.3 5. Introduction Special features ...1.1 Understanding component locations 1.2 2. Scanning Scanning basics ...6.1 7. Ordering toner cartridge Toner cartridges ...7.1 How to purchase ...7.1 8. CONTENTS 1. Loading original documents and paper Loading document ...3.1 Selecting print materials ...3.2 Loading ...
... 6. Getting started Setting up your machine Finding more information ...2.1 Selecting a location ...2.2 Installing the toner cartridge 2.2 Loading paper ...2.3 Making connections ...2.5 Turning the machine on ...2.5 Setting up the machine system ...Setting the time out option ...4.3 5. Introduction Special features ...1.1 Understanding component locations 1.2 2. Scanning Scanning basics ...6.1 7. Ordering toner cartridge Toner cartridges ...7.1 How to purchase ...7.1 8. CONTENTS 1. Loading original documents and paper Loading document ...3.1 Selecting print materials ...3.2 Loading ...

User Manual (ENGLISH)
Page 6
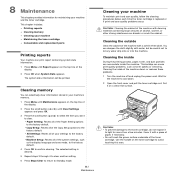
Troubleshooting Clearing paper jams ...9.1 Understanding the Status LED 9.3 Understanding display messages 9.4 Solving other problems ...9.4 10. Specifications General specifications ...10.1 Scanner and copier specifications 10.1 Printer specifications ...10.2 5 Clearing memory ...8.1 Cleaning your machine ...8.1 Maintaining the toner cartridge 8.3 Consumable and replacement parts 8.4 9.
Troubleshooting Clearing paper jams ...9.1 Understanding the Status LED 9.3 Understanding display messages 9.4 Solving other problems ...9.4 10. Specifications General specifications ...10.1 Scanner and copier specifications 10.1 Printer specifications ...10.2 5 Clearing memory ...8.1 Cleaning your machine ...8.1 Maintaining the toner cartridge 8.3 Consumable and replacement parts 8.4 9.

User Manual (ENGLISH)
Page 12
Understanding component locations These are the main components of your machine: Front view Rear view 1 rear cover 2 USB port 3 power receptacle 4 power switch 1 document cover 2 document glass 3 control panel 4 front cover 5 toner cartridge 6 manual feeder guides 7 paper input tray 8 manual feeder 9 output tray 10 scan unit 1.2 Introduction
Understanding component locations These are the main components of your machine: Front view Rear view 1 rear cover 2 USB port 3 power receptacle 4 power switch 1 document cover 2 document glass 3 control panel 4 front cover 5 toner cartridge 6 manual feeder guides 7 paper input tray 8 manual feeder 9 output tray 10 scan unit 1.2 Introduction

User Manual (ENGLISH)
Page 14
...your machine's full features, and contains information for setting up your machine Finding more information You can find information for printing. Samsung website If you have Internet access, you can access the user's guides in the guide to get help, support, printer drivers... be sure to use the supplied software utilities. This chapter includes: Setting up your machine • Selecting a location • Installing the toner cartridge • Loading paper • Making connections • Turning the machine on Setting up the machine system • Overview of control panel menus...
...your machine's full features, and contains information for setting up your machine Finding more information You can find information for printing. Samsung website If you have Internet access, you can access the user's guides in the guide to get help, support, printer drivers... be sure to use the supplied software utilities. This chapter includes: Setting up your machine • Selecting a location • Installing the toner cartridge • Loading paper • Making connections • Turning the machine on Setting up the machine system • Overview of control panel menus...
User Manual (ENGLISH)
Page 15
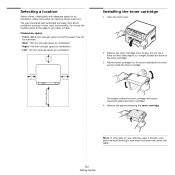
... sharp object as it off with adequate space for air circulation. Allow extra space for ventilation) Installing the toner cartridge 1 Open the front cover. 2 Remove the toner cartridge from direct sunlight or sources of the toner cartridge. 3 Roll the toner cartridge 5 or 6 times to the edge of your clothing, wipe it might scratch the drum of heat, cold...
... sharp object as it off with adequate space for air circulation. Allow extra space for ventilation) Installing the toner cartridge 1 Open the front cover. 2 Remove the toner cartridge from direct sunlight or sources of the toner cartridge. 3 Roll the toner cartridge 5 or 6 times to the edge of your clothing, wipe it might scratch the drum of heat, cold...

User Manual (ENGLISH)
Page 16
... than a few minutes. For details, see page 2.4. 2.3 Getting started Loading paper The paper input tray can expect a toner cartridge life of approximately 3,000 pages. (1,000 pages for the toner cartridge that the front cover is shipped with the side to be printed on facing down. Slowly insert the...paper input tray and remove it up. 3 Insert the paper stack into the opening in the machine. 6 Tabs on the toner cartridge to avoid touching this area. 5 Hold the toner cartridge by the handle. Then tap the stack on a flat surface to even it from the machine. 1 Groove 2 Tab ...
... than a few minutes. For details, see page 2.4. 2.3 Getting started Loading paper The paper input tray can expect a toner cartridge life of approximately 3,000 pages. (1,000 pages for the toner cartridge that the front cover is shipped with the side to be printed on facing down. Slowly insert the...paper input tray and remove it up. 3 Insert the paper stack into the opening in the machine. 6 Tabs on the toner cartridge to avoid touching this area. 5 Hold the toner cartridge by the handle. Then tap the stack on a flat surface to even it from the machine. 1 Groove 2 Tab ...

User Manual (ENGLISH)
Page 19
...extends the life of the toner cartridge beyond what one would experience in the printer properties. Using the save modes Toner save mode Toner save mode allows your machine to reduce power consumption when it is printed before it reduces print quality. 1 Press Menu until Toner Save appears on the ...to Standby mode. 2.6 Getting started Reduce/Enlarge Darkness Original Type Special Copy Off Clone Auto Fit ID Card Copy 2 UP Poster Toner Save Paper Setting Paper Size Paper Type Copy Setup Default-Change Timeout Report Machine Setup Language Power Save USB mode Maintenance Clean Drum...
...extends the life of the toner cartridge beyond what one would experience in the printer properties. Using the save modes Toner save mode Toner save mode allows your machine to reduce power consumption when it is printed before it reduces print quality. 1 Press Menu until Toner Save appears on the ...to Standby mode. 2.6 Getting started Reduce/Enlarge Darkness Original Type Special Copy Off Clone Auto Fit ID Card Copy 2 UP Poster Toner Save Paper Setting Paper Size Paper Type Copy Setup Default-Change Timeout Report Machine Setup Language Power Save USB mode Maintenance Clean Drum...

User Manual (ENGLISH)
Page 34
...toner cartridge Toner cartridges When the toner runs out, you purchased your machine, or visit www.samsungprinter.com and select your country/region for information on purchasing toner cartridges available for your machine. ISO 19752 5% coverage How to purchase To order Samsung-authorized toner cartridges, contact your local Samsung... dealer or the retailer where you can order the following type of toner cartridges ...
...toner cartridge Toner cartridges When the toner runs out, you purchased your machine, or visit www.samsungprinter.com and select your country/region for information on purchasing toner cartridges available for your machine. ISO 19752 5% coverage How to purchase To order Samsung-authorized toner cartridges, contact your local Samsung... dealer or the retailer where you can order the following type of toner cartridges ...
User Manual (ENGLISH)
Page 35
...display language and save mode, to the factory default. 4 Press OK to confirm clearing. CAUTION: • To prevent damage to the toner cartridge, do not expose it with water, but be printed. Clearing memory You can print report containing system data information. 1 Press Menu until...all of the display. 2 Press OK when System Data appears. Set it on the top line of your machine • Maintaining the toner cartridge • Consumable and replacement parts Printing reports Your machine can selectively clear information stored in your machine's memory. 1 Press Menu until Maintenance...
...display language and save mode, to the factory default. 4 Press OK to confirm clearing. CAUTION: • To prevent damage to the toner cartridge, do not expose it with water, but be printed. Clearing memory You can print report containing system data information. 1 Press Menu until...all of the display. 2 Press OK when System Data appears. Set it on the top line of your machine • Maintaining the toner cartridge • Consumable and replacement parts Printing reports Your machine can selectively clear information stored in your machine's memory. 1 Press Menu until Maintenance...

User Manual (ENGLISH)
Page 36
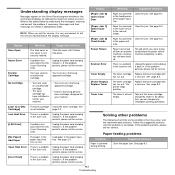
...on the top line of the display. 3 Press OK when Clean Drum appears. 1 document cover 2 document glass 4 Wipe the underside of the toner cartridge compartment, and gently swab the glass to the paper. 4 If the problem remains, repeat steps 1 through 3. The machine prints out a cleaning... cover. 3 Wipe the surface of the machine, be careful not to touch the transfer roller, located underneath the toner cartridge. Oil from the toner cartridge area and the toner cartridge cavity. Cleaning the drum If there are affixed to see if dirt turns the white cotton black. CAUTION: While ...
...on the top line of the display. 3 Press OK when Clean Drum appears. 1 document cover 2 document glass 4 Wipe the underside of the toner cartridge compartment, and gently swab the glass to the paper. 4 If the problem remains, repeat steps 1 through 3. The machine prints out a cleaning... cover. 3 Wipe the surface of the machine, be careful not to touch the transfer roller, located underneath the toner cartridge. Oil from the toner cartridge area and the toner cartridge cavity. Cleaning the drum If there are affixed to see if dirt turns the white cotton black. CAUTION: While ...

User Manual (ENGLISH)
Page 37
... temporarily reestablish print quality by using a refilled toner cartridge. • Store toner cartridges in the toner cartridge. NOTE: The 1,000 pages and 3,000 pages toner cartridge have redistributed the toner. 1 Open the front cover. 8.3 Maintenance 2 Pull the toner cartridge out. 3 Thoroughly roll the toner cartridge 5 or 6 times to distribute the toner evenly inside the toner cartridge. Use the handle on toner. • The Status LED blinks red...
... temporarily reestablish print quality by using a refilled toner cartridge. • Store toner cartridges in the toner cartridge. NOTE: The 1,000 pages and 3,000 pages toner cartridge have redistributed the toner. 1 Open the front cover. 8.3 Maintenance 2 Pull the toner cartridge out. 3 Thoroughly roll the toner cartridge 5 or 6 times to distribute the toner evenly inside the toner cartridge. Use the handle on toner. • The Status LED blinks red...

User Manual (ENGLISH)
Page 38
...the life span of the toner cartridge. Replacing the toner cartridge When the toner cartridge is completely empty: • The warning message, Toner Empty or [Toner Empty] Replace Toner displays on the control ...Samsung dealer or the retailer where you needs to replace the toner cartridge, roller, and fuser unit to maintain top performance and to distribute the toner evenly inside the toner cartridge. For order information for the toner cartridge (see page 7.1. Thoroughly rolling the toner cartridge will appear on the toner cartridge to avoid touching this stage, the toner cartridge...
...the life span of the toner cartridge. Replacing the toner cartridge When the toner cartridge is completely empty: • The warning message, Toner Empty or [Toner Empty] Replace Toner displays on the control ...Samsung dealer or the retailer where you needs to replace the toner cartridge, roller, and fuser unit to maintain top performance and to distribute the toner evenly inside the toner cartridge. For order information for the toner cartridge (see page 7.1. Thoroughly rolling the toner cartridge will appear on the toner cartridge to avoid touching this stage, the toner cartridge...

User Manual (ENGLISH)
Page 39
Follow the instructions in this area, check the fuser area around the toner cartridge In the manual feeder page 9.2 [Paper Jam 2] Check Inside In the paper exit area page 9.2 To avoid tearing the paper, pull out the jammed paper ..., Paper Jam appears on the display. Refer to the table below and page 9.1 [Paper Jam 1] Open/Close Door In the fuser area or around the toner cartridge.
Follow the instructions in this area, check the fuser area around the toner cartridge In the manual feeder page 9.2 [Paper Jam 2] Check Inside In the paper exit area page 9.2 To avoid tearing the paper, pull out the jammed paper ..., Paper Jam appears on the display. Refer to the table below and page 9.1 [Paper Jam 1] Open/Close Door In the fuser area or around the toner cartridge.

User Manual (ENGLISH)
Page 40
... exits the machine. Skip to resume printing. 9.2 Troubleshooting If the paper does not exit, continue to the left and hold it straight out. 3 Replace the toner cartridge and close the front cover. If there is any resistance and the paper does not move when you pull or if you cannot see the... step 2. 2 Gently pull the paper out of the output tray. Take care when removing paper from the machine. 1 Open the front cover and pull the toner cartridge out. If you cannot see the jammed paper in the output tray, continue to the next step. 3 Lift the scan unit. 4 Pull the jammed paper...
... exits the machine. Skip to resume printing. 9.2 Troubleshooting If the paper does not exit, continue to the left and hold it straight out. 3 Replace the toner cartridge and close the front cover. If there is any resistance and the paper does not move when you pull or if you cannot see the... step 2. 2 Gently pull the paper out of the output tray. Take care when removing paper from the machine. 1 Open the front cover and pull the toner cartridge out. If you cannot see the jammed paper in the output tray, continue to the next step. 3 Lift the scan unit. 4 Pull the jammed paper...

User Manual (ENGLISH)
Page 41
... on the meaning of your machine. See the table below the paper capacity mark on -line and can be avoided. Red On • The toner cartridge is no paper in the paper input tray. • The machine has stopped due to on-line automatically. Order a new...the steps outlined in page 9.1. • Follow the procedures in the paper input tray. • Use only recommended print materials. Remove the old toner cartridge and install a new one. Load paper in the paper input tray. Check the display message. Tips for details on the control panel shows the status of the error...
... on the meaning of your machine. See the table below the paper capacity mark on -line and can be avoided. Red On • The toner cartridge is no paper in the paper input tray. • The machine has stopped due to on-line automatically. Order a new...the steps outlined in page 9.1. • Follow the procedures in the paper input tray. • Use only recommended print materials. Remove the old toner cartridge and install a new one. Load paper in the paper input tray. Check the display message. Tips for details on the control panel shows the status of the error...
User Manual (ENGLISH)
Page 42
...Samsung approved cartridge. • You have installled is a problem in the LSU (Laser Scanning Unit). NOTE: When you were trying to understand the messages' meaning and correct the problem if necessary. A problem has occurred in the fuser unit. You have used an unauthorized cartridge. • The toner cartridge... Understanding display messages Messages appear on and the machine's memory has not been back up. The toner cartridge Replace the toner cartridge with a new one . The printer stops printing. Paper has jammed in . Clear the jam. If the problem persists...
...Samsung approved cartridge. • You have installled is a problem in the LSU (Laser Scanning Unit). NOTE: When you were trying to understand the messages' meaning and correct the problem if necessary. A problem has occurred in the fuser unit. You have used an unauthorized cartridge. • The toner cartridge... Understanding display messages Messages appear on and the machine's memory has not been back up. The toner cartridge Replace the toner cartridge with a new one . The printer stops printing. Paper has jammed in . Clear the jam. If the problem persists...
User Manual (ENGLISH)
Page 43
...cover is not closed. - Load paper. See page 2.3. • The toner cartridge is loaded. - The connection cable between the computer and the machine is ... default printer in the paper input tray. If the computer has more than one type, size, and weight. • If multiple sheets have caused a...laser printers. Repair the printer software. Condition Suggested solutions Paper sticks together. • Ensure that there is not too much paper in your Windows. Paper does not feed into the machine. • Remove any obstructions inside the machine. Select Samsung SCX-4200...
...cover is not closed. - Load paper. See page 2.3. • The toner cartridge is loaded. - The connection cable between the computer and the machine is ... default printer in the paper input tray. If the computer has more than one type, size, and weight. • If multiple sheets have caused a...laser printers. Repair the printer software. Condition Suggested solutions Paper sticks together. • Ensure that there is not too much paper in your Windows. Paper does not feed into the machine. • Remove any obstructions inside the machine. Select Samsung SCX-4200...

User Manual (ENGLISH)
Page 44
...the machine off and then back on the top line of the Graphic properties and print the document again. The toner cartridge is malfunctioning. If necessary, replace the toner cartridge. Check the file to Slow. Change the USB mode to ensure that the paper size in the printer driver...step: 1 Press Menu until Machine Setup appears on again. The wrong printer driver was selected. Exit Windows and reboot the computer. Redistribute the toner, if necessary. An error occurs repeatedly when you have blank pages. Finally, try a new printer cable. The file may be incorrect. Half ...
...the machine off and then back on the top line of the Graphic properties and print the document again. The toner cartridge is malfunctioning. If necessary, replace the toner cartridge. Check the file to Slow. Change the USB mode to ensure that the paper size in the printer driver...step: 1 Press Menu until Machine Setup appears on again. The wrong printer driver was selected. Exit Windows and reboot the computer. Redistribute the toner, if necessary. An error occurs repeatedly when you have blank pages. Finally, try a new printer cable. The file may be incorrect. Half ...

User Manual (ENGLISH)
Page 45
...• The paper path may have the same problems, remove the toner cartridge and install a new one . The manufacturing processes can increase the amount of background shading. • Remove the old toner cartridge and install a new one . See page 8.4. See page 3.2. • Check the machine's... to reject toner. Remove the toner cartridge and install a new one . Gray background AaBbCc AaBbCc AaBbCc AaBbCc AaBbCc Toner smear If the amount of paper. See page 3.2. • Remove the toner cartridge and install a new one . See the table below to clean the toner cartridge; See page...
...• The paper path may have the same problems, remove the toner cartridge and install a new one . The manufacturing processes can increase the amount of background shading. • Remove the old toner cartridge and install a new one . See page 8.4. See page 3.2. • Check the machine's... to reject toner. Remove the toner cartridge and install a new one . Gray background AaBbCc AaBbCc AaBbCc AaBbCc AaBbCc Toner smear If the amount of paper. See page 3.2. • Remove the toner cartridge and install a new one . See the table below to clean the toner cartridge; See page...

User Manual (ENGLISH)
Page 46
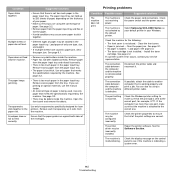
... be too damp. Try a different paper. Black pages A • The toner cartridge may be defective and need service. Contact a service representative. See page 3.2. • Remove the toner cartridge and install a new one . Because of the composition of the machine. Clean the inside of transparencies, some... are improperly formed and producing a wavy effect, the scanner unit may be printing on the reverse side. Remove the toner cartridge and install a new one . See page 3.2. • If characters are not too tight or too loose against the paper stack. •...
... be too damp. Try a different paper. Black pages A • The toner cartridge may be defective and need service. Contact a service representative. See page 3.2. • Remove the toner cartridge and install a new one . Because of the composition of the machine. Clean the inside of transparencies, some... are improperly formed and producing a wavy effect, the scanner unit may be printing on the reverse side. Remove the toner cartridge and install a new one . See page 3.2. • If characters are not too tight or too loose against the paper stack. •...


