User Manual (ENGLISH)
Page 9
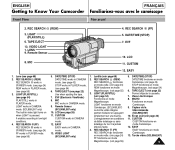
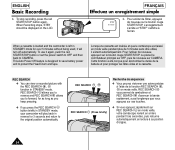
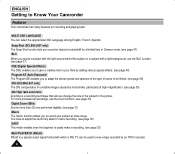
...fonctionne en mode Magnétoscope. (voir page 55) 5. Remote Sensor 8. Lens (see page 22) Use when ejecting the tape. 7. LIGHT works in CAMERA mode. (SCL906/L907 only) The built-in CAMERA mode. 13. CUSTOM CUSTOM works in PLAYER mode. REC SEARCH (REW) REC SEARCH fonctionne en...ée permet d'éclairer en appuyant simplement sur une touche. ENGLISH FRANÇAIS Getting to Know Your Camcorder Familiarisez-vous avec le caméscope Front View Vue avant 2. LCD 11. TAPE EJECT (see page 68) 2. EVF (Electronic Viewfinder) 8. LCD (see page 55) 3. Lentille (voir page...
...fonctionne en mode Magnétoscope. (voir page 55) 5. Remote Sensor 8. Lens (see page 22) Use when ejecting the tape. 7. LIGHT works in CAMERA mode. (SCL906/L907 only) The built-in CAMERA mode. 13. CUSTOM CUSTOM works in PLAYER mode. REC SEARCH (REW) REC SEARCH fonctionne en...ée permet d'éclairer en appuyant simplement sur une touche. ENGLISH FRANÇAIS Getting to Know Your Camcorder Familiarisez-vous avec le caméscope Front View Vue avant 2. LCD 11. TAPE EJECT (see page 68) 2. EVF (Electronic Viewfinder) 8. LCD (see page 55) 3. Lentille (voir page...
User Manual (ENGLISH)
Page 13
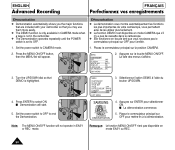
... le mode EASY ou CUSTOM est activé. z. Time (see page 64) (TAPE!, TAPE END!, PROTECTION!) Checks the operation of the tape used. It is activated. Tape counter Indicates amount of the Camcorder. v. LIGHT (SCL906/L907 only) Shows when the Light is activated. Heure (voir page 42) Indique...mode d'enregis-trement ou de lecture. Title (see page 31) Indicates digital zoom is active. q. l. The White Balance modes are using Hi8 tape when recording or playing back. q. s. u. EASY & CUSTOM Shows when the easy or custom mode is activated. p. Les différents...
... le mode EASY ou CUSTOM est activé. z. Time (see page 64) (TAPE!, TAPE END!, PROTECTION!) Checks the operation of the tape used. It is activated. Tape counter Indicates amount of the Camcorder. v. LIGHT (SCL906/L907 only) Shows when the Light is activated. Heure (voir page 42) Indique...mode d'enregis-trement ou de lecture. Title (see page 31) Indicates digital zoom is active. q. l. The White Balance modes are using Hi8 tape when recording or playing back. q. s. u. EASY & CUSTOM Shows when the easy or custom mode is activated. p. Les différents...
User Manual (ENGLISH)
Page 16
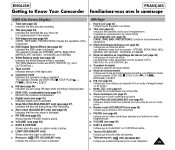
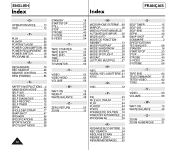
...recording. 3 Note: When recording with complete safety. 1. Press the Zoom and the red Record button without having to change the position of your camcorder with the timer, you to secure it tight in a stable, comfortable position. - Shoulder Strap ✤ The Shoulder Strap allows you wish ...poignée de soutien afin de filmer dans les meilleures conditions possibles. ✤ La poignée de soutien vous permet : - Detach adhesive tape from the Hand Strap. 2. d'appuyer sur le bouton du zoom et sur le bouton rouge d'enregistrement sans avoir à changer la position de...
...recording. 3 Note: When recording with complete safety. 1. Press the Zoom and the red Record button without having to change the position of your camcorder with the timer, you to secure it tight in a stable, comfortable position. - Shoulder Strap ✤ The Shoulder Strap allows you wish ...poignée de soutien afin de filmer dans les meilleures conditions possibles. ✤ La poignée de soutien vous permet : - Detach adhesive tape from the Hand Strap. 2. d'appuyer sur le bouton du zoom et sur le bouton rouge d'enregistrement sans avoir à changer la position de...
User Manual (ENGLISH)
Page 24
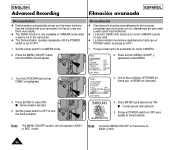
...arrête et "STBY" s'affiche à l'écran. When a cassette is loaded and the camcorder is designed to save battery power and to CAMERA. To use it will play back in STANDBY mode for... keep pressing. ✤ If you press the REC SEARCH button briefly in STANDBY mode, your camcorder will turn off automatically. Lorsqu'une cassette est insérée et que le caméscope...START/STOP button or set the power switch to OFF and then back to protect the Head Drum and tape. REC SEARCH , REC SEARCH (Press briefly) Recherche de séquences ✤ Vous pouvez visionner une ...
...arrête et "STBY" s'affiche à l'écran. When a cassette is loaded and the camcorder is designed to save battery power and to CAMERA. To use it will play back in STANDBY mode for... keep pressing. ✤ If you press the REC SEARCH button briefly in STANDBY mode, your camcorder will turn off automatically. Lorsqu'une cassette est insérée et que le caméscope...START/STOP button or set the power switch to OFF and then back to protect the Head Drum and tape. REC SEARCH , REC SEARCH (Press briefly) Recherche de séquences ✤ Vous pouvez visionner une ...
User Manual (ENGLISH)
Page 50
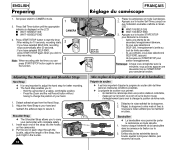
...them more easily. ✤ The DEMO function is only available in CAMERA mode when a tape is not in EASY or REC mode. I Demonstration will appear. Placez le commutateur principal ...Demonstration ✤ Demonstration automatically shows you the major functions that are included with your camcorder so that DEMO is set to select ON. MENU LCD ADJUST DIS OFF D.ZOOM ...OFF WHITE BAL ..........AUTO DISPLAY ON LANGUAGE..........ENGLISH WL REMOCON ....ON EXIT: MENU 2. SAMSUNG DEMONSTRATION 4. Appuyez sur la touche MENU ON/OFF. Démonstration ✤ La dé...
...them more easily. ✤ The DEMO function is only available in CAMERA mode when a tape is not in EASY or REC mode. I Demonstration will appear. Placez le commutateur principal ...Demonstration ✤ Demonstration automatically shows you the major functions that are included with your camcorder so that DEMO is set to select ON. MENU LCD ADJUST DIS OFF D.ZOOM ...OFF WHITE BAL ..........AUTO DISPLAY ON LANGUAGE..........ENGLISH WL REMOCON ....ON EXIT: MENU 2. SAMSUNG DEMONSTRATION 4. Appuyez sur la touche MENU ON/OFF. Démonstration ✤ La dé...

User Manual (ENGLISH)
Page 53
...éscope à un téléviseur via un magnétoscope. I The yellow plug: Video I Set the input selector on the VCR to view a tape using the LCD Screen in PLAYER mode only. ✤ There are two ways to your VCR or television instruction book) Remarque: pour visionner la cassette... cassette on the television. (Refer to see page 63) Connecting to a TV which has no Audio and Video input jack ✤ You can connect your camcorder to a TV which has an Audio and Video input jack ✤ Use the Audio/Video cable supplied with TV monitor: recommended for your...
...éscope à un téléviseur via un magnétoscope. I The yellow plug: Video I Set the input selector on the VCR to view a tape using the LCD Screen in PLAYER mode only. ✤ There are two ways to your VCR or television instruction book) Remarque: pour visionner la cassette... cassette on the television. (Refer to see page 63) Connecting to a TV which has no Audio and Video input jack ✤ You can connect your camcorder to a TV which has an Audio and Video input jack ✤ Use the Audio/Video cable supplied with TV monitor: recommended for your...
User Manual (ENGLISH)
Page 70
... - W - Z - M - P- RECHARGE BLOC BATTERIE ..19 REC SEARCH 24 REGLAGE ÉCRAN 26 REMISE À ZERO 55 REW(REMBOBINAGE) .......55 - TAPE END 64 TELECOMMANDE 15 TETES VIDEO 62 TITRE 44 - TAPE COUNTER 13 TAPE EJECT 22 TAPE END 64 TIME 42 TITLE 44 TV MONITOR 53 - MICROPHONE EXTERNE....68 MIRROR 40 MISE AU POINT MANUELLE/ AUTOMATIQUE...
... - W - Z - M - P- RECHARGE BLOC BATTERIE ..19 REC SEARCH 24 REGLAGE ÉCRAN 26 REMISE À ZERO 55 REW(REMBOBINAGE) .......55 - TAPE END 64 TELECOMMANDE 15 TETES VIDEO 62 TITRE 44 - TAPE COUNTER 13 TAPE EJECT 22 TAPE END 64 TIME 42 TITLE 44 TV MONITOR 53 - MICROPHONE EXTERNE....68 MIRROR 40 MISE AU POINT MANUELLE/ AUTOMATIQUE...
User Manual (ENGLISH)
Page 50
...SAMSUNG DEMONSTRATION 4. Note: The MENU ON/OFF function will not operate in the camcorder. ✤ The Demonstration operates repeatedly until the POWER switch is set to OFF. Ponga el interruptor de encendido en modo CAMERA. 2. Turn the UP/DOWN dial so that you the major functions that are included with your camcorder... ✤ Demonstration automatically shows you may use them more easily. ✤ The DEMO function is only available in CAMERA mode when a tape is not in EASY or REC mode. Press the MENU ON/OFF button, then the MENU list will start. 5. Nota: La funcion...
...SAMSUNG DEMONSTRATION 4. Note: The MENU ON/OFF function will not operate in the camcorder. ✤ The Demonstration operates repeatedly until the POWER switch is set to OFF. Ponga el interruptor de encendido en modo CAMERA. 2. Turn the UP/DOWN dial so that you the major functions that are included with your camcorder... ✤ Demonstration automatically shows you may use them more easily. ✤ The DEMO function is only available in CAMERA mode when a tape is not in EASY or REC mode. Press the MENU ON/OFF button, then the MENU list will start. 5. Nota: La funcion...
User Manual (ENGLISH)
Page 70
.....68 POWER REQUIREMENT...68 POWER SWITCH 18 PROGRAM AE 38 - RECHARGING 19 REC SEARCH 24 REMOTE CONTROL ..........15 REW (REWIND 55 - OSD 12 - TAPE EJECT 22 TAPE END 59 TEMPORIZADOR AUTOMÁTICO 15 TÍTULO 44 TROUBLE CHECK 59 - V - V - W - M - NEAR 36 NEG 40 NIVEL...40 SYSTEM 68 S-VIDEO 54 - ZERO RETURN 55 ZOOM 30 - W - ZOOM 30 ZOOM DIGITAL 31 70 OPERATION MODE............13 OSD 12 - TAPE COUNTER 13 TAPE EJECT 22 TAPE END 64 TIME 42 TITLE 44 TV MONITOR 53 - P- WAIT-10S 15 - Z - S - MANDO A DISTANCIA.........15 MICRÓFONO...
.....68 POWER REQUIREMENT...68 POWER SWITCH 18 PROGRAM AE 38 - RECHARGING 19 REC SEARCH 24 REMOTE CONTROL ..........15 REW (REWIND 55 - OSD 12 - TAPE EJECT 22 TAPE END 59 TEMPORIZADOR AUTOMÁTICO 15 TÍTULO 44 TROUBLE CHECK 59 - V - V - W - M - NEAR 36 NEG 40 NIVEL...40 SYSTEM 68 S-VIDEO 54 - ZERO RETURN 55 ZOOM 30 - W - ZOOM 30 ZOOM DIGITAL 31 70 OPERATION MODE............13 OSD 12 - TAPE COUNTER 13 TAPE EJECT 22 TAPE END 64 TIME 42 TITLE 44 TV MONITOR 53 - P- WAIT-10S 15 - Z - S - MANDO A DISTANCIA.........15 MICRÓFONO...
User Manual (ENGLISH)
Page 6
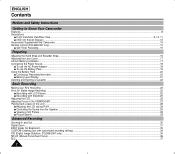
......8 Descriptions s Front View/Side View/Rear View...9, 10, 11 s OSD (On Screen Display) ...12 Accessories Supplied with the Camcorder...14 Remote Control (SCL906/L907 only) ...15 s Self Timer Recording...15 Preparing Adjusting the Hand Strap and Shoulder Strap ...16 Attaching the Lens Cover ...17... Recording ...25 s Recording with LCD Screen...25 s Recording with Viewfinder...25 Adjusting the LCD...26 Adjusting Focus of the VIEWFINDER ...27 Playing back a tape on the LCD ...28 s Adjusting the LCD during PLAY ...29 s Controlling the Sound from the Speaker...29 s Viewing a Still Picture...29 s ...
......8 Descriptions s Front View/Side View/Rear View...9, 10, 11 s OSD (On Screen Display) ...12 Accessories Supplied with the Camcorder...14 Remote Control (SCL906/L907 only) ...15 s Self Timer Recording...15 Preparing Adjusting the Hand Strap and Shoulder Strap ...16 Attaching the Lens Cover ...17... Recording ...25 s Recording with LCD Screen...25 s Recording with Viewfinder...25 Adjusting the LCD...26 Adjusting Focus of the VIEWFINDER ...27 Playing back a tape on the LCD ...28 s Adjusting the LCD during PLAY ...29 s Controlling the Sound from the Speaker...29 s Viewing a Still Picture...29 s ...
User Manual (ENGLISH)
Page 7
... and Recording a Title...44 Fade In and Out ...46 Snap Shot (SCL906/L907 only)...47 White Balance ...48 Selecting OSD Language...49 Demonstration ...50 Setting the Date/Title... Color ...51 Lighting Techniques...52 Playing back a Tape To watch with LCD ...53 To watch with TV ...53 Various Functions in ... Cleaning and Taking care of the Camcorder ...62 s Cleaning the Viewfinder ...62 s Cleaning the LCD Panel...62 s Cleaning the Video Heads ...62 s Storing the Camcorder ...62 Using Your Camcorder Abroad ...63 Troubleshooting Self Diagnosis Display...
... and Recording a Title...44 Fade In and Out ...46 Snap Shot (SCL906/L907 only)...47 White Balance ...48 Selecting OSD Language...49 Demonstration ...50 Setting the Date/Title... Color ...51 Lighting Techniques...52 Playing back a Tape To watch with LCD ...53 To watch with TV ...53 Various Functions in ... Cleaning and Taking care of the Camcorder ...62 s Cleaning the Viewfinder ...62 s Cleaning the LCD Panel...62 s Cleaning the Video Heads ...62 s Storing the Camcorder ...62 Using Your Camcorder Abroad ...63 Troubleshooting Self Diagnosis Display...
User Manual (ENGLISH)
Page 11
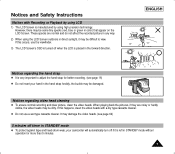
It may damage the video heads. (see page 16) ✤ Do not insert your camcorder will automatically turn off when the LCD is manufactured by using high precision technology. These specks are noisy or hardly visible, the video heads may ... ✤ It is left in STANDBY mode without operation for better recording. (see page 62) 5 minutes off timer in STANDBY mode ✤ To protect against tape and head-drum wear, your hand in the hand strap forcibly, the buckle may be dirty. However, there may be difficult to adjust the hand...
It may damage the video heads. (see page 16) ✤ Do not insert your camcorder will automatically turn off when the LCD is manufactured by using high precision technology. These specks are noisy or hardly visible, the video heads may ... ✤ It is left in STANDBY mode without operation for better recording. (see page 62) 5 minutes off timer in STANDBY mode ✤ To protect against tape and head-drum wear, your hand in the hand strap forcibly, the buckle may be dirty. However, there may be difficult to adjust the hand...
User Manual (ENGLISH)
Page 12
... than 22x are performed digitally. (see page 31) Macro The macro function allows you to Know Your Camcorder Features Your camcorder has many features for a limited time in the picture. Snap Shot (SCL906/L907 only) The Snap Shot function lets you record an object at a standstill for recording and playing ...40) Program AE (Auto Exposure) The Program AE enables you to adapt the shutter speed and aperture to the type of scene to view a tape recorded by hand shake, particularly at high magnification. (see page 35) 22x High ratio zoom lens Zooming is a recording technique that lets you ...
... than 22x are performed digitally. (see page 31) Macro The macro function allows you to Know Your Camcorder Features Your camcorder has many features for a limited time in the picture. Snap Shot (SCL906/L907 only) The Snap Shot function lets you record an object at a standstill for recording and playing ...40) Program AE (Auto Exposure) The Program AE enables you to adapt the shutter speed and aperture to the type of scene to view a tape recorded by hand shake, particularly at high magnification. (see page 35) 22x High ratio zoom lens Zooming is a recording technique that lets you ...
User Manual (ENGLISH)
Page 13
...5. Getting to Know Your Camcorder Front View ENGLISH 2. REC SEARCH (REW) 3. LIGHT (PLAY/STILL) 6. Remote Sensor 8. It enables recording in CAMERA mode. 9. DATE/TIME (STOP) DATE/TIME works in CAMERA mode. (see page 42) STOP works in PLAYER mode. EVF 10. CUSTOM 12. TAPE EJECT (see page 54)... 4. EVF (Electronic Viewfinder) 8. LIGHT (PLAY/STILL) (see page 68) 2. MIC MIC works in low-light conditions. 4. Remote Sensor (SCL906/L907 only) 10. VIDEO LIGHT 1. MIC 1. Lens (see page 54) PLAY...
...5. Getting to Know Your Camcorder Front View ENGLISH 2. REC SEARCH (REW) 3. LIGHT (PLAY/STILL) 6. Remote Sensor 8. It enables recording in CAMERA mode. 9. DATE/TIME (STOP) DATE/TIME works in CAMERA mode. (see page 42) STOP works in PLAYER mode. EVF 10. CUSTOM 12. TAPE EJECT (see page 54)... 4. EVF (Electronic Viewfinder) 8. LIGHT (PLAY/STILL) (see page 68) 2. MIC MIC works in low-light conditions. 4. Remote Sensor (SCL906/L907 only) 10. VIDEO LIGHT 1. MIC 1. Lens (see page 54) PLAY...
User Manual (ENGLISH)
Page 16
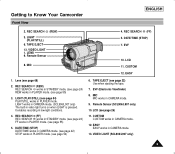
...see page 37) Indicates BLC is activated. Self record waiting timer. (SCL906/L907 only) (see page 42) Indicates the date of the recording. c. f. a. i. OSD in CAMERA mode ba t r sq c Hi8 REC p W T 880 x 0:00:00 o m CINEMA XX ...displayed in the viewfinder and the LCD Screen. ENGLISH Getting to Know Your Camcorder OSD (On Screen Display) ✤ You can be operated even after ...see page 21) Indicates the power left in PLAYER mode r q c Hi8 PLAY p 0:00:25 o Z.RTN u TITLE SEPIA v TAPE! h. Battery level (see page 38) Indicates Program AE mode is ...
...see page 37) Indicates BLC is activated. Self record waiting timer. (SCL906/L907 only) (see page 42) Indicates the date of the recording. c. f. a. i. OSD in CAMERA mode ba t r sq c Hi8 REC p W T 880 x 0:00:00 o m CINEMA XX ...displayed in the viewfinder and the LCD Screen. ENGLISH Getting to Know Your Camcorder OSD (On Screen Display) ✤ You can be operated even after ...see page 21) Indicates the power left in PLAYER mode r q c Hi8 PLAY p 0:00:25 o Z.RTN u TITLE SEPIA v TAPE! h. Battery level (see page 38) Indicates Program AE mode is ...
User Manual (ENGLISH)
Page 17
... you are STROBE, SEPIA, B&W, NEG., MIRROR, ART, MOSAIC, 16:9(WIDE) and CINEMA. n. Hi8 (see page 64) (TAPE!, TAPE END!, PROTECTION!) Checks the operation of the tape used. Zero return (SCL906/L907 only) (see page 56) Shows that the zero return is switched on the scene. w. ... the recorded title you are recording. o. Title (see page 42) Indicates the time you have set. Tape counter Indicates amount of the Camcorder. Getting to Know Your Camcorder OSD (On Screen Display) j. White Balance mode (see page 67) Monitors the moisture condensation. DEW (...
... you are STROBE, SEPIA, B&W, NEG., MIRROR, ART, MOSAIC, 16:9(WIDE) and CINEMA. n. Hi8 (see page 64) (TAPE!, TAPE END!, PROTECTION!) Checks the operation of the tape used. Zero return (SCL906/L907 only) (see page 56) Shows that the zero return is switched on the scene. w. ... the recorded title you are recording. o. Title (see page 42) Indicates the time you have set. Tape counter Indicates amount of the Camcorder. Getting to Know Your Camcorder OSD (On Screen Display) j. White Balance mode (see page 67) Monitors the moisture condensation. DEW (...
User Manual (ENGLISH)
Page 26
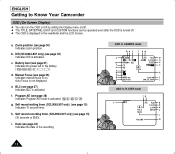
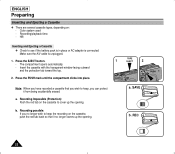
... keep , you can protect it no longer covers up the opening . b. Recording possible: If you no longer wish to cover up the opening . REC 22 Hi8 Inserting and Ejecting a Cassette ✤ Check to keep the recording on : - Press the PUSH mark until the compartment clicks into place. SAVE b. Note: When you... so that you wish to see if the battery pack is in place or AC adapter is unplugged. 1. Color system used - Press the EJECT button. 1 - TAPE EJECT 2 PUSH a. Make sure the A/V cable is connected. Recording/playback time. -
... keep , you can protect it no longer covers up the opening . b. Recording possible: If you no longer wish to cover up the opening . REC 22 Hi8 Inserting and Ejecting a Cassette ✤ Check to keep the recording on : - Press the PUSH mark until the compartment clicks into place. SAVE b. Note: When you... so that you wish to see if the battery pack is in place or AC adapter is unplugged. 1. Color system used - Press the EJECT button. 1 - TAPE EJECT 2 PUSH a. Make sure the A/V cable is connected. Recording/playback time. -

User Manual (ENGLISH)
Page 28
... turn off automatically. REC SEARCH , REC SEARCH (Press briefly) 24 ENGLISH Basic Recording b. STBY Y:YY:YY When a cassette is loaded and the camcorder is designed to save battery power and to forward, for over 5 minutes without being used, it again, push the red START/STOP button or set ... ✤ You can view a recorded picture with the REC SEARCH , function in STANDBY mode for as long as you to protect the Head Drum and tape. REC SEARCH allows you to reverse and REC SEARCH you keep pressing.
... turn off automatically. REC SEARCH , REC SEARCH (Press briefly) 24 ENGLISH Basic Recording b. STBY Y:YY:YY When a cassette is loaded and the camcorder is designed to save battery power and to forward, for over 5 minutes without being used, it again, push the red START/STOP button or set ... ✤ You can view a recorded picture with the REC SEARCH , function in STANDBY mode for as long as you to protect the Head Drum and tape. REC SEARCH allows you to reverse and REC SEARCH you keep pressing.
User Manual (ENGLISH)
Page 32
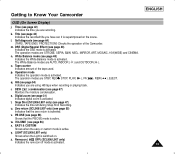
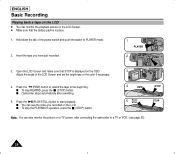
... Note: You can also monitor the picture on the LCD Screen. ✤ Make sure that STOP is in place. 1. ENGLISH Basic Recording Playing back a tape on the LCD ✤ You can monitor the playback picture on a TV screen, after rewinding. 5. s To stop REWIND, press the (STOP) button.... Open the LCD Screen and make sure that the battery pack is displayed on the LCD. s Camcorder stops automatically after connecting the camcorder to a TV or VCR. (see the video you have just recorded. 1 PLAYER 2 PUSH 3. s You can see page 53) STOP STOP...
... Note: You can also monitor the picture on the LCD Screen. ✤ Make sure that STOP is in place. 1. ENGLISH Basic Recording Playing back a tape on the LCD ✤ You can monitor the playback picture on a TV screen, after rewinding. 5. s To stop REWIND, press the (STOP) button.... Open the LCD Screen and make sure that the battery pack is displayed on the LCD. s Camcorder stops automatically after connecting the camcorder to a TV or VCR. (see the video you have just recorded. 1 PLAYER 2 PUSH 3. s You can see page 53) STOP STOP...

User Manual (ENGLISH)
Page 43
s The BLC function will be recorded on the tape. Press the P.AE button, the ( ) symbol will not operate in EASY or CUSTOM mode. Press the P.AE button until the P.AE Icon is displayed s No ...
s The BLC function will be recorded on the tape. Press the P.AE button, the ( ) symbol will not operate in EASY or CUSTOM mode. Press the P.AE button until the P.AE Icon is displayed s No ...


