
User Manual (ENGLISH)
Page 11
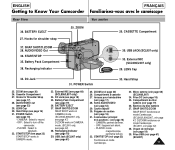
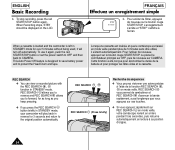
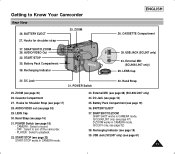
...28. Micro externe (voir page 68) (SCL906/L907) 34. Compartiment du bloc batterie (voir page 19) 36. Éjection du bloc batterie 37. ENGLISH FRANÇAIS Getting to turn off the camcorder. - AUDIO/VIDEO Out 32. Battery Pack Compartment 38. External MIC (SCL906/L907 only) 29. ZOOM (see page 53...) 29. AUDIO/VIDEO out (see page 30) 26. POWER Switch (see page 23) START/STOP works in CAMERA mode. (SCL901 only, see page 18) 35. BATTERY EJECT 37. ...
...28. Micro externe (voir page 68) (SCL906/L907) 34. Compartiment du bloc batterie (voir page 19) 36. Éjection du bloc batterie 37. ENGLISH FRANÇAIS Getting to turn off the camcorder. - AUDIO/VIDEO Out 32. Battery Pack Compartment 38. External MIC (SCL906/L907 only) 29. ZOOM (see page 53...) 29. AUDIO/VIDEO out (see page 30) 26. POWER Switch (see page 23) START/STOP works in CAMERA mode. (SCL901 only, see page 18) 35. BATTERY EJECT 37. ...
User Manual (ENGLISH)
Page 14
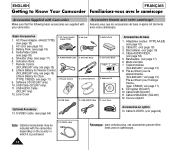
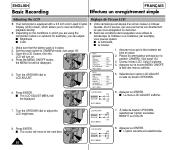
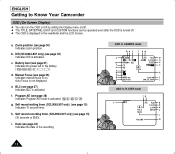
... lithium pour l'horloge interne. (type: CR2025, voir page 17) 9. Couvre-objectif Optional Accessory 13. Audio/Video Cable. (see page 18) 3. Lithium Batteries 3. Câble DC. (voir page 18) 3. Câble USB (SCL907) 11. AC cord. (see page 53) 5. Software CD (SCL907 ... USB Cable 11. CD logiciel (SCL907) 10. Instruction Book. 7. Bloc batterie. (voir page 19) 4. Lens Cover Accessoires de base 1. Bandoulière. (voir page 17) 6. Lens Cover 2. Instruction Book Video Camcorder 8mm COLOR Caméscope 8mm ÉCRAN LCD COULEUR 9. AC Power ...
... lithium pour l'horloge interne. (type: CR2025, voir page 17) 9. Couvre-objectif Optional Accessory 13. Audio/Video Cable. (see page 18) 3. Lithium Batteries 3. Câble DC. (voir page 18) 3. Câble USB (SCL907) 11. AC cord. (see page 53) 5. Software CD (SCL907 ... USB Cable 11. CD logiciel (SCL907) 10. Instruction Book. 7. Bloc batterie. (voir page 19) 4. Lens Cover Accessoires de base 1. Bandoulière. (voir page 17) 6. Lens Cover 2. Instruction Book Video Camcorder 8mm COLOR Caméscope 8mm ÉCRAN LCD COULEUR 9. AC Power ...
User Manual (ENGLISH)
Page 18
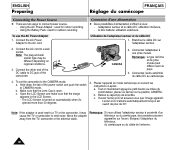
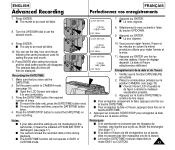
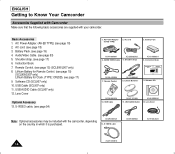
... LCD et assurez-vous que l'image apparaît. - Connexion d'une alimentation ✤ Deux possibilités d'alimentation s'offrent à vous: - Using the Battery Pack: used for outdoor recording. CAMERA 3 Remarque: le type de fiche et de prise murale peut différer selon le pays. 3. Note: The ...'il est ouvert de plus de 30°. l'adaptateur secteur et le câble DC: utilisation intérieure, - To set the camcorder to connect power source. - c. The LCD Screen is open. ENGLISH Preparing FRANÇAIS Réglage du caméscope Connecting the ...
... LCD et assurez-vous que l'image apparaît. - Connexion d'une alimentation ✤ Deux possibilités d'alimentation s'offrent à vous: - Using the Battery Pack: used for outdoor recording. CAMERA 3 Remarque: le type de fiche et de prise murale peut différer selon le pays. 3. Note: The ...'il est ouvert de plus de 30°. l'adaptateur secteur et le câble DC: utilisation intérieure, - To set the camcorder to connect power source. - c. The LCD Screen is open. ENGLISH Preparing FRANÇAIS Réglage du caméscope Connecting the ...
User Manual (ENGLISH)
Page 19
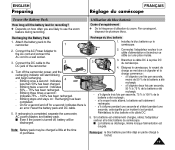
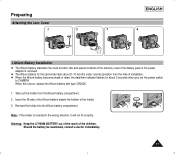
...cela signifie qu'un incident s'est produit. Recharging the Battery Pack 1. Blinking stops and stays on how often you are likely to the camcorder. 1 2. If recharging is completed, separate the camcorder, AC power adapter, and battery pack. Branchez le câble DC à la...Connect the DC cable to a wall socket. 3. Reset the battery pack and DC cable. 5. Note: Battery pack may be discharged. Réinitialisez le bloc batterie et le câble DC. 5. On for a second and off the camcorder power, and the recharging indicator will start blinking and begin recharging...
...cela signifie qu'un incident s'est produit. Recharging the Battery Pack 1. Blinking stops and stays on how often you are likely to the camcorder. 1 2. If recharging is completed, separate the camcorder, AC power adapter, and battery pack. Branchez le câble DC à la...Connect the DC cable to a wall socket. 3. Reset the battery pack and DC cable. 5. Note: Battery pack may be discharged. Réinitialisez le bloc batterie et le câble DC. 5. On for a second and off the camcorder power, and the recharging indicator will start blinking and begin recharging...
User Manual (ENGLISH)
Page 24
When a cassette is loaded and the camcorder is designed to save battery power and to forward, for as long as you keep pressing. ✤... If you to protect the Head Drum and tape. REC SEARCH allows you to reverse and REC SEARCH allows you press the REC SEARCH button briefly in STANDBY mode, your camcorder...START/STOP. Cette fonction a été conçue pour économiser la durée de la batterie et pour protèger les têtes vides et la cassette. To use it will turn off automatically. ...
When a cassette is loaded and the camcorder is designed to save battery power and to forward, for as long as you keep pressing. ✤... If you to protect the Head Drum and tape. REC SEARCH allows you to reverse and REC SEARCH allows you press the REC SEARCH button briefly in STANDBY mode, your camcorder...START/STOP. Cette fonction a été conçue pour économiser la durée de la batterie et pour protèger les têtes vides et la cassette. To use it will turn off automatically. ...
User Manual (ENGLISH)
Page 26
... LCD ADJUST [17] BRIGHT COLOR [17] EXIT: MENU 6. Open the LCD Screen, then the LCD will be displayed. Assurez-vous que le bloc batterie est bien en place. 2. Celui-ci s'allume. 4. Press the MENU ON/OFF button, the MENU list will turn on the conditions in place. 2.... dial to view recording or playback directly. ✤ Depending on . 4. Make sure that the battery pack is equipped with a 2.5 inch color Liquid Crystal Display (LCD) screen, which you are using the camcorder (indoors or outdoors for example), you to adjust the LCD brightness. 8. Sélectionnez l'option LCD...
... LCD ADJUST [17] BRIGHT COLOR [17] EXIT: MENU 6. Open the LCD Screen, then the LCD will be displayed. Assurez-vous que le bloc batterie est bien en place. 2. Celui-ci s'allume. 4. Press the MENU ON/OFF button, the MENU list will turn on the conditions in place. 2.... dial to view recording or playback directly. ✤ Depending on . 4. Make sure that the battery pack is equipped with a 2.5 inch color Liquid Crystal Display (LCD) screen, which you are using the camcorder (indoors or outdoors for example), you to adjust the LCD brightness. 8. Sélectionnez l'option LCD...
User Manual (ENGLISH)
Page 43
.... Press ENTER after setting the minute and the clock setting screen will not operate in the camcorder, it to CAMERA mode. (see page 18) I Open the LCD Screen and adjust it means the installed LITHIUM BATTERY is discharged. (see page 17) I If your recording. The selected date and time will then be...
.... Press ENTER after setting the minute and the clock setting screen will not operate in the camcorder, it to CAMERA mode. (see page 18) I Open the LCD Screen and adjust it means the installed LITHIUM BATTERY is discharged. (see page 17) I If your recording. The selected date and time will then be...
User Manual (ENGLISH)
Page 3
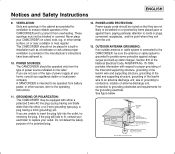
... size of grounding to conductors, location of antenna-discharge unit, connection to grounding electrodes and requirements for ventilation to ensure reliable operation of the CAMCORDER and to be equipped with either a polarized 2-wire AC line plug (a plug having one blade wider than the other) or a 3-wire... operating instructions. 11. If you are not likely to protect it from battery power, or other similar surface: on a bed, sofa, rug, or other sources, refer to replace your outlet. POWER SOURCES: The CAMCORDER should not be placed in a built-in the cabinet are unable to ...
... size of grounding to conductors, location of antenna-discharge unit, connection to grounding electrodes and requirements for ventilation to ensure reliable operation of the CAMCORDER and to be equipped with either a polarized 2-wire AC line plug (a plug having one blade wider than the other) or a 3-wire... operating instructions. 11. If you are not likely to protect it from battery power, or other similar surface: on a bed, sofa, rug, or other sources, refer to replace your outlet. POWER SOURCES: The CAMCORDER should not be placed in a built-in the cabinet are unable to ...
User Manual (ENGLISH)
Page 6
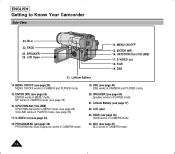
... (On Screen Display) ...12 Accessories Supplied with the Camcorder...14 Remote Control (SCL906/L907 only) ...15 s Self Timer Recording...15 Preparing Adjusting the Hand Strap and Shoulder Strap ...16 Attaching the Lens Cover ...17 Lithium Battery Installation ...17 Connecting the Power Source...18 s To ...use the AC Power Adapter ...18 s To use the Battery Pack ...19 Using the Battery Pack...20 s Continuous Recording time table ...20 s Battery Level Display...21 Inserting and Ejecting a Cassette ...22 Basic Recording Making your First Recording ...23 Hints...
... (On Screen Display) ...12 Accessories Supplied with the Camcorder...14 Remote Control (SCL906/L907 only) ...15 s Self Timer Recording...15 Preparing Adjusting the Hand Strap and Shoulder Strap ...16 Attaching the Lens Cover ...17 Lithium Battery Installation ...17 Connecting the Power Source...18 s To ...use the AC Power Adapter ...18 s To use the Battery Pack ...19 Using the Battery Pack...20 s Continuous Recording time table ...20 s Battery Level Display...21 Inserting and Ejecting a Cassette ...22 Basic Recording Making your First Recording ...23 Hints...
User Manual (ENGLISH)
Page 9
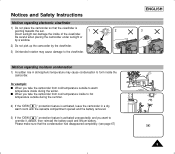
..., warm room with the cassette compartment opened and the battery removed. 3) If the "DEW( )" protection feature is pointing towards the sun. 1 2 Direct sunlight can damage the inside the camcorder. Be careful when placing the camcorder under sunlight or by a window. 2) Do not pick up the camcorder by the viewfinder. 3) Unintended rotation may cause condensation...
..., warm room with the cassette compartment opened and the battery removed. 3) If the "DEW( )" protection feature is pointing towards the sun. 1 2 Direct sunlight can damage the inside the camcorder. Be careful when placing the camcorder under sunlight or by a window. 2) Do not pick up the camcorder by the viewfinder. 3) Unintended rotation may cause condensation...
User Manual (ENGLISH)
Page 10
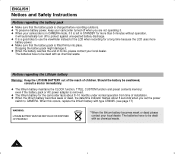
... if the battery pack or AC power adapter is removed. ✤ The lithium battery for a long time because the LCD uses more battery power. ✤ Make sure that the battery pack is charged before recording outdoors. ✤ To preserve battery power, keep your camcorder turned off when... swallowed, consult a doctor immediately. ✤ The lithium battery maintains the CLOCK function, TITLE, CUSTOM function and preset contents memory; The batteries have to use the viewfinder instead of the LCD when recording for the camcorder lasts about 8~10 months under normal operation from time of...
... if the battery pack or AC power adapter is removed. ✤ The lithium battery for a long time because the LCD uses more battery power. ✤ Make sure that the battery pack is charged before recording outdoors. ✤ To preserve battery power, keep your camcorder turned off when... swallowed, consult a doctor immediately. ✤ The lithium battery maintains the CLOCK function, TITLE, CUSTOM function and preset contents memory; The batteries have to use the viewfinder instead of the LCD when recording for the camcorder lasts about 8~10 months under normal operation from time of...
User Manual (ENGLISH)
Page 14
...) 22. DSE (see page 26) ENTER works in CAMERA and PLAYER mode. 20. Lithium Battery (see page 54) 18. BLC (see page 26) MENU ON/OFF works in CAMERA mode. 10 ENGLISH Getting to Know Your Camcorder Side View 24. P.AE 19. LCD Open 14. MENU ON/OFF (see page 37) BLC...
...) 22. DSE (see page 26) ENTER works in CAMERA and PLAYER mode. 20. Lithium Battery (see page 54) 18. BLC (see page 26) MENU ON/OFF works in CAMERA mode. 10 ENGLISH Getting to Know Your Camcorder Side View 24. P.AE 19. LCD Open 14. MENU ON/OFF (see page 37) BLC...
User Manual (ENGLISH)
Page 15
.../D.ZOOM 28. DC Jack 31. LENS Cap 30. POWER Switch (see page 17) 28. ZOOM (see page 23) START/STOP works in CAMERA mode. (SCL901 only, see page 19) 36. Cassette Compartment 27. START/STOP (see page 30) 26. USB Jack (SCL907 only) (see page 19) 39. External MIC...(SCL906/L907 only) 29. PLAYER : Select to turn off the camcorder. - Recharging Indicator (see page 61) 11 OFF : Select to playback. 32. Hand Strap 25. START/STOP 35. BATTERY EJECT 37. DC Jack (see page 16) 31. ZOOM 27. BATTERY EJECT 25. Recharging Indicator ENGLISH 26. Hand Strap (see page 18)...
.../D.ZOOM 28. DC Jack 31. LENS Cap 30. POWER Switch (see page 17) 28. ZOOM (see page 23) START/STOP works in CAMERA mode. (SCL901 only, see page 19) 36. Cassette Compartment 27. START/STOP (see page 30) 26. USB Jack (SCL907 only) (see page 19) 39. External MIC...(SCL906/L907 only) 29. PLAYER : Select to turn off the camcorder. - Recharging Indicator (see page 61) 11 OFF : Select to playback. 32. Hand Strap 25. START/STOP 35. BATTERY EJECT 37. DC Jack (see page 16) 31. ZOOM 27. BATTERY EJECT 25. Recharging Indicator ENGLISH 26. Hand Strap (see page 18)...
User Manual (ENGLISH)
Page 16
...in PLAYER mode r q c Hi8 PLAY p 0:00:25 o Z.RTN u TITLE SEPIA v TAPE! e. f. a. b. Manual Focus (see page 21) Indicates the power left in the battery. ( ) d. Self record waiting timer. (SCL906/L907 only) (see page 30) Indicates zoom position. h. l VOLUME w 12 Zoom position (see page 15) Indicates 10 second timer. ... Focus is activated g. c. Program AE (see page 38) Indicates Program AE mode is not displayed. ENGLISH Getting to Know Your Camcorder OSD (On Screen Display) ✤ You can turn the OSD on/off by setting the Display menu on .
...in PLAYER mode r q c Hi8 PLAY p 0:00:25 o Z.RTN u TITLE SEPIA v TAPE! e. f. a. b. Manual Focus (see page 21) Indicates the power left in the battery. ( ) d. Self record waiting timer. (SCL906/L907 only) (see page 30) Indicates zoom position. h. l VOLUME w 12 Zoom position (see page 15) Indicates 10 second timer. ... Focus is activated g. c. Program AE (see page 38) Indicates Program AE mode is not displayed. ENGLISH Getting to Know Your Camcorder OSD (On Screen Display) ✤ You can turn the OSD on/off by setting the Display menu on .
User Manual (ENGLISH)
Page 18
...SCL907 only) 10. S-VIDEO cable. (see page 17) 9. USB AUDIO Cable AD46-00060A 12. Basic Accessories 1. Lithium Battery for Remote Control. (see page 15) (SCL906/L907 only) Lithium Battery for Clock. (TYPE: CR2025, see page 54) 1. AC Power Adapter (AA-E8 TYPE) 2. AC cord 3. ...Lens Cover Optional Accessory 13. Lens Cover AD39-00073A Note: Optional accessories may be included with your camcorder. Instruction Book. 7. Remote Control SSTTOAPRT/...
...SCL907 only) 10. S-VIDEO cable. (see page 17) 9. USB AUDIO Cable AD46-00060A 12. Basic Accessories 1. Lithium Battery for Remote Control. (see page 15) (SCL906/L907 only) Lithium Battery for Clock. (TYPE: CR2025, see page 54) 1. AC Power Adapter (AA-E8 TYPE) 2. AC cord 3. ...Lens Cover Optional Accessory 13. Lens Cover AD39-00073A Note: Optional accessories may be included with your camcorder. Instruction Book. 7. Remote Control SSTTOAPRT/...

User Manual (ENGLISH)
Page 19
...Reset (see page 30) 6. WAIT-10S/SELF-30S: wait 10 seconds, followed by recording until you to reverse the polarity of the battery. Still (see page 55) 4. Self Timer Recording ✤ The Self Timer function on the remote control allows you press the START/STOP... button again. 15 Getting to Know Your Camcorder Remote Control (SCL906/L907 only) Description of recording. - You purchase the camcorder. - The remote control doesn't work. ✤ Insert Lithium Battery, following the + and - markings. ✤ Be careful not to start...
...Reset (see page 30) 6. WAIT-10S/SELF-30S: wait 10 seconds, followed by recording until you to reverse the polarity of the battery. Still (see page 55) 4. Self Timer Recording ✤ The Self Timer function on the remote control allows you press the START/STOP... button again. 15 Getting to Know Your Camcorder Remote Control (SCL906/L907 only) Description of recording. - You purchase the camcorder. - The remote control doesn't work. ✤ Insert Lithium Battery, following the + and - markings. ✤ Be careful not to start...
User Manual (ENGLISH)
Page 21
... the holder is removed. ✤ The lithium battery for about 8~10 months under normal operation from the lithium battery compartment. 2. Preparing ENGLISH Attaching the Lens Cover 1 2 3 4 Lithium Battery Installation ✤ The lithium battery maintains the clock function, title and preset contents ...lithium battery with type CR2025. 1. Should the battery be swallowed, consult a doctor immediately. 17 Warning: Keep the LITHIUM BATTERY out of the reach of installation. ✤ When the lithium battery becomes weak or dead, the date/time indicator flashes for the camcorder ...
... the holder is removed. ✤ The lithium battery for about 8~10 months under normal operation from the lithium battery compartment. 2. Preparing ENGLISH Attaching the Lens Cover 1 2 3 4 Lithium Battery Installation ✤ The lithium battery maintains the clock function, title and preset contents ...lithium battery with type CR2025. 1. Should the battery be swallowed, consult a doctor immediately. 17 Warning: Keep the LITHIUM BATTERY out of the reach of installation. ✤ When the lithium battery becomes weak or dead, the date/time indicator flashes for the camcorder ...
User Manual (ENGLISH)
Page 22
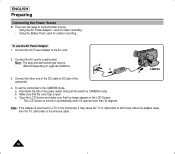
...Power Source ✤ There are two ways to the AC cord. 2. Connect the AC Power Adapter to connect power source. - To set the camcorder to a wall socket. b. Open the LCD Screen and make sure that the Lens Cap is turned on automatically when it may be different depending on... Connect the AC cord to the CAMERA mode. The LCD Screen is open. Using the Battery Pack: used for outdoor recording. Note: The plug and wall socket type may cause the TV or camcorder to a TV or the camcorder, it 's opened more than 30 degrees. c. Hold down the tab of the power ...
...Power Source ✤ There are two ways to the AC cord. 2. Connect the AC Power Adapter to connect power source. - To set the camcorder to a wall socket. b. Open the LCD Screen and make sure that the Lens Cap is turned on automatically when it may be different depending on... Connect the AC cord to the CAMERA mode. The LCD Screen is open. Using the Battery Pack: used for outdoor recording. Note: The plug and wall socket type may cause the TV or camcorder to a TV or the camcorder, it 's opened more than 30 degrees. c. Hold down the tab of the power ...
User Manual (ENGLISH)
Page 23
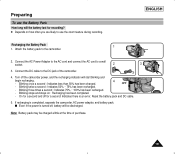
... the recharging indicator will start blinking and begin recharging. - s Even if the power is completed, separate the camcorder, AC power adapter, and battery pack. Blinking stops and stays on how often you are likely to the DC jack of purchase. 19 Connect...connect the AC cord to the camcorder. 2. If recharging is turned off, battery will be charged a little at the time of the camcorder. 4. Attach the battery pack to a wall socket. 2 3 3. ENGLISH Recharging the Battery Pack 1 1. Preparing To use the Battery Pack How long will the battery last for recording? ✤ ...
... the recharging indicator will start blinking and begin recharging. - s Even if the power is completed, separate the camcorder, AC power adapter, and battery pack. Blinking stops and stays on how often you are likely to the DC jack of purchase. 19 Connect...connect the AC cord to the camcorder. 2. If recharging is turned off, battery will be charged a little at the time of the camcorder. 4. Attach the battery pack to a wall socket. 2 3 3. ENGLISH Recharging the Battery Pack 1 1. Preparing To use the Battery Pack How long will the battery last for recording? ✤ ...

User Manual (ENGLISH)
Page 25
...the environmental temperature and conditions may be the same as possible) 6 ✤ Please refer to help you actually use the camcorder, the remaining battery time may choose which indicates discharged. Fully charged 2 2. 10~40% consumed 3. 40~60% consumed 3 4. 60~80%... (prepare a charged one indicates charged and which one ) 4 5. 80~95% consumed (change the battery) 5 6. 100% consumed (camcorder will turn off soon, change the battery as soon as the approximate continuous recording times given in the operating instructions is affected by environmental temperature and...
...the environmental temperature and conditions may be the same as possible) 6 ✤ Please refer to help you actually use the camcorder, the remaining battery time may choose which indicates discharged. Fully charged 2 2. 10~40% consumed 3. 40~60% consumed 3 4. 60~80%... (prepare a charged one indicates charged and which one ) 4 5. 80~95% consumed (change the battery) 5 6. 100% consumed (camcorder will turn off soon, change the battery as soon as the approximate continuous recording times given in the operating instructions is affected by environmental temperature and...


