

User Manual (user Manual) (ver.1.0) (English, Spanish)
Page 20
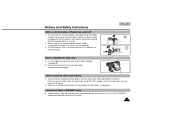
...ía. de la batería. 20 Notas: 1 La batería debe recargarse a temperatura ambiente entre 0°C(32°F) y 40°C(104°F). Model SCL700/L710 SCL750/L770 Modelo SCL700/L710 SCL750/L770 Battery Type SB-L110A LCD ON, EVF OFF Approximately 90 minutes SB-L160 SB-L320 Approximately 130 minutes Approximately 260...
...ía. de la batería. 20 Notas: 1 La batería debe recargarse a temperatura ambiente entre 0°C(32°F) y 40°C(104°F). Model SCL700/L710 SCL750/L770 Modelo SCL700/L710 SCL750/L770 Battery Type SB-L110A LCD ON, EVF OFF Approximately 90 minutes SB-L160 SB-L320 Approximately 130 minutes Approximately 260...

User Manual (user Manual) (ver.1.0) (English, Spanish)
Page 45
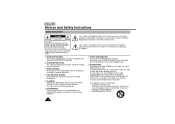
Press ENTER. Notes: s The title moves horizontally from ENGLISH/FRENCH/GERMAN/ ITALIAN/SPANISH/RUSSIAN. 7. s El titulo del pais seleccionado aparecera. 8. Al mismo tiempo la camara volvera al modo menu. Pulse MENU. 3. Notas: s El titulo se mueve horizontalmente de derecha a izquierda 10 segundos tras activarlo. Turn UP/DOWN dial to whichever TITLE you have selected a TITLE. 1. Recording a Title Note: s Make sure that you desire. 9. Turn the UP/DOWN dial until TITLE...........OFF is highlighted. 4. Press ENTER to select the appropriate language. s If you want to the left ...
Press ENTER. Notes: s The title moves horizontally from ENGLISH/FRENCH/GERMAN/ ITALIAN/SPANISH/RUSSIAN. 7. s El titulo del pais seleccionado aparecera. 8. Al mismo tiempo la camara volvera al modo menu. Pulse MENU. 3. Notas: s El titulo se mueve horizontalmente de derecha a izquierda 10 segundos tras activarlo. Turn UP/DOWN dial to whichever TITLE you have selected a TITLE. 1. Recording a Title Note: s Make sure that you desire. 9. Turn the UP/DOWN dial until TITLE...........OFF is highlighted. 4. Press ENTER to select the appropriate language. s If you want to the left ...

User Manual (user Manual) (ver.1.0) (English, Spanish)
Page 50
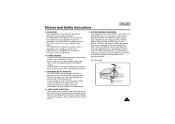
... shows you may use them more easily. 1 The DEMO function is only available in CAMERA mode when tape is not in EASY or REC mode. SAMSUNG DEMONSTRATION 4. Note: The MENU ON/OFF function will not operate in the camcorder. 1 The Demonstration operates repeatedly until the POWER switch is set to end...
... shows you may use them more easily. 1 The DEMO function is only available in CAMERA mode when tape is not in EASY or REC mode. SAMSUNG DEMONSTRATION 4. Note: The MENU ON/OFF function will not operate in the camcorder. 1 The Demonstration operates repeatedly until the POWER switch is set to end...

User Manual (user Manual) (ver.1.0) (English, Spanish)
Page 51
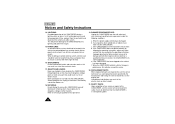
Set the power switch to select the appropriate color. 6. s The MENU list will appear in the Color you chose . Turn the UP/DOWN dial to CAMERA mode. (see page 22) 2. s The Title and Date/Time will appear. 3. Ponga el power switch en modo CAMERA. (ver pag. 22) MENU LCD ADJUST DIS OFF D.ZOOM OFF PIP OFF DISPLAY ON WHITE BAL ..........AUTO WL REMOCON ....ON NEXT: MENU MENU CUSTOM SET CLOCK SET TITLE SET TITLE OFF D/TITLE COLOR ..WHITE C.RESET 0:00:00 DEMO OFF EXIT: MENU 2. DATE/TITLE COLOR SELECT [WHITE] WHITE YELLOW CYAN MAGENTA RED GREEN BLUE EXIT: MENU DATE/TITLE...
Set the power switch to select the appropriate color. 6. s The MENU list will appear in the Color you chose . Turn the UP/DOWN dial to CAMERA mode. (see page 22) 2. s The Title and Date/Time will appear. 3. Ponga el power switch en modo CAMERA. (ver pag. 22) MENU LCD ADJUST DIS OFF D.ZOOM OFF PIP OFF DISPLAY ON WHITE BAL ..........AUTO WL REMOCON ....ON NEXT: MENU MENU CUSTOM SET CLOCK SET TITLE SET TITLE OFF D/TITLE COLOR ..WHITE C.RESET 0:00:00 DEMO OFF EXIT: MENU 2. DATE/TITLE COLOR SELECT [WHITE] WHITE YELLOW CYAN MAGENTA RED GREEN BLUE EXIT: MENU DATE/TITLE...

User Manual (user Manual) (ver.1.0) (English, Spanish)
Page 70
S - O - PESO 63 PIP 47 PLAY 53 PLAYER 53 PROGRAMA AE 38 - Z - ZOOM 30 ZOOM DIGITAL 31 70 RECHARGING 19 REC SEARCH 24 REMOTE CONTROL ..........15 REW (REWIND 55 - ZERO RETURN 55 ZOOM 30 - N - P - OSD 12 - VÍDEO 52 VISUALIZADOR 12 VOLUMEN 55 -W - WAIT-10S 15 WEIGHT 68 WHITE BALANCE 49 - R - TAPE EJECT 22 TAPE END 59 TEMPORIZADOR AUTOMÁTICO 15 TÍTULO 44 TROUBLE CHECK 59 -V - OPERATION MODE............13 OSD 12 - TAPE COUNTER 13 TAPE EJECT 22 TAPE END 64 TIME 42 TITLE 44 TV MONITOR 53 -V - VIDEO 53 VIDEO ...
S - O - PESO 63 PIP 47 PLAY 53 PLAYER 53 PROGRAMA AE 38 - Z - ZOOM 30 ZOOM DIGITAL 31 70 RECHARGING 19 REC SEARCH 24 REMOTE CONTROL ..........15 REW (REWIND 55 - ZERO RETURN 55 ZOOM 30 - N - P - OSD 12 - VÍDEO 52 VISUALIZADOR 12 VOLUMEN 55 -W - WAIT-10S 15 WEIGHT 68 WHITE BALANCE 49 - R - TAPE EJECT 22 TAPE END 59 TEMPORIZADOR AUTOMÁTICO 15 TÍTULO 44 TROUBLE CHECK 59 -V - OPERATION MODE............13 OSD 12 - TAPE COUNTER 13 TAPE EJECT 22 TAPE END 64 TIME 42 TITLE 44 TV MONITOR 53 -V - VIDEO 53 VIDEO ...

User Manual (user Manual) (ver.1.0) (English)
Page 1
ELECTRONICS US ENGLISH Video Camcorder 8mm COLOR LCD SCL700/L710/L750/L770 Hi SCL700/L710/L750/L770 SSTTOAPRT/ TIMSEELRF STIDLLISPRLEATZYUERRON CROESUENTTER WIDE TELE Owner's Instruction Book Before operating the unit, please read this instruction book thoroughly, and retain it for future reference.
ELECTRONICS US ENGLISH Video Camcorder 8mm COLOR LCD SCL700/L710/L750/L770 Hi SCL700/L710/L750/L770 SSTTOAPRT/ TIMSEELRF STIDLLISPRLEATZYUERRON CROESUENTTER WIDE TELE Owner's Instruction Book Before operating the unit, please read this instruction book thoroughly, and retain it for future reference.

User Manual (user Manual) (ver.1.0) (English)
Page 2
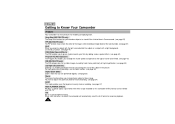
ENGLISH Contents Notices and Safety Instructions Getting to Know Your Camcorder Features ...12 Descriptions s Front View/Side View/Rear View ...13, 14, 15 s OSD (On Screen Display) ...16 Accessories Supplied with the Camcorder...18 Remote Control (SCL710/L750/L770 only) ...19 s Self Timer Recording ...19 Preparing Adjusting the Hand Strap and Shoulder Strap ...20 Lithium Battery Installation ...21 Connecting the Power Source ...22 s To use the AC Power Adapter...22 s To use the Battery Pack...23 Using the Battery Pack...24 s Continuous Recording time table...24 s Battery Level Display ...25 ...
ENGLISH Contents Notices and Safety Instructions Getting to Know Your Camcorder Features ...12 Descriptions s Front View/Side View/Rear View ...13, 14, 15 s OSD (On Screen Display) ...16 Accessories Supplied with the Camcorder...18 Remote Control (SCL710/L750/L770 only) ...19 s Self Timer Recording ...19 Preparing Adjusting the Hand Strap and Shoulder Strap ...20 Lithium Battery Installation ...21 Connecting the Power Source ...22 s To use the AC Power Adapter...22 s To use the Battery Pack...23 Using the Battery Pack...24 s Continuous Recording time table...24 s Battery Level Display ...25 ...
User Manual (user Manual) (ver.1.0) (English)
Page 3
Contents (continued) ENGLISH Program AE (Automatic Exposure) ...42 DSE (Digital Special Effects) in CAMERA mode ...44 Setting and Recording DATE/TIME...46 Selecting and Recording a Title ...48 Fade In and Out ...50 PIP (SCL750/L770 only)...51 Snap Shot (SCL750/L770 only) ...52 White Balance ...53 Demonstration ...54 Setting the Date/Title color ...55 Lighting Techniques...56 Playing back a Tape To watch with LCD ...57 To watch with TV monitor ...57 Various Functions in PLAYER mode...59 Adjusting the LCD ...60 Setting the Speaker ON/OFF ...60 DSE in PLAYER mode ...60 Multi Playback (Using the...
Contents (continued) ENGLISH Program AE (Automatic Exposure) ...42 DSE (Digital Special Effects) in CAMERA mode ...44 Setting and Recording DATE/TIME...46 Selecting and Recording a Title ...48 Fade In and Out ...50 PIP (SCL750/L770 only)...51 Snap Shot (SCL750/L770 only) ...52 White Balance ...53 Demonstration ...54 Setting the Date/Title color ...55 Lighting Techniques...56 Playing back a Tape To watch with LCD ...57 To watch with TV monitor ...57 Various Functions in PLAYER mode...59 Adjusting the LCD ...60 Setting the Speaker ON/OFF ...60 DSE in PLAYER mode ...60 Multi Playback (Using the...
User Manual (user Manual) (ver.1.0) (English)
Page 4
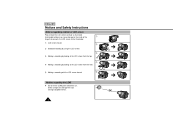
ENGLISH Notices and Safety Instructions Notices regarding rotation of the 1) hinge that connects the LCD screen to the inside of LCD screen Please rotate the LCD screen carefully as illustrated. Unintended rotation may cause damage to the Camcorder. 1) LCD screen closed. 2) 2) Standard recording by using the LCD screen. 3) 3) Making a recording by looking at the LCD screen from the top. 90° 4) 4) Making a recording by looking at the LCD screen from the front. 5) Making a recording with the LCD screen closed. 5) 90° 90° 90° Notices regarding the LENS 1 Do not...
ENGLISH Notices and Safety Instructions Notices regarding rotation of the 1) hinge that connects the LCD screen to the inside of LCD screen Please rotate the LCD screen carefully as illustrated. Unintended rotation may cause damage to the Camcorder. 1) LCD screen closed. 2) 2) Standard recording by using the LCD screen. 3) 3) Making a recording by looking at the LCD screen from the top. 90° 4) 4) Making a recording by looking at the LCD screen from the front. 5) Making a recording with the LCD screen closed. 5) 90° 90° 90° Notices regarding the LENS 1 Do not...
User Manual (user Manual) (ver.1.0) (English)
Page 5
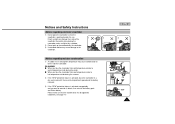
s When you take the camcorder from cool temperature inside to hot temperature outside during the summer. 2) If the "DEW" protection feature is activated, leave the camcorder in atmospheric temperature may cause damage to warm temperature inside during the winter. Please make sure that the viewfinder is activated unexpectedly, and you take the camcorder from cold temperature outside to the viewfinder. Notices regarding electronic viewfinder 1) Do not place the camcorder so that the condensation has disappeared completely. (see page 71) ENGLISH 3 DEW 5 for example: s When ...
s When you take the camcorder from cool temperature inside to hot temperature outside during the summer. 2) If the "DEW" protection feature is activated, leave the camcorder in atmospheric temperature may cause damage to warm temperature inside during the winter. Please make sure that the viewfinder is activated unexpectedly, and you take the camcorder from cold temperature outside to the viewfinder. Notices regarding electronic viewfinder 1) Do not place the camcorder so that the condensation has disappeared completely. (see page 71) ENGLISH 3 DEW 5 for example: s When ...
User Manual (user Manual) (ver.1.0) (English)
Page 6
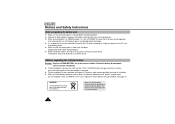
In this case, replace the lithium battery with as chemical waste. Dropping the battery pack might damage it will automatically turn off when you are not operating it. 1 When your camcorder is in CAMERA mode, if it is left in STANDBY for more than 5 minutes without operation, it . 1 When the battery reaches the end of its life, please contact your local dealer. The batteries have to be dealt with type CR2025. (see page 21) WARNING: LITHIUM BATTERY MUST BE RECYCLED OR DISPOSED OF PROPERLY. * When the lithium battery becomes weak or dead please contact your local dealer. Notices...
In this case, replace the lithium battery with as chemical waste. Dropping the battery pack might damage it will automatically turn off when you are not operating it. 1 When your camcorder is in CAMERA mode, if it is left in STANDBY for more than 5 minutes without operation, it . 1 When the battery reaches the end of its life, please contact your local dealer. The batteries have to be dealt with type CR2025. (see page 21) WARNING: LITHIUM BATTERY MUST BE RECYCLED OR DISPOSED OF PROPERLY. * When the lithium battery becomes weak or dead please contact your local dealer. Notices...
User Manual (user Manual) (ver.1.0) (English)
Page 7
If this happens, clean the video heads with Recording or Playback by using the LCD monitor outdoors in any way. 2) When using high precision technology. If this occurs, use a wet type cassette cleaner. These specks are noisy or hardly visible, the video heads may be dirty. When playing back the pictures, if they are normal and do not affect the recorded picture in direct sunlight, it is very important to view. Notices and Safety Instructions Notices with a dry type cassette cleaner. 1 Do not use the viewfinder. 3) The LCD monitor's OSD is turned off when the LCD is...
If this happens, clean the video heads with Recording or Playback by using the LCD monitor outdoors in any way. 2) When using high precision technology. If this occurs, use a wet type cassette cleaner. These specks are noisy or hardly visible, the video heads may be dirty. When playing back the pictures, if they are normal and do not affect the recorded picture in direct sunlight, it is very important to view. Notices and Safety Instructions Notices with a dry type cassette cleaner. 1 Do not use the viewfinder. 3) The LCD monitor's OSD is turned off when the LCD is...
User Manual (user Manual) (ver.1.0) (English)
Page 8
This symbol is intended to alert the user to the presence of uninsulated dangerous voltage within the product's enclosure that may be of sufficient magnitude to the presence of the unit should follow the manufacturer's instructions and should be moved with the CAMCORDER. RETAIN INSTRUCTIONS: The safety and operating instructions should be retained for future reference. 3. FOLLOW INSTRUCTIONS: All operating and maintenance instructions should be followed. 5. CLEANING: Unplug this product. 1. ATTACHMENTS: Do not use a mounting accessory recommended by RETAC) 8 Any ...
This symbol is intended to alert the user to the presence of uninsulated dangerous voltage within the product's enclosure that may be of sufficient magnitude to the presence of the unit should follow the manufacturer's instructions and should be moved with the CAMCORDER. RETAIN INSTRUCTIONS: The safety and operating instructions should be retained for future reference. 3. FOLLOW INSTRUCTIONS: All operating and maintenance instructions should be followed. 5. CLEANING: Unplug this product. 1. ATTACHMENTS: Do not use a mounting accessory recommended by RETAC) 8 Any ...
User Manual (user Manual) (ver.1.0) (English)
Page 9
Never place your outlet. If you are not likely to . 10. If the plug still fails to fit, contact your electrician to insert the plug fully into the outlet, try reversing the plug. See figure below. OUTDOOR ANTENNA GROUNDING: If an outside antenna or cable system is connected to the CAMCORDER, be sure the antenna or cable system is grounded to provide some protection against them, paying particular attention to the operating instructions. 11. POWER SOURCES: The CAMCORDER should be operated from overheating. A CAMCORDER is provided or the manufacturer's instructions have been ...
Never place your outlet. If you are not likely to . 10. If the plug still fails to fit, contact your electrician to insert the plug fully into the outlet, try reversing the plug. See figure below. OUTDOOR ANTENNA GROUNDING: If an outside antenna or cable system is connected to the CAMCORDER, be sure the antenna or cable system is grounded to provide some protection against them, paying particular attention to the operating instructions. 11. POWER SOURCES: The CAMCORDER should be operated from overheating. A CAMCORDER is provided or the manufacturer's instructions have been ...
User Manual (user Manual) (ver.1.0) (English)
Page 10
SERVICING: Do not attempt to qualified service personnel under the following the operating instructions, adjust only those controls that the CAMCORDER is damaged. When the power-supply cord or plug is in a fire or electric shock. d. POWER LINES: An outside antenna system, extreme care should not be sure the service technician has used replacement parts specified by the manufacturer and having the same characteristics as they may touch dangerous voltage points or short out a part that could result in safe operating order. 10 OBJECTS AND LIQUIDS: Never push objects of any ...
SERVICING: Do not attempt to qualified service personnel under the following the operating instructions, adjust only those controls that the CAMCORDER is damaged. When the power-supply cord or plug is in a fire or electric shock. d. POWER LINES: An outside antenna system, extreme care should not be sure the service technician has used replacement parts specified by the manufacturer and having the same characteristics as they may touch dangerous voltage points or short out a part that could result in safe operating order. 10 OBJECTS AND LIQUIDS: Never push objects of any ...

User Manual (user Manual) (ver.1.0) (English)
Page 11
Notices and Safety Instructions NOTE TO CATV SYSTEM INSTALLER: This reminder is provided to call the CATV system installer's attention to part 15 FCC rules. ENGLISH 11 USER INSTALLER CAUTION: Your authority to operate this FCC certified equipment could be connected to the grounding system of the building as close to the point of the NEC that provides guidelines for proper grounding and, in particular, specifies that the cable ground shall be voided if you make changes or modifications not expressly approved by this party responsible for compliance to Article 820-40 of cable entry as ...
Notices and Safety Instructions NOTE TO CATV SYSTEM INSTALLER: This reminder is provided to call the CATV system installer's attention to part 15 FCC rules. ENGLISH 11 USER INSTALLER CAUTION: Your authority to operate this FCC certified equipment could be connected to the grounding system of the building as close to the point of the NEC that provides guidelines for proper grounding and, in particular, specifies that the cable ground shall be voided if you make changes or modifications not expressly approved by this party responsible for compliance to Article 820-40 of cable entry as ...
User Manual (user Manual) (ver.1.0) (English)
Page 12
Snap Shot (SCL750/L770 only) The Snap Shot function lets you record an object at a standstill for record or playback. 12 Hi8 Hi8 is inserted, the camcorder will automatically select the Hi-8 format for a limited time in Camera mode. (see page 52) PIP (SCL750/L770 only) The PIP function shows where the center of the image is a recording technique that lets you change the size of the subject in the picture. For more than 22x are performed digitally. (see page 35) Macro The macro function allows you to adapt the shutter speed and aperture to the type of the Camera mode. (see page ...
Snap Shot (SCL750/L770 only) The Snap Shot function lets you record an object at a standstill for record or playback. 12 Hi8 Hi8 is inserted, the camcorder will automatically select the Hi-8 format for a limited time in Camera mode. (see page 52) PIP (SCL750/L770 only) The PIP function shows where the center of the image is a recording technique that lets you change the size of the subject in the picture. For more than 22x are performed digitally. (see page 35) Macro The macro function allows you to adapt the shutter speed and aperture to the type of the Camera mode. (see page ...
User Manual (user Manual) (ver.1.0) (English)
Page 13
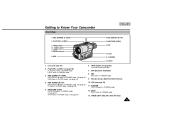
... in PLAYER mode. (see page 29) 11. DATE/TIME (STOP) 7. Getting to Know Your Camcorder Front View ENGLISH 3. REC SEARCH (REW) 2. EVF 10. VIDEO LIGHT (SCL700/L750/L770 only) 13
... in PLAYER mode. (see page 29) 11. DATE/TIME (STOP) 7. Getting to Know Your Camcorder Front View ENGLISH 3. REC SEARCH (REW) 2. EVF 10. VIDEO LIGHT (SCL700/L750/L770 only) 13
User Manual (user Manual) (ver.1.0) (English)
Page 14
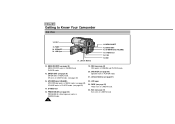
FADE 20. DSE 14. PROGRAM AE (see page 50) FADE works in CAMERA mode. 14 19. FADE (see page 42) PROGRAM AE (Auto Exposure) works in CAMERA mode. 24. BLC 23. SPEAKER 22. DSE (see page 30) MENU ON/OFF works in CAMERA and PLAYER mode. 20. MENU ON/OFF (see page 44) DSE works in CAMERA and PLAYER mode. 15. S-VIDEO out 18. LCD open 23. ENTER (MF) (see page 41) BLC works in MENU mode. LCD Open 21. S-VIDEO out 18. P.AE 19. BLC (see page 30) ENTER works in CAMERA mode Lithium Battery (see page 60) 17. Lithium Battery 14. UP/DOWN dial (VOLUME) UP/DOWN dial...
FADE 20. DSE 14. PROGRAM AE (see page 50) FADE works in CAMERA mode. 14 19. FADE (see page 42) PROGRAM AE (Auto Exposure) works in CAMERA mode. 24. BLC 23. SPEAKER 22. DSE (see page 30) MENU ON/OFF works in CAMERA and PLAYER mode. 20. MENU ON/OFF (see page 44) DSE works in CAMERA and PLAYER mode. 15. S-VIDEO out 18. LCD open 23. ENTER (MF) (see page 41) BLC works in MENU mode. LCD Open 21. S-VIDEO out 18. P.AE 19. BLC (see page 30) ENTER works in CAMERA mode Lithium Battery (see page 60) 17. Lithium Battery 14. UP/DOWN dial (VOLUME) UP/DOWN dial...

User Manual (user Manual) (ver.1.0) (English)
Page 15
...) - Getting to playback. 32. PLAYER : Select to Know Your Camcorder Rear View ENGLISH 36. START/STOP (see page 28) START/STOP works in CAMERA mode. (SCL700/L710 only, see page 52) D.ZOOM works in CAMERA mode. 33.
...) - Getting to playback. 32. PLAYER : Select to Know Your Camcorder Rear View ENGLISH 36. START/STOP (see page 28) START/STOP works in CAMERA mode. (SCL700/L710 only, see page 52) D.ZOOM works in CAMERA mode. 33.