
User Manual (user Manual) (ver.f10) (English)
Page 2
PORTABLE All Digital MOBILE PHONE User Manual Please read this manual before operating your phone, and keep it for future reference.
PORTABLE All Digital MOBILE PHONE User Manual Please read this manual before operating your phone, and keep it for future reference.

User Manual (user Manual) (ver.f10) (English)
Page 3
... programs, and related documentation and other works of Samsung or its respective suppliers relating to the SAMSUNG Phone, including but is proprietary to you have questions about your Samsung Mobile Phone? All applicable rights of Samsung Electronics America, Inc. and its suppliers. Lookout ... English_CG18_KR_091009_F10 You may not infringe or otherwise violate the rights secured by or which is otherwise the property of authorship. Samsung Telecommunications America (STA), LLC Headquarters: Customer Care Center: 1301 E. Do you . Intellectual Property includes, but not ...
... programs, and related documentation and other works of Samsung or its respective suppliers relating to the SAMSUNG Phone, including but is proprietary to you have questions about your Samsung Mobile Phone? All applicable rights of Samsung Electronics America, Inc. and its suppliers. Lookout ... English_CG18_KR_091009_F10 You may not infringe or otherwise violate the rights secured by or which is otherwise the property of authorship. Samsung Telecommunications America (STA), LLC Headquarters: Customer Care Center: 1301 E. Do you . Intellectual Property includes, but not ...

User Manual (user Manual) (ver.f10) (English)
Page 6
... 12 Inserting and Removing Your Memory Card 13 Memory Card Formatting 14 Section 2: Understanding Your Phone 15 Features of Your Phone 15 Closed View of Your Phone 15 Open View of Your Phone (Portrait Mode 17 Command Keys 18 Understanding the Home Screen 20 Icon Glossary 20 Section 3:... 58 Editing an Existing Contact Entry 58 Deleting a Contact Entry 59 Backup Assistant 59 Speed Dialing 60 My Name Card 61 Finding My Phone Number 61 Emergency Contacts 61 Section 6: Entering Text 63 Section 7: Messaging 65 Types of Messages 65 Changing Message Settings 65 Creating and ...
... 12 Inserting and Removing Your Memory Card 13 Memory Card Formatting 14 Section 2: Understanding Your Phone 15 Features of Your Phone 15 Closed View of Your Phone 15 Open View of Your Phone (Portrait Mode 17 Command Keys 18 Understanding the Home Screen 20 Icon Glossary 20 Section 3:... 58 Editing an Existing Contact Entry 58 Deleting a Contact Entry 59 Backup Assistant 59 Speed Dialing 60 My Name Card 61 Finding My Phone Number 61 Emergency Contacts 61 Section 6: Entering Text 63 Section 7: Messaging 65 Types of Messages 65 Changing Message Settings 65 Creating and ...
User Manual (user Manual) (ver.f10) (English)
Page 7
... Section 8: Changing Your Settings 89 My Verizon 89 Tools 89 Bluetooth Menu 89 Sounds Settings 93 Display Settings 96 Phone Settings 102 Call Settings 110 TTY 110 Memory 113 USB Mode 114 Phone Info 115 Section 9: Media Center 116 Media Center 116 Music & Tones 116 Picture & Video 118 Games 123 ... 139 Making a Push-to-Talk Call 140 Making a Push-to-Talk Call From History 140 Answering Push-to-Talk Calls 141 Making PTT Calls (Phone Closed 142 Using Call Alerts 142 Using Group Calls 142 Making Group Calls 142 Making a Group Call From History 143 Making a Group Call On-the...
... Section 8: Changing Your Settings 89 My Verizon 89 Tools 89 Bluetooth Menu 89 Sounds Settings 93 Display Settings 96 Phone Settings 102 Call Settings 110 TTY 110 Memory 113 USB Mode 114 Phone Info 115 Section 9: Media Center 116 Media Center 116 Music & Tones 116 Picture & Video 118 Games 123 ... 139 Making a Push-to-Talk Call 140 Making a Push-to-Talk Call From History 140 Answering Push-to-Talk Calls 141 Making PTT Calls (Phone Closed 142 Using Call Alerts 142 Using Group Calls 142 Making Group Calls 142 Making a Group Call From History 143 Making a Group Call On-the...
User Manual (user Manual) (ver.f10) (English)
Page 8
...Section 14: Health and Safety Information 148 Health and Safety Information 148 Samsung Mobile Products and Recycling 149 UL Certified Travel Adapter 149 Consumer Information on Wireless Phones 150 Road Safety 155 Responsible Listening 157 Operating Environment 159 Using Your Phone Near Other Electronic Devices 159 FCC Hearing-Aid Compatibility (HAC) Regulations for... 15: Warranty Information 168 Standard Limited Warranty 168 End User License Agreement for Software 171 Index 176 Note: The home screen is where the phone is displayed and the phone isn't performing any action.
...Section 14: Health and Safety Information 148 Health and Safety Information 148 Samsung Mobile Products and Recycling 149 UL Certified Travel Adapter 149 Consumer Information on Wireless Phones 150 Road Safety 155 Responsible Listening 157 Operating Environment 159 Using Your Phone Near Other Electronic Devices 159 FCC Hearing-Aid Compatibility (HAC) Regulations for... 15: Warranty Information 168 Standard Limited Warranty 168 End User License Agreement for Software 171 Index 176 Note: The home screen is where the phone is displayed and the phone isn't performing any action.

User Manual (user Manual) (ver.f10) (English)
Page 9
... support, or getting an understanding of how this manual generally follow the same order as the menus and sub-menus in your phone. Dialogue boxes and their definitions are set apart from the rest. A robust index for activating features, to the subject at ...?" • Performing -Example: "SENDING..." These are as low memory. Most of this guide are icons and text that could affect performance, or even damage your phone. "CONNECTING..." • Completed -Example: "MESSAGE SENT" • Information -Example: "NEW MESSAGE" • Error -Example: "SYSTEM ERROR!" • Warning -...
... support, or getting an understanding of how this manual generally follow the same order as the menus and sub-menus in your phone. Dialogue boxes and their definitions are set apart from the rest. A robust index for activating features, to the subject at ...?" • Performing -Example: "SENDING..." These are as low memory. Most of this guide are icons and text that could affect performance, or even damage your phone. "CONNECTING..." • Completed -Example: "MESSAGE SENT" • Information -Example: "NEW MESSAGE" • Error -Example: "SYSTEM ERROR!" • Warning -...
User Manual (user Manual) (ver.f10) (English)
Page 10
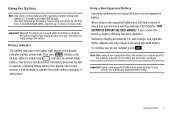
... you receive this warning, battery charging has been disabled. Using a Non-Supported Battery Samsung handsets do not support the use of charge time. When using your phone for the duration of the life of beeps and you will only charge a Samsung approved battery. To continue use , otherwise you will hear a series of the...
... you receive this warning, battery charging has been disabled. Using a Non-Supported Battery Samsung handsets do not support the use of charge time. When using your phone for the duration of the life of beeps and you will only charge a Samsung approved battery. To continue use , otherwise you will hear a series of the...
User Manual (user Manual) (ver.f10) (English)
Page 11
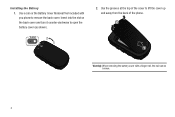
Insert into the slot on the back cover and turn it counter-clockwise to lift the cover up and away from the back of the phone. Use the grooves at the top of the cover to open the battery cover (as shown). *Included 2. Warning!: When removing the battery cover with you phone to remove the back cover. Installing the Battery 1. Use a coin or the Battery Cover Removal Tool included with a finger nail, the nail can be broken. 6
Insert into the slot on the back cover and turn it counter-clockwise to lift the cover up and away from the back of the phone. Use the grooves at the top of the cover to open the battery cover (as shown). *Included 2. Warning!: When removing the battery cover with you phone to remove the back cover. Installing the Battery 1. Use a coin or the Battery Cover Removal Tool included with a finger nail, the nail can be broken. 6

User Manual (user Manual) (ver.f10) (English)
Page 12
The gold contacts at the battery end must align with contacts on the handset and turn the grooved dial clockwise until it snaps into the phone housing using the directional arrow printed on the battery. With the battery in position on the phone, place the cover back on the phone. 3. Insert the top end of the battery down until the cover locks. *Included Getting Started 7 Push bottom end of the battery into place. 4.
The gold contacts at the battery end must align with contacts on the handset and turn the grooved dial clockwise until it snaps into the phone housing using the directional arrow printed on the battery. With the battery in position on the phone, place the cover back on the phone. 3. Insert the top end of the battery down until the cover locks. *Included Getting Started 7 Push bottom end of the battery into place. 4.

User Manual (user Manual) (ver.f10) (English)
Page 13
Use the grooves at the top of the phone. 8 Use a coin or the Battery Cover Removal Tool included with you phone to lift the cover up and away from the back of the cover to remove the back cover. Insert into the slot on the back cover and turn it counter-clockwise to open the battery cover (as shown). *Included 2. Removing the Battery 1.
Use the grooves at the top of the phone. 8 Use a coin or the Battery Cover Removal Tool included with you phone to lift the cover up and away from the back of the cover to remove the back cover. Insert into the slot on the back cover and turn it counter-clockwise to open the battery cover (as shown). *Included 2. Removing the Battery 1.

User Manual (user Manual) (ver.f10) (English)
Page 14
With the battery in position on the phone, place the cover back on the handset and turn the grooved dial clockwise until the cover locks. *Included Getting Started 9 Lift the battery from the bottom end and remove. 4. 3.
With the battery in position on the phone, place the cover back on the handset and turn the grooved dial clockwise until the cover locks. *Included Getting Started 9 Lift the battery from the bottom end and remove. 4. 3.
User Manual (user Manual) (ver.f10) (English)
Page 15
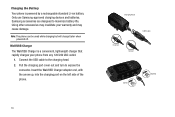
...adapter end, with the arrow up, into the charging port on the left side of the phone. 10 Charging Head USB Cable Incorrect Correct Correct Incorrect + Only use Samsung-approved charging devices and batteries. Pull the charging port cover out and turn to maximize battery ...The Wall/USB Charger is powered by a rechargeable standard Li-ion battery. Charging the Battery Your phone is a convenient, lightweight charger that rapidly charges your warranty and may cause damage. Samsung accessories are designed to expose the connector. Connect the USB cable to the charging head. 2.
...adapter end, with the arrow up, into the charging port on the left side of the phone. 10 Charging Head USB Cable Incorrect Correct Correct Incorrect + Only use Samsung-approved charging devices and batteries. Pull the charging port cover out and turn to maximize battery ...The Wall/USB Charger is powered by a rechargeable standard Li-ion battery. Charging the Battery Your phone is a convenient, lightweight charger that rapidly charges your warranty and may cause damage. Samsung accessories are designed to expose the connector. Connect the USB cable to the charging head. 2.

User Manual (user Manual) (ver.f10) (English)
Page 16
... touch the internal antenna as it responds best to a light touch from the pad of your finger or a non-metallic stylus. Note: If the phone is completely charged (the battery icon becomes still), unplug the adapter from the charging port cover and replace the charging port cover. Warning!: If your... object when pressing on the back side of the display. 3. Remove the adapter end from the power outlet. Open the phone, then press and hold the End/Power key . Once the phone finds a signal, the time, date, and day appear in the top of your handset has a touch screen, it ...
... touch the internal antenna as it responds best to a light touch from the pad of your finger or a non-metallic stylus. Note: If the phone is completely charged (the battery icon becomes still), unplug the adapter from the charging port cover and replace the charging port cover. Warning!: If your... object when pressing on the back side of the display. 3. Remove the adapter end from the power outlet. Open the phone, then press and hold the End/Power key . Once the phone finds a signal, the time, date, and day appear in the top of your handset has a touch screen, it ...
User Manual (user Manual) (ver.f10) (English)
Page 17
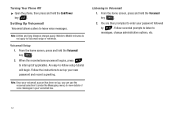
... . 2. Follow the instructions to Voicemail 1. Note: Airtime and long distance charges apply. Setting Up Voicemail Voicemail allows callers to enter your voicemail box. Turning Your Phone Off ᮣ Open the phone, then press and hold the End/Power key .
... . 2. Follow the instructions to Voicemail 1. Note: Airtime and long distance charges apply. Setting Up Voicemail Voicemail allows callers to enter your voicemail box. Turning Your Phone Off ᮣ Open the phone, then press and hold the End/Power key .

User Manual (user Manual) (ver.f10) (English)
Page 18
Pull the microSD card cover out and turn to unlock and remove. Removing Your Memory Card 1. Inserting and Removing Your Memory Card Inserting Your microSD™ Card Note: Your phone does not come with the contacts side down, into the memory card slot until it must be purchased as an accessory. Press in the microSD card to expose the card slot. 2. Refer to the following illustration. See your service provider for more information. ᮣ Lift memory card cover and insert the memory card, with the microSD™ memory card, it is fully seated. Getting Started 13
Pull the microSD card cover out and turn to unlock and remove. Removing Your Memory Card 1. Inserting and Removing Your Memory Card Inserting Your microSD™ Card Note: Your phone does not come with the contacts side down, into the memory card slot until it must be purchased as an accessory. Press in the microSD card to expose the card slot. 2. Refer to the following illustration. See your service provider for more information. ᮣ Lift memory card cover and insert the memory card, with the microSD™ memory card, it is fully seated. Getting Started 13

User Manual (user Manual) (ver.f10) (English)
Page 19
... & Tools. 2. Press right soft key for Card Memory. 4. The My Music directory will be reformatted. 7. Press for Options. 5. Press . 6. Highlight Yes and press to your phone. Insert the microSD™ memory card into the SD card reader slot. 3. Plug the SD card reader into your My Computer directory and highlight the...
... & Tools. 2. Press right soft key for Card Memory. 4. The My Music directory will be reformatted. 7. Press for Options. 5. Press . 6. Highlight Yes and press to your phone. Insert the microSD™ memory card into the SD card reader slot. 3. Plug the SD card reader into your My Computer directory and highlight the...
User Manual (user Manual) (ver.f10) (English)
Page 20
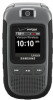
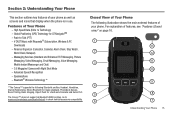
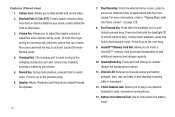
...The Convoy™ does not support all Bluetooth OBEX profiles. For explanation of Your Phone - Features of features; V CAST Music with Night Shot Mode - Closed View of Your Phone The following Bluetooth profiles: Headset, Handsfree, Dial-Up Networking, Stereo Bluetooth for ...VZ NavigatorSM - see "Features (Closed view)" on page 16. 1 13 2 12 3 11 10 9 4 5 8 6 7 Understanding Your Phone 15 Messaging Services (Standard and Enhanced TXT Messaging, Picture Messaging, Video Messaging, Email Messaging, Voice Messaging, Mobile Instant Messenger and Chat) - 2.0 Megapixel...
...The Convoy™ does not support all Bluetooth OBEX profiles. For explanation of Your Phone - Features of features; V CAST Music with Night Shot Mode - Closed View of Your Phone The following Bluetooth profiles: Headset, Handsfree, Dial-Up Networking, Stereo Bluetooth for ...VZ NavigatorSM - see "Features (Closed view)" on page 16. 1 13 2 12 3 11 10 9 4 5 8 6 7 Understanding Your Phone 15 Messaging Services (Standard and Enhanced TXT Messaging, Picture Messaging, Video Messaging, Email Messaging, Voice Messaging, Mobile Instant Messenger and Chat) - 2.0 Megapixel...
User Manual (user Manual) (ver.f10) (English)
Page 21
...It also displays incoming calls or messages. 12. 2.5mm Headset Jack: Allows you to insert a microSD™ memory card (purchased separately) to your phone, press to initiate the Push-to plug in an optional headset for safe, convenient conversations. 13. Shortcut/Push To Talk (PTT): Press to Unlock... external keys. To mute the ringer during a call , press the volume key up or down. Press and hold with the Phone Closed" on your phone. 5. External LCD: External LCD shows signal and battery strength, time, day, and date. Battery Cover Removal Tool: Use to Lock/ Unlock...
...It also displays incoming calls or messages. 12. 2.5mm Headset Jack: Allows you to insert a microSD™ memory card (purchased separately) to your phone, press to initiate the Push-to plug in an optional headset for safe, convenient conversations. 13. Shortcut/Push To Talk (PTT): Press to Unlock... external keys. To mute the ringer during a call , press the volume key up or down. Press and hold with the Phone Closed" on your phone. 5. External LCD: External LCD shows signal and battery strength, time, day, and date. Battery Cover Removal Tool: Use to Lock/ Unlock...
User Manual (user Manual) (ver.f10) (English)
Page 22
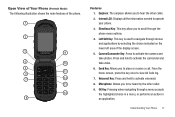
...9. Internal LCD: Displays all the information needed to activate the camera and take video. 6. Microphone: Allows you to scroll through the phone menu options. 4. Open View of Your Phone (Portrait Mode) The following illustration shows the main features of the display screen. 5. Left Soft Key: This key is used to ...activate the camcorder and take photos. Camera/Camcorder Key: Press to operate your phone. 3. From the home screen, press the key once to be heard by selecting the choice indicated on the lower left area of the...
...9. Internal LCD: Displays all the information needed to activate the camera and take video. 6. Microphone: Allows you to scroll through the phone menu options. 4. Open View of Your Phone (Portrait Mode) The following illustration shows the main features of the display screen. 5. Left Soft Key: This key is used to ...activate the camcorder and take photos. Camera/Camcorder Key: Press to operate your phone. 3. From the home screen, press the key once to be heard by selecting the choice indicated on the lower left area of the...

User Manual (user Manual) (ver.f10) (English)
Page 24
...keys (located on the left , right) to activate the camcorder. Each key also acts as a shortcut to adjust the volume. Speakerphone Key With the phone open, press the Speakerphone key (on page 102. Press the Speakerphone key to the speakerphone before or during a call. • Press to send an... hold the Vibration Mode key to set your favorite application. The Directional keys can be customized to pick up , down, left side of your phone) to launch applications. Send Key The Send key is used to answer calls, dial calls, and to recall the last number(s) dialed, received,...
...keys (located on the left , right) to activate the camcorder. Each key also acts as a shortcut to adjust the volume. Speakerphone Key With the phone open, press the Speakerphone key (on page 102. Press the Speakerphone key to the speakerphone before or during a call. • Press to send an... hold the Vibration Mode key to set your favorite application. The Directional keys can be customized to pick up , down, left side of your phone) to launch applications. Send Key The Send key is used to answer calls, dial calls, and to recall the last number(s) dialed, received,...


