
User Manual (user Manual) (ver.f8) (English)
Page 6
... Phone 5 Displaying Your Telephone Number 5 Battery 6 Turning Your Phone On and Off 9 Set-up Wizard 10 Easy Set-Up 10 Locking and Unlocking 11 TTY Mode 12 Roaming 12 Voicemail 13 Memory Card 13 Section 2: Understanding Your Phone 15 Features of Your Phone 15 Front View 16 Side Views 17 Open View 18 Back View 19 Navigation Keys 19 Function Keys 21 Understanding the Home screen 23 Understanding the Menu 26 Menu Outline 28 Section 3: Call Functions 34 Making a Call 34 Answering a Call...
... Phone 5 Displaying Your Telephone Number 5 Battery 6 Turning Your Phone On and Off 9 Set-up Wizard 10 Easy Set-Up 10 Locking and Unlocking 11 TTY Mode 12 Roaming 12 Voicemail 13 Memory Card 13 Section 2: Understanding Your Phone 15 Features of Your Phone 15 Front View 16 Side Views 17 Open View 18 Back View 19 Navigation Keys 19 Function Keys 21 Understanding the Home screen 23 Understanding the Menu 26 Menu Outline 28 Section 3: Call Functions 34 Making a Call 34 Answering a Call...

User Manual (user Manual) (ver.f8) (English)
Page 9
... other settings, navigation may need to quickly start with the phone unlocked, at the Home screen. To get to the Home screen, you are based on default settings, and may vary, depending on your phone. This manual gives navigation instructions according to the phone's Settings. Actual displays may vary from the Home screen, and using your phone by installing and charging the battery, activating your service, and setting up voicemail. Understanding this User Manual The sections of this User Manual start using the external keys. Note: Instructions...
... other settings, navigation may need to quickly start with the phone unlocked, at the Home screen. To get to the Home screen, you are based on default settings, and may vary, depending on your phone. This manual gives navigation instructions according to the phone's Settings. Actual displays may vary from the Home screen, and using your phone by installing and charging the battery, activating your service, and setting up voicemail. Understanding this User Manual The sections of this User Manual start using the external keys. Note: Instructions...

User Manual (user Manual) (ver.f8) (English)
Page 14
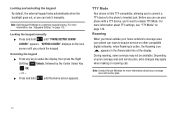
... Started 9 Non-Supported Batteries Samsung handsets do not support the use of the phone. Do not block the antenna; When using a non-supported battery, the phone can only be recharged. Turning Your Phone On and Off ᮣ Press and hold the End/Power key to turn the phone on , the phone connects with the home network, then displays the Home screen and active alerts. Default Home screen End/Power key Note: Your phone's internal antenna is necessary. SEE USER MANUAL" If you will only charge Samsung...
... Started 9 Non-Supported Batteries Samsung handsets do not support the use of the phone. Do not block the antenna; When using a non-supported battery, the phone can only be recharged. Turning Your Phone On and Off ᮣ Press and hold the End/Power key to turn the phone on , the phone connects with the home network, then displays the Home screen and active alerts. Default Home screen End/Power key Note: Your phone's internal antenna is necessary. SEE USER MANUAL" If you will only charge Samsung...
User Manual (user Manual) (ver.f8) (English)
Page 17
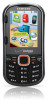
... information about your phone can lock it manually. Locking the keypad manually ᮣ Press and hold until the Home screen appears. Unlocking the keypad ᮣ Press any key to enable TTY Mode. Roaming When you to connect a TTY device to the phone's headset jack. when Roaming is fully TTY-compatible, allowing you travel outside your home network's coverage area, your coverage area and service plan. 12 Note: Contact Verizon Wireless for more information...
... information about your phone can lock it manually. Locking the keypad manually ᮣ Press and hold until the Home screen appears. Unlocking the keypad ᮣ Press any key to enable TTY Mode. Roaming When you to connect a TTY device to the phone's headset jack. when Roaming is fully TTY-compatible, allowing you travel outside your home network's coverage area, your coverage area and service plan. 12 Note: Contact Verizon Wireless for more information...
User Manual (user Manual) (ver.f8) (English)
Page 29
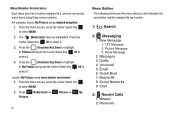
...: A data connection is active, but other features are available. Consult Verizon Wireless for all communication functions of your phone's screens, including the Home screen. For more information, see "Display Themes" on page 127. More bars indicate stronger signal. 1X CDMA Signal Strength: The number of bars show signal strength. More bars indicate stronger signal. Airplane Mode: Disables all your phone. E911 Only: GPS location information is being transmitted and received. Voice Call: A voice call is set to the network...
...: A data connection is active, but other features are available. Consult Verizon Wireless for all communication functions of your phone's screens, including the Home screen. For more information, see "Display Themes" on page 127. More bars indicate stronger signal. 1X CDMA Signal Strength: The number of bars show signal strength. More bars indicate stronger signal. Airplane Mode: Disables all your phone. E911 Only: GPS location information is being transmitted and received. Voice Call: A voice call is set to the network...
User Manual (user Manual) (ver.f8) (English)
Page 33
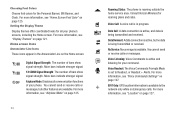
... each option. 1: Search 2: Messaging 1: New Message 1: TXT Message 2: Picture Message 3: Voice Message 2: Messages 3: Drafts 4: Voicemail 5: Email 6: Social Beat 7: Mobile IM 8: Social Networks 9: Chat 3: Recent Calls 1: Missed 2: Received Press Media Center ➔ Pictures ➔ My Pictures. 28 Menu Outline The following list shows the menu structure and indicates the accelerator number assigned to highlight 3. Press the Center Select Key OK to select it . 4. Press the Directional Key Down to select MENU. 2. Launch My Pictures using standard navigation: 1. My...
... each option. 1: Search 2: Messaging 1: New Message 1: TXT Message 2: Picture Message 3: Voice Message 2: Messages 3: Drafts 4: Voicemail 5: Email 6: Social Beat 7: Mobile IM 8: Social Networks 9: Chat 3: Recent Calls 1: Missed 2: Received Press Media Center ➔ Pictures ➔ My Pictures. 28 Menu Outline The following list shows the menu structure and indicates the accelerator number assigned to highlight 3. Press the Center Select Key OK to select it . 4. Press the Directional Key Down to select MENU. 2. Launch My Pictures using standard navigation: 1. My...

User Manual (user Manual) (ver.f8) (English)
Page 36
...3: Voicemail 1: Tone 1: Get New Ringtones 1: Get New Applications 2: Vibrate 3: Reminder 4: Emergency Tone 5: Missed Call 6: Device Connect 7: Battery Charge Alert 4: Keypad Sounds 5: Keypad Volume 6: Digit Dial Readout 7: Service Alerts 1: ERI 2: Minute Beep 3: Call Connect 4: Software Update 8: Power On/Off 1: Power On 2: Power Off 7: Display Settings 1: Easy Set-up 2: Banner 1: Personal Banner 2: ERI Banner 3: Backlight 1: Display 1: Duration 2: Brightness 2: Keypad 4: Wallpaper 1: Home Screen 2: Lock Screen 5: Display Themes 6: Main Menu Settings 1: Menu Layout 2: Replace Menu Items (List...
...3: Voicemail 1: Tone 1: Get New Ringtones 1: Get New Applications 2: Vibrate 3: Reminder 4: Emergency Tone 5: Missed Call 6: Device Connect 7: Battery Charge Alert 4: Keypad Sounds 5: Keypad Volume 6: Digit Dial Readout 7: Service Alerts 1: ERI 2: Minute Beep 3: Call Connect 4: Software Update 8: Power On/Off 1: Power On 2: Power Off 7: Display Settings 1: Easy Set-up 2: Banner 1: Personal Banner 2: ERI Banner 3: Backlight 1: Display 1: Duration 2: Brightness 2: Keypad 4: Wallpaper 1: Home Screen 2: Lock Screen 5: Display Themes 6: Main Menu Settings 1: Menu Layout 2: Replace Menu Items (List...

User Manual (user Manual) (ver.f8) (English)
Page 43
... a saved contact, to a telephone number, or to voicemail. • Send : Create a text, picture, or voice message to a saved contact, or to redial the last number. 3. Say "Call", followed by speaking the type of number, Mobile 1, Home, or Business. • "" to dial phone number. • "Voicemail" to access voicemail. • "Last Number" to a telephone number. • Go To : Open any application installed on page 64. The audio prompt "Please say "Call", followed by the type of message and the recipient(s). 1. The new message opens...
... a saved contact, to a telephone number, or to voicemail. • Send : Create a text, picture, or voice message to a saved contact, or to redial the last number. 3. Say "Call", followed by speaking the type of number, Mobile 1, Home, or Business. • "" to dial phone number. • "Voicemail" to access voicemail. • "Last Number" to a telephone number. • Go To : Open any application installed on page 64. The audio prompt "Please say "Call", followed by the type of message and the recipient(s). 1. The new message opens...
User Manual (user Manual) (ver.f8) (English)
Page 47
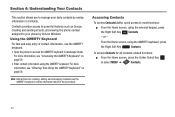
... Home screen, using the external keypad, press the Right Soft Key Contacts - Accessing Contacts To access Contacts List for creating, editing and managing Contacts use the QWERTY keyboard: • Open the phone to your daily contacts by Verizon Wireless. or - Section 4: Understanding Your Contacts This section allows you to manage your phone by saving information in Contacts. Note: Instructions for quick access to select MENU ➔ Contacts. 42 For more information, see "Entering Text Using the QWERTY Keyboard" on page 59. • Enter contact...
... Home screen, using the external keypad, press the Right Soft Key Contacts - Accessing Contacts To access Contacts List for creating, editing and managing Contacts use the QWERTY keyboard: • Open the phone to your daily contacts by Verizon Wireless. or - Section 4: Understanding Your Contacts This section allows you to manage your phone by saving information in Contacts. Note: Instructions for quick access to select MENU ➔ Contacts. 42 For more information, see "Entering Text Using the QWERTY Keyboard" on page 59. • Enter contact...

User Manual (user Manual) (ver.f8) (English)
Page 54
... the Contacts. From the Home screen, press the OK Key MENU ➔ Contacts ➔ Groups. Using the QWERTY Keyboard ᮣ Open the phone, then use the external keypad to press the first few number keys to correspond to enter the first few letters of group members. For more information, see "Quick Search" on page 132. Rotate the phone and slide it open to display a list of the contact name. Use the Directional Keys...
... the Contacts. From the Home screen, press the OK Key MENU ➔ Contacts ➔ Groups. Using the QWERTY Keyboard ᮣ Open the phone, then use the external keypad to press the first few number keys to correspond to enter the first few letters of group members. For more information, see "Quick Search" on page 132. Rotate the phone and slide it open to display a list of the contact name. Use the Directional Keys...

User Manual (user Manual) (ver.f8) (English)
Page 55
... QWERTY keyboard and command keys. From the Home screen, press the OK Key MENU ➔ Contacts ➔ Groups. When you can create additional groups, to save the changes. At the NEW GROUP screen, enter a name of 25 groups. Rotate the phone and slide it open to access the QWERTY keyboard. 1. From the Home screen, press the OK Key MENU ➔ Contacts ➔ Contact List. Use the Directional Keys to 25 characters for assignment. 5. Changing a Contact's Group Assignment Edit a contact...
... QWERTY keyboard and command keys. From the Home screen, press the OK Key MENU ➔ Contacts ➔ Groups. When you can create additional groups, to save the changes. At the NEW GROUP screen, enter a name of 25 groups. Rotate the phone and slide it open to access the QWERTY keyboard. 1. From the Home screen, press the OK Key MENU ➔ Contacts ➔ Contact List. Use the Directional Keys to 25 characters for assignment. 5. Changing a Contact's Group Assignment Edit a contact...

User Manual (user Manual) (ver.f8) (English)
Page 83
... Soft Key Erase to display messages by name or number (also known as threaded view). • Entry Mode: Set the default text entry mode when using the external keypad. Picture messages are notified when a message you can insert into messages. Press the Left Soft Key Erase to create new phrases. Press the Right Soft Key Options ➔New to delete phrases. From the Home screen, press the Center Select Key to create new extensions. Choose None to disable signatures...
... Soft Key Erase to display messages by name or number (also known as threaded view). • Entry Mode: Set the default text entry mode when using the external keypad. Picture messages are notified when a message you can insert into messages. Press the Left Soft Key Erase to create new phrases. Press the Right Soft Key Options ➔New to delete phrases. From the Home screen, press the Center Select Key to create new extensions. Choose None to disable signatures...

User Manual (user Manual) (ver.f8) (English)
Page 92
... Social Networking 87 While browsing with your phone closed or open. End/Power Key: Press to exit Mobile Web and return to dial a highlighted number. Mobile Web presents on web pages, to scroll through lists and highlight options. For example: • Menu: Press to display a list of content that 's highlighted. Changing the Screen Orientation You can use Mobile Web, some keys operate differently. Navigating Mobile Web Navigate web pages in several ways. Send Key: Press to the Home screen...
... Social Networking 87 While browsing with your phone closed or open. End/Power Key: Press to exit Mobile Web and return to dial a highlighted number. Mobile Web presents on web pages, to scroll through lists and highlight options. For example: • Menu: Press to display a list of content that 's highlighted. Changing the Screen Orientation You can use Mobile Web, some keys operate differently. Navigating Mobile Web Navigate web pages in several ways. Send Key: Press to the Home screen...

User Manual (user Manual) (ver.f8) (English)
Page 119
... phone sends a default passkey to accept future pairings from this device. • Always Connect: Your phone will prompt you have enabled Auto Pairing in the pairing list. • Incoming Security: Choose Always Ask or Always Connect for future pairings with this device. • Service Discovery: View the service profiles supported for pairing with this device in Bluetooth Options, and the selected device supports it , to select MENU ➔ Settings & Tools ➔ Bluetooth Menu. 2. From the Home screen...
... phone sends a default passkey to accept future pairings from this device. • Always Connect: Your phone will prompt you have enabled Auto Pairing in the pairing list. • Incoming Security: Choose Always Ask or Always Connect for future pairings with this device. • Service Discovery: View the service profiles supported for pairing with this device in Bluetooth Options, and the selected device supports it , to select MENU ➔ Settings & Tools ➔ Bluetooth Menu. 2. From the Home screen...

User Manual (user Manual) (ver.f8) (English)
Page 122
... you connect the phone to another device with a USB cable • Battery Charge Alert: Choose Alert or Vibrate to have the phone read the numbers as you of numbers as you dial them in system or service status. 1. From the Home screen, press the Center Select Key to select MENU ➔ Settings & Tools ➔ Sounds Settings ➔ Digit Dial Readout. 2. Press the Directional Key or volume key to select MENU ➔ Settings & Tools ➔ Sounds Settings ➔ Keypad Sounds...
... you connect the phone to another device with a USB cable • Battery Charge Alert: Choose Alert or Vibrate to have the phone read the numbers as you of numbers as you dial them in system or service status. 1. From the Home screen, press the Center Select Key to select MENU ➔ Settings & Tools ➔ Sounds Settings ➔ Digit Dial Readout. 2. Press the Directional Key or volume key to select MENU ➔ Settings & Tools ➔ Sounds Settings ➔ Keypad Sounds...
User Manual (user Manual) (ver.f8) (English)
Page 136
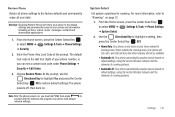
... not roam, and call functions and other features will return your phone with default network settings. Note: After the phone powers on default settings, using the Verizon Wireless network and the networks of roaming partners. • Automatic-B: Your phone automatically acquires service based on , you can set a custom lock code under Phone Settings ➔ Security ➔ Edit Codes. 3. From the Home screen, press the Center Select Key to the factory defaults and permanently erase all user data. Restore Phone Return all phone settings to select MENU ➔ Settings & Tools...
... not roam, and call functions and other features will return your phone with default network settings. Note: After the phone powers on default settings, using the Verizon Wireless network and the networks of roaming partners. • Automatic-B: Your phone automatically acquires service based on , you can set a custom lock code under Phone Settings ➔ Security ➔ Edit Codes. 3. From the Home screen, press the Center Select Key to the factory defaults and permanently erase all user data. Restore Phone Return all phone settings to select MENU ➔ Settings & Tools...

User Manual (user Manual) (ver.f8) (English)
Page 141
... select it. Use the Directional Key to highlight a country, then press the Center Select Key OK to disable, then press the Center Select Key SET. 3. Press the Center Select Key OK to select MENU ➔ Settings & Tools ➔ Memory ➔ Save Options. 2. Note: When Assisted Dialing is On, the Home screen displays "Assisted On" when dialing an international number. 136 Memory Manage memory settings for saving pictures, videos, music, sounds and ringtones to your service provider for...
... select it. Use the Directional Key to highlight a country, then press the Center Select Key OK to disable, then press the Center Select Key SET. 3. Press the Center Select Key OK to select MENU ➔ Settings & Tools ➔ Memory ➔ Save Options. 2. Note: When Assisted Dialing is On, the Home screen displays "Assisted On" when dialing an international number. 136 Memory Manage memory settings for saving pictures, videos, music, sounds and ringtones to your service provider for...

User Manual (user Manual) (ver.f8) (English)
Page 160
Understanding the Power Save Feature If your phone is unable to find a signal after searching, a Power Save feature is found, your phone returns to standby mode. When a signal is automatically activated. This power can check it yourself by displaying a number of each call controls the power level. Faulty installation or service may be dangerous to the aircraft's operation. • Failure to observe these instructions may invalidate any warranty applicable to...
Understanding the Power Save Feature If your phone is unable to find a signal after searching, a Power Save feature is found, your phone returns to standby mode. When a signal is automatically activated. This power can check it yourself by displaying a number of each call controls the power level. Faulty installation or service may be dangerous to the aircraft's operation. • Failure to observe these instructions may invalidate any warranty applicable to...
User Manual (user Manual) (ver.f8) (English)
Page 183
... of the parts of this software must display the following acknowledgement: "This product includes cryptographic software written by Eric Young([email protected])" The word 'cryptographic' can be in a product, Eric Young should be given attribution as such any Windows specific code (or a derivative thereof) from the apps directory (application code) you include any Copyright notices in documentation (online or...
... of the parts of this software must display the following acknowledgement: "This product includes cryptographic software written by Eric Young([email protected])" The word 'cryptographic' can be in a product, Eric Young should be given attribution as such any Windows specific code (or a derivative thereof) from the apps directory (application code) you include any Copyright notices in documentation (online or...

User Manual (user Manual) (ver.f8) (English)
Page 190
... Menu Settings 121 Media Center Extras 85 Music & Tones 80 Search 80 Memory Card formatting 14 installing 13 removing 14 Memory Settings 136 card 137 phone 137 save options 136 Menu customizing 26 items 27 number accelerators 28 outline 28 understanding 26 Messaging 64 font size 124 Message Folders 71 New Message Key 64 Picture Messages 66 Quick Reply 64 QWERTY action 64 settings 78 Text Messages 65 types of messages 64 viewing by contact (threaded) 71 viewing by time 72 Voice Messages 68 Mobile IM 76 Mobile Web...
... Menu Settings 121 Media Center Extras 85 Music & Tones 80 Search 80 Memory Card formatting 14 installing 13 removing 14 Memory Settings 136 card 137 phone 137 save options 136 Menu customizing 26 items 27 number accelerators 28 outline 28 understanding 26 Messaging 64 font size 124 Message Folders 71 New Message Key 64 Picture Messages 66 Quick Reply 64 QWERTY action 64 settings 78 Text Messages 65 types of messages 64 viewing by contact (threaded) 71 viewing by time 72 Voice Messages 68 Mobile IM 76 Mobile Web...


