User Manual (user Manual) (ver.f5) (English)
Page 4
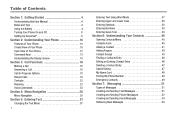
... Screen 15 Section 3: Call Functions 18 Making a Call 18 Answering a Call 18 Call In-Progress Options 18 Recent Calls 19 Contacts 22 Roaming 23 Voice Commands 23 Section 4: Menu Navigation 30 Menu Navigation 30 Section 5: Entering Text 37 Changing the Text Mode ... Numbers 39 Entering Quick Text 39 Section 6: Understanding Your Contacts 40 Opening Contacts Menu 40 Contacts Icons 40 Adding a Contact 41 Adding Pauses 43 Contact Groups 43 Finding a Contacts Entry 46 Editing an Existing Contact Entry 46 Deleting a Contact Entry 47 Speed Dialing 47 My Name Card 48 Finding...
... Screen 15 Section 3: Call Functions 18 Making a Call 18 Answering a Call 18 Call In-Progress Options 18 Recent Calls 19 Contacts 22 Roaming 23 Voice Commands 23 Section 4: Menu Navigation 30 Menu Navigation 30 Section 5: Entering Text 37 Changing the Text Mode ... Numbers 39 Entering Quick Text 39 Section 6: Understanding Your Contacts 40 Opening Contacts Menu 40 Contacts Icons 40 Adding a Contact 41 Adding Pauses 43 Contact Groups 43 Finding a Contacts Entry 46 Editing an Existing Contact Entry 46 Deleting a Contact Entry 47 Speed Dialing 47 My Name Card 48 Finding...
User Manual (user Manual) (ver.f5) (English)
Page 7
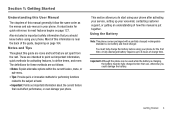
...; Important: Points out important information about the current feature that could damage the battery. These are as the menus and sub-menus in your voicemail, contacting customer support, or getting an understanding of how this manual is important safety information that are icons and text that you should know before first...
...; Important: Points out important information about the current feature that could damage the battery. These are as the menus and sub-menus in your voicemail, contacting customer support, or getting an understanding of how this manual is important safety information that are icons and text that you should know before first...

User Manual (user Manual) (ver.f5) (English)
Page 9
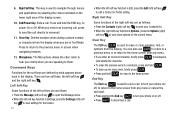
Getting Started 6 The gold contacts at the battery end must align with contacts on the battery. Slide the battery cover up to remove. 3. Press down until it snaps into place. Push bottom end of the battery into the phone housing using the directional arrow printed on the phone. Insert the top end of the battery down , and slide the battery cover back and lift up until it snaps into place. Removing the Battery 1. 2.
Getting Started 6 The gold contacts at the battery end must align with contacts on the battery. Slide the battery cover up to remove. 3. Press down until it snaps into place. Push bottom end of the battery into the phone housing using the directional arrow printed on the phone. Insert the top end of the battery down , and slide the battery cover back and lift up until it snaps into place. Removing the Battery 1. 2.
User Manual (user Manual) (ver.f5) (English)
Page 16
... to view more options for the soft keys are as follows. • Press the Message (left) soft key to open your Contacts list. • When the right soft key function is used to power On or Off. 9. Right Soft Key: This key is... soft key and the right soft key . Command Keys Functions for the current menu. There are as follows. • Press the Contacts (right) soft key to open the Message menu. • When the left soft key function is Settings, press the Settings (left...hold the End key END to turn your phone on or off. • Press END to edit a Contact or Profile setting.
... to view more options for the soft keys are as follows. • Press the Message (left) soft key to open your Contacts list. • When the right soft key function is used to power On or Off. 9. Right Soft Key: This key is... soft key and the right soft key . Command Keys Functions for the current menu. There are as follows. • Press the Contacts (right) soft key to open the Message menu. • When the left soft key function is Settings, press the Settings (left...hold the End key END to turn your phone on or off. • Press END to edit a Contact or Profile setting.

User Manual (user Manual) (ver.f5) (English)
Page 21
... position; Call In-Progress Options Access numerous menus and features even while in the display. • Messaging: Displays the Messages menu. • Contacts List: Opens Contact list to view your contacts. • Recent Calls: Displays recent incoming, missed and outgoing calls. • Bluetooth Menu: Displays the Bluetooth menu. • Main Menu: Displays the...
... position; Call In-Progress Options Access numerous menus and features even while in the display. • Messaging: Displays the Messages menu. • Contacts List: Opens Contact list to view your contacts. • Recent Calls: Displays recent incoming, missed and outgoing calls. • Bluetooth Menu: Displays the Bluetooth menu. • Main Menu: Displays the...
User Manual (user Manual) (ver.f5) (English)
Page 22
.... Press the Directional key up or down to unmute the call is a missed, dialed, or received. • Name: If the caller is not in your Contacts list, No Name appears. • Number: Displays the telephone number. • Time: The time of the call. • Date: The date of calls ...; Call Type: The title bar displays if the call . These types of the call is highlighted, press OPEN. 4. The following options: • Save to Contacts: Save the number to highlight a menu. Press to open the highlighted menu or to indicate Mobile 1, Mobile 2, Home, Work, or Fax. From the home ...
.... Press the Directional key up or down to unmute the call is a missed, dialed, or received. • Name: If the caller is not in your Contacts list, No Name appears. • Number: Displays the telephone number. • Time: The time of the call. • Date: The date of calls ...; Call Type: The title bar displays if the call . These types of the call is highlighted, press OPEN. 4. The following options: • Save to Contacts: Save the number to highlight a menu. Press to open the highlighted menu or to indicate Mobile 1, Mobile 2, Home, Work, or Fax. From the home ...
User Manual (user Manual) (ver.f5) (English)
Page 23
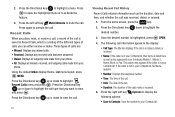
... press SEND then press the Directional key up or down to highlight an option. Press SEND to call Making Calls Using Call History 1. Save to Contacts is highlighted. Indicates a Missed call Indicates a Dialed call Indicates a Received call the highlighted number. Press . Note: If save doesn't appear, that...the highlighted number. Call Functions 20 From the home screen, press SEND . Or, you view Recent Calls, an icon to highlight Add New Contact or Update Existing. Press . 2. Press the right soft key Options. Press the Directional key up or down to the left of the ...
... press SEND then press the Directional key up or down to highlight an option. Press SEND to call Making Calls Using Call History 1. Save to Contacts is highlighted. Indicates a Missed call Indicates a Dialed call Indicates a Received call the highlighted number. Press . Note: If save doesn't appear, that...the highlighted number. Call Functions 20 From the home screen, press SEND . Or, you view Recent Calls, an icon to highlight Add New Contact or Update Existing. Press . 2. Press the right soft key Options. Press the Directional key up or down to the left of the ...

User Manual (user Manual) (ver.f5) (English)
Page 24
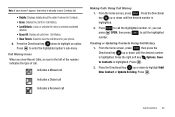
... selection list of text entry, such as Word, Abc, ABC, 123, or Symbols. 7. If you selected Update Existing, proceed to your Contacts. 21 If you 're finished entering information for the entry using the keypad. Enter a name for the entry, press SAVE. Highlight an ...unassigned location and press SET. Note: You can assign a speed dial location to your Contacts. 9. Location 411: directory assistance, 611: customer service access, 911: emergency phone number. The number is saved to step 9. 5. Press the Directional...
... selection list of text entry, such as Word, Abc, ABC, 123, or Symbols. 7. If you selected Update Existing, proceed to your Contacts. 21 If you 're finished entering information for the entry using the keypad. Enter a name for the entry, press SAVE. Highlight an ...unassigned location and press SET. Note: You can assign a speed dial location to your Contacts. 9. Location 411: directory assistance, 611: customer service access, 911: emergency phone number. The number is saved to step 9. 5. Press the Directional...

User Manual (user Manual) (ver.f5) (English)
Page 25
...Functions 22 Press the Directional key down until the desired number is highlighted then press VIEW. Press the right soft key Options. Contacts Making Calls Using Contacts Contacts are entries that you create to call the number. pop-up menu appears in the display. 3. Press the Directional key down...then press the Directional key up or down to call is highlighted. Press the right soft key Options. Details for people or groups of the contact's name. 2. A popup menu appears in the display. popup screen. 4. For more than one number, press the Directional key up or...
...Functions 22 Press the Directional key down until the desired number is highlighted then press VIEW. Press the right soft key Options. Contacts Making Calls Using Contacts Contacts are entries that you create to call the number. pop-up menu appears in the display. 3. Press the Directional key down...then press the Directional key up or down to call is highlighted. Press the right soft key Options. Details for people or groups of the contact's name. 2. A popup menu appears in the display. popup screen. 4. For more than one number, press the Directional key up or...
User Manual (user Manual) (ver.f5) (English)
Page 26
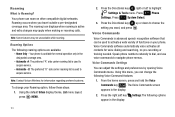
... systems. To change the following Voice Command features: 1. Automatic -A: The preferred "A" side carrier roaming list is Roaming? Automatic - Note: Contact Verizon Wireless for normal operation only in the display. 2. Using the default Urban display theme, List menu layout: press MENU. 23 2.... Press 6 mno Phone Settings. Voice Commands software automatically voice activates all contacts for voice dialing and searching, no pre-recording or training needed. Speak phone numbers naturally to dial, and use voice commands to...
... systems. To change the following Voice Command features: 1. Automatic -A: The preferred "A" side carrier roaming list is Roaming? Automatic - Note: Contact Verizon Wireless for normal operation only in the display. 2. Using the default Urban display theme, List menu layout: press MENU. 23 2.... Press 6 mno Phone Settings. Voice Commands software automatically voice activates all contacts for voice dialing and searching, no pre-recording or training needed. Speak phone numbers naturally to dial, and use voice commands to...

User Manual (user Manual) (ver.f5) (English)
Page 27
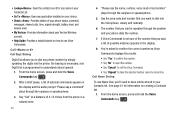
... to get better performance by selecting the Sensitivity setting Reject More. • Digit Dialing: Use the Digit Dialing menu to adapt digit dialing to your Contacts List, a Name and a Location (home, work, mobile) or the phone number. • Send : Send a text or picture message to a number or to someone in the... as "Please say a command." - Prompts: Turns playback on or off for example, when confirming a phone number. - Voice Commands The following : - Names: Turns playback on your Contacts List.
... to get better performance by selecting the Sensitivity setting Reject More. • Digit Dialing: Use the Digit Dialing menu to adapt digit dialing to your Contacts List, a Name and a Location (home, work, mobile) or the phone number. • Send : Send a text or picture message to a number or to someone in the... as "Please say a command." - Prompts: Turns playback on or off for example, when confirming a phone number. - Voice Commands The following : - Names: Turns playback on your Contacts List.
User Manual (user Manual) (ver.f5) (English)
Page 28
...have the selected number read one more time. From the home screen, press and hold the Voice Commands key 0 . • Lookup: Open the contact record for information on how to have entries stored in a natural voice. 25 4. See page 41 for any name in the display. 8. You...Name Dial, you said is repeated through the earpiece or speakerphone. 5. After a brief pause, a list of 3-12 inches from the phone in your Contacts List. • Go To : Open any phone number by simply speaking the digits into the microphone, clearly and naturally. 6. Call Call Digit Dialing ...
...have the selected number read one more time. From the home screen, press and hold the Voice Commands key 0 . • Lookup: Open the contact record for information on how to have entries stored in a natural voice. 25 4. See page 41 for any name in the display. 8. You...Name Dial, you said is repeated through the earpiece or speakerphone. 5. After a brief pause, a list of 3-12 inches from the phone in your Contacts List. • Go To : Open any phone number by simply speaking the digits into the microphone, clearly and naturally. 6. Call Call Digit Dialing ...

User Manual (user Manual) (ver.f5) (English)
Page 29
... is displayed in the display and the audio prompt "Please say the name, number, voice mail or last number" plays through the speaker and your Contacts list, first name followed by last name or the phone number of commands appears in your phone dials the number. 2. Say "Call" at a distance of... 3-12 inches from the phone in the display. 8. To use Name Dialing, say the name of the contact that you said , a list of the number that you want to have the selected number read one more time. If Voice Commands is repeated through...
... is displayed in the display and the audio prompt "Please say the name, number, voice mail or last number" plays through the speaker and your Contacts list, first name followed by last name or the phone number of commands appears in your phone dials the number. 2. Say "Call" at a distance of... 3-12 inches from the phone in the display. 8. To use Name Dialing, say the name of the contact that you said , a list of the number that you want to have the selected number read one more time. If Voice Commands is repeated through...
User Manual (user Manual) (ver.f5) (English)
Page 30
... be provided. Goto The "Go To" command allows you can take a picture of "Please choose" plays through the earpiece or speakerphone. 3. The contact name appears in the To: field. From the home screen, press and hold the Voice Commands key 0 . 2. To begin navigation of menu items..., say the name or number" plays through the earpiece or speakerphone. 3. The contact name appears in the To: field. For more information, refer to open select applications using the camera. 1. A list of commands appears in the ...
... be provided. Goto The "Go To" command allows you can take a picture of "Please choose" plays through the earpiece or speakerphone. 3. The contact name appears in the To: field. From the home screen, press and hold the Voice Commands key 0 . 2. To begin navigation of menu items..., say the name or number" plays through the earpiece or speakerphone. 3. The contact name appears in the To: field. For more information, refer to open select applications using the camera. 1. A list of commands appears in the ...
User Manual (user Manual) (ver.f5) (English)
Page 31
...screen, press and hold the Voice Commands key 0 . 2. Say "Check" at a distance of the following menus or applications: Media Center, Messaging, Contacts, Recent Calls, Settings & Tools or Mobile Web 5. "Please choose" plays through the earpiece or speakerphone-if it is enabled. 4. A list of ...enabled. • "Volume": Displays and announces the current master volume setting through the earpiece or speakerphone. The option spoken opens. Contacts Name Lookup Note: Name Lookup can be accessed with the phone flip in the display and the audio prompt "Please say a ...
...screen, press and hold the Voice Commands key 0 . 2. Say "Check" at a distance of the following menus or applications: Media Center, Messaging, Contacts, Recent Calls, Settings & Tools or Mobile Web 5. "Please choose" plays through the earpiece or speakerphone-if it is enabled. 4. A list of ...enabled. • "Volume": Displays and announces the current master volume setting through the earpiece or speakerphone. The option spoken opens. Contacts Name Lookup Note: Name Lookup can be accessed with the phone flip in the display and the audio prompt "Please say a ...
User Manual (user Manual) (ver.f5) (English)
Page 32
... status by last name. 6. The tutorial appears in a natural voice. In a single command, say "Lookup" followed by the name of a contact entry at a distance of commands appears in the display with other information that you could say the name" plays through the speakerphone. 3. The... contact name appears in the display and the audio prompt "Please say a command" plays through them earpiece or speakerphone. 3. A list of 3-12...
... status by last name. 6. The tutorial appears in a natural voice. In a single command, say "Lookup" followed by the name of a contact entry at a distance of commands appears in the display with other information that you could say the name" plays through the speakerphone. 3. The... contact name appears in the display and the audio prompt "Please say a command" plays through them earpiece or speakerphone. 3. A list of 3-12...
User Manual (user Manual) (ver.f5) (English)
Page 34
... Directional key Groups and press . Press the Directional key Family and press . From the home screen, press MENU. 2. Press the Directional key Contacts and press . Press 3 def Groups, then: 4 ghi Family to select a menu item. 31 Alarm Clock *Press the Directional key to access... and/or sub-menu number(s) for standard menu navigation and number accelerators using number accelerators: 1. New TXT Message 2. Press 3 def Contacts. 3. Menu Number Accelerators You can also access menus and sub-menus faster and with fewer key presses using standard menu navigation: 1. See...
... Directional key Groups and press . Press the Directional key Family and press . From the home screen, press MENU. 2. Press the Directional key Contacts and press . Press 3 def Groups, then: 4 ghi Family to select a menu item. 31 Alarm Clock *Press the Directional key to access... and/or sub-menu number(s) for standard menu navigation and number accelerators using number accelerators: 1. New TXT Message 2. Press 3 def Contacts. 3. Menu Number Accelerators You can also access menus and sub-menus faster and with fewer key presses using standard menu navigation: 1. See...

User Manual (user Manual) (ver.f5) (English)
Page 35
... & Download 1: Get New Applications 6: Extras 1: Get New Applications Messaging 1: New Message 1: TXT Message 2: Picture Message 3: Voice Message 2: Inbox 3: Sent 4: Drafts 5: Voicemail 6: Mobile IM 7: Email 8: Chat Contacts 1: New Contact 2: Contact List 3: Groups 1: No Group 2: Business 3: Colleague 4: Family 5: Friends 4: Speed Dials 5: In Case of Emergency Menu Navigation 32
... & Download 1: Get New Applications 6: Extras 1: Get New Applications Messaging 1: New Message 1: TXT Message 2: Picture Message 3: Voice Message 2: Inbox 3: Sent 4: Drafts 5: Voicemail 6: Mobile IM 7: Email 8: Chat Contacts 1: New Contact 2: Contact List 3: Groups 1: No Group 2: Business 3: Colleague 4: Family 5: Friends 4: Speed Dials 5: In Case of Emergency Menu Navigation 32
User Manual (user Manual) (ver.f5) (English)
Page 43
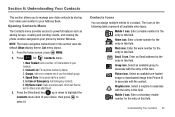
...a speed dial for the entry in this field. Mobile 1 icon. Email 1 icon. Understanding Your Contacts 40 Enter the work number for a contact. 5. Home icon. Group icon. Opening Contacts Menu The Contacts menu provides access to powerful features such as an attachment 3. Work icon. Picture icon. Enter a ...secondary mobile number for the entry in this field. New Contact: Add a number, or Email address to your five default groups. 4. Enter a home number for the entry in the following ...
...a speed dial for the entry in this field. Mobile 1 icon. Email 1 icon. Understanding Your Contacts 40 Enter the work number for a contact. 5. Home icon. Group icon. Opening Contacts Menu The Contacts menu provides access to powerful features such as an attachment 3. Work icon. Picture icon. Enter a ...secondary mobile number for the entry in this field. New Contact: Add a number, or Email address to your five default groups. 4. Enter a home number for the entry in the following ...

User Manual (user Manual) (ver.f5) (English)
Page 44
... press the right soft key Options. Note: Voicemail is highlighted, press to add the Contact to each number associated with the contact (Home, Work, Mobile 1, Mobile 2, and Fax.). 9. Enter a name for Contacts menu. 3. Highlight Set Speed Dial and press . 8. Highlight an unassigned location and press... Email 2 icon. Press 3 def for the entry using the keypad. 5. Method 1 Creating a new Contact from the home screen, then following the necessary prompts to your Contacts, you can assign a speed dial location to the speed dial location. Once highlighted, use the keypad to ...
... press the right soft key Options. Note: Voicemail is highlighted, press to add the Contact to each number associated with the contact (Home, Work, Mobile 1, Mobile 2, and Fax.). 9. Enter a name for Contacts menu. 3. Highlight Set Speed Dial and press . 8. Highlight an unassigned location and press... Email 2 icon. Press 3 def for the entry using the keypad. 5. Method 1 Creating a new Contact from the home screen, then following the necessary prompts to your Contacts, you can assign a speed dial location to the speed dial location. Once highlighted, use the keypad to ...


