

User Manual (user Manual) (ver.1.0) (English)
Page 13
Getting to Know Your Camcorder ENGLISH Features • Digital data transfer function with IEEE1394 By incorporating the IEEE 1394 (i.LINKTM : i.LINK is a serial data transfer protocol and interconnection system, used to transmit DV data) high speed data transport port, moving and still images can be transferred to your PC, making it possible to...
Getting to Know Your Camcorder ENGLISH Features • Digital data transfer function with IEEE1394 By incorporating the IEEE 1394 (i.LINKTM : i.LINK is a serial data transfer protocol and interconnection system, used to transmit DV data) high speed data transport port, moving and still images can be transferred to your PC, making it possible to...

User Manual (user Manual) (ver.1.0) (English)
Page 17
PHOTO button (see page 21) 4. S-VIDEO out 13 Power switch (CAMERA or PLAYER) (see page 58) 3. Audio/Video out 8. External MIC in (see page 57) 7. Getting to Know Your Camcorder Right & Top View 1. Audio/Video out 6. DV IN/OUT 4. Zoom lever and Volume Control 2. Zoom lever and Volume Control (see page 25) ENGLISH 8. OPEN/EJECT button 7. OPEN/EJECT button (see page 37) 2. PHOTO button 3. DV IN/OUT 6. Power switch (CAMERA or PLAYER) 1. S-VIDEO out 5. External MIC in 5.
PHOTO button (see page 21) 4. S-VIDEO out 13 Power switch (CAMERA or PLAYER) (see page 58) 3. Audio/Video out 8. External MIC in (see page 57) 7. Getting to Know Your Camcorder Right & Top View 1. Audio/Video out 6. DV IN/OUT 4. Zoom lever and Volume Control 2. Zoom lever and Volume Control (see page 25) ENGLISH 8. OPEN/EJECT button 7. OPEN/EJECT button (see page 37) 2. PHOTO button 3. DV IN/OUT 6. Power switch (CAMERA or PLAYER) 1. S-VIDEO out 5. External MIC in 5.

User Manual (user Manual) (ver.1.0) (English)
Page 21
... ✤ When you turn the DATE/TIME on the rear side panel. - Volume control (see page 67) 29. DV IN (DV data receiving mode) (see page 31) 26. Each press of the button toggles the OSD function on /off , access... SP STILL 0:00:00:00 17 12 DEW 100 MIN 16 A.DUB 29 11 TAPE 25 VOLUME 0 16 20 DV IN 28 26 SOUND2 27 16BIT 11:30 PM DEC.31,2001 10 Turning the OSD on/off . - Getting to...affected when the OSD function is automatically turned off. ✤ Refer to Know Your Camcorder OSD (On Screen Display) 25. Audio playback channel (see those features being used.
... ✤ When you turn the DATE/TIME on the rear side panel. - Volume control (see page 67) 29. DV IN (DV data receiving mode) (see page 31) 26. Each press of the button toggles the OSD function on /off , access... SP STILL 0:00:00:00 17 12 DEW 100 MIN 16 A.DUB 29 11 TAPE 25 VOLUME 0 16 20 DV IN 28 26 SOUND2 27 16BIT 11:30 PM DEC.31,2001 10 Turning the OSD on/off . - Getting to...affected when the OSD function is automatically turned off. ✤ Refer to Know Your Camcorder OSD (On Screen Display) 25. Audio playback channel (see those features being used.

User Manual (user Manual) (ver.1.0) (English)
Page 29
...so that it covers the hole. • How to keep a tape a. Slide the OPEN/EJECT button forward and open . The camcorder will not be accidentally erased. 1 2 Tape window 3 4 Cassette holder a. REC 25 The compartment opens automatically. 2. Recording Impossible(Protection.... Recording possible : If you can cause a malfunction. ✤ Do not use tapes other than Mini DV CASSETTE. 1. b. Preparing ENGLISH Inserting and Ejecting a Cassette ✤ Use Mini DV Cassettes only. ✤ When inserting a tape or closing a cassette holder, do not apply excessive force....
...so that it covers the hole. • How to keep a tape a. Slide the OPEN/EJECT button forward and open . The camcorder will not be accidentally erased. 1 2 Tape window 3 4 Cassette holder a. REC 25 The compartment opens automatically. 2. Recording Impossible(Protection.... Recording possible : If you can cause a malfunction. ✤ Do not use tapes other than Mini DV CASSETTE. 1. b. Preparing ENGLISH Inserting and Ejecting a Cassette ✤ Use Mini DV Cassettes only. ✤ When inserting a tape or closing a cassette holder, do not apply excessive force....
User Manual (user Manual) (ver.1.0) (English)
Page 71
...video and audio signals are transmitted in digital, allowing high quality images to the DV port with DV port 67 ENGLISH 4Pin Type 6Pin Type DV format VCR Portable PC with other DV standard products. In this camcorder to another DV device, some functions may not work. There are two types of the PC...IEEE 1394 add-on card (not supplied) on the PC. ✤ The frame rate recorded for video capturing is quite simple. Mini DV camcorder Desk top PC with the correct cable. !!! If a product has a DV port, you can transfer data by connecting to be transferred. Be careful.
...video and audio signals are transmitted in digital, allowing high quality images to the DV port with DV port 67 ENGLISH 4Pin Type 6Pin Type DV format VCR Portable PC with other DV standard products. In this camcorder to another DV device, some functions may not work. There are two types of the PC...IEEE 1394 add-on card (not supplied) on the PC. ✤ The frame rate recorded for video capturing is quite simple. Mini DV camcorder Desk top PC with the correct cable. !!! If a product has a DV port, you can transfer data by connecting to be transferred. Be careful.

User Manual (user Manual) (ver.1.0) (English)
Page 72
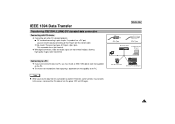
... the REC PAUSE mode. Start playback on the other DV device. s If you monitor the picture. 5. Connect the DV cable (not supplied) to the DV IN/OUT port of camcorder and to the DV IN/OUT port of the other DV device while you want to start recording. Press the .... 2. s PAUSE is displayed in IEEE1394 card (Not Supplied) Recording with DV connecting cable 1. To stop recording, press the (STOP) button. 6Pin 4Pin IN/OUT (Not Supplied) DV port linking diagram Note s When making recordings on the camcorder, the pictures on the monitor. 3. ENGLISH IEEE 1394 Data Transfer q System...
... the REC PAUSE mode. Start playback on the other DV device. s If you monitor the picture. 5. Connect the DV cable (not supplied) to the DV IN/OUT port of camcorder and to the DV IN/OUT port of the other DV device while you want to start recording. Press the .... 2. s PAUSE is displayed in IEEE1394 card (Not Supplied) Recording with DV connecting cable 1. To stop recording, press the (STOP) button. 6Pin 4Pin IN/OUT (Not Supplied) DV port linking diagram Note s When making recordings on the camcorder, the pictures on the monitor. 3. ENGLISH IEEE 1394 Data Transfer q System...


