
User Manual (ENGLISH)
Page 2
... ...21 OSD (On Screen Display in REC / PLAY Modes) ...22 OSD (On Screen Display) in (Camera) Modes ...23 Turning the OSD (On Screen Display) On / Off ...24 The Camcorder : Preparation 25 How to Use the Remote Control ...25 Battery Installation for the Remote Control ...25 Self Timer... Recording using the Remote Control ...25 Adjusting the Hand Strap ...26 Hand strap ...26 Shoulder strap...26 Connecting a Power Source ...27 Using the AC Power Adapter and the ...
... ...21 OSD (On Screen Display in REC / PLAY Modes) ...22 OSD (On Screen Display) in (Camera) Modes ...23 Turning the OSD (On Screen Display) On / Off ...24 The Camcorder : Preparation 25 How to Use the Remote Control ...25 Battery Installation for the Remote Control ...25 Self Timer... Recording using the Remote Control ...25 Adjusting the Hand Strap ...26 Hand strap ...26 Shoulder strap...26 Connecting a Power Source ...27 Using the AC Power Adapter and the ...

User Manual (ENGLISH)
Page 14
...; To ensure a steady picture during filming, make sure that the hand strap is removed. 2. Servicing ✤ Do not attempt to service this CAMCORDER yourself. ✤ Opening or removing covers may result in fire, electric shock or other hazards. ✤ Refer all servicing to dangerous voltage or ... THE FLASH BY HANDS. The Lithium battery for the camcorder lasts about 6 months under normal operation from the time of installation. DO NOT TOUCH THE FLASHLIGHT AFTER CONTINUOUS FIRING OF THE FLASH. even when the battery pack or AC adapter is properly adjusted. ✤ Do not force your ...
...; To ensure a steady picture during filming, make sure that the hand strap is removed. 2. Servicing ✤ Do not attempt to service this CAMCORDER yourself. ✤ Opening or removing covers may result in fire, electric shock or other hazards. ✤ Refer all servicing to dangerous voltage or ... THE FLASH BY HANDS. The Lithium battery for the camcorder lasts about 6 months under normal operation from the time of installation. DO NOT TOUCH THE FLASHLIGHT AFTER CONTINUOUS FIRING OF THE FLASH. even when the battery pack or AC adapter is properly adjusted. ✤ Do not force your ...
User Manual (ENGLISH)
Page 16
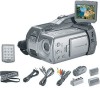
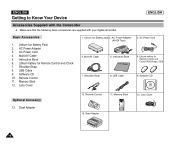
.... Lens Cover 13. Shoulder Strap 8. AC Power Cord 6. Remote Control 11. Multi-AV Cable 5. ENGLISH Getting to Know Your Device Accessories Supplied with the Camcorder ✤ Make sure that the following basic accessories are supplied with your digital camcorder. Lithium battery for Remote Control and Clock(CR2025 type, 2EA) 9. AC Power Adapter (AA-E8 Type) 4. Basic...
.... Lens Cover 13. Shoulder Strap 8. AC Power Cord 6. Remote Control 11. Multi-AV Cable 5. ENGLISH Getting to Know Your Device Accessories Supplied with the Camcorder ✤ Make sure that the following basic accessories are supplied with your digital camcorder. Lithium battery for Remote Control and Clock(CR2025 type, 2EA) 9. AC Power Adapter (AA-E8 Type) 4. Basic...

User Manual (ENGLISH)
Page 27
... according to your camcorder. 4. Connect the AC Power Cord to the AC cord. 2. Connect the AC Power Adapter to a wall socket. Plug in the DC jack of the AC Power Adapter into the Power In jack of your country of power source that can be connected to the REC / PLAY, or (CAMERA) modes. 27 The Camcorder : Preparation Connecting a Power...
... according to your camcorder. 4. Connect the AC Power Cord to the AC cord. 2. Connect the AC Power Adapter to a wall socket. Plug in the DC jack of the AC Power Adapter into the Power In jack of your country of power source that can be connected to the REC / PLAY, or (CAMERA) modes. 27 The Camcorder : Preparation Connecting a Power...

User Manual (ENGLISH)
Page 28
...3. Turn the device off and the charging indicator will still discharge if it is left attached to flash, showing that the battery is used. - Connect the AC Power Adapter to the AC Power Cord and connect the AC Power Cord to the device. 2. Blinking time Once per...since there is fully charged, disconnect the battery pack and the AC Power Adapter from the camcorder after use (Camcorder/Camera/With LCD monitor etc.). - Type of continuous recording time available depends on the device. 4. ENGLISH The Camcorder : Preparation Using the Lithium Ion Battery Pack Charging the Lithium...
...3. Turn the device off and the charging indicator will still discharge if it is left attached to flash, showing that the battery is used. - Connect the AC Power Adapter to the AC Power Cord and connect the AC Power Cord to the device. 2. Blinking time Once per...since there is fully charged, disconnect the battery pack and the AC Power Adapter from the camcorder after use (Camcorder/Camera/With LCD monitor etc.). - Type of continuous recording time available depends on the device. 4. ENGLISH The Camcorder : Preparation Using the Lithium Ion Battery Pack Charging the Lithium...
User Manual (ENGLISH)
Page 31
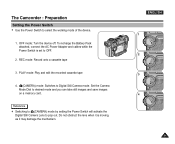
... device. 1. ENGLISH 1 2 3 4 31 To recharge the Battery Pack attached, connect the AC Power Adapter and cables while the Power Switch is moving, as it may damage the mechanism. The Camcorder : Preparation Setting the Power Switch ✤ Use the Power Switch to Digital Still Camera mode. REC mode: Record onto a cassette tape 3. OFF mode: Turn the device...
... device. 1. ENGLISH 1 2 3 4 31 To recharge the Battery Pack attached, connect the AC Power Adapter and cables while the Power Switch is moving, as it may damage the mechanism. The Camcorder : Preparation Setting the Power Switch ✤ Use the Power Switch to Digital Still Camera mode. REC mode: Record onto a cassette tape 3. OFF mode: Turn the device...

User Manual (ENGLISH)
Page 73
... tape reaches its end while being played back, the tape will appear on connecting the AC Power Adapter and Cable to your camcorder, refer to page 27. ✤ Refer to page 145 for the camcorder. The Camcorder : Playback ENGLISH Playing Back a Recorded Tape ✤ The tape playback functions work only .../PAL). ✤ It is automatically selected. 73 in PLAY mode. Press the (PLAY/STILL) button. Reference ✤ The playback mode (SP/LP) is recommended to PLAY mode. 2. Playback on connecting your Camcorder to play back. 4. Using the (FF) button or (REW) buttons, find the ...
... tape reaches its end while being played back, the tape will appear on connecting the AC Power Adapter and Cable to your camcorder, refer to page 27. ✤ Refer to page 145 for the camcorder. The Camcorder : Playback ENGLISH Playing Back a Recorded Tape ✤ The tape playback functions work only .../PAL). ✤ It is automatically selected. 73 in PLAY mode. Press the (PLAY/STILL) button. Reference ✤ The playback mode (SP/LP) is recommended to PLAY mode. 2. Playback on connecting your Camcorder to play back. 4. Using the (FF) button or (REW) buttons, find the ...

User Manual (ENGLISH)
Page 141
... printing might damage data on the memory card. 1. Miscellaneous Information Printing Images Using DPOF (Digital Print Order Format) Settings ✤ DPOF PRINT requires at least one DPOF marked image on the memory card. ✤ Printing still images is supported. DPOF printing starts to print images and the progress bar is selected... YES and NO. 4. ENGLISH Reference ✤ If no image is displayed. 3. The available options are commercially available. ✤ Use the USB cable provided with the Camera. ✤ Use the AC power adapter for DPOF, "DPOF PRINT" in page 137.
... printing might damage data on the memory card. 1. Miscellaneous Information Printing Images Using DPOF (Digital Print Order Format) Settings ✤ DPOF PRINT requires at least one DPOF marked image on the memory card. ✤ Printing still images is supported. DPOF printing starts to print images and the progress bar is selected... YES and NO. 4. ENGLISH Reference ✤ If no image is displayed. 3. The available options are commercially available. ✤ Use the USB cable provided with the Camera. ✤ Use the AC power adapter for DPOF, "DPOF PRINT" in page 137.

User Manual (ENGLISH)
Page 158
... LCD monitor and viewfinder. However, to a video cassette recorder (VCR), the television set or to copy it to view your camcorder abroad, check the following items: Power Sources You can use a separate Video Format Transcoder (NTSC-PAL format Converter). PAL-Compatible Countries /... Mexico, Philippines, Korea, Taiwan, United States of the local wall outlets. Use a commercially available AC plug adapter if necessary, depending on a television set or the VCR must comply with the supplied AC Power Adapter where the power input range is 100V ~ 240V, 50/60Hz. Colour System You can view your...
... LCD monitor and viewfinder. However, to a video cassette recorder (VCR), the television set or to copy it to view your camcorder abroad, check the following items: Power Sources You can use a separate Video Format Transcoder (NTSC-PAL format Converter). PAL-Compatible Countries /... Mexico, Philippines, Korea, Taiwan, United States of the local wall outlets. Use a commercially available AC plug adapter if necessary, depending on a television set or the VCR must comply with the supplied AC Power Adapter where the power input range is 100V ~ 240V, 50/60Hz. Colour System You can view your...
User Manual (ENGLISH)
Page 160
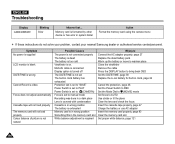
... set to PLAY Power Switch is set The built-in system folder Action Format the memory card using the camera menu ✤ If these instructions do not solve your problem, contact your nearest Samsung dealer or authorised service center/personnel. Symptom No power is supplied LCD monitor is blank DATE/TIME is... Set the Mode Dial to (MOVIE) mode Set focus to (CAMERA) Focus is set to AUTO Use strobe or lit the place Clear the lens and check the focus Insert the cassette tape properly, page 47 Charge the battery or use AC adapter Insert the memory card properly, page 83 Clear the memory...
... set to PLAY Power Switch is set The built-in system folder Action Format the memory card using the camera menu ✤ If these instructions do not solve your problem, contact your nearest Samsung dealer or authorised service center/personnel. Symptom No power is supplied LCD monitor is blank DATE/TIME is... Set the Mode Dial to (MOVIE) mode Set focus to (CAMERA) Focus is set to AUTO Use strobe or lit the place Clear the lens and check the focus Insert the cassette tape properly, page 47 Charge the battery or use AC adapter Insert the memory card properly, page 83 Clear the memory...

User Manual (ENGLISH)
Page 5
.... Reorient or relocate the receiving antenna. - FCC Warning The user is cautioned that to which the receiver is provided to call 1-800-Samsung ENGLISH NOTE: This equipment has been tested and found to comply with the instructions, may result in a particular installation. The user may...experienced radio/TV technician for help and for a Class B digital device, pursuant to rain or moisture. 23. To prevent damage which can radiate radio frequency energy and, if not installed and used at 240V ac, a suitable plug adapter should be determined by turning the equipment off and on ...
.... Reorient or relocate the receiving antenna. - FCC Warning The user is cautioned that to which the receiver is provided to call 1-800-Samsung ENGLISH NOTE: This equipment has been tested and found to comply with the instructions, may result in a particular installation. The user may...experienced radio/TV technician for help and for a Class B digital device, pursuant to rain or moisture. 23. To prevent damage which can radiate radio frequency energy and, if not installed and used at 240V ac, a suitable plug adapter should be determined by turning the equipment off and on ...

User Manual (ENGLISH)
Page 6
...Know Your Device 14 Features ...14 Accessories Supplied with the Camcorder ...15 Basic Accessories ...15 Front & Left View ...16 Left side View ...17 Right & Top View ...18 Rear & Bottom View ...19 Remote Control ...20 OSD (On Screen Display in CAMERA and PLAYER Modes) ...21 OSD (On Screen Display in...the Remote Control ...24 Adjusting the Hand Strap ...25 Hand strap ...25 Shoulder strap...25 Connecting a Power Source ...26 To use the AC Power adapter and DC Cable ...26 Using the Lithium Ion Battery Pack ...27 Charging the Lithium Ion Battery Pack ...27 Table of Continuous Recording Time Based...
...Know Your Device 14 Features ...14 Accessories Supplied with the Camcorder ...15 Basic Accessories ...15 Front & Left View ...16 Left side View ...17 Right & Top View ...18 Rear & Bottom View ...19 Remote Control ...20 OSD (On Screen Display in CAMERA and PLAYER Modes) ...21 OSD (On Screen Display in...the Remote Control ...24 Adjusting the Hand Strap ...25 Hand strap ...25 Shoulder strap...25 Connecting a Power Source ...26 To use the AC Power adapter and DC Cable ...26 Using the Lithium Ion Battery Pack ...27 Charging the Lithium Ion Battery Pack ...27 Table of Continuous Recording Time Based...

User Manual (ENGLISH)
Page 19
...: CR2025) 7. Shoulder strap (AD72-00050A) 8. AC Power Adapter 3. REW/RPS PLAY FF/FPS A.DUB STOP SELF TIMER SLOW 11. Getting to Know Your Device Accessories Supplied with the Camcorder Make sure that the following basic accessories are supplied with your digital video camera. Lithium battery (AD43-10130H) 7. ENGLISH Basic Accessories 1. AC Power Adapter (AD43-00112A) (AD44-00065A) 3.
...: CR2025) 7. Shoulder strap (AD72-00050A) 8. AC Power Adapter 3. REW/RPS PLAY FF/FPS A.DUB STOP SELF TIMER SLOW 11. Getting to Know Your Device Accessories Supplied with the Camcorder Make sure that the following basic accessories are supplied with your digital video camera. Lithium battery (AD43-10130H) 7. ENGLISH Basic Accessories 1. AC Power Adapter (AD43-00112A) (AD44-00065A) 3.

User Manual (ENGLISH)
Page 30
... PLAY modes. 26 The Battery Pack : used for outdoor recording. Note The plug and wall socket type may differ according to your camcorder. - To Use the AC Power Adapter and DC Cable 1. Connect the AC Power adapter to a wall socket. Connect the AC cord to the AC cord. 2. The AC Power Adapter with the AC cord : used for indoor recording. -
... PLAY modes. 26 The Battery Pack : used for outdoor recording. Note The plug and wall socket type may differ according to your camcorder. - To Use the AC Power Adapter and DC Cable 1. Connect the AC Power adapter to a wall socket. Connect the AC cord to the AC cord. 2. The AC Power Adapter with the AC cord : used for indoor recording. -

User Manual (ENGLISH)
Page 31
... per second Blinking stops and stays on the camcorder. 4. Turn the Camera power switch to flash, showing that you are using. - I Even with the power switched off, the battery pack will start to OFF, and the charging indicator will still discharge if it is left connected to the ... type and capacity of continuous recording time available depends on : - When the battery is fully charged, disconnect the battery pack and the AC Power adapter from the camcorder after it is fully charged. 27 It is used. Attach the battery pack to a wall socket. 3. Reset the battery pack and the...
... per second Blinking stops and stays on the camcorder. 4. Turn the Camera power switch to flash, showing that you are using. - I Even with the power switched off, the battery pack will start to OFF, and the charging indicator will still discharge if it is left connected to the ... type and capacity of continuous recording time available depends on : - When the battery is fully charged, disconnect the battery pack and the AC Power adapter from the camcorder after it is fully charged. 27 It is used. Attach the battery pack to a wall socket. 3. Reset the battery pack and the...

User Manual (ENGLISH)
Page 55
... the LCD monitor or viewfinder. ENGLISH 2 PLAY TAPE MEMORY OFF REC 3 LAY APE EMORY F REC 51 Connect a Power source to the camcorder. (See page 26) 1 (A battery pack or the AC power adapter) I STBY is displayed on the LCD. I REC is displayed on the LCD. To start recording, press the START/STOP button. I Make...
... the LCD monitor or viewfinder. ENGLISH 2 PLAY TAPE MEMORY OFF REC 3 LAY APE EMORY F REC 51 Connect a Power source to the camcorder. (See page 26) 1 (A battery pack or the AC power adapter) I STBY is displayed on the LCD. I REC is displayed on the LCD. To start recording, press the START/STOP button. I Make...

User Manual (ENGLISH)
Page 81
... of the TV or VCR. 2. If you need to the TV with the Audio/Video cable. I You may use the AC Power Adapter as the power source for the camcorder. STEREO only - Turn the TV on and set the TV/VIDEO selector on your TV. Set the power switch to obtain ... cable to view a tape using the LCD when in PLAY mode only. Video inputYellow TV Audio input (left)-White Audio input (right)-Red S-VIDEO input Camcorder Multi A/V cable Notes I Refer to VIDEO. I The Red plug : Audio(R) - ENGLISH Playback on a TV Monitor ✤ To play back a tape, the television must have a...
... of the TV or VCR. 2. If you need to the TV with the Audio/Video cable. I You may use the AC Power Adapter as the power source for the camcorder. STEREO only - Turn the TV on and set the TV/VIDEO selector on your TV. Set the power switch to obtain ... cable to view a tape using the LCD when in PLAY mode only. Video inputYellow TV Audio input (left)-White Audio input (right)-Red S-VIDEO input Camcorder Multi A/V cable Notes I Refer to VIDEO. I The Red plug : Audio(R) - ENGLISH Playback on a TV Monitor ✤ To play back a tape, the television must have a...

User Manual (ENGLISH)
Page 91
... CAMERA (See page 26) (A battery pack or an AC power adapter) 2. I This Auto Power off feature is enough remaining power for the best results. 4. I Ensure that there is designed to save battery power. Press the Photo Button halfway down to record appears on the screen. I While the camcorder ...is set the focus. Note I Open the LCD monitor. Connect a power source to the REC mode. I A Sound Effect will play when the focus is recording the still image, " " appears on the LCD monitor or viewfinder. I...
... CAMERA (See page 26) (A battery pack or an AC power adapter) 2. I This Auto Power off feature is enough remaining power for the best results. 4. I Ensure that there is designed to save battery power. Press the Photo Button halfway down to record appears on the screen. I While the camcorder ...is set the focus. Note I Open the LCD monitor. Connect a power source to the REC mode. I A Sound Effect will play when the focus is recording the still image, " " appears on the LCD monitor or viewfinder. I...

User Manual (ENGLISH)
Page 125
... view pictures on a television or copy it on the LCD from anywhere in the viewfinder. Otherwise, you may need to use your camcorder in any country or area with your recording in the world. 121 However, to 240V, 50/60 Hz. G NTSC-compatible Countries/Regions ..., Central America, Japan, Mexico, Philippines, Korea, Taiwan, United States of the local wall outlet. Note You can make recordings with the supplied AC Power Adapter within 100V to view it to a videocassette recorder, the television or VCR must be NTSC-compatible and have the appropriate audio/video jacks. G PAL...
... view pictures on a television or copy it on the LCD from anywhere in the viewfinder. Otherwise, you may need to use your camcorder in any country or area with your recording in the world. 121 However, to 240V, 50/60 Hz. G NTSC-compatible Countries/Regions ..., Central America, Japan, Mexico, Philippines, Korea, Taiwan, United States of the local wall outlet. Note You can make recordings with the supplied AC Power Adapter within 100V to view it to a videocassette recorder, the television or VCR must be NTSC-compatible and have the appropriate audio/video jacks. G PAL...

User Manual (ENGLISH)
Page 128
... POWER switch. This is set to STBY for the camcorder to PLAYER. Check the battery pack or the AC Power Adapter. does not operate You have left the camcorder set to reduce the contrast or background. The atmospheric ...camcorder on the cassette. while recording. You have reached the end of the cassette. Play, FF or REW button does not work . The battery pack is too low. recording a dark Make the background bright to CAMERA.... these instructions do not solve your problem, contact your nearest Samsung authorized service center. The battery pack is quickly exhausted.
... POWER switch. This is set to STBY for the camcorder to PLAYER. Check the battery pack or the AC Power Adapter. does not operate You have left the camcorder set to reduce the contrast or background. The atmospheric ...camcorder on the cassette. while recording. You have reached the end of the cassette. Play, FF or REW button does not work . The battery pack is too low. recording a dark Make the background bright to CAMERA.... these instructions do not solve your problem, contact your nearest Samsung authorized service center. The battery pack is quickly exhausted.


