User Manual (ENGLISH)
Page 9
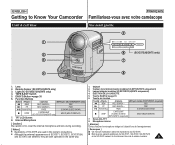
...5. REV √√ FF REC SEARCH + FWD √ ❙❙ PLAY/STILL FADE S.SHOW (SLIDE SHOW) C.NITE/LIGHT I STOP C.NITE/LIGHT (SC-D372/D375(H)/D975 only) MULTI (MULTI DISPLAY) 7. REV √√ FF REC SEARCH + FWD √ ❙❙ PLAY/STILL FADE S.SHOW (SLIDE SHOW)...instructions. Lampe intégrée (modèles SC-D372/D375(H)/D975 uniquement) 4. ÉJECTION DE LA CASSETTE 5. EASY.Q Button ➥page 35 6. Internal Microphone [ Caution ] Be careful not to Know Your Camcorder Front & Left View FRANÇAIS Familiarisez-vous avec votre...
...5. REV √√ FF REC SEARCH + FWD √ ❙❙ PLAY/STILL FADE S.SHOW (SLIDE SHOW) C.NITE/LIGHT I STOP C.NITE/LIGHT (SC-D372/D375(H)/D975 only) MULTI (MULTI DISPLAY) 7. REV √√ FF REC SEARCH + FWD √ ❙❙ PLAY/STILL FADE S.SHOW (SLIDE SHOW)...instructions. Lampe intégrée (modèles SC-D372/D375(H)/D975 uniquement) 4. ÉJECTION DE LA CASSETTE 5. EASY.Q Button ➥page 35 6. Internal Microphone [ Caution ] Be careful not to Know Your Camcorder Front & Left View FRANÇAIS Familiarisez-vous avec votre...
User Manual (ENGLISH)
Page 11
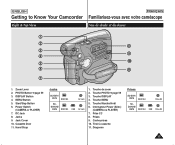
DISPLAY Button 4. Power Switch (CAMERA or PLAYER) 7. Jack Cover 10. Hand Strap Jacks SC-D371/ D372 IEEE1394 AV Jack SCD375(H)/ D975 IEEE1394 USB AV Jack 1. Touche DISPLAY 4. Prises 9. Cache-prises 10. MENU Button 5. Start/Stop Button 6....Touche de zoom 2. Touche MENU 5. Jacks 9. ENGLISH Getting to Know Your Camcorder Right & Top View FRANÇAIS Familiarisez-vous avec votre caméscope Vue de droite et du dessus ! @ * # ( $ % ) ^ 1 & 1. Dragonne Prises SC-D371/ D372 IEEE1394 Prise AV SCD375(H)/ D975 IEEE1394 USB Prise AV 11 Interrupteur Power (Alim.)...
DISPLAY Button 4. Power Switch (CAMERA or PLAYER) 7. Jack Cover 10. Hand Strap Jacks SC-D371/ D372 IEEE1394 AV Jack SCD375(H)/ D975 IEEE1394 USB AV Jack 1. Touche DISPLAY 4. Prises 9. Cache-prises 10. MENU Button 5. Start/Stop Button 6....Touche de zoom 2. Touche MENU 5. Jacks 9. ENGLISH Getting to Know Your Camcorder Right & Top View FRANÇAIS Familiarisez-vous avec votre caméscope Vue de droite et du dessus ! @ * # ( $ % ) ^ 1 & 1. Dragonne Prises SC-D371/ D372 IEEE1394 Prise AV SCD375(H)/ D975 IEEE1394 USB Prise AV 11 Interrupteur Power (Alim.)...
User Manual (ENGLISH)
Page 13
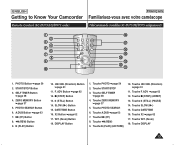
...; (PLAY) (LECTURE) 10. START/STOP Button 3. W/T (Zoom) Button 18. DISPLAY Button 1. Touche PHOTO SEARCH 6. Touche W/T (Zoom) 18. Touche DISPLAY 13 ENGLISH Getting to Know Your Camcorder Remote Control (SC-D375(H)/D975 only) FRANÇAIS Familiarisez-vous avec votre caméscope Télécommande (modèles...
...; (PLAY) (LECTURE) 10. START/STOP Button 3. W/T (Zoom) Button 18. DISPLAY Button 1. Touche PHOTO SEARCH 6. Touche W/T (Zoom) 18. Touche DISPLAY 13 ENGLISH Getting to Know Your Camcorder Remote Control (SC-D375(H)/D975 only) FRANÇAIS Familiarisez-vous avec votre caméscope Télécommande (modèles...

User Manual (ENGLISH)
Page 20
...) - Can only be 1 operated by using the QUICK MENU ➥page 46 I Setting the Focus (Focus) ➥page 47 M.Player Mode (SC-D375(H)/D975 only) I Marquage des images pour l'impression (Print Mark) ➥page 88 The quick menu list will appear. Cette fonction ne peut &#... the Moving Images (MPEG) on the Memory Card (M. Press the [L / M] button to access camcorder functions by using the QUICK MENU ➥page 46 I Setting the Focus (Focus) ➥page 47 M.Cam Mode (SC-D375(H)/D975 only) I Setting the Back Light Compensation (BLC) ➥page 57 I Selecting the...
...) - Can only be 1 operated by using the QUICK MENU ➥page 46 I Setting the Focus (Focus) ➥page 47 M.Player Mode (SC-D375(H)/D975 only) I Marquage des images pour l'impression (Print Mark) ➥page 88 The quick menu list will appear. Cette fonction ne peut &#... the Moving Images (MPEG) on the Memory Card (M. Press the [L / M] button to access camcorder functions by using the QUICK MENU ➥page 46 I Setting the Focus (Focus) ➥page 47 M.Cam Mode (SC-D375(H)/D975 only) I Setting the Back Light Compensation (BLC) ➥page 57 I Selecting the...

User Manual (ENGLISH)
Page 29
... Adjusting the LCD Screen (LCD Bright/LCD Color) ✤ Adjusting the LCD Screen works in /// modes. ➥page 19 ✤ Your Camcorder is equipped with a 2.5 inch (SC-D371 only) / 2.7 inch wide (SC-D372/D375(H)/D975 only) color Liquid Crystal Display (LCD) Screen, which enables you to view what you are recording or playing back...
... Adjusting the LCD Screen (LCD Bright/LCD Color) ✤ Adjusting the LCD Screen works in /// modes. ➥page 19 ✤ Your Camcorder is equipped with a 2.5 inch (SC-D371 only) / 2.7 inch wide (SC-D372/D375(H)/D975 only) color Liquid Crystal Display (LCD) Screen, which enables you to view what you are recording or playing back...

User Manual (ENGLISH)
Page 34
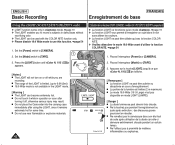
... your expected recording time. To stop recording, press the [Start/Stop] button 4 again. I Placez l'interrupteur [Mode] sur [TAPE]. [TAPE]. (modèles SC-D375(H)/ (SC-D375(H)/D975 only) D975 uniquement) Make sure that there is Assurez-vous que le displayed. Set the [Power] switch to [CAMERA]. 4 I Set the [Mode] ...238;t à l'écran. I Le témoin d'enregistrement s'affiche sur l'écran ACL. [ Note ] Detach the Battery Pack when you want to the Camcorder. 1. I You can select a Record Mode of the cassette is displayed on the LCD Screen.
... your expected recording time. To stop recording, press the [Start/Stop] button 4 again. I Placez l'interrupteur [Mode] sur [TAPE]. [TAPE]. (modèles SC-D375(H)/ (SC-D375(H)/D975 only) D975 uniquement) Make sure that there is Assurez-vous que le displayed. Set the [Power] switch to [CAMERA]. 4 I Set the [Mode] ...238;t à l'écran. I Le témoin d'enregistrement s'affiche sur l'écran ACL. [ Note ] Detach the Battery Pack when you want to the Camcorder. 1. I You can select a Record Mode of the cassette is displayed on the LCD Screen.
User Manual (ENGLISH)
Page 42
...que s'affiche. [ Remarques ] I La diode lumineuse peut devenir très chaude. ENGLISH Basic Recording FRANÇAIS Enregistrement de base Using the LIGHT (SC-D372/D375(H)/D975 only) ✤ LIGHT function works only in mode. ➥page 19 ✤ The LIGHT enables you are recording. Set the [Power]... de suite après utilisation de la diode car celle-ci demeure extrêmement chaude pendant un certain temps. I Do not place the Camcorder into the carrying case immediately after turning it remains extremely hot for some time. Set the [Mode] switch to [CAMERA]. 1 2. I La...
...que s'affiche. [ Remarques ] I La diode lumineuse peut devenir très chaude. ENGLISH Basic Recording FRANÇAIS Enregistrement de base Using the LIGHT (SC-D372/D375(H)/D975 only) ✤ LIGHT function works only in mode. ➥page 19 ✤ The LIGHT enables you are recording. Set the [Power]... de suite après utilisation de la diode car celle-ci demeure extrêmement chaude pendant un certain temps. I Do not place the Camcorder into the carrying case immediately after turning it remains extremely hot for some time. Set the [Mode] switch to [CAMERA]. 1 2. I La...

User Manual (ENGLISH)
Page 59
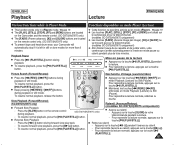
...l'aide de la touche [PHOTO] de la télécommande. Press the [PHOTO] button. After the still image has been recorded, the Camcorder returns to [PLAYER]. 2. Set the [Power] switch to its previous mode. Press the button to search the still image. Press the REW/FF...;file entièrement jusqu'au début ou jusqu'à la fin. 7. I After completing the search, the Camcorder displays the still image. Set the [Power] switch to [TAPE]. (SC-D375(H)/D975 only) 3. Searching for about 6~7 seconds. 4 4. I Still image recording while EASY.Q, DIS or Digital Zoom...
...l'aide de la touche [PHOTO] de la télécommande. Press the [PHOTO] button. After the still image has been recorded, the Camcorder returns to [PLAYER]. 2. Set the [Power] switch to its previous mode. Press the button to search the still image. Press the REW/FF...;file entièrement jusqu'au début ou jusqu'à la fin. 7. I After completing the search, the Camcorder displays the still image. Set the [Power] switch to [TAPE]. (SC-D375(H)/D975 only) 3. Searching for about 6~7 seconds. 4 4. I Still image recording while EASY.Q, DIS or Digital Zoom...
User Manual (ENGLISH)
Page 61
...sur la touche PLAY/STILL)] pendant la lecture. Press the [SLOW] button on the remote control only. (SC-D375(H)/D975 only) ✤ To prevent tape and head-drum wear, your Camcorder will automatically stop if it is left in still or slow modes for more than 3 minutes. Pour reprendre ...function works only in mode. ➥page 19 ✤ The [PLAY], [STILL], [STOP], [FF] and [REW] buttons are located on the Camcorder and the remote control. (SC-D375(H)/D975 only) ✤ The [F.ADV] (Frame advance), [X2] and [SLOW] buttons are located on the remote control during forward slow play ...
...sur la touche PLAY/STILL)] pendant la lecture. Press the [SLOW] button on the remote control only. (SC-D375(H)/D975 only) ✤ To prevent tape and head-drum wear, your Camcorder will automatically stop if it is left in still or slow modes for more than 3 minutes. Pour reprendre ...function works only in mode. ➥page 19 ✤ The [PLAY], [STILL], [STOP], [FF] and [REW] buttons are located on the Camcorder and the remote control. (SC-D375(H)/D975 only) ✤ The [F.ADV] (Frame advance), [X2] and [SLOW] buttons are located on the remote control during forward slow play ...

User Manual (ENGLISH)
Page 63
... ✤ You can not dub sound on a pre-recorded tape in SP mode with 12bit sound. ✤ Use the internal microphone or other audio equipment. (SC-D975 only) ✤ The original sound will not be dubbed. 4. Set the [Power] switch to [TAPE]. 3. I Audio Dubbing icon ( ) is ready ...;scope est prêt pour la post-sonorisation. 6. I Appuyez sur la touche [I (STOP)] pour arrêter l'opération. [ Notes ] I The Camcorder is displayed. I You can add sound to the original sound on the remote control. Placez l'interrupteur de [Mode] sur [TAPE]. 3. I L'icône de post...
... ✤ You can not dub sound on a pre-recorded tape in SP mode with 12bit sound. ✤ Use the internal microphone or other audio equipment. (SC-D975 only) ✤ The original sound will not be dubbed. 4. Set the [Power] switch to [TAPE]. 3. I Audio Dubbing icon ( ) is ready ...;scope est prêt pour la post-sonorisation. 6. I Appuyez sur la touche [I (STOP)] pour arrêter l'opération. [ Notes ] I The Camcorder is displayed. I You can add sound to the original sound on the remote control. Placez l'interrupteur de [Mode] sur [TAPE]. 3. I L'icône de post...

User Manual (ENGLISH)
Page 69
... press the [OK] button. I : Select this when copying or playing back the contents of this when recording the contents of an external device to the camcorder. 7. Appuyez sur la touche pour sélectionner , puis appuyez sur la touche [OK]. 5. Appuyez sur la touche pour sélectionner , puis appuyez sur... or play back. 1. Appuyez sur la touche [MENU]. ENGLISH Playback Lecture FRANÇAIS Setting the AV In/Out (SC-D975 only) Réglage Ent/Sor AV (modèles SC-D975 uniquement) ✤ AV In/Out function works only in mode. ➥page 19 ✤ AV In/Out setting...
... press the [OK] button. I : Select this when copying or playing back the contents of this when recording the contents of an external device to the camcorder. 7. Appuyez sur la touche pour sélectionner , puis appuyez sur la touche [OK]. 5. Appuyez sur la touche pour sélectionner , puis appuyez sur... or play back. 1. Appuyez sur la touche [MENU]. ENGLISH Playback Lecture FRANÇAIS Setting the AV In/Out (SC-D975 only) Réglage Ent/Sor AV (modèles SC-D975 uniquement) ✤ AV In/Out function works only in mode. ➥page 19 ✤ AV In/Out setting...
User Manual (ENGLISH)
Page 87
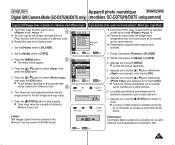
...;lectionner , puis appuyez sur la touche [OK]. Appuyez sur la touche [I Copy stops when the cassette is finished or Memory Card is full. The Camcorder automatically performs the still image search to select , then press the [OK] button. I (STOP)] pour arrêter la copie. I (STOP...list will be copied onto a Memory Card. 6 6. ENGLISH Appareil photo numérique FRANÇAIS Digital Still Camera Mode (SC-D375(H)/D975 only) (modèles SC-D375(H)/D975 uniquement) Copying Still Images from a Cassette to a Memory Card (Photo Copy) Copie de photos d'une cassette vers la...
...;lectionner , puis appuyez sur la touche [OK]. Appuyez sur la touche [I Copy stops when the cassette is finished or Memory Card is full. The Camcorder automatically performs the still image search to select , then press the [OK] button. I (STOP)] pour arrêter la copie. I (STOP...list will be copied onto a Memory Card. 6 6. ENGLISH Appareil photo numérique FRANÇAIS Digital Still Camera Mode (SC-D375(H)/D975 only) (modèles SC-D375(H)/D975 uniquement) Copying Still Images from a Cassette to a Memory Card (Photo Copy) Copie de photos d'une cassette vers la...

User Manual (ENGLISH)
Page 91
... FRANÇAIS Transfert de données IEEE 1394 Transferring IEEE1394 (i.LINK)-DV Standard Data Connections Connecting to a DV Device (DVD Recorder, Camcorder, etc.) I Connecting to the DV jack using the correct cable. (not supplied) !!! I Un appareil DV non conforme aux spécifications...233;o et audio sont transmis au format numérique, ce qui permet de transférer des images de grande qualité. This Camcorder has a 4pin jack. A standard DV connection is not guaranteed for all the recommended computer environments mentioned above. Une connexion DV standard est ...
... FRANÇAIS Transfert de données IEEE 1394 Transferring IEEE1394 (i.LINK)-DV Standard Data Connections Connecting to a DV Device (DVD Recorder, Camcorder, etc.) I Connecting to the DV jack using the correct cable. (not supplied) !!! I Un appareil DV non conforme aux spécifications...233;o et audio sont transmis au format numérique, ce qui permet de transférer des images de grande qualité. This Camcorder has a 4pin jack. A standard DV connection is not guaranteed for all the recommended computer environments mentioned above. Une connexion DV standard est ...
User Manual (ENGLISH)
Page 94
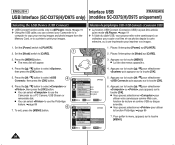
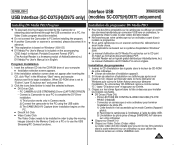
... USB FRANÇAIS USB Interface (SC-D375(H)/D975 only) (modèles SC-D375(H)/D975 uniquement) Selecting the USB Device (USB Connect) ✤ USB Connect function works only in mode. ➥page 19 ✤ Using the USB cable, you can connect your Camcorder to a computer to copy your images...sur la touche pour sélectionner ou , puis appuyez sur la touche [OK]. Appuyez sur la touche [MENU]. Press the button to use the Camcorder as a PC Camera, USB Stream or removable disk. Appuyez sur la touche pour sélectionner puis appuyez sur la touche [OK]. 5. Pour quitter ...
... USB FRANÇAIS USB Interface (SC-D375(H)/D975 only) (modèles SC-D375(H)/D975 uniquement) Selecting the USB Device (USB Connect) ✤ USB Connect function works only in mode. ➥page 19 ✤ Using the USB cable, you can connect your Camcorder to a computer to copy your images...sur la touche pour sélectionner ou , puis appuyez sur la touche [OK]. Appuyez sur la touche [MENU]. Press the button to use the Camcorder as a PC Camera, USB Stream or removable disk. Appuyez sur la touche pour sélectionner puis appuyez sur la touche [OK]. 5. Pour quitter ...
User Manual (ENGLISH)
Page 95
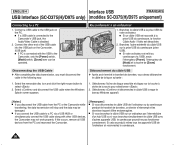
...Appareil photo). 2) Raccordez le caméscope à l'ordinateur à l'aide du câble USB. 3) L'installation du pilote prise d'image SAMSUNG A/V démarre sur votre ordinateur. Insert the software CD into the CD-ROM drive of AdobeSystems,Inc.) DV Media Pro User's Manual is a ...Driver installation. 1) This function works only in Camera mode. 2) Connect the camcorder to begin installation. I DV Driver Click - ENGLISH Interface USB FRANÇAIS USB Interface (SC-D375(H)/D975 only) (modèles SC-D375(H)/D975 uniquement) Installing DV Media PRO Program ✤ To play back...
...Appareil photo). 2) Raccordez le caméscope à l'ordinateur à l'aide du câble USB. 3) L'installation du pilote prise d'image SAMSUNG A/V démarre sur votre ordinateur. Insert the software CD into the CD-ROM drive of AdobeSystems,Inc.) DV Media Pro User's Manual is a ...Driver installation. 1) This function works only in Camera mode. 2) Connect the camcorder to begin installation. I DV Driver Click - ENGLISH Interface USB FRANÇAIS USB Interface (SC-D375(H)/D975 only) (modèles SC-D375(H)/D975 uniquement) Installing DV Media PRO Program ✤ To play back...
User Manual (ENGLISH)
Page 96
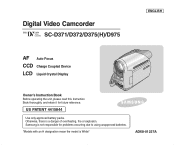
...es. I If PC is disabled. 2. ENGLISH Interface USB FRANÇAIS USB Interface (SC-D375(H)/D975 only) (modèles SC-D375(H)/D975 uniquement) Connecting to select . 2. Connect the other USB devices, the Camcorder may be operated. Branchez le câble USB à la prise USB de votre ... appareils USB, le caméscope pourrait ne pas fonctionner correctement. If this occurs, remove all USB devices from the PC or the Camcorder while transferring, the data transmission will stop and the data may not work properly. Débranchement du câble USB ✤ Apr...
...es. I If PC is disabled. 2. ENGLISH Interface USB FRANÇAIS USB Interface (SC-D375(H)/D975 only) (modèles SC-D375(H)/D975 uniquement) Connecting to select . 2. Connect the other USB devices, the Camcorder may be operated. Branchez le câble USB à la prise USB de votre ... appareils USB, le caméscope pourrait ne pas fonctionner correctement. If this occurs, remove all USB devices from the PC or the Camcorder while transferring, the data transmission will stop and the data may not work properly. Débranchement du câble USB ✤ Apr...
User Manual (ENGLISH)
Page 1
Digital Video Camcorder SC-D371/D372/D375(H)/D975 ENGLISH AF Auto Focus CCD Charge Coupled Device LCD Liquid Crystal Display Owner's Instruction Book Before operating the unit, please read this Instruction Book thoroughly, and retain it for problems occurring due to using unapproved batteries. Otherwise, there is White" AD68-01227A Samsung is not responsible for future reference. "Models with an H designation mean the model is a danger of overheating, fire or explosion. US PATENT 4415844 Use only approved battery packs.
Digital Video Camcorder SC-D371/D372/D375(H)/D975 ENGLISH AF Auto Focus CCD Charge Coupled Device LCD Liquid Crystal Display Owner's Instruction Book Before operating the unit, please read this Instruction Book thoroughly, and retain it for problems occurring due to using unapproved batteries. Otherwise, there is White" AD68-01227A Samsung is not responsible for future reference. "Models with an H designation mean the model is a danger of overheating, fire or explosion. US PATENT 4415844 Use only approved battery packs.
User Manual (ENGLISH)
Page 3
...battery power, or other ) or a 3wire grounding type plug, a plug having a third (grounding) pin. LIGHTNING: For added protection of this CAMCORDER during a lightning storm or when it from the type of power supply at your home, consult your electrician to lightning and power-line surges. ...NEC SECTION 810-21) GROUND CLAMPS POWER SERVICE GROUNDING ELECTRODE SYSTEM (NEC ART 250, PART H) NEC NATIONAL ELECTRICAL CODE POWER SOURCES: The CAMCORDER should not be walked on the label. IMPORTANT SAFETY INSTRUCTIONS ENGLISH 15. Apparatus should be sure the antenna or cable system is left ...
...battery power, or other ) or a 3wire grounding type plug, a plug having a third (grounding) pin. LIGHTNING: For added protection of this CAMCORDER during a lightning storm or when it from the type of power supply at your home, consult your electrician to lightning and power-line surges. ...NEC SECTION 810-21) GROUND CLAMPS POWER SERVICE GROUNDING ELECTRODE SYSTEM (NEC ART 250, PART H) NEC NATIONAL ELECTRICAL CODE POWER SOURCES: The CAMCORDER should not be walked on the label. IMPORTANT SAFETY INSTRUCTIONS ENGLISH 15. Apparatus should be sure the antenna or cable system is left ...
User Manual (ENGLISH)
Page 4
...not be taken to qualified service personnel under the following the operating instructions, adjust only those controls that could result in performance, this CAMCORDER through openings as contact with them might be sure the service technician has used replacement parts specified by following conditions: a. When the...occur, unplug unit and have fallen into such power lines or circuits. f. Never spill liquids of any service or repairs to this CAMCORDER from the wall outlet and refer servicing to keep from touching such power lines or circuits as they may result in a risk of...
...not be taken to qualified service personnel under the following the operating instructions, adjust only those controls that could result in performance, this CAMCORDER through openings as contact with them might be sure the service technician has used replacement parts specified by following conditions: a. When the...occur, unplug unit and have fallen into such power lines or circuits. f. Never spill liquids of any service or repairs to this CAMCORDER from the wall outlet and refer servicing to keep from touching such power lines or circuits as they may result in a risk of...
User Manual (ENGLISH)
Page 6
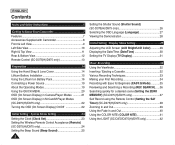
... Camcorder 7 Features 7 Accessories Supplied with Camcorder 8 Front & Left View 9 Left Side View 10 Right & Top View 11 Rear & Bottom View 12 Remote Control (SC-D375... Modes 21 OSD (On Screen Display) in M.Cam/M.Player Modes (SC-D375(H)/D975 only 22 Turning the OSD (On Screen Display) On/Off...Acceptance (Remote) (SC-D375(H)/D975 only 24 Setting the Beep Sound (Beep Sound 25 2 Setting the Shutter Sound (Shutter Sound) (SC-D375(H)/D975 only...Setting the ZERO MEMORY) (SC-D375(H)/D975 only 37 Self Record using the Remote Control (Setting the Self Timer) (SC-D375(H)/D975 only 38 Zooming ...
... Camcorder 7 Features 7 Accessories Supplied with Camcorder 8 Front & Left View 9 Left Side View 10 Right & Top View 11 Rear & Bottom View 12 Remote Control (SC-D375... Modes 21 OSD (On Screen Display) in M.Cam/M.Player Modes (SC-D375(H)/D975 only 22 Turning the OSD (On Screen Display) On/Off...Acceptance (Remote) (SC-D375(H)/D975 only 24 Setting the Beep Sound (Beep Sound 25 2 Setting the Shutter Sound (Shutter Sound) (SC-D375(H)/D975 only...Setting the ZERO MEMORY) (SC-D375(H)/D975 only 37 Self Record using the Remote Control (Setting the Self Timer) (SC-D375(H)/D975 only 38 Zooming ...


