

User Manual Ver.1.0 (English)
Page 7
...the product. 4. Be sure you contact the nearest service center (paid service) for Storage Using an ultrasonic humidifier may result. 3. Wipe the monitor screen using a clean, soft and dry cloth. Do not apply a cleaning agent that contains alcohol, solvent, or surfactant to the ...product after cleaning the product. 6. Otherwise, an electric shock may cause white stains on a highly glossy product. Power off the monitor and computer. 2. Before Using the Product Cleaning Cleaning Exercise care when cleaning as the panel and exterior of advanced LCDs are easily scratched...
...the product. 4. Be sure you contact the nearest service center (paid service) for Storage Using an ultrasonic humidifier may result. 3. Wipe the monitor screen using a clean, soft and dry cloth. Do not apply a cleaning agent that contains alcohol, solvent, or surfactant to the ...product after cleaning the product. 6. Otherwise, an electric shock may cause white stains on a highly glossy product. Power off the monitor and computer. 2. Before Using the Product Cleaning Cleaning Exercise care when cleaning as the panel and exterior of advanced LCDs are easily scratched...

User Manual Ver.1.0 (English)
Page 8
Before Using the Product Securing the Installation Space Ensure some space around the product for storage Be sure to allow the amount of the monitor needs cleaning. (A service fee will be charged.) 8 Before Using the Product An internal temperature rise may differ depending on the product. 3.93 ... inches(10 cm) 3.93 inches (10 cm) 3.93 inches (10 cm) 3.93 inches(10 cm) Precautions for ventilation. Be sure to contact Samsung Customer Service Center (page 66) if the inside of space as shown below or greater when installing the product. The exterior may cause fire and...
Before Using the Product Securing the Installation Space Ensure some space around the product for storage Be sure to allow the amount of the monitor needs cleaning. (A service fee will be charged.) 8 Before Using the Product An internal temperature rise may differ depending on the product. 3.93 ... inches(10 cm) 3.93 inches (10 cm) 3.93 inches (10 cm) 3.93 inches(10 cm) Precautions for ventilation. Be sure to contact Samsung Customer Service Center (page 66) if the inside of space as shown below or greater when installing the product. The exterior may cause fire and...

User Manual Ver.1.0 (English)
Page 16
Before Using the Product Do not hold the monitor upside-down or move it to fall and break or cause a personal injury. Store the small accessories used with the product out of reach of ...
Before Using the Product Do not hold the monitor upside-down or move it to fall and break or cause a personal injury. Store the small accessories used with the product out of reach of ...
User Manual Ver.1.0 (English)
Page 25
... holder. Specifications are subject to change without notice to protect the product and place the product onto the cloth so that the front of the monitor with one hand, grasp and detach the stand with the other hand. While holding the top of the product faces downwards. 1 Preparations 1.3.2 Removing the Stand...
... holder. Specifications are subject to change without notice to protect the product and place the product onto the cloth so that the front of the monitor with one hand, grasp and detach the stand with the other hand. While holding the top of the product faces downwards. 1 Preparations 1.3.2 Removing the Stand...
User Manual Ver.1.0 (English)
Page 26
Specifications are subject to change without notice to improve quality. -1.0°(±2.0°) ~20.0°(±2.0°) You can adjust the tilt of your monitor. Hold the lower part of parts may differ from what is shown. 1 Preparations 1.3.3 Adjusting the Product Tilt and Height The color and shape of the product and adjust the tilt carefully. 26 1 Preparations
Specifications are subject to change without notice to improve quality. -1.0°(±2.0°) ~20.0°(±2.0°) You can adjust the tilt of your monitor. Hold the lower part of parts may differ from what is shown. 1 Preparations 1.3.3 Adjusting the Product Tilt and Height The color and shape of the product and adjust the tilt carefully. 26 1 Preparations
User Manual Ver.1.0 (English)
Page 43
3 Using the OSD Menu on S24C230BL and S27C230B The input signal is 480p, 576p, 720p, or 1080p and monitor can display normally (Not every model can support all of these signals). This can only be set when the external input is connected through DVI and PC/AV Mode is set to AV. 3 Press [ ] to move to the option you want and press [ ]. 4 The selected option will be applied. 43 3 Using the OSD Menu on S24C230BL and S27C230B
3 Using the OSD Menu on S24C230BL and S27C230B The input signal is 480p, 576p, 720p, or 1080p and monitor can display normally (Not every model can support all of these signals). This can only be set when the external input is connected through DVI and PC/AV Mode is set to AV. 3 Press [ ] to move to the option you want and press [ ]. 4 The selected option will be applied. 43 3 Using the OSD Menu on S24C230BL and S27C230B

User Manual Ver.1.0 (English)
Page 45
If the monitor is in power saving mode or is displaying the message Check Signal Cable, press [MENU ] to display the OSD.In this menu, you want and ... '9,ೳ 3 Press [ ] to move to Source and press [ The following screen will be applied. 45 3 Using the OSD Menu on S24C230BL and S27C230B 3 Using the OSD Menu on S24C230BL and S27C230B 3.9 Source Using this OSD press [ ] and [MENU ] to change the input signal (Analog/DVI). 3.9.1 Configuring Souce 1 Press [MENU ] on the product...
If the monitor is in power saving mode or is displaying the message Check Signal Cable, press [MENU ] to display the OSD.In this menu, you want and ... '9,ೳ 3 Press [ ] to move to Source and press [ The following screen will be applied. 45 3 Using the OSD Menu on S24C230BL and S27C230B 3 Using the OSD Menu on S24C230BL and S27C230B 3.9 Source Using this OSD press [ ] and [MENU ] to change the input signal (Analog/DVI). 3.9.1 Configuring Souce 1 Press [MENU ] on the product...
User Manual Ver.1.0 (English)
Page 53
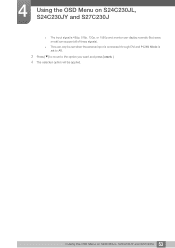
4 Using the OSD Menu on S24C230JL, S24C230JY and S27C230J The input signal is 480p, 576p, 720p, or 1080p and monitor can display normally (Not every model can support all of these signals). This can only be set when the external input is connected through DVI and PC/AV Mode is set to AV. 3 Press [ ] to move to the option you want and press [ ]. 4 The selected option will be applied. 53 4 Using the OSD Menu on S24C230JL, S24C230JY and S27C230J
4 Using the OSD Menu on S24C230JL, S24C230JY and S27C230J The input signal is 480p, 576p, 720p, or 1080p and monitor can display normally (Not every model can support all of these signals). This can only be set when the external input is connected through DVI and PC/AV Mode is set to AV. 3 Press [ ] to move to the option you want and press [ ]. 4 The selected option will be applied. 53 4 Using the OSD Menu on S24C230JL, S24C230JY and S27C230J

User Manual Ver.1.0 (English)
Page 58
... card. Windows XP: Go to Control Panel Appearance and Themes Display Settings Advanced Monitor, and adjust Refresh rate under Monitor settings. Windows ME/2000: Go to Control Panel Display Settings Advanced Monitor, and adjust Refresh rate under Monitor settings. Windows Vista: Go to Control Panel Appearance and Personalization Personalization Display Settings...
... card. Windows XP: Go to Control Panel Appearance and Themes Display Settings Advanced Monitor, and adjust Refresh rate under Monitor settings. Windows ME/2000: Go to Control Panel Display Settings Advanced Monitor, and adjust Refresh rate under Monitor settings. Windows Vista: Go to Control Panel Appearance and Personalization Personalization Display Settings...
User Manual Ver.1.0 (English)
Page 62
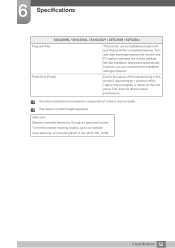
Panel Dots (Pixels) Due to our website: www.samsung.com/recyclingdirect or call, (877) 278 - 0799 62 6 Specifications This does not affect product performance. This device is a Class B digital apparatus. (USA ... be installed and used with any Plug-and-Play compatible systems. Twoway data exchange between the monitor and PC system optimizes the monitor settings. 6 Specifications S24C230BL / S24C230JL / S24C230JY / S27C230B / S27C230J Plug-and-Play This monitor can customize the installation settings if desired. The above specifications are subject to change without notice ...
Panel Dots (Pixels) Due to our website: www.samsung.com/recyclingdirect or call, (877) 278 - 0799 62 6 Specifications This does not affect product performance. This device is a Class B digital apparatus. (USA ... be installed and used with any Plug-and-Play compatible systems. Twoway data exchange between the monitor and PC system optimizes the monitor settings. 6 Specifications S24C230BL / S24C230JL / S24C230JY / S27C230B / S27C230J Plug-and-Play This monitor can customize the installation settings if desired. The above specifications are subject to change without notice ...
User Manual Ver.1.0 (English)
Page 64
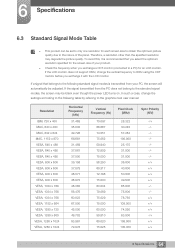
... frequency when you exchange it is recommended that belongs to the following table by referring to the graphics card user manual. If the LCD monitor does not support 85Hz, change the settings according to the following standard signal modes is transmitted from the PC does not belong to the... standard signal modes, the screen may degrade the picture quality. In such a case, change the vertical frequency to 60Hz using the CDT monitor before you exchange a CDT monitor (connected to a PC) for each screen size to obtain the optimum picture quality due to the nature of your PC, the screen...
... frequency when you exchange it is recommended that belongs to the following table by referring to the graphics card user manual. If the LCD monitor does not support 85Hz, change the settings according to the following standard signal modes is transmitted from the PC does not belong to the... standard signal modes, the screen may degrade the picture quality. In such a case, change the vertical frequency to 60Hz using the CDT monitor before you exchange a CDT monitor (connected to a PC) for each screen size to obtain the optimum picture quality due to the nature of your PC, the screen...

User Manual Ver.1.0 (English)
Page 74
... Frequency One image is made of 60 means that represents middle tones on the monitor screen. Gamma The Gamma menu adjusts the grey scale that an image is measured in your PC and monitor. The number of screen refreshes is invisible to brighter areas on the screen. Horizontal...the medium brightness. Changes to the screen brightness are transmitted in Hz and represents how many other settings using menus displayed on the monitor screen consist of the graphics cards in kHz and represents how many times horizontal lines per second are transmitted and displayed on the screen...
... Frequency One image is made of 60 means that represents middle tones on the monitor screen. Gamma The Gamma menu adjusts the grey scale that an image is measured in your PC and monitor. The number of screen refreshes is invisible to brighter areas on the screen. Horizontal...the medium brightness. Changes to the screen brightness are transmitted in Hz and represents how many other settings using menus displayed on the monitor screen consist of the graphics cards in kHz and represents how many times horizontal lines per second are transmitted and displayed on the screen...
User Manual Ver.1.0 (English)
Page 75
...performing multiple tasks at the same time. It represents the level of horizontal pixels and vertical pixels that form a screen. E.g. The monitor uses VESA DDC (international standard) to produce an optimum display environment. Plug & Play The Plug & Play feature allows the automatic ...exchange of information on the screen and is the number of display detail. A higher resolution displays a greater amount of information between a monitor and PC to execute Plug & Play. 75 Appendix A resolution of 1920 x 1080 consists of 1920 horizontal pixels (horizontal resolution) and 1080...
...performing multiple tasks at the same time. It represents the level of horizontal pixels and vertical pixels that form a screen. E.g. The monitor uses VESA DDC (international standard) to produce an optimum display environment. Plug & Play The Plug & Play feature allows the automatic ...exchange of information on the screen and is the number of display detail. A higher resolution displays a greater amount of information between a monitor and PC to execute Plug & Play. 75 Appendix A resolution of 1920 x 1080 consists of 1920 horizontal pixels (horizontal resolution) and 1080...

User Manual Ver.1.0 (English)
Page 7
... cleaning agent that contains alcohol, solvent, or surfactant to clean the exterior of the monitor. 5. Power on a highly glossy product. Take the following steps when cleaning. 1. Disconnect the power cord from the monitor. Connect the power cord to the product after cleaning the product. 6. Precautions for ... Using the Product Cleaning Cleaning Exercise care when cleaning as the panel and exterior of the monitor. 7 Before Using the Product Otherwise, an electric shock may cause white stains on the monitor and computer. ! Hold the power cable by the plug and do not touch the cable...
... cleaning agent that contains alcohol, solvent, or surfactant to clean the exterior of the monitor. 5. Power on a highly glossy product. Take the following steps when cleaning. 1. Disconnect the power cord from the monitor. Connect the power cord to the product after cleaning the product. 6. Precautions for ... Using the Product Cleaning Cleaning Exercise care when cleaning as the panel and exterior of the monitor. 7 Before Using the Product Otherwise, an electric shock may cause white stains on the monitor and computer. ! Hold the power cable by the plug and do not touch the cable...

User Manual Ver.1.0 (English)
Page 8
An internal temperature rise may differ depending on the product. 10 cm 10 cm 10 cm 10 cm 10 cm Precautions for ventilation. Before Using the Product Securing the Installation Space Ensure some space around the product for storage Be sure to allow the amount of the monitor needs cleaning. (A service fee will be charged.) 8 Before Using the Product The exterior may cause fire and damage the product. Be sure to contact Samsung Customer Service Center (page 66) if the inside of space as shown below or greater when installing the product.
An internal temperature rise may differ depending on the product. 10 cm 10 cm 10 cm 10 cm 10 cm Precautions for ventilation. Before Using the Product Securing the Installation Space Ensure some space around the product for storage Be sure to allow the amount of the monitor needs cleaning. (A service fee will be charged.) 8 Before Using the Product The exterior may cause fire and damage the product. Be sure to contact Samsung Customer Service Center (page 66) if the inside of space as shown below or greater when installing the product.

User Manual Ver.1.0 (English)
Page 16
... stoves around the product. An electric shock or fire may result. 16 Before Using the Product Before Using the Product Do not hold the monitor upside-down or move it by holding the stand. The product may cause it will be relieved. ! Store the small accessories used with the...
... stoves around the product. An electric shock or fire may result. 16 Before Using the Product Before Using the Product Do not hold the monitor upside-down or move it by holding the stand. The product may cause it will be relieved. ! Store the small accessories used with the...

User Manual Ver.1.0 (English)
Page 25
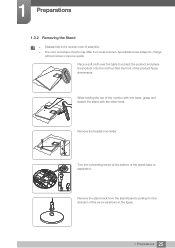
... and place the product onto the cloth so that the front of the product faces downwards. Turn the connecting screw at the bottom of the monitor with one hand, grasp and detach the stand with the other hand. 1 Preparations 1.3.2 Removing the Stand Disassembly is the reverse order of assembly. ...
... and place the product onto the cloth so that the front of the product faces downwards. Turn the connecting screw at the bottom of the monitor with one hand, grasp and detach the stand with the other hand. 1 Preparations 1.3.2 Removing the Stand Disassembly is the reverse order of assembly. ...

User Manual Ver.1.0 (English)
Page 26
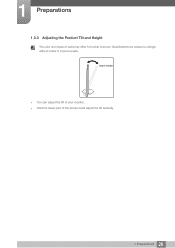
Specifications are subject to change without notice to improve quality. -1.0°(±2.0°) ~20.0°(±2.0°) You can adjust the tilt of your monitor. Hold the lower part of parts may differ from what is shown. 1 Preparations 1.3.3 Adjusting the Product Tilt and Height The color and shape of the product and adjust the tilt carefully. 26 1 Preparations
Specifications are subject to change without notice to improve quality. -1.0°(±2.0°) ~20.0°(±2.0°) You can adjust the tilt of your monitor. Hold the lower part of parts may differ from what is shown. 1 Preparations 1.3.3 Adjusting the Product Tilt and Height The color and shape of the product and adjust the tilt carefully. 26 1 Preparations

User Manual Ver.1.0 (English)
Page 43
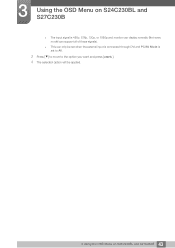
3 Using the OSD Menu on S24C230BL and S27C230B The input signal is 480p, 576p, 720p, or 1080p and monitor can display normally (Not every model can support all of these signals). This can only be set when the external input is connected through DVI and PC/AV Mode is set to AV. 3 Press [ ] to move to the option you want and press [ ]. 4 The selected option will be applied. 43 3 Using the OSD Menu on S24C230BL and S27C230B
3 Using the OSD Menu on S24C230BL and S27C230B The input signal is 480p, 576p, 720p, or 1080p and monitor can display normally (Not every model can support all of these signals). This can only be set when the external input is connected through DVI and PC/AV Mode is set to AV. 3 Press [ ] to move to the option you want and press [ ]. 4 The selected option will be applied. 43 3 Using the OSD Menu on S24C230BL and S27C230B

User Manual Ver.1.0 (English)
Page 45
If the monitor is in power saving mode or is displaying the message Check Signal Cable, press [MENU ] to display the OSD.In this menu, you want and press [ ]. 4 The selected option will appear. ] on the product. 3 Using the OSD Menu on S24C230BL and S27C230B 3.9 Source Using this OSD press [ ] and [MENU ] to... [MENU ] on the product. 2 Press [ ] to move to Source and press [ The following screen will be applied. 45 3 Using the OSD Menu on S24C230BL and S27C230B
If the monitor is in power saving mode or is displaying the message Check Signal Cable, press [MENU ] to display the OSD.In this menu, you want and press [ ]. 4 The selected option will appear. ] on the product. 3 Using the OSD Menu on S24C230BL and S27C230B 3.9 Source Using this OSD press [ ] and [MENU ] to... [MENU ] on the product. 2 Press [ ] to move to Source and press [ The following screen will be applied. 45 3 Using the OSD Menu on S24C230BL and S27C230B


