
User Manual Ver.1.0 (English)
Page 2
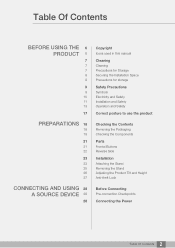
... Icons used in this manual Cleaning Cleaning Precautions for Storage Securing the Installation Space Precautions for storage Safety Precautions Symbols Electricity and Safety Installation and Safety Operation and Safety Correct posture to use the product Checking the Contents Removing the Packaging Checking the Components Parts Frontal Buttons Reverse Side Installation Attaching the Stand Removing the Stand Adjusting the Product Tilt and Height Anti-theft Lock Before Connecting Pre-connection Checkpoints Connecting the Power 2 Table...
... Icons used in this manual Cleaning Cleaning Precautions for Storage Securing the Installation Space Precautions for storage Safety Precautions Symbols Electricity and Safety Installation and Safety Operation and Safety Correct posture to use the product Checking the Contents Removing the Packaging Checking the Components Parts Frontal Buttons Reverse Side Installation Attaching the Stand Removing the Stand Adjusting the Product Tilt and Height Anti-theft Lock Before Connecting Pre-connection Checkpoints Connecting the Power 2 Table...

User Manual Ver.1.0 (English)
Page 9
...Using the Product Safety Precautions Caution RISK OF ELECTRIC SHOCK DO NOT OPEN Caution: TO REDUCE THE RISK OF ELECTRIC SHOCK, DO NOT REMOVE COVER (OR BACK). REFER ALL SERVICING TO QUALIFIED PERSONNEL. It is present inside. This symbol alerts you that high voltage is dangerous to properties may result if instructions...or fatal injury may result if instructions are not followed. Personal injury or damage to make any internal part of this symbol must be followed. 9 Before Using the Product Instructions marked by this product. THERE ARE NO USER SERVICEABLE PARTS INSIDE.
...Using the Product Safety Precautions Caution RISK OF ELECTRIC SHOCK DO NOT OPEN Caution: TO REDUCE THE RISK OF ELECTRIC SHOCK, DO NOT REMOVE COVER (OR BACK). REFER ALL SERVICING TO QUALIFIED PERSONNEL. It is present inside. This symbol alerts you that high voltage is dangerous to properties may result if instructions...or fatal injury may result if instructions are not followed. Personal injury or damage to make any internal part of this symbol must be followed. 9 Before Using the Product Instructions marked by this product. THERE ARE NO USER SERVICEABLE PARTS INSIDE.

User Manual Ver.1.0 (English)
Page 11
... installing the product in a narrow space with the power button. Before Using the Product Caution Do not unplug the power cord when the product is connected unobstructed. If any problem occurs in a place that cannot be completely cut off with bad ventilation, such as a bookshelf or wall closet. Otherwise, a fire may suffocate. 11 Before Using the Product Keep the power...
... installing the product in a narrow space with the power button. Before Using the Product Caution Do not unplug the power cord when the product is connected unobstructed. If any problem occurs in a place that cannot be completely cut off with bad ventilation, such as a bookshelf or wall closet. Otherwise, a fire may suffocate. 11 Before Using the Product Keep the power...
User Manual Ver.1.0 (English)
Page 19
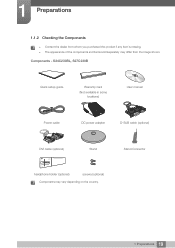
Components - S24C230BL, S27C230B Quick setup guide Warranty card (Not available in some locations) User manual Power cable DC power adapter D-SUB cable (optional) DVI cable (optional) Stand Stand Connector headphone holder (optional) screws (optional) Components may differ from the image shown. 1 Preparations 1.1.2 Checking the Components Contact the dealer from whom you purchased the product if any item is missing. The appearance of the components and items sold separately may vary depending on the country. 19 1 Preparations
Components - S24C230BL, S27C230B Quick setup guide Warranty card (Not available in some locations) User manual Power cable DC power adapter D-SUB cable (optional) DVI cable (optional) Stand Stand Connector headphone holder (optional) screws (optional) Components may differ from the image shown. 1 Preparations 1.1.2 Checking the Components Contact the dealer from whom you purchased the product if any item is missing. The appearance of the components and items sold separately may vary depending on the country. 19 1 Preparations
User Manual Ver.1.0 (English)
Page 20
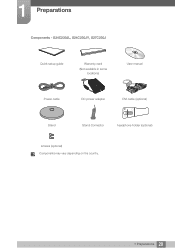
1 Preparations Components - S24C230JL, S24C230JY, S27C230J Quick setup guide Warranty card (Not available in some locations) User manual Power cable DC power adapter DVI cable (optional) Stand Stand Connector headphone holder (optional) screws (optional) Components may vary depending on the country. 20 1 Preparations
1 Preparations Components - S24C230JL, S24C230JY, S27C230J Quick setup guide Warranty card (Not available in some locations) User manual Power cable DC power adapter DVI cable (optional) Stand Stand Connector headphone holder (optional) screws (optional) Components may vary depending on the country. 20 1 Preparations

User Manual Ver.1.0 (English)
Page 21
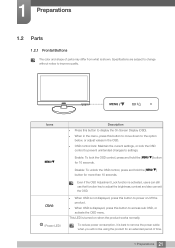
... unintended changes to improve quality. 1 Preparations 1.2 Parts 1.2.1 Frontal Buttons The color and shape of time. 21 1 Preparations Even if the OSD Adjustment Lock function is activated, users can still use that function key to adjust the brightness,contrast and also can exit the OSD. When OSD is not displayed, press this button to power on when the product works normally. Disable: To unlock the OSD control, press and hold the [MENU ] button for...
... unintended changes to improve quality. 1 Preparations 1.2 Parts 1.2.1 Frontal Buttons The color and shape of time. 21 1 Preparations Even if the OSD Adjustment Lock function is activated, users can still use that function key to adjust the brightness,contrast and also can exit the OSD. When OSD is not displayed, press this button to power on when the product works normally. Disable: To unlock the OSD control, press and hold the [MENU ] button for...

User Manual Ver.1.0 (English)
Page 31
... to Display Properties and check that the resolution and refresh rate are appropriate. 2 Connecting and Using a Source Device 2.3.3 Driver Installation You can set the optimum resolution and frequency for this product by installing the corresponding drivers. An installation driver is contained on the CD supplied with the product. If the file provided is faulty, visit the Samsung homepage (http://www.samsung.com/) and download the file. 1 Insert the user manual...
... to Display Properties and check that the resolution and refresh rate are appropriate. 2 Connecting and Using a Source Device 2.3.3 Driver Installation You can set the optimum resolution and frequency for this product by installing the corresponding drivers. An installation driver is contained on the CD supplied with the product. If the file provided is faulty, visit the Samsung homepage (http://www.samsung.com/) and download the file. 1 Insert the user manual...

User Manual Ver.1.0 (English)
Page 56
... Using a PC") Check that the device connected to the product is powered on . If the screen remains blank, check the PC system, video controller and cable. 5.1.2 Checking the Resolution and Frequency For a mode that the power cable is connected properly. (Refer to "6.3 Standard Signal Mode Table"), the message Not Optimum Mode will not switch on . 56 5 Troubleshooting Guide Check that exceeds the supported resolution (refer to "2.3 Connecting and Using a PC") The message Check Signal Cable appears. 5 Troubleshooting Guide 5.1 Requirements Before Contacting Samsung Customer Service...
... Using a PC") Check that the device connected to the product is powered on . If the screen remains blank, check the PC system, video controller and cable. 5.1.2 Checking the Resolution and Frequency For a mode that the power cable is connected properly. (Refer to "6.3 Standard Signal Mode Table"), the message Not Optimum Mode will not switch on . 56 5 Troubleshooting Guide Check that exceeds the supported resolution (refer to "2.3 Connecting and Using a PC") The message Check Signal Cable appears. 5 Troubleshooting Guide 5.1 Requirements Before Contacting Samsung Customer Service...

User Manual Ver.1.0 (English)
Page 57
... resolution or frequency for the PC are shadows or ghost images left on the screen. 5 Troubleshooting Guide Screen issue Not Optimum Mode is too bright. The screen is displayed. Check the cable connection to the product (Refer to "2.3 Connecting and Using a PC") Remove any key on the screen and the power LED blinks every 0.5 to Standard Signal Mode Table (page 64). Adjust Brightness (page 37, page 48) and Contrast (page 38, page 49). Source device issue A beeping sound...
... resolution or frequency for the PC are shadows or ghost images left on the screen. 5 Troubleshooting Guide Screen issue Not Optimum Mode is too bright. The screen is displayed. Check the cable connection to the product (Refer to "2.3 Connecting and Using a PC") Remove any key on the screen and the power LED blinks every 0.5 to Standard Signal Mode Table (page 64). Adjust Brightness (page 37, page 48) and Contrast (page 38, page 49). Source device issue A beeping sound...
User Manual Ver.1.0 (English)
Page 59
...Display Adjust Resolution, and adjust the resolution. Windows 8: Go to the user manual for your PC or graphics card for further instructions on the PC. Refer to Settings Control Panel Appearance and Personalization Display Adjust Resolution, and adjust the resolution. Windows XP: Set power-saving mode in Control Panel Appearance and Themes Display Screen Saver Settings or BIOS SETUP on the PC. Windows ME/2000: Set power-saving mode in Control Panel Display Screen Saver Settings or BIOS SETUP on the PC. Windows Vista: Set power-saving mode in Control Panel...
...Display Adjust Resolution, and adjust the resolution. Windows 8: Go to the user manual for your PC or graphics card for further instructions on the PC. Refer to Settings Control Panel Appearance and Personalization Display Adjust Resolution, and adjust the resolution. Windows XP: Set power-saving mode in Control Panel Appearance and Themes Display Screen Saver Settings or BIOS SETUP on the PC. Windows ME/2000: Set power-saving mode in Control Panel Display Screen Saver Settings or BIOS SETUP on the PC. Windows Vista: Set power-saving mode in Control Panel...
User Manual Ver.1.0 (English)
Page 64
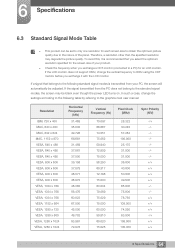
... standard signal modes, the screen may degrade the picture quality. In such a case, change the vertical frequency to 60Hz using the CDT monitor before you select the optimum resolution specified for the screen size of the panel. If the LCD monitor does not support 85Hz, change the settings according to the following standard signal modes is recommended that belongs to the following table by referring to the graphics card user manual. 6 Specifications 6.3 Standard Signal Mode Table...
... standard signal modes, the screen may degrade the picture quality. In such a case, change the vertical frequency to 60Hz using the CDT monitor before you select the optimum resolution specified for the screen size of the panel. If the LCD monitor does not support 85Hz, change the settings according to the following standard signal modes is recommended that belongs to the following table by referring to the graphics card user manual. 6 Specifications 6.3 Standard Signal Mode Table...

User Manual Ver.1.0 (English)
Page 74
... vertically to create an image. Gamma The Gamma menu adjusts the grey scale that represents middle tones on the screen. Adjusting the brightness brightens the whole screen, but adjusting Gamma only brightens the medium brightness. Scanning rate Scanning rate, or refresh rate, refers to the frequency of color change the screen brightness, tint, size and many times horizontal lines per second. The screen scanning rate depends on the performance of 60Hz means that make...
... vertically to create an image. Gamma The Gamma menu adjusts the grey scale that represents middle tones on the screen. Adjusting the brightness brightens the whole screen, but adjusting Gamma only brightens the medium brightness. Scanning rate Scanning rate, or refresh rate, refers to the frequency of color change the screen brightness, tint, size and many times horizontal lines per second. The screen scanning rate depends on the performance of 60Hz means that make...

User Manual Ver.1.0 (English)
Page 2
... Icons used in this manual Cleaning Cleaning Precautions for Storage Securing the Installation Space Precautions for storage Safety Precautions Symbols Electricity and Safety Installation and Safety Operation and Safety Correct posture to use the product Checking the Contents Removing the Packaging Checking the Components Parts Frontal Buttons Reverse Side Installation Attaching the Stand Removing the Stand Adjusting the Product Tilt and Height Anti-theft Lock Before Connecting Pre-connection Checkpoints Connecting the Power 2 Table...
... Icons used in this manual Cleaning Cleaning Precautions for Storage Securing the Installation Space Precautions for storage Safety Precautions Symbols Electricity and Safety Installation and Safety Operation and Safety Correct posture to use the product Checking the Contents Removing the Packaging Checking the Components Parts Frontal Buttons Reverse Side Installation Attaching the Stand Removing the Stand Adjusting the Product Tilt and Height Anti-theft Lock Before Connecting Pre-connection Checkpoints Connecting the Power 2 Table...
User Manual Ver.1.0 (English)
Page 11
... power cord when the product is connected unobstructed. If any problem occurs in a place that cannot be completely cut the power to the product. Avoid installing the product in use the power cord for the product in the product, unplug the power cable to an increased internal temperature. Keep the power socket where the power cord is in a narrow space with the power button. DO NOT INSTALL...
... power cord when the product is connected unobstructed. If any problem occurs in a place that cannot be completely cut the power to the product. Avoid installing the product in use the power cord for the product in the product, unplug the power cable to an increased internal temperature. Keep the power socket where the power cord is in a narrow space with the power button. DO NOT INSTALL...
User Manual Ver.1.0 (English)
Page 21
... 1.2 Parts 1.2.1 Frontal Buttons The color and shape of time. 21 1 Preparations Even if the OSD Adjustment Lock function is activated, users can still use that function key to adjust the brightness,contrast and also can exit the OSD. When OSD is displayed, press this button to move down to the option below, or adjust values in the menu, press this button to power on when the product works normally...
... 1.2 Parts 1.2.1 Frontal Buttons The color and shape of time. 21 1 Preparations Even if the OSD Adjustment Lock function is activated, users can still use that function key to adjust the brightness,contrast and also can exit the OSD. When OSD is displayed, press this button to move down to the option below, or adjust values in the menu, press this button to power on when the product works normally...
User Manual Ver.1.0 (English)
Page 31
... 2.3.3 Driver Installation You can set the optimum resolution and frequency for further details. 31 2 Connecting and Using a Source Device Refer to your Windows OS manual for this product by installing the corresponding drivers. An installation driver is contained on the CD supplied with the product. If the file provided is faulty, visit the Samsung homepage (http://www.samsung.com/) and download the file. 1 Insert the user manual...
... 2.3.3 Driver Installation You can set the optimum resolution and frequency for further details. 31 2 Connecting and Using a Source Device Refer to your Windows OS manual for this product by installing the corresponding drivers. An installation driver is contained on the CD supplied with the product. If the file provided is faulty, visit the Samsung homepage (http://www.samsung.com/) and download the file. 1 Insert the user manual...

User Manual Ver.1.0 (English)
Page 56
... Samsung Customer Service Center. Check if your product as follows. Installation issue (PC mode) The screen keeps switching on . The screen will appear for a short time. 5.1.3 Check the following. 5 Troubleshooting Guide 5.1 Requirements Before Contacting Samsung Customer Service Center 5.1.1 Testing the Product Before calling Samsung Customer Service Center, test your product is connected properly. (Refer to "2.3 Connecting and Using a PC") The message Check Signal Cable appears. If the screen is turned off and the power indicator blinks...
... Samsung Customer Service Center. Check if your product as follows. Installation issue (PC mode) The screen keeps switching on . The screen will appear for a short time. 5.1.3 Check the following. 5 Troubleshooting Guide 5.1 Requirements Before Contacting Samsung Customer Service Center 5.1.1 Testing the Product Before calling Samsung Customer Service Center, test your product is connected properly. (Refer to "2.3 Connecting and Using a PC") The message Check Signal Cable appears. If the screen is turned off and the power indicator blinks...

User Manual Ver.1.0 (English)
Page 59
...Display Adjust Resolution, and adjust the resolution. Windows 8: Go to the user manual for your PC or graphics card for further instructions on the PC. Refer to Settings Control Panel Appearance and Personalization Display Adjust Resolution, and adjust the resolution. Windows XP: Set power-saving mode in Control Panel Appearance and Themes Display Screen Saver Settings or BIOS SETUP on the PC. Windows ME/2000: Set power-saving mode in Control Panel Display Screen Saver Settings or BIOS SETUP on the PC. Windows Vista: Set power-saving mode in Control Panel...
...Display Adjust Resolution, and adjust the resolution. Windows 8: Go to the user manual for your PC or graphics card for further instructions on the PC. Refer to Settings Control Panel Appearance and Personalization Display Adjust Resolution, and adjust the resolution. Windows XP: Set power-saving mode in Control Panel Appearance and Themes Display Screen Saver Settings or BIOS SETUP on the PC. Windows ME/2000: Set power-saving mode in Control Panel Display Screen Saver Settings or BIOS SETUP on the PC. Windows Vista: Set power-saving mode in Control Panel...

User Manual Ver.1.0 (English)
Page 64
... power LED turns on. If the signal transmitted from the PC does not belong to 60Hz using the CDT monitor before you exchange it is transmitted from your product. Check the frequency when you exchange a CDT monitor (connected to the graphics card user manual. In such a case, change the vertical frequency to the standard signal modes, the screen may degrade the picture quality. To avoid this, it with the LCD monitor...
... power LED turns on. If the signal transmitted from the PC does not belong to 60Hz using the CDT monitor before you exchange it is transmitted from your product. Check the frequency when you exchange a CDT monitor (connected to the graphics card user manual. In such a case, change the vertical frequency to the standard signal modes, the screen may degrade the picture quality. To avoid this, it with the LCD monitor...

User Manual Ver.1.0 (English)
Page 74
... with black and white variation, and grey scale refers to brighter areas on the screen. A horizontal frequency of numerous horizontal lines. The vertical frequency is invisible to optimize the picture quality as it refreshes to display an image, although the refreshing is measured in 85kHz. Horizontal Frequency Characters or images displayed on the monitor screen consist of the graphics cards in kHz and represents how many other settings using menus displayed on the screen. Adjusting the brightness...
... with black and white variation, and grey scale refers to brighter areas on the screen. A horizontal frequency of numerous horizontal lines. The vertical frequency is invisible to optimize the picture quality as it refreshes to display an image, although the refreshing is measured in 85kHz. Horizontal Frequency Characters or images displayed on the monitor screen consist of the graphics cards in kHz and represents how many other settings using menus displayed on the screen. Adjusting the brightness...


