

User Manual Ver.1.0 (English)
Page 3
... Using an DVI-HDMI Cable (S22C350B / S23C350B / S23C350BL) Connection Using an HDMI Cable (S22C350H / S23C340H / S23C350H /S24C340HL / S24C350H / S24C350HL / S27C350H) Connection Using an HDMI-DVI Cable (S22C350H / S23C340H / S23C350H / S24C340HL / S24C350H / S24C350HL / S27C350H) Connecting to Headphones or Speakers (S22C350H / S23C340H / S23C350H / S24C340HL / S24C350H / S24C350HL / S27C350H) Tidying Up the Connected Cables Changing the sound settings on Windows Driver Installation Setting Optimum Resolution Changing the Resolution Using a PC Brightness Configuring Brightness Contrast...
... Using an DVI-HDMI Cable (S22C350B / S23C350B / S23C350BL) Connection Using an HDMI Cable (S22C350H / S23C340H / S23C350H /S24C340HL / S24C350H / S24C350HL / S27C350H) Connection Using an HDMI-DVI Cable (S22C350H / S23C340H / S23C350H / S24C340HL / S24C350H / S24C350HL / S27C350H) Connecting to Headphones or Speakers (S22C350H / S23C340H / S23C350H / S24C340HL / S24C350H / S24C350HL / S27C350H) Tidying Up the Connected Cables Changing the sound settings on Windows Driver Installation Setting Optimum Resolution Changing the Resolution Using a PC Brightness Configuring Brightness Contrast...
User Manual Ver.1.0 (English)
Page 13
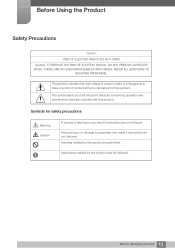
...part of contact with this symbol are prohibited. Personal injury or damage to make any kind of this symbol must be followed. 13 Before Using the Product Symbols for safety precautions Warning Caution A serious or fatal injury may result if instructions are not followed. Instructions... high voltage is dangerous to properties may result if instructions are not followed. Before Using the Product Safety Precautions Caution RISK OF ELECTRIC SHOCK DO NOT OPEN Caution: TO REDUCE THE RISK OF ELECTRIC SHOCK, DO NOT REMOVE COVER (OR BACK). THERE ARE NO USER SERVICEABLE PARTS INSIDE.
...part of contact with this symbol are prohibited. Personal injury or damage to make any kind of this symbol must be followed. 13 Before Using the Product Symbols for safety precautions Warning Caution A serious or fatal injury may result if instructions are not followed. Instructions... high voltage is dangerous to properties may result if instructions are not followed. Before Using the Product Safety Precautions Caution RISK OF ELECTRIC SHOCK DO NOT OPEN Caution: TO REDUCE THE RISK OF ELECTRIC SHOCK, DO NOT REMOVE COVER (OR BACK). THERE ARE NO USER SERVICEABLE PARTS INSIDE.

User Manual Ver.1.0 (English)
Page 15
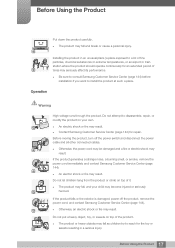
... as a bookshelf or wall closet. Hold the plug when disconnecting the power cord from the power socket. z Children may result due to the product. z Otherwise, a fire may suffocate. 15 Before Using the Product Avoid installing the product in use the power cord for the product in the product, unplug the power cable to the product cannot be reached by Samsung. ! Keep the plastic packaging...
... as a bookshelf or wall closet. Hold the plug when disconnecting the power cord from the power socket. z Children may result due to the product. z Otherwise, a fire may suffocate. 15 Before Using the Product Avoid installing the product in use the power cord for the product in the product, unplug the power cable to the product cannot be reached by Samsung. ! Keep the plastic packaging...
User Manual Ver.1.0 (English)
Page 17
... product falls or the exterior is damaged, power off the power switch and disconnect the power cable and all other connected cables. ! Installing the product in a serious injury. 17 Before Using the Product Operation Warning High voltage runs through the product. Before moving the product, turn off the product, remove the power cord, and contact Samsung Customer Service Center (page 144). If the product generates...
... product falls or the exterior is damaged, power off the power switch and disconnect the power cable and all other connected cables. ! Installing the product in a serious injury. 17 Before Using the Product Operation Warning High voltage runs through the product. Before moving the product, turn off the product, remove the power cord, and contact Samsung Customer Service Center (page 144). If the product generates...
User Manual Ver.1.0 (English)
Page 23
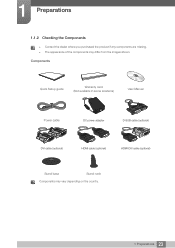
Components Quick Setup guide Warranty card (Not available In some locations) User Manual Power cable DC power adapter D-SUB cable (optional) DVI cable (optional) HDMI cable (optional) HDMI-DVI cable (optional) Stand base Stand neck Components may differ from the images shown. z The appearance of the components may vary depending on the country. 23 1 Preparations 1 Preparations 1.1.2 Checking the Components z Contact the dealer where you purchased the product if any components are missing.
Components Quick Setup guide Warranty card (Not available In some locations) User Manual Power cable DC power adapter D-SUB cable (optional) DVI cable (optional) HDMI cable (optional) HDMI-DVI cable (optional) Stand base Stand neck Components may differ from the images shown. z The appearance of the components may vary depending on the country. 23 1 Preparations 1 Preparations 1.1.2 Checking the Components z Contact the dealer where you purchased the product if any components are missing.
User Manual Ver.1.0 (English)
Page 27
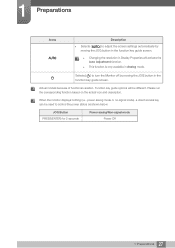
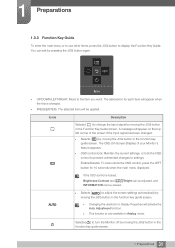
...) for 2 seconds Power saving/Non-signal mode Power Off 27 1 Preparations Please run the corresponding function based on the actual icon and description. When the monitor displays nothing (i.e., power saving mode or no-signal mode), a direct access key can be different. z This function is only available in Display Properties will be used to turn the Monitor off by moving the JOG button in the function key guide screen. z Changing the resolution in Analog mode.
...) for 2 seconds Power saving/Non-signal mode Power Off 27 1 Preparations Please run the corresponding function based on the actual icon and description. When the monitor displays nothing (i.e., power saving mode or no-signal mode), a direct access key can be different. z This function is only available in Display Properties will be used to turn the Monitor off by moving the JOG button in the function key guide screen. z Changing the resolution in Analog mode.
User Manual Ver.1.0 (English)
Page 31
... of your Monitor's feature appears. Selects [ ] to change the input signal by moving the JOG button in the function key guide screen. The description for 10 seconds when the main menu displayed. z PRESS(ENTER): The selected item will activate the Auto Adjustment function. z This function is locked, Brightness/Contrast and SAMSUNG MAGIC Bright can be adjusted, and INFORMATION can exit by moving the JOG button in Display Properties will...
... of your Monitor's feature appears. Selects [ ] to change the input signal by moving the JOG button in the function key guide screen. The description for 10 seconds when the main menu displayed. z PRESS(ENTER): The selected item will activate the Auto Adjustment function. z This function is locked, Brightness/Contrast and SAMSUNG MAGIC Bright can be adjusted, and INFORMATION can exit by moving the JOG button in Display Properties will...
User Manual Ver.1.0 (English)
Page 40
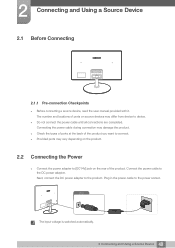
z Check the types of ports at the back of the product. Plug in the power cable to the product. DC14V DVI IN RGB IN DC14V The input voltage is switched automatically. 40 2 Connecting and Using a Source Device 2 Connecting and Using a Source Device 2.1 Before Connecting DDCC1144VV DDVIVINI IN RRGGBB ININ 2.1.1 Pre-connection Checkpoints z Before connecting a source device, read the user manual provided with it. Next, connect the DC power adapter to the power socket. Connect the power cable to device...
z Check the types of ports at the back of the product. Plug in the power cable to the product. DC14V DVI IN RGB IN DC14V The input voltage is switched automatically. 40 2 Connecting and Using a Source Device 2 Connecting and Using a Source Device 2.1 Before Connecting DDCC1144VV DDVIVINI IN RRGGBB ININ 2.1.1 Pre-connection Checkpoints z Before connecting a source device, read the user manual provided with it. Next, connect the DC power adapter to the power socket. Connect the power cable to device...
User Manual Ver.1.0 (English)
Page 43
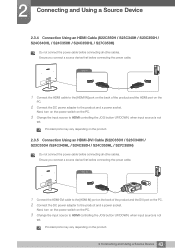
... HDMI controlling the JOG button UP/DOWN, when input source is not set . Next, turn on the power switch on the PC. 2 Connect the DC power adapter to the [HDMI IN] port on the back of the product and the HDMI port on the product. 43 2 Connecting and Using a Source Device Ensure you connect a source device first before connecting the power cable. Ensure you connect a source device first before connecting all other cables. DC14V HDMI IN RGB IN HDMI IN 1 Connect the HDMI-DVI cable...
... HDMI controlling the JOG button UP/DOWN, when input source is not set . Next, turn on the power switch on the PC. 2 Connect the DC power adapter to the [HDMI IN] port on the back of the product and the HDMI port on the product. 43 2 Connecting and Using a Source Device Ensure you connect a source device first before connecting the power cable. Ensure you connect a source device first before connecting all other cables. DC14V HDMI IN RGB IN HDMI IN 1 Connect the HDMI-DVI cable...
User Manual Ver.1.0 (English)
Page 46
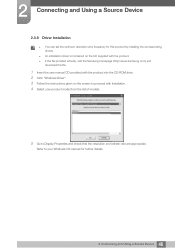
... screen to Display Properties and check that the resolution and refresh rate are appropriate. z An installation driver is faulty, visit the Samsung homepage (http://www.samsung.com) and download the file. 1 Insert the user manual CD provided with the product into the CD-ROM drive. 2 Click "Windows Driver". 3 Follow the instructions given on the CD supplied with installation. 4 Select your Windows OS manual for this product by installing the corresponding drivers. 2 Connecting and Using a Source...
... screen to Display Properties and check that the resolution and refresh rate are appropriate. z An installation driver is faulty, visit the Samsung homepage (http://www.samsung.com) and download the file. 1 Insert the user manual CD provided with the product into the CD-ROM drive. 2 Click "Windows Driver". 3 Follow the instructions given on the CD supplied with installation. 4 Select your Windows OS manual for this product by installing the corresponding drivers. 2 Connecting and Using a Source...
User Manual Ver.1.0 (English)
Page 52
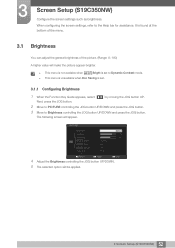
... JOG button. 3 Move to Brightness controlling the JOG button UP/DOWN and press the JOG button. PICTURE Brightness Contrast Sharpness SAMSUNG MAGIC Bright SAMSUNG MAGIC Angle SAMSUNG MAGIC Upscale Image Size Custom Off Off Wide Return Adjust Enter 4 Adjust the Brightness controlling the JOG button UP/DOWN. 5 The selected option will appear. 3 Screen Setup (S19C350NW) Configure the screen settings such as brightness. The following screen will be applied. 52 3 Screen Setup (S19C350NW) z This menu is unavailable when Eco Saving is...
... JOG button. 3 Move to Brightness controlling the JOG button UP/DOWN and press the JOG button. PICTURE Brightness Contrast Sharpness SAMSUNG MAGIC Bright SAMSUNG MAGIC Angle SAMSUNG MAGIC Upscale Image Size Custom Off Off Wide Return Adjust Enter 4 Adjust the Brightness controlling the JOG button UP/DOWN. 5 The selected option will appear. 3 Screen Setup (S19C350NW) Configure the screen settings such as brightness. The following screen will be applied. 52 3 Screen Setup (S19C350NW) z This menu is unavailable when Eco Saving is...
User Manual Ver.1.0 (English)
Page 76
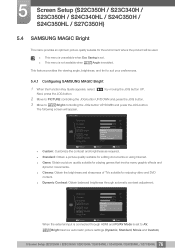
... Custom) 76 5 Screen Setup (S22C350H / S23C340H / S23C350H / S24C340HL / S24C350H / S24C350HL / S27C350H) z Dynamic Contrast: Obtain balanced brightness through HDMI and PC/AV Mode is set . z This menu is unavailable when Eco Saving is enabled. PICTURE Brightness Contrast Sharpness SAMSUNG MAGIC Bright SAMSUNG MAGIC Angle SAMSUNG MAGIC Upscale Image Size DCyunsatmomic Standard Movie Custom Wide Return Move Enter When the external input is connected through automatic contrast adjustment. The following screen will be used. z Game: Obtain a picture quality suitable...
... Custom) 76 5 Screen Setup (S22C350H / S23C340H / S23C350H / S24C340HL / S24C350H / S24C350HL / S27C350H) z Dynamic Contrast: Obtain balanced brightness through HDMI and PC/AV Mode is set . z This menu is unavailable when Eco Saving is enabled. PICTURE Brightness Contrast Sharpness SAMSUNG MAGIC Bright SAMSUNG MAGIC Angle SAMSUNG MAGIC Upscale Image Size DCyunsatmomic Standard Movie Custom Wide Return Move Enter When the external input is connected through automatic contrast adjustment. The following screen will be used. z Game: Obtain a picture quality suitable...
User Manual Ver.1.0 (English)
Page 82
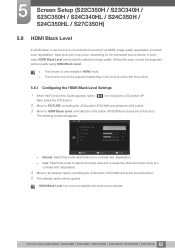
... adjust the image quality. z The function may occur, depending on the ports provided with some source devices. 82 5 Screen Setup (S22C350H / S23C340H / S23C350H / S24C340HL / S24C350H / S24C350HL / S27C350H) PICTURE HDMI Black Level H-Position V-Position Coarse Fine Normal Low 50 1936 0 Return Move Enter z Normal: Select this is the case, correct the degraded picture quality using HDMI Black Level. In such case, HDMI Black Level can be supported depending on the connected source...
... adjust the image quality. z The function may occur, depending on the ports provided with some source devices. 82 5 Screen Setup (S22C350H / S23C340H / S23C350H / S24C340HL / S24C350H / S24C350HL / S27C350H) PICTURE HDMI Black Level H-Position V-Position Coarse Fine Normal Low 50 1936 0 Return Move Enter z Normal: Select this is the case, correct the degraded picture quality using HDMI Black Level. In such case, HDMI Black Level can be supported depending on the connected source...
User Manual Ver.1.0 (English)
Page 89
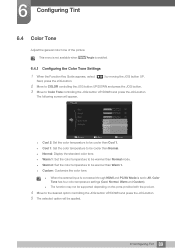
... be applied. 89 6 Configuring Tint z When the external input is connected through HDMI and PC/AV Mode is enabled. 6.4.1 Configuring the Color Tone Settings 1 When the Function Key Guide appears, select [ ] by moving the JOG button UP. This menu is not available when SAMSUNG MAGIC Angle is set to be warmer than Warm 1. COLOR Red Green Blue Color Tone Gamma 50 50 50 Cool 2 Cool 1 Normal...
... be applied. 89 6 Configuring Tint z When the external input is connected through HDMI and PC/AV Mode is enabled. 6.4.1 Configuring the Color Tone Settings 1 When the Function Key Guide appears, select [ ] by moving the JOG button UP. This menu is not available when SAMSUNG MAGIC Angle is set to be warmer than Warm 1. COLOR Red Green Blue Color Tone Gamma 50 50 50 Cool 2 Cool 1 Normal...
User Manual Ver.1.0 (English)
Page 117
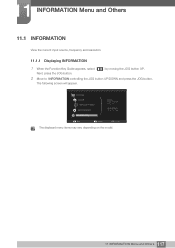
Next, press the JOG button. 2 Move to INFORMATION controlling the JOG button UP/DOWN and press the JOG button. 11 INFORMATION Menu and Others 11.1 INFORMATION View the current input source, frequency and resolution. 11.1.1 Displaying INFORMATION 1 When the Function Key Guide appears, select [ ] by moving the JOG button UP. The following screen will appear. PICTURE COLOR MENU SETTINGS SETUP&RESET INFORMATION Analog **kHz **Hz NP **** x **** Optimal Mode **** x **** **Hz Exit Move Enter The displayed menu items may vary depending on the model. 117 11 INFORMATION Menu and Others
Next, press the JOG button. 2 Move to INFORMATION controlling the JOG button UP/DOWN and press the JOG button. 11 INFORMATION Menu and Others 11.1 INFORMATION View the current input source, frequency and resolution. 11.1.1 Displaying INFORMATION 1 When the Function Key Guide appears, select [ ] by moving the JOG button UP. The following screen will appear. PICTURE COLOR MENU SETTINGS SETUP&RESET INFORMATION Analog **kHz **Hz NP **** x **** Optimal Mode **** x **** **Hz Exit Move Enter The displayed menu items may vary depending on the model. 117 11 INFORMATION Menu and Others

User Manual Ver.1.0 (English)
Page 124
...-diagnosis test. 1 Power off . If the screen is turned off and the power indicator blinks even though the product is working normally. Screen issue Check that exceeds the supported resolution (refer to "2.3 Connecting and Using a PC") The screen cannot be switched on . If the problem persists, contact Samsung Customer Service Center. Check the cable connection between the product and PC, and ensure the connectors are locked. (Refer to "14.7 Standard Signal Mode Table"), the...
...-diagnosis test. 1 Power off . If the screen is turned off and the power indicator blinks even though the product is working normally. Screen issue Check that exceeds the supported resolution (refer to "2.3 Connecting and Using a PC") The screen cannot be switched on . If the problem persists, contact Samsung Customer Service Center. Check the cable connection between the product and PC, and ensure the connectors are locked. (Refer to "14.7 Standard Signal Mode Table"), the...

User Manual Ver.1.0 (English)
Page 125
... signal from the graphics card exceeds the maximum resolution or frequency for the PC are shadows or ghost images left on the screen and the power LED blinks every 0.5 to " Configuring Tint") White does not really look distorted. The screen is blurry. Next, if required, change the settings, referring to normal operating mode. 125 13 Troubleshooting Guide Screen color is no image on the screen. distorted. (Refer to 1 second. The screen...
... signal from the graphics card exceeds the maximum resolution or frequency for the PC are shadows or ghost images left on the screen and the power LED blinks every 0.5 to " Configuring Tint") White does not really look distorted. The screen is blurry. Next, if required, change the settings, referring to normal operating mode. 125 13 Troubleshooting Guide Screen color is no image on the screen. distorted. (Refer to 1 second. The screen...
User Manual Ver.1.0 (English)
Page 128
... do I change the resolution? z Windows ME/2000: Go to Settings Control Panel Appearance and Personalization Display Adjust Resolution, and adjust the resolution. z Windows 8: Go to Control Panel Display Settings, and adjust the resolution. z Windows XP: Set power-saving mode in Control Panel Display Screen Saver Settings or BIOS SETUP on the PC. z Windows Vista: Go to the user manual for your PC or graphics card for further instructions on the PC. z Windows ME/2000: Set power-saving mode in Control Panel Appearance and Themes Display Screen Saver Settings or BIOS SETUP on the...
... do I change the resolution? z Windows ME/2000: Go to Settings Control Panel Appearance and Personalization Display Adjust Resolution, and adjust the resolution. z Windows 8: Go to Control Panel Display Settings, and adjust the resolution. z Windows XP: Set power-saving mode in Control Panel Display Screen Saver Settings or BIOS SETUP on the PC. z Windows Vista: Go to the user manual for your PC or graphics card for further instructions on the PC. z Windows ME/2000: Set power-saving mode in Control Panel Appearance and Themes Display Screen Saver Settings or BIOS SETUP on the...
User Manual Ver.1.0 (English)
Page 141
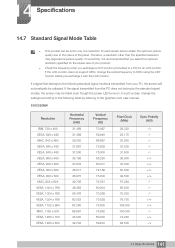
... Sync Polarity (H/V) 141 14 Specifications To avoid this, it with the LCD monitor. Therefore, a resolution other than the specified resolution may be adjusted. z Check the frequency when you exchange a CDT monitor (connected to the graphics card user manual. If a signal that belongs to the following table by referring to a PC) for an LCD monitor. 14 Specifications 14.7 Standard Signal Mode Table z This product can be set to only one resolution for each screen size...
... Sync Polarity (H/V) 141 14 Specifications To avoid this, it with the LCD monitor. Therefore, a resolution other than the specified resolution may be adjusted. z Check the frequency when you exchange a CDT monitor (connected to the graphics card user manual. If a signal that belongs to the following table by referring to a PC) for an LCD monitor. 14 Specifications 14.7 Standard Signal Mode Table z This product can be set to only one resolution for each screen size...

User Manual Ver.1.0 (English)
Page 153
... variations of screen refreshes. Horizontal Frequency Characters or images displayed on the monitor screen consist of 60Hz means that the screen refreshes 60 times per second. A scanning rate of numerous dots (pixels). The horizontal frequency is measured in kHz and represents how many other settings using menus displayed on the screen. The vertical frequency is measured in Hz and represents how many images can change the screen brightness, tint, size and many times horizontal lines per...
... variations of screen refreshes. Horizontal Frequency Characters or images displayed on the monitor screen consist of 60Hz means that the screen refreshes 60 times per second. A scanning rate of numerous dots (pixels). The horizontal frequency is measured in kHz and represents how many other settings using menus displayed on the screen. The vertical frequency is measured in Hz and represents how many images can change the screen brightness, tint, size and many times horizontal lines per...


