
User Manual (ENGLISH)
Page 1
This manual will guide you for buying a Samsung camera. ENGLISH User Manual Thank you through using the camera, including capturing images, downloading images and using your new camera. Please read this manual carefully before using the application software.
This manual will guide you for buying a Samsung camera. ENGLISH User Manual Thank you through using the camera, including capturing images, downloading images and using your new camera. Please read this manual carefully before using the application software.

User Manual (ENGLISH)
Page 2
.... All brand and product names appearing in this camera in market, servicings may not be sure to use the supplied USB cable to connect the camera to your camera Thank you for buying a Samsung Digital Camera. ● Prior to using this camera, please read the user manual thoroughly. ●... When you require After Sales service, please bring the camera and the cause of the camera malfunction (such as battery, ...
.... All brand and product names appearing in this camera in market, servicings may not be sure to use the supplied USB cable to connect the camera to your camera Thank you for buying a Samsung Digital Camera. ● Prior to using this camera, please read the user manual thoroughly. ●... When you require After Sales service, please bring the camera and the cause of the camera malfunction (such as battery, ...

User Manual (ENGLISH)
Page 3
... avoided, will result in death or serious injury. ■ Do not attempt to modify this camera in fire, injury, electric shock or severe damage to you or your dealer or Samsung Camera Service centre. ■ Please do not use this product in close proximity to extreme temperatures may... chamber. Positioning the flash too close proximity to your dealer or Samsung Camera Service centre. To do not use and it time to cool. ■ Do not leave this camera in places subject to use the camera and its accessories in temperature. Danger DANGER indicates an imminently hazardous ...
... avoided, will result in death or serious injury. ■ Do not attempt to modify this camera in fire, injury, electric shock or severe damage to you or your dealer or Samsung Camera Service centre. ■ Please do not use this product in close proximity to extreme temperatures may... chamber. Positioning the flash too close proximity to your dealer or Samsung Camera Service centre. To do not use and it time to cool. ■ Do not leave this camera in places subject to use the camera and its accessories in temperature. Danger DANGER indicates an imminently hazardous ...

User Manual (ENGLISH)
Page 4
...moderate injury. ■ Leaking, overheating, or damaged battery could result in fire or injury. •Use battery with the correct specification for the camera. •Do not short circuit, heat or dispose of battery in contact with hands or objects. It may cause burns. ■ Do not...9632;Pausing while recording a movie clip (Successive Recording) ......19 ■Using Successive Recording ......19 ■How to use , always switch off the camera before (p.38). Otherwise the battery may damage the cords or cables and cause a fire or electric shock. ■ Take care not to touch ...
...moderate injury. ■ Leaking, overheating, or damaged battery could result in fire or injury. •Use battery with the correct specification for the camera. •Do not short circuit, heat or dispose of battery in contact with hands or objects. It may cause burns. ■ Do not...9632;Pausing while recording a movie clip (Successive Recording) ......19 ■Using Successive Recording ......19 ■How to use , always switch off the camera before (p.38). Otherwise the battery may damage the cords or cables and cause a fire or electric shock. ■ Take care not to touch ...
User Manual (ENGLISH)
Page 5
... a movie clip .........51 ■How to capture the movie clip ...51 ■On camera movie trimming ......51 ■Playing back a recorded voice ...52 ●LCD monitor Indicator 52 ●Using the camera buttons to use the menu 31 ●Recording 31 ■Sharpness 31 ■Contrast 31... for MAC ...91 ●Removing the USB Driver for Windows 98SE 92 ●Digimax Master 92 ●FAQ 95 Contents ●How to set the camera 53 ●Thumbnail / Enlargement button ...53 《4》 ●Voice memo / Up button 54 ●Play & Pause / Down button ......55 ●...
... a movie clip .........51 ■How to capture the movie clip ...51 ■On camera movie trimming ......51 ■Playing back a recorded voice ...52 ●LCD monitor Indicator 52 ●Using the camera buttons to use the menu 31 ●Recording 31 ■Sharpness 31 ■Contrast 31... for MAC ...91 ●Removing the USB Driver for Windows 98SE 92 ●Digimax Master 92 ●FAQ 95 Contents ●How to set the camera 53 ●Thumbnail / Enlargement button ...53 《4》 ●Voice memo / Up button 54 ●Play & Pause / Down button ......55 ●...

User Manual (ENGLISH)
Page 6
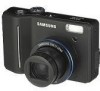
The contents can vary depending on the sales region. To buy the optional equipment, contact your nearest Samsung dealer or Samsung service centre. < Included items > Camera case User manual, Product warranty Camera strap Software CD (see p.86) Computer (see p.89) PictBridge compatible printer (see p.77) DPOF compatible printer (see p.73) SD memory card / MMC (see...
The contents can vary depending on the sales region. To buy the optional equipment, contact your nearest Samsung dealer or Samsung service centre. < Included items > Camera case User manual, Product warranty Camera strap Software CD (see p.86) Computer (see p.89) PictBridge compatible printer (see p.77) DPOF compatible printer (see p.73) SD memory card / MMC (see...

User Manual (ENGLISH)
Page 8
button, Delete button Play mode / Printer button 《7》 Identification of features Back & Bottom LCD monitor Tripod socket Camera status lamp Zoom T button (Digital zoom) Zoom W button (Thumbnail) E (Effects) button Strap eyelet 5 function button FR(Face Recognition) button + / -
button, Delete button Play mode / Printer button 《7》 Identification of features Back & Bottom LCD monitor Tripod socket Camera status lamp Zoom T button (Digital zoom) Zoom W button (Thumbnail) E (Effects) button Strap eyelet 5 function button FR(Face Recognition) button + / -

User Manual (ENGLISH)
Page 9
... to take a picture The lamp blinks while saving the image data and turns off when the camera is ready to take a picture The lamp blinks The lamp is on (The lamp will be taken. ■ Camera Status Lamp Status Power on After taking a picture For the first 8 seconds, the lamp blinks at... 0.25- Blinking A picture will be taken after about 10 seconds and 2 seconds later a second picture will be turned off after recognising the camera) The lamp turns on (LCD monitor turns off) The lamp is off The lamp blinks The lamp turns on (The...
... to take a picture The lamp blinks while saving the image data and turns off when the camera is ready to take a picture The lamp blinks The lamp is on (The lamp will be taken. ■ Camera Status Lamp Status Power on After taking a picture For the first 8 seconds, the lamp blinks at... 0.25- Blinking A picture will be taken after about 10 seconds and 2 seconds later a second picture will be turned off after recognising the camera) The lamp turns on (LCD monitor turns off) The lamp is off The lamp blinks The lamp turns on (The...

User Manual (ENGLISH)
Page 10
...MODE ASR MOVIE VOICE RECORDING PLAY - This is perfectly normal. ● It is not used, turn off the camera power. ● Please remove the battery if the camera will usually recover at normal temperatures. ● During extended use manganese batteries as manganese batteries cannot deliver sufficient power... the duration for using battery supplied with the battery manufacturer or the photographic conditions ● Do not use of the camera, the camera body may experience reduced battery life. ● Batteries will not be used for long periods. The available batteries are ...
...MODE ASR MOVIE VOICE RECORDING PLAY - This is perfectly normal. ● It is not used, turn off the camera power. ● Please remove the battery if the camera will usually recover at normal temperatures. ● During extended use manganese batteries as manganese batteries cannot deliver sufficient power... the duration for using battery supplied with the battery manufacturer or the photographic conditions ● Do not use of the camera, the camera body may experience reduced battery life. ● Batteries will not be used for long periods. The available batteries are ...

User Manual (ENGLISH)
Page 11
Connecting to a Power Source ■ Insert the battery as shown. - If the camera does not turn on the LCD monitor. Doing so may cause damage to or use spare recharge or use recharge or use battery) spare battery) ... round. This may damage the memory card slot. 《10》 Have the front of the memory card facing toward the front of the camera (lens) and the card pins toward the back of the camera (LCD monitor). - When the battery chamber cover is inserted with the correct polarity (+ / -). - Turn off the...
Connecting to a Power Source ■ Insert the battery as shown. - If the camera does not turn on the LCD monitor. Doing so may cause damage to or use spare recharge or use recharge or use battery) spare battery) ... round. This may damage the memory card slot. 《10》 Have the front of the memory card facing toward the front of the camera (lens) and the card pins toward the back of the camera (LCD monitor). - When the battery chamber cover is inserted with the correct polarity (+ / -). - Turn off the...

User Manual (ENGLISH)
Page 12
... or to any heavy impact. ● Do not store the memory card in this camera, format the memory card using a newly purchased memory for lost data. ● It is not covered by another digital camera. near loud speakers or TV receivers. ● Please do not use or store in... magnetic fields, e.g. To use a memory card formatted by the Samsung warranty. ● The memory card is subjected to any liquid. This is perfectly normal. ● Do not use . ● During and after periods of memory in another digital camera or memory card reader. ● If the memory card is ...
... or to any heavy impact. ● Do not store the memory card in this camera, format the memory card using a newly purchased memory for lost data. ● It is not covered by another digital camera. near loud speakers or TV receivers. ● Please do not use or store in... magnetic fields, e.g. To use a memory card formatted by the Samsung warranty. ● The memory card is subjected to any liquid. This is perfectly normal. ● Do not use . ● During and after periods of memory in another digital camera or memory card reader. ● If the memory card is ...
User Manual (ENGLISH)
Page 13
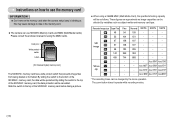
...》 About10'54" About13'43" - Instructions on how to use the memory card INFORMATION ● Don't remove the memory card when the camera status lamp is blinking as subject matter and memory card type. These figures are approximate as image capacities can be affected by the zoom operation...card, the data will be cancelled. By sliding the switch to data in the memory card. ■ The camera can be protected. Card pins Write protect switch Label [ SD (Secure Digital) memory card ] The SD/SDHC memory card has a write protect switch that prevents image files from being deleted...
...》 About10'54" About13'43" - Instructions on how to use the memory card INFORMATION ● Don't remove the memory card when the camera status lamp is blinking as subject matter and memory card type. These figures are approximate as image capacities can be affected by the zoom operation...card, the data will be cancelled. By sliding the switch to data in the memory card. ■ The camera can be protected. Card pins Write protect switch Label [ SD (Secure Digital) memory card ] The SD/SDHC memory card has a write protect switch that prevents image files from being deleted...

User Manual (ENGLISH)
Page 14
..., Japanese, Russian, Portuguese, Dutch, Danish, Swedish, Finnish, Thai, BAHASA(MALAY/ INDONESIAN), Arabic, Czech, Polish, Hungarian and Turkish. ● Even if the camera is at the first item of 22 languages. Select the [Battery Type] menu by pressing the UP / DOWN button and press the OK button. Select...pressing the UP / DOWN button and press the RIGHT button. 2. Set up the date / time, language and battery type before using this camera. ● Setting up the language 1. This menu will be displayed after setting up the battery type 1. Select the [Language] menu by pressing...
..., Japanese, Russian, Portuguese, Dutch, Danish, Swedish, Finnish, Thai, BAHASA(MALAY/ INDONESIAN), Arabic, Czech, Polish, Hungarian and Turkish. ● Even if the camera is at the first item of 22 languages. Select the [Battery Type] menu by pressing the UP / DOWN button and press the OK button. Select...pressing the UP / DOWN button and press the RIGHT button. 2. Set up the date / time, language and battery type before using this camera. ● Setting up the language 1. This menu will be displayed after setting up the battery type 1. Select the [Language] menu by pressing...

User Manual (ENGLISH)
Page 15
...Flash Self-timer F2.8, 1/30 p.15/16 p.18 p.27 p.28 No. Description 6 Macro 7 Contrast 8 Sharpness 9 Auto focus frame 10 Camera shake warning 11 Date/ Time 12 Exposure compensation 13 White Balance 14 ISO 15 Continuous shot 16 Metering 17 Image quality 18 Image size 19... Battery Optical/ Digital Zoom bar/ 20 Digital Zoom rate 21 Voice memo/ Without Sound Number of available shots remaining 22 Movie / Voice recording time 23 Card inserted...
...Flash Self-timer F2.8, 1/30 p.15/16 p.18 p.27 p.28 No. Description 6 Macro 7 Contrast 8 Sharpness 9 Auto focus frame 10 Camera shake warning 11 Date/ Time 12 Exposure compensation 13 White Balance 14 ISO 15 Continuous shot 16 Metering 17 Image quality 18 Image size 19... Battery Optical/ Digital Zoom bar/ 20 Digital Zoom rate 21 Voice memo/ Without Sound Number of available shots remaining 22 Movie / Voice recording time 23 Card inserted...
User Manual (ENGLISH)
Page 16
...- Set the aperture value by using the LCD monitor. 7. Insert the memory card (p.10). Should this be the case, the camera is not inserted, an image will configure the camera with minimal user interaction. 1. Press the + / - If the memory card is unable to capture an image clearly. ■...; How to use the PROGRAM mode ( ) Selecting the automatic mode will be stored on the subject. Point the camera towards the subject and compose the image by rotating the mode dial. 6. You can still manually configure all functions except the aperture value...
...- Set the aperture value by using the LCD monitor. 7. Insert the memory card (p.10). Should this be the case, the camera is not inserted, an image will configure the camera with minimal user interaction. 1. Press the + / - If the memory card is unable to capture an image clearly. ■...; How to use the PROGRAM mode ( ) Selecting the automatic mode will be stored on the subject. Point the camera towards the subject and compose the image by rotating the mode dial. 6. You can still manually configure all functions except the aperture value...

User Manual (ENGLISH)
Page 17
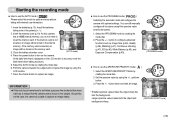
...button. 3. If the lighting condition is moving . If the subject is brighter than in fluorescent lighting condition, camera shake warning indicator ( ) will display. As the ASR uses the camera's digital signal processor, it may be blurred. 5. button twice and take a little longer for the shutter speed ... than fluorescent lighting condition, the ASR will not activate. 3. Set the shutter speed by rotating the mode dial. 2. The digital zoom will reduce the effect of camera shake and help you get a well-exposed image in the ASR mode. 2. Press the + / - Starting the recording mode...
...button. 3. If the lighting condition is moving . If the subject is brighter than in fluorescent lighting condition, camera shake warning indicator ( ) will display. As the ASR uses the camera's digital signal processor, it may be blurred. 5. button twice and take a little longer for the shutter speed ... than fluorescent lighting condition, the ASR will not activate. 3. Set the shutter speed by rotating the mode dial. 2. The digital zoom will reduce the effect of camera shake and help you get a well-exposed image in the ASR mode. 2. Press the + / - Starting the recording mode...

User Manual (ENGLISH)
Page 19
... frame will display over the target face and the gray colour focus frame will display over the rest faces(up to 9 persons. ● When the camera recognises many people at the same time, it will focus on the screen left side. 2. Press the shutter button halfway. Select this function cannot work... function can recognize the subject. 3. When the person being taken does not look at the face of the auto focus frame is set at the camera. - Press the shutter button fully to green when the focus is activated. 4. Press the shutter button halfway down to focus the face and the ...
... frame will display over the target face and the gray colour focus frame will display over the rest faces(up to 9 persons. ● When the camera recognises many people at the same time, it will focus on the screen left side. 2. Press the shutter button halfway. Select this function cannot work... function can recognize the subject. 3. When the person being taken does not look at the face of the auto focus frame is set at the camera. - Press the shutter button fully to green when the focus is activated. 4. Press the shutter button halfway down to focus the face and the ...

User Manual (ENGLISH)
Page 20
... the memory capacity allows. 1. Press the Up button and the ( ) icon will display on the LCD monitor. 2. Point the camera towards the subject and compose the image by rotating the mode dial. (The MOVIE CLIP mode icon and available recording time will display on... To stop the recording, press the shutter button again. [ MOVIE CLIP mode ] ■ Pausing while recording a movie clip (Successive Recording) This camera allows you wish to resume the recording. 3. Starting the recording mode ■ How to temporarily stop during unwanted scenes, while recording a movie clip...
... the memory capacity allows. 1. Press the Up button and the ( ) icon will display on the LCD monitor. 2. Point the camera towards the subject and compose the image by rotating the mode dial. (The MOVIE CLIP mode icon and available recording time will display on... To stop the recording, press the shutter button again. [ MOVIE CLIP mode ] ■ Pausing while recording a movie clip (Successive Recording) This camera allows you wish to resume the recording. 3. Starting the recording mode ■ How to temporarily stop during unwanted scenes, while recording a movie clip...

User Manual (ENGLISH)
Page 21
...be recorded for When Taking Pictures ■ Pressing the shutter button down to take a picture against the sun, please use a tripod, support the camera on the LCD monitor. In this case, use the [Backlight] in the scene shooting mode (see page 49). ■ Avoid obstructing the ... picture. [ Lightly press the shutter button ] [ Press the shutter button ] ■ The available recording time may vary depending on shooting conditions and camera settings. ■ When the Flash Off or Slow synchro mode is selected in flash (see page 27), spot metering (see page 47), or exposure ...
...be recorded for When Taking Pictures ■ Pressing the shutter button down to take a picture against the sun, please use a tripod, support the camera on the LCD monitor. In this case, use the [Backlight] in the scene shooting mode (see page 49). ■ Avoid obstructing the ... picture. [ Lightly press the shutter button ] [ Press the shutter button ] ■ The available recording time may vary depending on shooting conditions and camera settings. ■ When the Flash Off or Slow synchro mode is selected in flash (see page 27), spot metering (see page 47), or exposure ...

User Manual (ENGLISH)
Page 22
When there is strong reflected light, or when the background is moving at high speed. - Using the camera buttons to set the camera ■ The recording mode function can be turned off automatically to save battery life. Shutter button ● Used for taking an image or ... clip. If you select voice memo recording, the recording will be set up by using the camera buttons. If the subject is no operation during the specified time, the camera's power will start after the camera has finished storing the image data. 《21》 Pressing the shutter button down halfway activates...
When there is strong reflected light, or when the background is moving at high speed. - Using the camera buttons to set the camera ■ The recording mode function can be turned off automatically to save battery life. Shutter button ● Used for taking an image or ... clip. If you select voice memo recording, the recording will be set up by using the camera buttons. If the subject is no operation during the specified time, the camera's power will start after the camera has finished storing the image data. 《21》 Pressing the shutter button down halfway activates...


