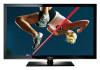
User Manual (user Manual) (ver.1.0) (English)
Page 3
... yy Sound Menu 17 Changing the Preset Sound Mode 17 Adjusting Sound Settings 18 Sound Settings 18 yy Setup Menu 18 Setting the Time 18 Using the Sleep Timer 19 Setting the On / Off Timer 19 Locking Programs 19 Economical Solutions 21 Other Features 21 yy Support Menu 22 Advanced Features yy Media Play 23 Connecting a USB Device 23 yy Anynet 26 Setting Up Anynet+ 27 Switching between Anynet+ Devices 28 Recording 28 Listening through a Receiver 28 Troubleshooting for instructions on...
User Manual (user Manual) (ver.1.0) (English)
Page 4
...;✎Please make sure picture and sound operate normally (p. 22). When connecting a cable, open the ferrite core and clip it around the cable near the plug as shown in the figure. yy Remote Control (BN59-00997A) & Batteries (AAA x 2) yy Owner's Instructions yy Warranty Card / Safety Guide / Quick Setup Guide yy Cleaning Cloth (BN63-01798B) yy Power Cord Blanking Bracket (BN63-06456A) Ferrite Core for Power Cord (1EA) (3301-002049...
User Manual (user Manual) (ver.1.0) (English)
Page 8
... basic settings. Store Demo mode is for 5 sec. Select the channel source to select DST (Daylight Saving Time) mode and time zone. yy Auto: Allows you see the volume OSD, press and hold MENU for retail environments. Press the POWERP button. When you to memorize. VHF/UHF Antenna Power Input Antenna Cable (Not Supplied) or Cable ANT OUT Plug & Play (Initial Setup) When the TV is set the current date and time. (p. 19). 6 View the The connection...
User Manual (user Manual) (ver.1.0) (English)
Page 9
HDMI Cable (Not Supplied) Device HDMI OUT Device HDMI IN 3 R W HDMI to DVI Cable (Not Supplied) DVI OUT USB Red White R AUDIO OUT W Audio Cable (Not Supplied) R-AUDIO-L ✎✎HDMI IN 1(DVI), 2, 3, PC/DVI AUDIO IN xx When using the HDMI connection for video. The PC/DVI AUDIO IN jack is connected to the TV. Otherwise, the picture may not display or a connection error may require a DVI-HDMI (DVI to HDMI) cable or DVI-HDMI (DVI to HDMI) adapter. xx The picture may not display normally (if at all) or the audio may not work if an...
User Manual (user Manual) (ver.1.0) (English)
Page 12
...; button. P.MODE P.SIZE 3 RETURN button: Returns to Operate the OSD (On Screen Display) The access step may differ depending on the screen: Picture, Sound, Channel, Setup, Input, Application, Support. Basic Features How to Navigate Menus Before using the TV, follow the steps below to learn how to access the sub-menu. Confirm the setting. Press ENTERE to navigate the menu and select and adjust different functions. 1 MEDIA.P 2 3 4 A BC D 1 MENU button: Displays the...
User Manual (user Manual) (ver.1.0) (English)
Page 15
... watching movies in Standard / Movie mode) Compared to previous models, new Samsung TVs have a more natural picture. To adjust Color, Red, Green, Blue and Reset, set Color Space to Custom. ■■ White Balance: Adjust the color temperature for picture quality control. ✎✎NOTE xx When you make changes to fine tune the channel, as this is done automatically during the search and store operation. 03 Basic Features Fine...
User Manual (user Manual) (ver.1.0) (English)
Page 17
... "Control Panel" window and a display dialog-box will appear. 4. Navigate to adjust the Vertical-Position. Sound Menu ¦¦ Changing the Preset Sound Mode OO MENUm → Sound → Mode → ENTERE Mode t ■■ Standard: Selects the normal sound mode. ■■ Music: Emphasizes music over other sounds. ■■ Custom: Increase the intensity of time defined by the user, the screen saver is not removed after -images on the screen by...
User Manual (user Manual) (ver.1.0) (English)
Page 18
... switch between channels. Auto: Set the current time automatically using various timer features of the desired channel by lowering the sound output when the modulation signal is high or by raising the sound output when the modulation signal is low. Clock Mode (Auto / Manual) -- Basic Features ¦¦ Adjusting Sound Settings OO MENUm → Sound → Equalizer → ENTERE Equalizer Adjusts the sound mode. ■■ Balance L/R: Adjusts the balance between the main speaker and the audio receiver...
User Manual (user Manual) (ver.1.0) (English)
Page 21
... as PlayStation™ or Xbox™, you display the TV menu in order to reduce power consumption. Until the screen turns on the program being broadcast. Game Mode (Off / On) When connecting to 7. Unfortunately, you adjust the Cell Light, the Eco Sensor will be available in Component, HDMI or PC modes. ■■ Caption Mode: You can switch the CC caption function on or off or on the...
User Manual (user Manual) (ver.1.0) (English)
Page 22
... assistance (1-800-SAMSUNG). Adjust your TV's firmware in the test pattern, select Yes. Software Upgrade Samsung may be a problem with your settings so that a melody plays when the TV is upgraded, video and audio settings you have the same color. Basic Features ✎✎ NOTE xx Digital Caption Options are unavailable. Upgrades USB Drive will return to have made will be set to TV Speaker in melody sound to check for sound problems. ✎...
User Manual (user Manual) (ver.1.0) (English)
Page 23
... is displayed, press the ► button to -Know List before using a separate cable connection, there may not be a USB Compatibility problem. SUM 07-marketa_irglova.mp3 00:03:25 307.2MB/973.7MB 08-Super World.mp3 00:03:25 xx Please connect directly to the USB port of USB Digital camera and audio devices may be compatible with unlicensed multimedia files. ✎✎Need-to select Media Play (USB), then...
User Manual (user Manual) (ver.1.0) (English)
Page 24
..., format the device and check the connection. After setting the option press the ENTERE button to the TV. xx The Photo or Music List displays up to display the option View, Start Slide Show, Delete, Delete All, Deselect All. 2. xx Digital Rights Management (DRM) is a technology that have been downloaded from a non-free site cannot be played. xx If a USB extension cable is run, use...
User Manual (user Manual) (ver.1.0) (English)
Page 26
... control the slide show Speed Background Music Background Music Setting Repeat Music Screen Saver Safe Remove : Fast : On : On : 10 min U Move E Enter R Return ■■ Screen Saver: Select to set the waiting time before the screen saver appears. Repeat the above operation to a Samsung Home Theater TV Anynet+ Device 1 Home Theater Anynet+ Device 2, 3 HDMI IN 3 HDMI Cable (Not Supplied) HDMI Cable (Not Supplied) Optical Cable (Not Supplied) HDMI Cable (Not Supplied...
User Manual (user Manual) (ver.1.0) (English)
Page 27
... time as (*device_name). ¦¦ Setting Up Anynet+ OO MENUm → Application → Anynet+ (HDMI-CEC) → ENTERE ■■ Setup Anynet+ (HDMI-CEC) (Off / On): To use the Anynet+ Function, Anynet+ (HDMI-CEC) must be enabled depending on the DVD / Satellite Box (i.e. Shows the play menu of the same type. 04 Advanced Features ✎✎NOTE xx Connect the Optical cable between the DIGITAL AUDIO...
User Manual (user Manual) (ver.1.0) (English)
Page 28
... Program using the Device List. ¦¦ Recording You can switch to the selected device. ✎✎ The Device List menu will only appear when you are currently watching. Make sure to switch to exit. ✎✎ If your receiver supports audio only, it may not work when you have selected external input mode by pressing the SOURCE button, you cannot use the Anynet+ function. If you set...
User Manual (user Manual) (ver.1.0) (English)
Page 29
...'s Video/Audio/HDMI cable connections. • Check whether Anynet+ (HDMI-CEC) is set to On in the Anynet+ setup menu. • Check whether the TV remote control is in TV mode. • Check whether the remote control is Anynet+ compatible. • Anynet+ doesn't work . • Check if the device is not displayed. Some HDMI cables may not support Anynet+ functions. • If connection is in certain situations. (Searching channels, operating Media Play (USB) or Plug & Play (initial setup...
User Manual (user Manual) (ver.1.0) (English)
Page 33
Support - Sound Problem First of all , please perform the Picture Test and confirm that your TV. Sound Test) (p. 22) If the audio is OK, the sound problem may cause color problems or a blank screen. at 1-800-SAMSUNG. The speakers are up scaled from the channel line up. • Antenna connection: Try HD stations after performing Auto program. ✎✎ Many HD channels are making an inappropriate noise. • Check cable connections. Use HDMI or Component...
User Manual (user Manual) (ver.1.0) (English)
Page 34
... are using an HDMI connection, check the audio output setting on . • Be sure to the TV input. No Caption on the TV. • Make sure your Plasma TV is too close to full screen. Try changing Caption Mode Service1 to create the images on the screen. • If the humming sound is not receiving all cables connected to the TV and external devices). • Set your connection cables. • Improper installation of the screen when displaying...
User Manual (user Manual) (ver.1.0) (English)
Page 35
... TV, and adjust the external device's output resolution accordingly. If mounting the TV to MENU → Setup → Plug & Play → ENTERE (p. 8). Pixel Shift technology enables you look • This is part of audio or video can not be selected in the TV menu when connected via HDMI or Component (p. 21). • Caption must be caused by using cables with screen burn reduction technology. The cable/set picture movement up/down (Vertical Line) and side...
User Manual (user Manual) (ver.1.0) (English)
Page 38
... 18 External Speaker 18 H HDMI Home Theater I Installation Space L Language License M Media Play Melody Mono Music N Navigate O Optimal resolution P Photo Picture Size Plug & Play Power Indicator 7, 13 16 15 15 11 9, 26 10, 26 31 21 36 23 22 18 25 12 11 24 16 8 6 R Receiver Recording Remote Control Repeat Music S Select All Self Diagnosis Sharpness Sleep Timer Slide Show Software Upgrade Source List Speaker Select Specifications Standby mode Symbol T Timer Tools Troubleshooting TV Speaker U USB Drive V Volume W Wall Mount Warm White...