Samsung PN50A400C2D Research

View Results Below
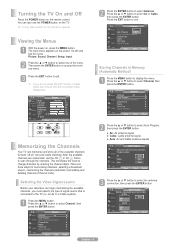
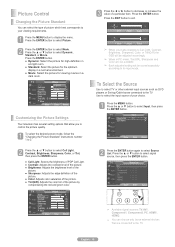
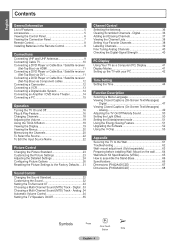
Free Samsung PN50A400C2D manuals!
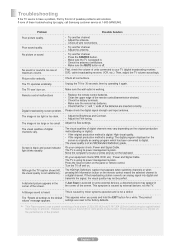
Problems with Samsung PN50A400C2D?
Ask a Question
Free Samsung PN50A400C2D manuals!
Problems with Samsung PN50A400C2D?
Ask a Question
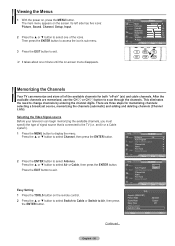
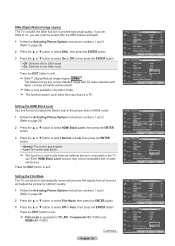
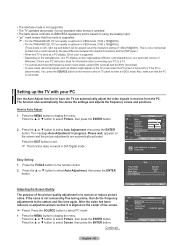
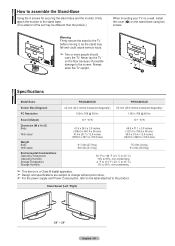
Related Manual Pages


Similar Questions

Does Samsung Plasma Model 50a5505 Have A Fire Wire Audio Output
(Posted by yatzeeking54 2 years ago)

Where Can I Get The Software Update For My Samsung Pn50a400c2dxza?
Where can I get the software update for my Samsung PN50A400C2DXZA?
Where can I get the software update for my Samsung PN50A400C2DXZA?
(Posted by vexxer1 4 years ago)


I Want To Upgrade Firmware For Samsung Ps42c430 Model Tv
Firmware upgrade
Firmware upgrade
(Posted by Gabran 10 years ago)
Weight Of Television
I AM ATTEMPTING TO HANG MY TV ON THE WALL. I NEED TO KNOW THE WEIGHT OF THE SAMSUNG pn50a400c2d TELE...
I AM ATTEMPTING TO HANG MY TV ON THE WALL. I NEED TO KNOW THE WEIGHT OF THE SAMSUNG pn50a400c2d TELE...
(Posted by flamesong5654 12 years ago)
Related Terms
The following terms were also used when searching for Samsung PN50A400C2D Research:- pn50a400c2d
- samsung pn50a400c2d
- pn50a400c2dxza
- samsung pn50a400c2dxza
- pn50a400c2d samsung
- pn50a400c2d plasma
- pn50a400c2d manual
- pn50a400c2d hdtv
- pn50a400c2d specs
- pn50a400c2d volume control
- pn50a400c2d wall mount
- samsung pn50a400c2d logic board
- samsung pn50a400c2d how to remove cable
- samsung pn50a400c2d hdtv
- samsung pn50a400c2d plasma
- samsung pn50a400c2d for sale
- samsung pn50a400c2d firmware update
- samsung pn50a400c2d firmware
- samsung pn50a400c2d buy
- samsung pn50a400c2d black vertical line
- samsung pn50a400c2d base
- samsung plasma pn50a400c2d
- samsung model pn50a400c2dxza
- samsung model pn50a400c2d
- pn50a400c2dxza stand
- pn50a400c2dxza samsung
- samsung pn50a400c2d settings
- tv pn50a400c2d
- samsung tv pn50a400c2d
- samsung pn50a400c2d weight
- samsung pn50a400c2d wall mount
- samsung pn50a400c2d volume control
- samsung pn50a400c2d user manual
- samsung pn50a400c2d tv
- samsung pn50a400c2d stand
- samsung pn50a400c2d specs
- samsung pn50a400c2d software update
- samsung pn50a400c2d manual
- samsung pn50a400c2d screen burn
- samsung pn50a400c2d resolution
- samsung pn50a400c2d problems
- samsung pn50a400c2d price
- samsung pn50a400c2d power cord
- samsung pn50a400c2d plasma tv
- pn50a400c2d upgrades
- samsung pn50a400c2d parts
- samsung pn50a400c2d no picture
- pn50a400c2d firmware
- pn50a400c2d plasma tv
- pn50a400c2d parts
- pn50a400c2d panel
- pn50a400c2d owners manual
- pn50a400c2d no picture
- pn50a400c2d logic board
- pn50a400c2d how to remove cable
- pn50a400c2d for sale
- pn50a400c2d firmware update
- pn50a400c2d power cord
- pn50a400c2d calibration
- pn50a400c2d buy
- pn50a400c2d black vertical line
- pn50a400c2d base
- pn50a400c2d 1080
- plasma pn50a400c2d
- model pn50a400c2dxza
- model pn50a400c2d
- buy samsung pn50a400c2d
- pn50a400c2d service manual samsung
- pn50a400c2d user manual
- buy pn50a400c2d
- pn50a400c2d update
- pn50a400c2d tv
- pn50a400c2d stand
- pn50a400c2d software upgrade
- pn50a400c2d software update
- pn50a400c2d software
- pn50a400c2d settings
- pn50a400c2d weight
- pn50a400c2d service manual
- pn50a400c2d screen burn
- pn50a400c2d samsung plasma tv
- pn50a400c2d samsung plasma
- pn50a400c2d resolution
- pn50a400c2d reset
- pn50a400c2d problems
- pn50a400c2d price