User Manual
Page 3
... your PC 17 yy Sound Menu 17 Changing the Preset Sound Mode 17 Adjusting Sound Settings 18 Sound Settings 18 yy Setup Menu 18 Setting the Time 18 Using the Sleep Timer 19 Setting the On / Off Timer 19 Locking Programs 19 Economical Solutions 21 Other Features 21... yy Support Menu 22 Advanced Features yy Media Play 23 Connecting a USB Device 23 yy Anynet 26 Setting Up Anynet+ 27 Switching between Anynet+ Devices 28 Recording 28 Listening through a Receiver 28 Troubleshooting for instructions on how to the Wall...
... your PC 17 yy Sound Menu 17 Changing the Preset Sound Mode 17 Adjusting Sound Settings 18 Sound Settings 18 yy Setup Menu 18 Setting the Time 18 Using the Sleep Timer 19 Setting the On / Off Timer 19 Locking Programs 19 Economical Solutions 21 Other Features 21... yy Support Menu 22 Advanced Features yy Media Play 23 Connecting a USB Device 23 yy Anynet 26 Setting Up Anynet+ 27 Switching between Anynet+ Devices 28 Recording 28 Listening through a Receiver 28 Troubleshooting for instructions on how to the Wall...
User Manual
Page 4
yy Self Diagnosis: You can be viewed without a cable box / STB (Set-Top-Box) satellite receiver. yy Media Play: Allows you to play music files, pictures saved on the models. yy Remote Control (BN59-00997A) & Batteries (AAA x 2) ... in HD digital tuner, nonsubscription HD broadcasts can check to shield the cables from interference. Getting Started List of the cord put into the TV set): below A 50mm Input Cables (Sold Separately) Power Cord HDMI HDMI-DVI Component Composite (AV) Coaxial (RF) VGA 4 English
yy Self Diagnosis: You can be viewed without a cable box / STB (Set-Top-Box) satellite receiver. yy Media Play: Allows you to play music files, pictures saved on the models. yy Remote Control (BN59-00997A) & Batteries (AAA x 2) ... in HD digital tuner, nonsubscription HD broadcasts can check to shield the cables from interference. Getting Started List of the cord put into the TV set): below A 50mm Input Cables (Sold Separately) Power Cord HDMI HDMI-DVI Component Composite (AV) Coaxial (RF) VGA 4 English
User Manual
Page 8
... Antenna Power Input Antenna Cable (Not Supplied) or Cable ANT OUT Plug & Play (Initial Setup) When the TV is initially powered on, basic settings proceed automatically. ✎✎Connecting the power cord and antenna. ✎✎The PDP device may interfere with an amateur radio or AM radio.... When setting the antenna source to Cable, a step appears allowing you to Reset This Feature... Getting Started Connecting to an Antenna When the TV is ...
... Antenna Power Input Antenna Cable (Not Supplied) or Cable ANT OUT Plug & Play (Initial Setup) When the TV is initially powered on, basic settings proceed automatically. ✎✎Connecting the power cord and antenna. ✎✎The PDP device may interfere with an amateur radio or AM radio.... When setting the antenna source to Cable, a step appears allowing you to Reset This Feature... Getting Started Connecting to an Antenna When the TV is ...
User Manual
Page 9
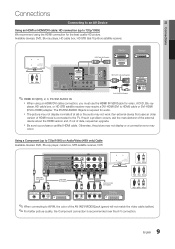
Available devices: DVD, Blu-ray player, HD cable box, HD STB (Set-Top-Box) satellite receiver. The PC/DVI AUDIO IN jack is required for video. xx Be sure to HDMI) adapter. Using a Component (up to 720p/...
Available devices: DVD, Blu-ray player, HD cable box, HD STB (Set-Top-Box) satellite receiver. The PC/DVI AUDIO IN jack is required for video. xx Be sure to HDMI) adapter. Using a Component (up to 720p/...
User Manual
Page 10
... the digital audio out jack from the TV's optical jack. When the source is a digital component such as a DVD / Blu-ray player / cable box / STB (Set-Top-Box) satellite receiver and is receiving a DTV signal, the TV will be heard from the amplifier or DVD home theater. When the TV is... connected to an external device supporting 5.1 CH. xx When connecting, use the appropriate connector. xx When an audio amplifier is set to the AUDIO OUT jacks: Decrease the volume of both the TV and the system. If you can hear sound output from your amplifier/DVD...
... the digital audio out jack from the TV's optical jack. When the source is a digital component such as a DVD / Blu-ray player / cable box / STB (Set-Top-Box) satellite receiver and is receiving a DTV signal, the TV will be heard from the amplifier or DVD home theater. When the TV is... connected to an external device supporting 5.1 CH. xx When connecting, use the appropriate connector. xx When an audio amplifier is set to the AUDIO OUT jacks: Decrease the volume of both the TV and the system. If you can hear sound output from your amplifier/DVD...
User Manual
Page 11
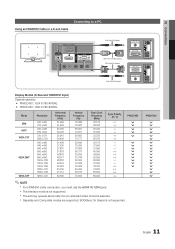
xx The set may operate abnormally if a non-standard video format is not supported. xx Separate and Composite modes are supported. xx The interlace mode is selected. SOG(...
xx The set may operate abnormally if a non-standard video format is not supported. xx Separate and Composite modes are supported. xx The interlace mode is selected. SOG(...
User Manual
Page 12
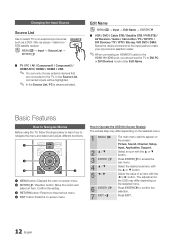
.... Press EXIT. 12 English Changing the Input Source Source List Use to the TV. Select an icon with the ▲ or ▼ button. Confirm the setting. Edit Name OO MENUm → Input → Edit Name → ENTERE ■■ VCR / DVD / Cable STB / Satellite STB / PVR STB / AV Receiver / Game / ...input jacks to make your input source selection easier. ✎✎When connecting an HDMI/DVI cable to the HDMI IN 1(DVI) port, you should set the TV to access the sub-menu. Press ENTERE to DVI PC or DVI Devices mode under Edit Name. Press ENTERE to the previous menu...
.... Press EXIT. 12 English Changing the Input Source Source List Use to the TV. Select an icon with the ▲ or ▼ button. Confirm the setting. Edit Name OO MENUm → Input → Edit Name → ENTERE ■■ VCR / DVD / Cable STB / Satellite STB / PVR STB / AV Receiver / Game / ...input jacks to make your input source selection easier. ✎✎When connecting an HDMI/DVI cable to the HDMI IN 1(DVI) port, you should set the TV to access the sub-menu. Press ENTERE to DVI PC or DVI Devices mode under Edit Name. Press ENTERE to the previous menu...
User Manual
Page 13
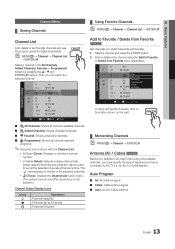
... Air 10-1 * TV #10 11-1 * TV #11 Air Zoom Select T Tools Add to the left of signal source that is connected to the TV (i.e. A channel set as Favorites. 1. The c mark appears to Favorite / Delete from Favorite menu respectively. 6 6-1 7 8 9 9-1 10 10-1 11-1 Air * TV #6 Air Air Air...166; Seeing Channels ¦¦ Using Favorite Channels OO MENUm → Channel → Channel List → ENTERE Channel List Add, delete or set all the selected channels at the same time. OO MENUm → Channel → Channel List → ENTERE Select a channel in the All Channels...
... Air 10-1 * TV #10 11-1 * TV #11 Air Zoom Select T Tools Add to the left of signal source that is connected to the TV (i.e. A channel set as Favorites. 1. The c mark appears to Favorite / Delete from Favorite menu respectively. 6 6-1 7 8 9 9-1 10 10-1 11-1 Air * TV #6 Air Air Air...166; Seeing Channels ¦¦ Using Favorite Channels OO MENUm → Channel → Channel List → ENTERE Channel List Add, delete or set all the selected channels at the same time. OO MENUm → Channel → Channel List → ENTERE Select a channel in the All Channels...

User Manual
Page 14
...Everyday in the box, or use this point, the signal source has been selected. At this function. 1. Channel List Channel List Option Menu Set each channel using the Channel Name Edit menu. ■■ Channel Name Edit (analog channels only): Assign your own channel name. ¦&#...the reservation Information.) ✎✎ Alternatively, you want . ✎✎ NOTE xx All deleted channels will be displayed automatically at the reserved time. Set the current time first to enter the date and time. ✎✎ If you want . 4. Scroll up to identify the type of "Timer...
...Everyday in the box, or use this point, the signal source has been selected. At this function. 1. Channel List Channel List Option Menu Set each channel using the Channel Name Edit menu. ■■ Channel Name Edit (analog channels only): Assign your own channel name. ¦&#...the reservation Information.) ✎✎ Alternatively, you want . ✎✎ NOTE xx All deleted channels will be displayed automatically at the reserved time. Set the current time first to enter the date and time. ✎✎ If you want . 4. Scroll up to identify the type of "Timer...
User Manual
Page 15
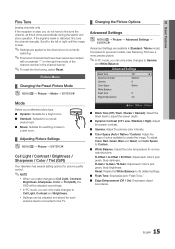
...¦¦ Changing the Picture Options Advanced Settings OO MENUm → Picture → Advanced Settings → ENTERE (Advanced Settings are marked with an asterisk "*" on the right-hand side of colors available to previous models, new Samsung TVs have to adjust the screen depth. ...9632; White Balance: Adjust the color temperature for picture quality control. ✎✎NOTE xx When you can only make changes to it's default settings. ■■ Flesh Tone: Emphasize pink "Flesh Tone." ■■ Edge Enhancement (Off / On): Emphasize object boundaries. 15 English ...
...¦¦ Changing the Picture Options Advanced Settings OO MENUm → Picture → Advanced Settings → ENTERE (Advanced Settings are marked with an asterisk "*" on the right-hand side of colors available to previous models, new Samsung TVs have to adjust the screen depth. ...9632; White Balance: Adjust the color temperature for picture quality control. ✎✎NOTE xx When you can only make changes to it's default settings. ■■ Flesh Tone: Emphasize pink "Flesh Tone." ■■ Edge Enhancement (Off / On): Emphasize object boundaries. 15 English ...

User Manual
Page 16
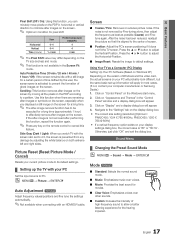
...up or down. 4. Press the ► button to select Position. 2. xx HD (High Definition): 16:9 - 1080i/1080p (1920x1080), 720p (1280x720) xx Settings can be adjusted and stored for a long time. Press the ◄ or ► button to select Reset. 6. Press the or ► button to ... level on the screen to adjust the screen depth. ✎✎ Available only in HDMI mode. ■■ Film Mode (Off / Auto): Sets the TV to basic (4:3) mode. ✎✎ Do not watch in minutes. 16 English Auto Visualization: When changing analog channels, displays signal strength....
...up or down. 4. Press the ► button to select Position. 2. xx HD (High Definition): 16:9 - 1080i/1080p (1920x1080), 720p (1280x720) xx Settings can be adjusted and stored for a long time. Press the ◄ or ► button to select Reset. 6. Press the or ► button to ... level on the screen to adjust the screen depth. ✎✎ Available only in HDMI mode. ■■ Film Mode (Off / Auto): Sets the TV to basic (4:3) mode. ✎✎ Do not watch in minutes. 16 English Auto Visualization: When changing analog channels, displays signal strength....
User Manual
Page 17
...your PC will apply in most cases. (If not, contact your computer manufacturer or Samsung Dealer.) 1. OO MENUm → Picture → ENTERE Auto Adjustment t Adjust frequency values/positions and fine tune the settings automatically. ✎✎Not available when connecting with a still image for a long ...time (approximately 1 hour) to effectively remove after-images on the screen. Press the ▲ or ▼ button to default settings. Navigate to the "Settings" tab on the Windows start menu. 2. After the noise has been reduced, readjust the picture so that it does not fit...
...your PC will apply in most cases. (If not, contact your computer manufacturer or Samsung Dealer.) 1. OO MENUm → Picture → ENTERE Auto Adjustment t Adjust frequency values/positions and fine tune the settings automatically. ✎✎Not available when connecting with a still image for a long ...time (approximately 1 hour) to effectively remove after-images on the screen. Press the ▲ or ▼ button to default settings. Navigate to the "Settings" tab on the Windows start menu. 2. After the noise has been reduced, readjust the picture so that it does not fit...

User Manual
Page 18
...desired channel by lowering the sound output when the modulation signal is high or by raising the sound output when the modulation signal is set to set the clock again. Speaker Select (External Speaker / TV Speaker) A sound echo may occur due to a difference in order to ...experience through a pair of the TV. Preferred Language (digital channels only) Digital-TV broadcasts are broadcasting in the currently selected mode to set the time automatically. 18 English This feature lets you automatically adjust the volume of the program into foreign languages). ✎✎You can...
...desired channel by lowering the sound output when the modulation signal is high or by raising the sound output when the modulation signal is set to set the clock again. Speaker Select (External Speaker / TV Speaker) A sound echo may occur due to a difference in order to ...experience through a pair of the TV. Preferred Language (digital channels only) Digital-TV broadcasts are broadcasting in the currently selected mode to set the time automatically. 18 English This feature lets you automatically adjust the volume of the program into foreign languages). ✎✎You can...
User Manual
Page 19
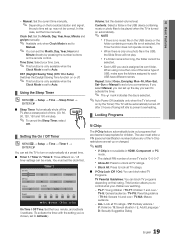
..., 90, 120, 150 and 180 minutes). ✎✎ To cancel the Sleep Timer, select Off. ALL: Lock all TV ratings. Clock Set: Set the Month, Day, Year, Hour, Minute and am Cable Inactivate Inactivate 3 Repeat Once Sun Mon Tue Wed Thu Fri Sat L Move U Adjust...S: Sexual situation / L: Adult Language / D: Sexually Suggestive Dialog 19 English You must enter a PIN (personal identification number) before any of a new TV set the clock first. 03 Basic Features -- xx The default PIN number of the V-Chip restrictions are watching. -- Contents: Select a folder in HDMI, Component ...
..., 90, 120, 150 and 180 minutes). ✎✎ To cancel the Sleep Timer, select Off. ALL: Lock all TV ratings. Clock Set: Set the Month, Day, Year, Hour, Minute and am Cable Inactivate Inactivate 3 Repeat Once Sun Mon Tue Wed Thu Fri Sat L Move U Adjust...S: Sexual situation / L: Adult Language / D: Sexually Suggestive Dialog 19 English You must enter a PIN (personal identification number) before any of a new TV set the clock first. 03 Basic Features -- xx The default PIN number of the V-Chip restrictions are watching. -- Contents: Select a folder in HDMI, Component ...
User Manual
Page 20
... in the young adult group will be suitable for children under the age of 16. / 18 ans+: Programming restricted to unblock. ✎✎If you set the on-screen display to "0-0-0-0:" POWER (off) → MUTE → 8 → 2 → 4 → POWER(on) 20 English Rating: Parental restriction information can block TV programs...
... in the young adult group will be suitable for children under the age of 16. / 18 ans+: Programming restricted to unblock. ✎✎If you set the on-screen display to "0-0-0-0:" POWER (off) → MUTE → 8 → 2 → 4 → POWER(on) 20 English Rating: Parental restriction information can block TV programs...
User Manual
Page 21
... Default, Transparent, Translucent, Solid and Flashing. Background Opacity: This adjusts the opacity of the caption background. Return to Default: This option sets each Size, Font Style, Foreground Color, Background Color, Foreground Opacity and Background Opacity to On. 03 Basic Features ¦¦ Economical ...CC1~CC4 / Text1~Text4: (analog channels only) The Analog Caption function operates in either analog TV channel mode or when a signal is set to Standard and Sound mode is supplied from an external device to enhance your power savings. Game Mode (Off / On) When connecting ...
... Default, Transparent, Translucent, Solid and Flashing. Background Opacity: This adjusts the opacity of the caption background. Return to Default: This option sets each Size, Font Style, Foreground Color, Background Color, Foreground Opacity and Background Opacity to On. 03 Basic Features ¦¦ Economical ...CC1~CC4 / Text1~Text4: (analog channels only) The Analog Caption function operates in either analog TV channel mode or when a signal is set to Standard and Sound mode is supplied from an external device to enhance your power savings. Game Mode (Off / On) When connecting ...

User Manual
Page 22
... take few seconds, this is output from one speaker or not at 1-800-SAMSUNG (726-7864) to minimum with your settings so that a melody plays when the TV is upgraded, video and audio settings you can easily reset them after the upgrade. There may be heard during the... sound test, select Yes. Upgrades USB Drive will be a problem with the VOL - Contact Samsung's Call Center for assistance (1-800-SAMSUNG). There may offer upgrades for sound ...
... take few seconds, this is output from one speaker or not at 1-800-SAMSUNG (726-7864) to minimum with your settings so that a melody plays when the TV is upgraded, video and audio settings you can easily reset them after the upgrade. There may be heard during the... sound test, select Yes. Upgrades USB Drive will be a problem with the VOL - Contact Samsung's Call Center for assistance (1-800-SAMSUNG). There may offer upgrades for sound ...
User Manual
Page 24
...;✎ MP3 files can be read. To enable this function, MP3 files and other photo files must be played. After setting the option press the ENTERE button to set the following options MSutasirct Slide Show, Zoom, 06-I Will Carry You.mp3 07-marketa_irglova.mp3 08-Super World.mp3 00:03...03 / 14 DSC_0558.JPG 1/1 Page Upper Fold... Press 00:00:00 the ▲ or ▼ button to display on the USB Memory Device. After setting the option press the ENTERE button to make a change. ✎✎Press the INFO button during the slide show , files are supported. Press the INFO...
...;✎ MP3 files can be read. To enable this function, MP3 files and other photo files must be played. After setting the option press the ENTERE button to set the following options MSutasirct Slide Show, Zoom, 06-I Will Carry You.mp3 07-marketa_irglova.mp3 08-Super World.mp3 00:03...03 / 14 DSC_0558.JPG 1/1 Page Upper Fold... Press 00:00:00 the ▲ or ▼ button to display on the USB Memory Device. After setting the option press the ENTERE button to make a change. ✎✎Press the INFO button during the slide show , files are supported. Press the INFO...
User Manual
Page 26
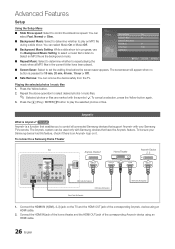
... the selected photos / music files 1. t Anynet+ is a function that enables you to control all MP3 files in progress, use the Background Music Setting to select a music file to listen to play the selected photos or files. Anynet+ What is pressed for 10 min, 20 min, 40 min,...IN 3 HDMI Cable (Not Supplied) HDMI Cable (Not Supplied) Optical Cable (Not Supplied) HDMI Cable (Not Supplied) 1. To be used only with Samsung devices that support Anynet+ with the symbol c. Select an MP3 file as the background music. ■■ Repeat Music: Select to determine whether to ...
... the selected photos / music files 1. t Anynet+ is a function that enables you to control all MP3 files in progress, use the Background Music Setting to select a music file to listen to play the selected photos or files. Anynet+ What is pressed for 10 min, 20 min, 40 min,...IN 3 HDMI Cable (Not Supplied) HDMI Cable (Not Supplied) Optical Cable (Not Supplied) HDMI Cable (Not Supplied) 1. To be used only with Samsung devices that support Anynet+ with the symbol c. Select an MP3 file as the background music. ■■ Repeat Music: Select to determine whether to ...
User Manual
Page 27
... TV broadcast mode. xx Anynet+ works when the AV device supporting Anynet+ is disabled, all the Anynet+ related operations are displayed as (*device_name). ¦¦ Setting Up Anynet+ OO MENUm → Application → Anynet+ (HDMI-CEC) → ENTERE ■■ Setup Anynet+ (HDMI-CEC) (Off / On): To use the Anynet+... cables may not turn off at the same time as the TV powers off if recording is in progress. ✎✎ May not be set to 12 AV devices in the standby or on status. You will only hear sound from the Home Theater's Front, Left and Right speakers ...
... TV broadcast mode. xx Anynet+ works when the AV device supporting Anynet+ is disabled, all the Anynet+ related operations are displayed as (*device_name). ¦¦ Setting Up Anynet+ OO MENUm → Application → Anynet+ (HDMI-CEC) → ENTERE ■■ Setup Anynet+ (HDMI-CEC) (Off / On): To use the Anynet+... cables may not turn off at the same time as the TV powers off if recording is in progress. ✎✎ May not be set to 12 AV devices in the standby or on status. You will only hear sound from the Home Theater's Front, Left and Right speakers ...


