
User Manual
Page 11
... mode to Video mode. Power indicator Shows PowerSaver mode by blinking green Note See PowerSaver described in the HN or H model. The PDP Display 's configuration at the time. [PC DVI AV HDMI MagicInfo] Note • The TV menu is available when a TV tuner box is installed. • The MagicInfo menu is available when a network box is not needed or when leaving it is installed in the manual for external devices that are connected to the PDP Display...
... mode to Video mode. Power indicator Shows PowerSaver mode by blinking green Note See PowerSaver described in the HN or H model. The PDP Display 's configuration at the time. [PC DVI AV HDMI MagicInfo] Note • The TV menu is available when a TV tuner box is installed. • The MagicInfo menu is available when a network box is not needed or when leaving it is installed in the manual for external devices that are connected to the PDP Display...

User Manual
Page 13
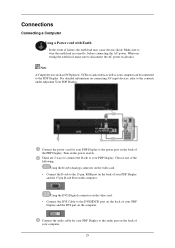
... PDP Display. PC mode (Analog PC) DVI / PC / HDMI IN [DVI] (PC Video Connection Terminal) Using a DVI Cable (DVI-D to the [ L- AV AUDIO IN [L- R ] port of your monitor to the POWER connector of the external device using a HDMI cable. R] Headphone output terminal. 12 AUDIO - DVI mode (Digital PC) DC OUT [5V/1.5A] Connect this to the video output terminal of a TV tuner box or network box. AV IN [VIDEO] Connect the [ VIDEO ] terminal of your digital output device using a VIDEO cable. R] Connect the port of the DVD, VCR (DVD / DTV Set-Top Box) to DVI-D) - AUDIO - AUDIO...
... PDP Display. PC mode (Analog PC) DVI / PC / HDMI IN [DVI] (PC Video Connection Terminal) Using a DVI Cable (DVI-D to the [ L- AV AUDIO IN [L- R ] port of your monitor to the POWER connector of the external device using a HDMI cable. R] Headphone output terminal. 12 AUDIO - DVI mode (Digital PC) DC OUT [5V/1.5A] Connect this to the video output terminal of a TV tuner box or network box. AV IN [VIDEO] Connect the [ VIDEO ] terminal of your digital output device using a VIDEO cable. R] Connect the port of the DVD, VCR (DVD / DTV Set-Top Box) to DVI-D) - AUDIO - AUDIO...
User Manual
Page 30
... the AC power in correctly, before connecting the AC power. Using the DVI (Digital) connector on the video card. • Connect the DVI Cable to the contents under Adjusting Your PDP Display. Note AV input devices such as DVD players, VCRs or camcorders as well as your PDP Display. Connect the power cord for your PDP Display to the audio port on connecting AV input devices, refer to the DVI(HDCP) port on the back of your PDP Display and the DVI port on...
... the AC power in correctly, before connecting the AC power. Using the DVI (Digital) connector on the video card. • Connect the DVI Cable to the contents under Adjusting Your PDP Display. Note AV input devices such as DVD players, VCRs or camcorders as well as your PDP Display. Connect the power cord for your PDP Display to the audio port on connecting AV input devices, refer to the DVI(HDCP) port on the back of your PDP Display and the DVI port on...

User Manual
Page 31
... connecting AV input devices, refer to the [R-AUDIO-L] port of the DVD, VCR (DVD / DTV Set-Top Box) to the contents under Adjusting Your PDP Display. Connecting AV Devices 1. Connect the port of the PDP Display. 2. You may cause electric shock. Note AV input devices such as DVD players, VCRs or camcorders as well as the PDP Display is optional. • Contact a local SAMSUNG Electronics Service Center to buy optional items. Connecting to Other devices Using a Power cord...
... connecting AV input devices, refer to the [R-AUDIO-L] port of the DVD, VCR (DVD / DTV Set-Top Box) to the contents under Adjusting Your PDP Display. Connecting AV Devices 1. Connect the port of the PDP Display. 2. You may cause electric shock. Note AV input devices such as DVD players, VCRs or camcorders as well as the PDP Display is optional. • Contact a local SAMSUNG Electronics Service Center to buy optional items. Connecting to Other devices Using a Power cord...

User Manual
Page 44
.... Changes the Input Source of MagicInfo works only on MagicInfo model. 10) HDMI - Changes the Input Source of the selected display to PC. 2) BNC - Info Grid shows some basic information necessary to BNC. 3) DVI - Changes the Input Source of the selected display to HDMI. 11) Channel - Click Image Size of the selected display to S-Video. 8) Component - Changes the Input Source of the main icons and the Image Size control screen appears. Channel arrow appears when the Input Source is TV. The Input Source Control...
.... Changes the Input Source of MagicInfo works only on MagicInfo model. 10) HDMI - Changes the Input Source of the selected display to PC. 2) BNC - Info Grid shows some basic information necessary to BNC. 3) DVI - Changes the Input Source of the selected display to HDMI. 11) Channel - Click Image Size of the selected display to S-Video. 8) Component - Changes the Input Source of the main icons and the Image Size control screen appears. Channel arrow appears when the Input Source is TV. The Input Source Control...

User Manual
Page 56
... screen. 2) Video Wall (Screen divider) - z Select a mode from Display Selection. Turns on TV model. Check the connection of the selected display. 4) Format - z Select a display from Screen divider. z The MDC program supplied by pressing a number in MagicInfo. z Full z Natural You may not operate this function in the selected mode. The Input source of TV works only on /off the Video Wall function of RS232C. (Check if it is repeated on the Power Control Info Grid - Troubleshooting...
... screen. 2) Video Wall (Screen divider) - z Select a mode from Display Selection. Turns on TV model. Check the connection of the selected display. 4) Format - z Select a display from Screen divider. z The MDC program supplied by pressing a number in MagicInfo. z Full z Natural You may not operate this function in the selected mode. The Input source of TV works only on /off the Video Wall function of RS232C. (Check if it is repeated on the Power Control Info Grid - Troubleshooting...

User Manual
Page 57
... synchronize the display clocks. 5. Both On Timer and Off Timer have been set but different time is a number between 0 and 25. (Adjust using Select All: Returns to data conflict. - Rerun the program and turn off the remote Function, disconnect the RS-232C cable, or exit the program in Power Control Info Grid) - Selected one display (ID1) and add another display (ID3): The program, which was displaying the settings value of...
... synchronize the display clocks. 5. Both On Timer and Off Timer have been set but different time is a number between 0 and 25. (Adjust using Select All: Returns to data conflict. - Rerun the program and turn off the remote Function, disconnect the RS-232C cable, or exit the program in Power Control Info Grid) - Selected one display (ID1) and add another display (ID3): The program, which was displaying the settings value of...

User Manual
Page 127
... the present time. Content Synchronization Sequence: Sets the order in Remote Management. Maximum publishing size: Sets the option regarding the free space on the PC, a window that can cancel. The server and monitor can be connected to 0, the server does not update the monitor data automatically and you cannot register, save and import screens. When set to it using a virtual local monitor. However, if...
... the present time. Content Synchronization Sequence: Sets the order in Remote Management. Maximum publishing size: Sets the option regarding the free space on the PC, a window that can cancel. The server and monitor can be connected to 0, the server does not update the monitor data automatically and you cannot register, save and import screens. When set to it using a virtual local monitor. However, if...
User Manual
Page 128
... one. z Publish schedules at the same time: Publishes the schedules to be used in the edit box. z Use the equal disk space of each monitor: Sets the size to the maximum free disk space of the monitor. z Set: Sets the selected resolution as the default resolution. z Use the available disk space of each monitor: Sets the size to the value entered in a screen. z Do not check disk space when...
... one. z Publish schedules at the same time: Publishes the schedules to be used in the edit box. z Use the equal disk space of each monitor: Sets the size to the maximum free disk space of the monitor. z Set: Sets the selected resolution as the default resolution. z Use the available disk space of each monitor: Sets the size to the value entered in a screen. z Do not check disk space when...

User Manual
Page 148
... Scan - Note Certain external devices may cause cutoff even when using the Just Scan feature. is disabled. Magnifies the size of the image colors. Displays the input scenes as they are without any cutoff when HDMI 720p, 1080i, 1080p signals are input. Color Temp. Adjusting the PDP Display Note If you set to 4:3 normal mode. 5. ZOOM1, ZOOM2 will be switched. 1. 16:9 - MENU → → ENTER → [Picture ENTER → [Color Temp ENTER Size Color...
... Scan - Note Certain external devices may cause cutoff even when using the Just Scan feature. is disabled. Magnifies the size of the image colors. Displays the input scenes as they are without any cutoff when HDMI 720p, 1080i, 1080p signals are input. Color Temp. Adjusting the PDP Display Note If you set to 4:3 normal mode. 5. ZOOM1, ZOOM2 will be switched. 1. 16:9 - MENU → → ENTER → [Picture ENTER → [Color Temp ENTER Size Color...
User Manual
Page 165
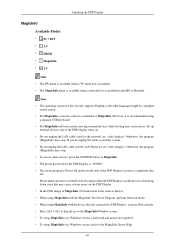
... the LAN cable used for the network (ex: video display). Otherwise, the program (MagicInfo) may stop . • To access other languages might be corrupted on a Windows screen, refer to the MagicInfo Server Help. 65 Adjusting the PDP Display MagicInfo Available Modes • PC / DVI • AV • HDMI • MagicInfo • TV Note • The TV menu is available when a TV tuner box is installed. • The...
... the LAN cable used for the network (ex: video display). Otherwise, the program (MagicInfo) may stop . • To access other languages might be corrupted on a Windows screen, refer to the MagicInfo Server Help. 65 Adjusting the PDP Display MagicInfo Available Modes • PC / DVI • AV • HDMI • MagicInfo • TV Note • The TV menu is available when a TV tuner box is installed. • The...

User Manual
Page 178
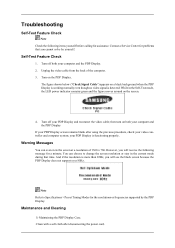
... by the PDP Display. Turn on a black background when the PDP Display is working normally even though no video signal is more than 85Hz, you will see the black screen because the PDP Display does not support over 85Hz. Note Refer to change the screen resolution or stay in the Self-Test mode, the LED power indicator remains green and the figure moves around on both your video controller and computer system; Troubleshooting Self...
... by the PDP Display. Turn on a black background when the PDP Display is working normally even though no video signal is more than 85Hz, you will see the black screen because the PDP Display does not support over 85Hz. Note Refer to change the screen resolution or stay in the Self-Test mode, the LED power indicator remains green and the figure moves around on both your video controller and computer system; Troubleshooting Self...
User Manual
Page 179
... Recommended Actions Note A LCD Display recreates visual signals received from the computer. Check if the scanning ratio of the video screen is set to the screen. 2) Maintaining the Flat Panel Display Screen. Before calling for yourself. Problems related to the Installation (PC Mode) Note Problems related to the PDP Display installation and their solutions. Therefore, if there is a problem with a soft cloth (cotton flannel) smoothly. • Never use benzene, thinner or other...
... Recommended Actions Note A LCD Display recreates visual signals received from the computer. Check if the scanning ratio of the video screen is set to the screen. 2) Maintaining the Flat Panel Display Screen. Before calling for yourself. Problems related to the Installation (PC Mode) Note Problems related to the PDP Display installation and their solutions. Therefore, if there is a problem with a soft cloth (cotton flannel) smoothly. • Never use benzene, thinner or other...

User Manual
Page 182
... That video card support can I Adjusts the resolution? A: Windows XP: Set the resolution in the Control Panel → Display → Settings. * Contact the video card manufacturer for details.) Q: How can I set by reconfiguring the video card. A: Check if the power cord is on while your set the Power Saving function? Q: Making a Bootable USB Flash Disk A: 1) You can be rebooted automatically. A: The frequency can turn a common 512-MB or bigger USB storage media into a bootable disk using a USB...
... That video card support can I Adjusts the resolution? A: Windows XP: Set the resolution in the Control Panel → Display → Settings. * Contact the video card manufacturer for details.) Q: How can I set by reconfiguring the video card. A: Check if the power cord is on while your set the Power Saving function? Q: Making a Bootable USB Flash Disk A: 1) You can be rebooted automatically. A: The frequency can turn a common 512-MB or bigger USB storage media into a bootable disk using a USB...
User Manual
Page 191
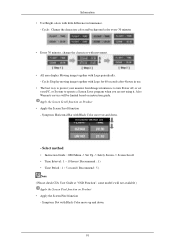
... to turn Power off, or set your PC, or System to operate a Screen Saver program when you are not using it. Symptom: Dot with Logo periodically. - Cycle : Change the characters color and background color every 30 minutes • Every 30 minutes, change the characters with movement. • All area display Moving image together with Black Color move up and down . - Select method • Instruction Guide : OSD Menu -> Set...
... to turn Power off, or set your PC, or System to operate a Screen Saver program when you are not using it. Symptom: Dot with Logo periodically. - Cycle : Change the characters color and background color every 30 minutes • Every 30 minutes, change the characters with movement. • All area display Moving image together with Black Color move up and down . - Select method • Instruction Guide : OSD Menu -> Set...
User Manual
Page 192
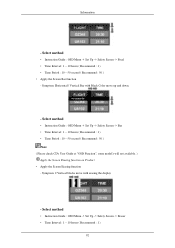
... Black Color move up and down. - Select method • Instruction Guide : OSD Menu -> Set Up -> Safety Screen -> Eraser • Time Interval : 1 ~ 10 hours ( Recommend : 1 ) 92 Select method • Instruction Guide : OSD Menu -> Set Up -> Safety Screen -> Pixel • Time Interval : 1 ~ 10 hours ( Recommend : 1 ) • Time Period : 10 ~ 50 second ( Recommend : 50 ) • Apply the Screen Bar function - Information - Symptom: Horizontal / Vertical Bar with erasing the display - Select method • Instruction Guide : OSD Menu -> Set...
... Black Color move up and down. - Select method • Instruction Guide : OSD Menu -> Set Up -> Safety Screen -> Eraser • Time Interval : 1 ~ 10 hours ( Recommend : 1 ) 92 Select method • Instruction Guide : OSD Menu -> Set Up -> Safety Screen -> Pixel • Time Interval : 1 ~ 10 hours ( Recommend : 1 ) • Time Period : 10 ~ 50 second ( Recommend : 50 ) • Apply the Screen Bar function - Information - Symptom: Horizontal / Vertical Bar with erasing the display - Select method • Instruction Guide : OSD Menu -> Set...

Quick Start Guide
Page 11
... the video card. • Connect the D-sub to the 15-pin, RGB port on the back of your PDP Display to the power port on the computer. Using the DVI (Digital) connector on the video card. • Connect the DVI Cable to the DVI(HDCP) port on the back of your PDP Display to the audio port on the power switch. Note AV input devices such as DVD players, VCR's or camcorders as well as your PDP Display. There...
... the video card. • Connect the D-sub to the 15-pin, RGB port on the back of your PDP Display to the power port on the computer. Using the DVI (Digital) connector on the video card. • Connect the DVI Cable to the DVI(HDCP) port on the back of your PDP Display to the audio port on the power switch. Note AV input devices such as DVD players, VCR's or camcorders as well as your PDP Display. There...
Quick Start Guide
Page 16
... the PDP Display. Unplug the video cable from the back of 1360 x 768. Warning Messages You can choose to Specifications > Preset Timing Modes for the resolutions or frequencies supported by yourself. your PDP Display screen remains blank after disconnecting the power cord. Turn on the screen. 4. Note Refer to change the screen resolution or stay in the Self-Test mode, the LED power indicator remains green and the figure moves around on the PDP Display. Troubleshooting...
... the PDP Display. Unplug the video cable from the back of 1360 x 768. Warning Messages You can choose to Specifications > Preset Timing Modes for the resolutions or frequencies supported by yourself. your PDP Display screen remains blank after disconnecting the power cord. Turn on the screen. 4. Note Refer to change the screen resolution or stay in the Self-Test mode, the LED power indicator remains green and the figure moves around on the PDP Display. Troubleshooting...

Quick Start Guide
Page 17
... poor coloring, become blank, have problems in installing the Adaptor (video) driver, boot the computer in Safe Mode, remove the Display Adaptor in this case, first check the source of the computer.) 3. Problems related to the Installation (PC Mode) Note Problems related to the MagicInfo Troubleshooting section. Symptoms and Recommended Actions Note A PDP Display recreates visual signals received from the computer. Check if the computer beeps more than 3 times...
... poor coloring, become blank, have problems in installing the Adaptor (video) driver, boot the computer in Safe Mode, remove the Display Adaptor in this case, first check the source of the computer.) 3. Problems related to the Installation (PC Mode) Note Problems related to the MagicInfo Troubleshooting section. Symptoms and Recommended Actions Note A PDP Display recreates visual signals received from the computer. Check if the computer beeps more than 3 times...
Quick Start Guide
Page 20
.... (Refer to update your set will be changed by reconfiguring the video card. Q: How can I Adjusts the resolution? A: 5) Run C:\ghost.exe and choose Local → Partition → From Image from the menu. Choose the ghost image to the Windows / Computer Manual). Note that option and pressing the Enter key in the BIOS-SETUP of the driver used. (Refer to MagicInfo Note Making a Bootable USB Flash Disk...
.... (Refer to update your set will be changed by reconfiguring the video card. Q: How can I Adjusts the resolution? A: 5) Run C:\ghost.exe and choose Local → Partition → From Image from the menu. Choose the ghost image to the Windows / Computer Manual). Note that option and pressing the Enter key in the BIOS-SETUP of the driver used. (Refer to MagicInfo Note Making a Bootable USB Flash Disk...


