Quick Guide (ENGLISH)
Page 9
... channel list in PC mode. S.MODE 16.MDC 17.LOCK 18. TV/DTV 8. The LCD Display has a built-in the control panel, auto function is only allowed for the Power and LOCK buttons. This button is pressed in the Mute mode. CH/P 21.D.MENU 22.GUIDE For more information > TTX... unfreeze. In TV mode, selects TV channels. VOL + is used to return to the monitor at the bottom centre of the screen. Activates a highlighted menu item. Teletext Buttons 13.STILL 14.AUTO 15. 5. + VOL 6. Current picture information is displayed at the time. By changing the resolution in high ...
... channel list in PC mode. S.MODE 16.MDC 17.LOCK 18. TV/DTV 8. The LCD Display has a built-in the control panel, auto function is only allowed for the Power and LOCK buttons. This button is pressed in the Mute mode. CH/P 21.D.MENU 22.GUIDE For more information > TTX... unfreeze. In TV mode, selects TV channels. VOL + is used to return to the monitor at the bottom centre of the screen. Activates a highlighted menu item. Teletext Buttons 13.STILL 14.AUTO 15. 5. + VOL 6. Current picture information is displayed at the time. By changing the resolution in high ...
User Manual (ENGLISH)
Page 11
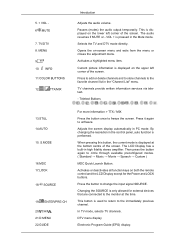
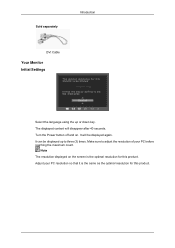
Sold separately Introduction DVI Cable Your Monitor Initial Settings Select the language using the up to adjust the resolution of your PC resolution so that it is the optimal resolution for this product. The displayed content will be displayed up or down key. It will disappear after 40 seconds. Adjust your PC before reaching the maximum count. Make sure to three (3) times. Note The resolution displayed on . It can be displayed again. Turn the Power button off and on the screen is the same as the optimal resolution for this product.
Sold separately Introduction DVI Cable Your Monitor Initial Settings Select the language using the up to adjust the resolution of your PC resolution so that it is the optimal resolution for this product. The displayed content will be displayed up or down key. It will disappear after 40 seconds. Adjust your PC before reaching the maximum count. Make sure to three (3) times. Note The resolution displayed on . It can be displayed again. Turn the Power button off and on the screen is the same as the optimal resolution for this product.
User Manual (ENGLISH)
Page 12
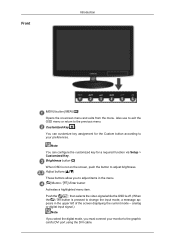
Also use to exit the OSD menu or return to adjust brightness. Adjust buttons [ ] These buttons allow you must connect your preferences. Brightness button [ ] When OSD is pressed to your monitor to adjust items in the upper left of the screen displaying the current mode -- analog or digital input ...signal.) Note If you select the digital mode, you to the graphic card's DVI port using the DVI cable. Front Introduction MENU button [MENU/ ]...
Also use to exit the OSD menu or return to adjust brightness. Adjust buttons [ ] These buttons allow you must connect your preferences. Brightness button [ ] When OSD is pressed to your monitor to adjust items in the upper left of the screen displaying the current mode -- analog or digital input ...signal.) Note If you select the digital mode, you to the graphic card's DVI port using the DVI cable. Front Introduction MENU button [MENU/ ]...
User Manual (ENGLISH)
Page 13
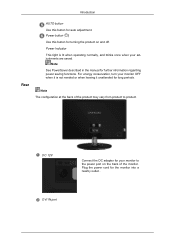
Power button [ ] Use this button for further information regarding power saving functions. Note The configuration at the back of the monitor. Plug the power cord for turning the product on the back of the product may vary from product to the power port on and off....light is not needed or when leaving it unattended for your adjustments are saved. For energy conservation, turn your monitor OFF when it is lit when operating normally, and blinks once when your monitor to product. DC 12V Connect the DC adapter for long periods. DVI IN port Note See PowerSaver described...
Power button [ ] Use this button for further information regarding power saving functions. Note The configuration at the back of the monitor. Plug the power cord for turning the product on the back of the product may vary from product to the power port on and off....light is not needed or when leaving it unattended for your adjustments are saved. For energy conservation, turn your monitor OFF when it is lit when operating normally, and blinks once when your monitor to product. DC 12V Connect the DC adapter for long periods. DVI IN port Note See PowerSaver described...
User Manual (ENGLISH)
Page 15
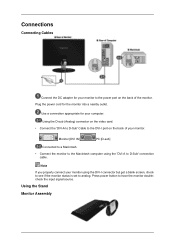
...-I connector but get a blank screen, check to see if the monitor status is set to analog. Using the Stand Monitor Assembly Press power button to the Macintosh computer using the DVI-I port on the back of your monitor. Plug the power cord for the monitor into a nearby outlet. Connections Connecting Cables Connect the DC adapter...
...-I connector but get a blank screen, check to see if the monitor status is set to analog. Using the Stand Monitor Assembly Press power button to the Macintosh computer using the DVI-I port on the back of your monitor. Plug the power cord for the monitor into a nearby outlet. Connections Connecting Cables Connect the DC adapter...

User Manual (ENGLISH)
Page 17
...-ROM drive. 2. Internet web site : http://www.samsung.com/ (Worldwide) Installing the Monitor Driver (Automatic) 1. Choose your monitor model in the model list, then click the "OK" button. 4. Follow the directions appropriate for the monitor driver, insert the CDROM included with this monitor. If you have. Then click "OK" button (Microsoft® Windows® XP/2000 Operating...
...-ROM drive. 2. Internet web site : http://www.samsung.com/ (Worldwide) Installing the Monitor Driver (Automatic) 1. Choose your monitor model in the model list, then click the "OK" button. 4. Follow the directions appropriate for the monitor driver, insert the CDROM included with this monitor. If you have. Then click "OK" button (Microsoft® Windows® XP/2000 Operating...
User Manual (ENGLISH)
Page 18
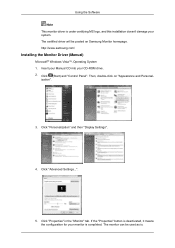
...ROM drive. 2. If the "Properties" button is completed. ization". 3. Click "Properties" in the "Monitor" tab. Click "Personalization" and then "Display Settings". 4. Click "Advanced Settings...". 5. Using the Software Note This monitor driver is . The monitor can be posted on "Appearance and ...Personal- Click (Start) and "Control Panel". The certified driver will be used as is under certifying MS logo, and this installation doesn't damage your system. http://www.samsung.com/ Installing the Monitor...
...ROM drive. 2. If the "Properties" button is completed. ization". 3. Click "Properties" in the "Monitor" tab. Click "Personalization" and then "Display Settings". 4. Click "Advanced Settings...". 5. Using the Software Note This monitor driver is . The monitor can be posted on "Appearance and ...Personal- Click (Start) and "Control Panel". The certified driver will be used as is under certifying MS logo, and this installation doesn't damage your system. http://www.samsung.com/ Installing the Monitor...
User Manual (ENGLISH)
Page 21
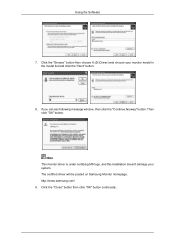
Click "Display" icon and choose the "Settings" tab then click "Advanced...". 4. and select "Install from a list or..." Click "Start" → "Control Panel" then click the "Appearance and Themes" icon. 3. Using the Software 1. Insert CD into the CD-ROM drive. 2. Click "Update Driver..." Select "Don't search, I will..." then click "Next" and then click "Have disk". then click "Next" button. 6. Click the "Properties" button on the "Monitor" tab and select "Driver" tab. 5.
Click "Display" icon and choose the "Settings" tab then click "Advanced...". 4. and select "Install from a list or..." Click "Start" → "Control Panel" then click the "Appearance and Themes" icon. 3. Using the Software 1. Insert CD into the CD-ROM drive. 2. Click "Update Driver..." Select "Don't search, I will..." then click "Next" and then click "Have disk". then click "Next" button. 6. Click the "Properties" button on the "Monitor" tab and select "Driver" tab. 5.
User Manual (ENGLISH)
Page 22
The certified driver will be posted on Samsung Monitor homepage. Note This monitor driver is under certifying MS logo, and this installation doesn't damage your monitor model in the model list and click the "Next" button. 8. Click the "Close" button then click "OK" button continually. Click the "Browse" button then choose A:(D:\Driver) and choose your system. Then click "OK" button. Using the Software 7. If you can see following message window, then click the "Continue Anyway" button. http://www.samsung.com/ 9.
The certified driver will be posted on Samsung Monitor homepage. Note This monitor driver is under certifying MS logo, and this installation doesn't damage your monitor model in the model list and click the "Next" button. 8. Click the "Close" button then click "OK" button continually. Click the "Browse" button then choose A:(D:\Driver) and choose your system. Then click "OK" button. Using the Software 7. If you can see following message window, then click the "Continue Anyway" button. http://www.samsung.com/ 9.
User Manual (ENGLISH)
Page 23
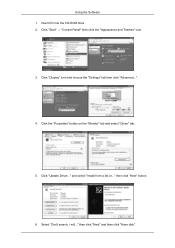
... on the "File Needed" window. 3. Click the "Open" button, then click "OK" button. 9. How to install 1. Click "Start", "Setting", "Control Panel". 2. Choose "Monitor". Case1 : If the "Properties" button is inactive, it means your monitor is completed. Click the "Browse" button then choose A:(D:\Driver). 8. Click the "Finish" button then the "Close" button. Please stop installation Case2 : If the "Properties...
... on the "File Needed" window. 3. Click the "Open" button, then click "OK" button. 9. How to install 1. Click "Start", "Setting", "Control Panel". 2. Choose "Monitor". Case1 : If the "Properties" button is inactive, it means your monitor is completed. Click the "Browse" button then choose A:(D:\Driver). 8. Click the "Finish" button then the "Close" button. Please stop installation Case2 : If the "Properties...
User Manual (ENGLISH)
Page 24
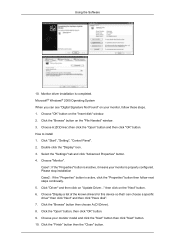
... your mouse. 3. The next screen is for selecting a keyboard. Double click the "Display" icon. 3. Select the "Monitor" tab. 5. Choose "Display a list of resolution, colors or frequency). Click "Apply" button if you connected to a different mode (lower mode of all devices" and choose the... monitor that you need to the Preset Timing Modes in the "Monitor Type" area. 6. And click the "Finish" button then the "Close" button. Microsoft® Windows® Millennium Operating System 1. In Display Registration Information...
... your mouse. 3. The next screen is for selecting a keyboard. Double click the "Display" icon. 3. Select the "Monitor" tab. 5. Choose "Display a list of resolution, colors or frequency). Click "Apply" button if you connected to a different mode (lower mode of all devices" and choose the... monitor that you need to the Preset Timing Modes in the "Monitor Type" area. 6. And click the "Finish" button then the "Close" button. Microsoft® Windows® Millennium Operating System 1. In Display Registration Information...
User Manual (ENGLISH)
Page 25
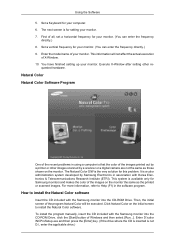
... initial screen to Help (F1) in using a computer is not D:\, enter the applicable drive.) Set a Keyboard for Samsung monitors and makes the color of your monitor. (You can enter the frequency directly.) 9. This information will not affect the actual execution of the program Natural Color will... be executed. How to install the Natural Color software Insert the CD included with the Samsung monitor into the CD-ROM Drive, click the [Start] button of the images printed out by a printer or other re- Using the Software 5. Set a vertical frequency ...
... initial screen to Help (F1) in using a computer is not D:\, enter the applicable drive.) Set a Keyboard for Samsung monitors and makes the color of your monitor. (You can enter the frequency directly.) 9. This information will not affect the actual execution of the program Natural Color will... be executed. How to install the Natural Color software Insert the CD included with the Samsung monitor into the CD-ROM Drive, click the [Start] button of the images printed out by a printer or other re- Using the Software 5. Set a vertical frequency ...
User Manual (ENGLISH)
Page 26
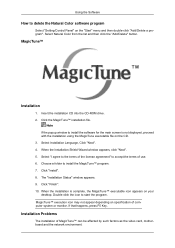
...press F5 Key. Using the Software How to delete the Natural Color software program Select "Setting/Control Panel" on specification of computer system or monitor. Click "Finish". 10. MagicTune™ execution icon may not appear depending on the "Start" menu and then double-click "Add/Delete a... program". Select Natural Color from the list and then click the "Add/Delete" button. Double-click the icon to install the MagicTune™ program. 7. Insert the installation CD into the CD-ROM drive. 2. Select installation Language, ...
...press F5 Key. Using the Software How to delete the Natural Color software program Select "Setting/Control Panel" on specification of computer system or monitor. Click "Finish". 10. MagicTune™ execution icon may not appear depending on the "Start" menu and then double-click "Add/Delete a... program". Select Natural Color from the list and then click the "Add/Delete" button. Double-click the icon to install the MagicTune™ program. 7. Insert the installation CD into the CD-ROM drive. 2. Select installation Language, ...

User Manual (ENGLISH)
Page 30
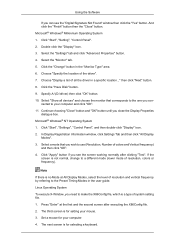
...pressing the MENU button after locking the OSD This is the function that locks the OSD in the animated screen on the center. Customized key You can still adjust the brightness and contrast, and adjust Customized Key ( ) using the Direct button. Adjusting the Monitor Direct Functions AUTO... When the 'AUTO' button is pressed, the auto adjustment screen appears as shown in order to keep the current states of Fine, Coarse...
...pressing the MENU button after locking the OSD This is the function that locks the OSD in the animated screen on the center. Customized key You can still adjust the brightness and contrast, and adjust Customized Key ( ) using the Direct button. Adjusting the Monitor Direct Functions AUTO... When the 'AUTO' button is pressed, the auto adjustment screen appears as shown in order to keep the current states of Fine, Coarse...

User Manual (ENGLISH)
Page 31
...function. (MagicBright - SITION tion sition Menu VPosition SETUP&RESET Reset Menu Trans- V-Position Image Size Menu H-Po- When the / button is off. H-Posi- Language LED On/Off parency SOURCE Selects the video signal while the OSD is pressed to adjust brightness. OSD...or digital input signal. Red Color Green Blue Color Tone Color Effect Gamma SIZE&PO- Adjusting the Monitor To view the operating screen displayed when pressing the [ ] button after configuring the customized key for a required function via Setup > Customized Key. Contrast ness Sharpness MagicBright...
...function. (MagicBright - SITION tion sition Menu VPosition SETUP&RESET Reset Menu Trans- V-Position Image Size Menu H-Po- When the / button is off. H-Posi- Language LED On/Off parency SOURCE Selects the video signal while the OSD is pressed to adjust brightness. OSD...or digital input signal. Red Color Green Blue Color Tone Color Effect Gamma SIZE&PO- Adjusting the Monitor To view the operating screen displayed when pressing the [ ] button after configuring the customized key for a required function via Setup > Customized Key. Contrast ness Sharpness MagicBright...
User Manual (ENGLISH)
Page 33
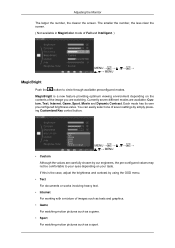
... circle through available preconfigured modes. MENU MENU • Custom Although the values are carefully chosen by simply pressing Customized Key control button. Each mode has its own pre-configured brightness value. MagicBright is the case, adjust the brightness and contrast by using the OSD... heavy text. • Internet For working with a mixture of Full and Intelligent. ) MENU MENU MagicBright Push the button to your taste. Adjusting the Monitor The larger the number, the clearer the screen. If this is a new feature providing optimum viewing environment depending on ...
... circle through available preconfigured modes. MENU MENU • Custom Although the values are carefully chosen by simply pressing Customized Key control button. Each mode has its own pre-configured brightness value. MagicBright is the case, adjust the brightness and contrast by using the OSD... heavy text. • Internet For working with a mixture of Full and Intelligent. ) MENU MENU MagicBright Push the button to your taste. Adjusting the Monitor The larger the number, the clearer the screen. If this is a new feature providing optimum viewing environment depending on ...
User Manual (ENGLISH)
Page 38
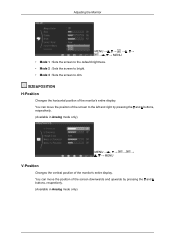
... display. You can move the position of the screen downwards and upwards by pressing the and buttons, respectively. (Available in Analog mode only) You can move the position of the screen to dim. Adjusting the Monitor MENU MENU • Mode 1 : Sets the screen to the default brightness. •... Mode 2 : Sets the screen to bright. • Mode 3 : Sets the screen to the left and right by pressing the and buttons, respectively. (Available in Analog mode only...
... display. You can move the position of the screen downwards and upwards by pressing the and buttons, respectively. (Available in Analog mode only) You can move the position of the screen to dim. Adjusting the Monitor MENU MENU • Mode 1 : Sets the screen to the default brightness. •... Mode 2 : Sets the screen to bright. • Mode 3 : Sets the screen to the left and right by pressing the and buttons, respectively. (Available in Analog mode only...
User Manual (ENGLISH)
Page 41
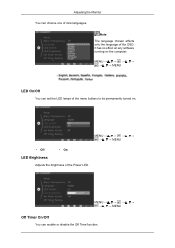
MENU MENU Off Timer On/Off You can choose one of the menu buttons to be permanently turned on the computer. MENU MENU • Off • On LED Brightness Adjusts the brightness of the OSD. It has no effect on any software running on . Adjusting the Monitor You can enable or disable the Off Time function. Note The language chosen affects only the language of the Power LED. MENU → , → MENU LED On/Off You can set the LED lamps of nine languages.
MENU MENU Off Timer On/Off You can choose one of the menu buttons to be permanently turned on the computer. MENU MENU • Off • On LED Brightness Adjusts the brightness of the OSD. It has no effect on any software running on . Adjusting the Monitor You can enable or disable the Off Time function. Note The language chosen affects only the language of the Power LED. MENU → , → MENU LED On/Off You can set the LED lamps of nine languages.
User Manual (ENGLISH)
Page 46
... "Recommended Mode 1600 x 900 60 Hz" on the screen? Troubleshooting Remove all electronic devices such as radios, fans, clocks and telephones that the monitor can handle properly. In this section to see if you see "Check Signal Cable" on the screen or if the screen goes white, this message... remedy any problems yourself. I cannot turn on the screen. A: Check the signal cable connection. (Connected using the DVI cable) Press ' ' button to the Preset Timing Modes) If the initial screen (the login screen) does not appear, contact the Service Center or your dealer. Check List ...
... "Recommended Mode 1600 x 900 60 Hz" on the screen? Troubleshooting Remove all electronic devices such as radios, fans, clocks and telephones that the monitor can handle properly. In this section to see if you see "Check Signal Cable" on the screen or if the screen goes white, this message... remedy any problems yourself. I cannot turn on the screen. A: Check the signal cable connection. (Connected using the DVI cable) Press ' ' button to the Preset Timing Modes) If the initial screen (the login screen) does not appear, contact the Service Center or your dealer. Check List ...
User Manual (ENGLISH)
Page 47
... Mode 1600 x 900 60 Hz" message appears for at the screen through a cellophane paper? Please change to the video card manual. A: The monitor is no image, press the ' ' button. A: Press a key on the keyboard to a crash between applications? A: If there is running a program or due to activate the... monitor and restore the image on the screen. Connect the DVI cable and then reboot the system. Q: Have you connect the DVI cable...
... Mode 1600 x 900 60 Hz" message appears for at the screen through a cellophane paper? Please change to the video card manual. A: The monitor is no image, press the ' ' button. A: Press a key on the keyboard to a crash between applications? A: If there is running a program or due to activate the... monitor and restore the image on the screen. Connect the DVI cable and then reboot the system. Q: Have you connect the DVI cable...


