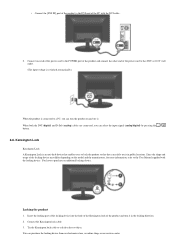
Samsung P2050 Research
Related Manual Pages


Related Videos

Samsung P2050 - Kursor TV
Duration: 1:39
Total Views: 5,580
Duration: 1:39
Total Views: 5,580
Unboxing LCD Samsung 20in P2050
Duration: 4:31
Total Views: 326
Duration: 4:31
Total Views: 326
Samsung P2050 20" LCD Monitor
Duration: 3:19
Total Views: 1,049
Duration: 3:19
Total Views: 1,049
Samsung P2050 20" LCD Monitor
Duration: 2:53
Total Views: 542
Duration: 2:53
Total Views: 542
SAMSUNG P2050 by.getitnow.gr 0432375
Duration: :13
Total Views: 718
Duration: :13
Total Views: 718
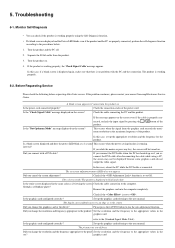
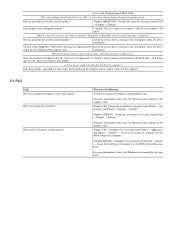
Similar Questions

Monitor Gives A Dark Picture After 3 Seconds
I have a problem with this monitor. After connecting to the pc and powered up the monitor, the monit...
I have a problem with this monitor. After connecting to the pc and powered up the monitor, the monit...
(Posted by joskeelst 10 years ago)

Setting Problem
plz send the detail setting we have to set in our system.we are unable to set the setting.so pz send...
plz send the detail setting we have to set in our system.we are unable to set the setting.so pz send...
(Posted by soumyajeetrath 10 years ago)

Monitor Is Getting Power But Display Screen Is Not Working,it Remains Black.
my samsung 920 NW monitor remains black evev if the power supply is there as indicated by the power ...
my samsung 920 NW monitor remains black evev if the power supply is there as indicated by the power ...
(Posted by abhijitroy4u 11 years ago)

What Is The Power Consumption Of This 713n Model.
(Posted by svsivanatarajan 11 years ago)
My Sreen Go Black And The Power Botton Blink Reb When I Coned To My New Pc
(Posted by janmarie 12 years ago)
Related Terms
The following terms were also used when searching for Samsung P2050 Research:- samsung p2050
- samsung p2050 monitor
- p2050 samsung
- samsung p2050 lcd
- p2050 manual
- p2050 driver
- samsung p2050 driver
- p2050 specs
- p2050 monitor
- samsung p2050 20 lcd
- samsung p2050 price
- p2050 price
- samsung p2050 lcd monitor
- p2050 lcd monitor
- p2050 20 lcd
- p2050 philippines
- p2050 monitor review
- samsung p2050 specs
- p2050 20 lcd monitor
- samsung p2050 monitor review
- samsung p2050 syncmaster
- samsung p2050 monitor price
- samsung p2050g
- samsung p2050 20 lcd monitor
- samsung p2050 20-inch
- samsung p2050 crystal design
- samsung p2050 dimension
- samsung p2050 voltage
- samsung p2050 driver windows 7
- samsung p2050 pdf
- samsung p2050 drivers
- syncmaster p2050
- samsung p2050 spec
- samsung p2050 resolution
- samsung p2050 manual
- samsung p2050 remove stand
- samsung p2050 monitor driver
- samsung p2050 philippines
- p2050 monitor price
- p2050 20-inch
- p2050 code
- p2050 crystal design
- p2050 dimension
- p2050 driver download
- p2050 driver windows 7
- p2050 driver xp
- p2050 drivers
- p2050 firmware
- p2050 firmware update
- p2050 hp driver
- p2050 monitor driver
- samsung p2050 20
- p2050 problems
- p2050 remove stand
- p2050 resolution
- p2050 samsung monitor
- p2050 service manual
- p2050 spec
- p2050 syncmaster
- p2050 voltage
- p2050 windows 7 driver
- p2050 xp driver
- samsung 2050
- samsung p 2050