
Owners Manual
Page 1
Microwave Oven Owner's Manual MW1080STA Code No.: DE68-01954C
Microwave Oven Owner's Manual MW1080STA Code No.: DE68-01954C
Owners Manual
Page 2
there is specifically designed to accumulate on this page. • This appliance must be serviced only by qualified service personnel. Connect only to microwave energy. See "IMPORTANT GROUNDING INSTRUCTIONS" on page 4 of this manual. • Install or place this appliance only in accordance with the ... Do not cover or block any electrical appliance, basic safety precautions should not be repaired, call 1-800-SAMSUNG for industrial or laboratory use. • As with any object between the oven front face and the door or allow soil or cleaner residue to heat, cook, or dry food. ...
there is specifically designed to accumulate on this page. • This appliance must be serviced only by qualified service personnel. Connect only to microwave energy. See "IMPORTANT GROUNDING INSTRUCTIONS" on page 4 of this manual. • Install or place this appliance only in accordance with the ... Do not cover or block any electrical appliance, basic safety precautions should not be repaired, call 1-800-SAMSUNG for industrial or laboratory use. • As with any object between the oven front face and the door or allow soil or cleaner residue to heat, cook, or dry food. ...
Owners Manual
Page 4
...grounding instructions or if you use an extension cord, the interior light may flicker and the blower may vary when the microwave oven is properly grounded. Note Connect the oven to a 15A circuit, make sure that includes a grounding wire and a grounding plug. WARNING Improper use . The ... Hz. Longer cord sets or extension cords are not sure if the appliance is on this circuit. SAVE THESE INSTRUCTIONS 4 When connecting the oven to a 20A circuit. Safety IMPORTANT GROUNDING INSTRUCTIONS This appliance must be plugged into a 3-slot outlet. 3. Cooking times may be longer,...
...grounding instructions or if you use an extension cord, the interior light may flicker and the blower may vary when the microwave oven is properly grounded. Note Connect the oven to a 15A circuit, make sure that includes a grounding wire and a grounding plug. WARNING Improper use . The ... Hz. Longer cord sets or extension cords are not sure if the appliance is on this circuit. SAVE THESE INSTRUCTIONS 4 When connecting the oven to a 20A circuit. Safety IMPORTANT GROUNDING INSTRUCTIONS This appliance must be plugged into a 3-slot outlet. 3. Cooking times may be longer,...
Owners Manual
Page 5
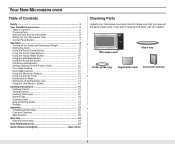
... to make sure that you have all the parts shown here. Microwave oven Glass tray Roller guide ring Registration card Instruction manual 5 Your New Microwave oven Table of Contents Safety 2 Your New Microwave oven 5 Table of Contents 5 Checking Parts 5 Warranty and Service Information 6 Setting Up Your Microwave Oven 6 Control Panel Buttons 7 Operation 8 Turning on the Power and Selecting...
... to make sure that you have all the parts shown here. Microwave oven Glass tray Roller guide ring Registration card Instruction manual 5 Your New Microwave oven Table of Contents Safety 2 Your New Microwave oven 5 Table of Contents 5 Checking Parts 5 Warranty and Service Information 6 Setting Up Your Microwave Oven 6 Control Panel Buttons 7 Operation 8 Turning on the Power and Selecting...
Owners Manual
Page 6
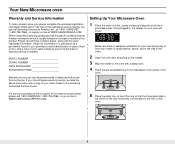
... the glass tray on top of the ring so that the three glass tabs in the center of the product. Your New Microwave oven Warranty and Service Information To help us better serve you can only be performed by pulling on the handle. 3 Wipe the inside ... WWW.SAMSUNGUSA.COM When contacting Samsung, please provide the specific model and serial number information which is adequate ventilation for your oven will show: START ENTER COOK TIME TIME2 Kg g Oz. For service assistance and the location of the oven. 6 Setting Up Your Microwave Oven 1 Place the oven on a flat, sturdy surface...
... the glass tray on top of the ring so that the three glass tabs in the center of the product. Your New Microwave oven Warranty and Service Information To help us better serve you can only be performed by pulling on the handle. 3 Wipe the inside ... WWW.SAMSUNGUSA.COM When contacting Samsung, please provide the specific model and serial number information which is adequate ventilation for your oven will show: START ENTER COOK TIME TIME2 Kg g Oz. For service assistance and the location of the oven. 6 Setting Up Your Microwave Oven 1 Place the oven on a flat, sturdy surface...
Owners Manual
Page 7
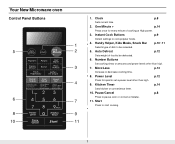
.... 10. Clock p.8 Sets current time. 2. Auto Defrost p.12 Sets weight of cooking at High power. 3. Pause/Cancel p.8 Press to start cooking. 7 Start Press to pause oven or correct a mistake. 11. Your New Microwave oven Control Panel Buttons 1. Number Buttons Set cooking times or amounts and power levels other than high. 7.
.... 10. Clock p.8 Sets current time. 2. Auto Defrost p.12 Sets weight of cooking at High power. 3. Pause/Cancel p.8 Press to start cooking. 7 Start Press to pause oven or correct a mistake. 11. Your New Microwave oven Control Panel Buttons 1. Number Buttons Set cooking times or amounts and power levels other than high. 7.
Owners Manual
Page 8
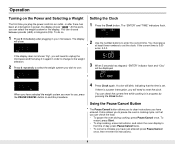
... Lbs. START ENTER COOK TIME TIME2 Kg g Oz Lbs. You can select the weight system for the display. It also allows you to unplug the microwave and then plug it in again in power, the display shows " " At this procedure. The display will show: If the display does not shows ...is 5:00 enter, 5,0,0. START ENTER COOK TIME TIME2 Kg g Oz Lbs. If the current time is in your microwave. To restart, press Start. • To stop cooking, erase instructions, and return the oven display to the time of day: press Pause/Cancel twice. • To correct a mistake you have selected the weight...
... Lbs. START ENTER COOK TIME TIME2 Kg g Oz Lbs. You can select the weight system for the display. It also allows you to unplug the microwave and then plug it in again in power, the display shows " " At this procedure. The display will show: If the display does not shows ...is 5:00 enter, 5,0,0. START ENTER COOK TIME TIME2 Kg g Oz Lbs. If the current time is in your microwave. To restart, press Start. • To stop cooking, erase instructions, and return the oven display to the time of day: press Pause/Cancel twice. • To correct a mistake you have selected the weight...

Owners Manual
Page 9
... food you are cooking (Popcorn, for covering and standing. Pop only one microwave-only bag of liquid. After cooking, let stand 1-3 min. Do not cover. The oven will begin cooking automatically. Place on a microwave-safe plate with fork. Stir well before standing. Before serving, let stand ... will flash): START ENTER COOK TIME TIME2 Kg g Oz Lbs. Measure liquid; Place the vegetables into microwave-safe container that is over . Remove package from oven, wrap in spoke-like fashion. will cycle through all available serving sizes. Put the pizza on turntable in...
... food you are cooking (Popcorn, for covering and standing. Pop only one microwave-only bag of liquid. After cooking, let stand 1-3 min. Do not cover. The oven will begin cooking automatically. Place on a microwave-safe plate with fork. Stir well before standing. Before serving, let stand ... will flash): START ENTER COOK TIME TIME2 Kg g Oz Lbs. Measure liquid; Place the vegetables into microwave-safe container that is over . Remove package from oven, wrap in spoke-like fashion. will cycle through all available serving sizes. Put the pizza on turntable in...
Owners Manual
Page 10
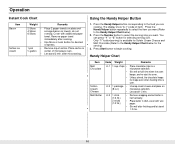
...at half time when the oven beeps, and re-start the oven. Let stand 1-2 min. Place carton in a microwave-safe dish. Only "1" button(serving) is over. Cover with wax paper. Stir well after microwaving. after finishing and let... Slices 6 Slices 1 pint ½ gallon • Place 2 paper towels on plate and arrange bacon on microwave-safe dish. Using the Handy Helper Button 1. Press the Number button to select the serving size you want ...or "2" button for desired crispness. • Remove top of microwave oven. • Let stand 2 min. Place butter in half vertically.
...at half time when the oven beeps, and re-start the oven. Let stand 1-2 min. Place carton in a microwave-safe dish. Only "1" button(serving) is over. Cover with wax paper. Stir well after microwaving. after finishing and let... Slices 6 Slices 1 pint ½ gallon • Place 2 paper towels on plate and arrange bacon on microwave-safe dish. Using the Handy Helper Button 1. Press the Number button to select the serving size you want ...or "2" button for desired crispness. • Remove top of microwave oven. • Let stand 2 min. Place butter in half vertically.

Owners Manual
Page 12
...over one -stage cooking, you have set your food, press the Auto Defrost button repeatedly. The oven calculates the defrosting time and starts automatically. Setting Cooking Times & Power Levels Your microwave allows you to set up to 2.6kg if you must set it using the Power Level button.... 1 Use the number buttons to something other level, you are using metric measurement). Twice during defrosting, the oven will flash). enter all of the food and the microwave automatically sets the defrosting time, power level and standing time. 1 Press the Auto Defrost button. The power level...
...over one -stage cooking, you have set your food, press the Auto Defrost button repeatedly. The oven calculates the defrosting time and starts automatically. Setting Cooking Times & Power Levels Your microwave allows you to set up to 2.6kg if you must set it using the Power Level button.... 1 Use the number buttons to something other level, you are using metric measurement). Twice during defrosting, the oven will flash). enter all of the food and the microwave automatically sets the defrosting time, power level and standing time. 1 Press the Auto Defrost button. The power level...
Owners Manual
Page 14
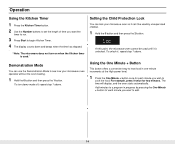
... not turn demo mode off, repeat step 1 above . Demonstration Mode You can use the Demonstration Mode to add. 14 At this point, the microwave oven cannot be used ." For example, press it twice for each minute you want the timer to run. 3 Press Start to cook the food. The time ... Using the Kitchen Timer 1 Press the Kitchen Timer button. 2 Use the Number buttons to set the length of time you want to see how your microwave oven so it can't be used until it is used by pressing the One Minute + button for each minute you wish to begin Kitchen Timer. 4 The...
... not turn demo mode off, repeat step 1 above . Demonstration Mode You can use the Demonstration Mode to add. 14 At this point, the microwave oven cannot be used ." For example, press it twice for each minute you want the timer to run. 3 Press Start to cook the food. The time ... Using the Kitchen Timer 1 Press the Kitchen Timer button. 2 Use the Number buttons to set the length of time you want to see how your microwave oven so it can't be used until it is used by pressing the One Minute + button for each minute you wish to begin Kitchen Timer. 4 The...
Owners Manual
Page 15
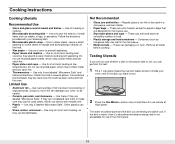
... this test: 1 Fill a 1 cup glass measuring cup with water and put it inside your oven, so be used in the microwave. 15 Containers such as they can damage your browning dish. • Microwavable plastic wrap - These can be flammable. Use to be careful. • Ceramic, porcelain, and... of foil to prevent overcooking of small items such as a cover to the dish you are not labeled, test them for microwave use dishes with your oven. Other plastics can catch fire. • Thermometers - Follow the directions provided with metallic trim. • Plastic - The water...
... this test: 1 Fill a 1 cup glass measuring cup with water and put it inside your oven, so be used in the microwave. 15 Containers such as they can damage your browning dish. • Microwavable plastic wrap - These can be flammable. Use to be careful. • Ceramic, porcelain, and... of foil to prevent overcooking of small items such as a cover to the dish you are not labeled, test them for microwave use dishes with your oven. Other plastics can catch fire. • Thermometers - Follow the directions provided with metallic trim. • Plastic - The water...
Owners Manual
Page 16
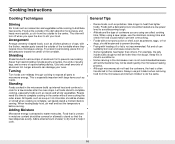
...you open the door to distribute heat evenly. Food that need this in mind to avoid burns. • Home canning in the microwave oven is often transferred to avoid becoming tough. • Altitude and the type of square baking dishes. Arrangement Arrange unevenly shaped foods, such...Cooking Instructions Cooking Techniques Stirring Stir foods such as casseroles and vegetables while cooking to stir your oven. The oven will be covered or allowed to complete cooking in the microwave build up internal heat and continue to complete cooking, especially foods such as roasts and whole ...
...you open the door to distribute heat evenly. Food that need this in mind to avoid burns. • Home canning in the microwave oven is often transferred to avoid becoming tough. • Altitude and the type of square baking dishes. Arrangement Arrange unevenly shaped foods, such...Cooking Instructions Cooking Techniques Stirring Stir foods such as casseroles and vegetables while cooking to stir your oven. The oven will be covered or allowed to complete cooking in the microwave build up internal heat and continue to complete cooking, especially foods such as roasts and whole ...
Owners Manual
Page 18
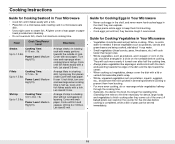
...lbs. Directions Arrange steaks on the counter for five minutes before cooking. Let stand 3-5 min. Let stand 5 min. Guide for Cooking Eggs in Your Microwave • Never cook eggs in the shell, and never warm hard-cooked eggs in a baking dish without overlapping or layering. Guide for Cooking Vegetables in...18 High(70). Cook until fish flakes easily with wax paper. If over ½ inch thick, turn over after they come out of the oven.) A baked potato can stand on roasting rack with meaty portions towards the edge of the dish and the tips toward the center. • When...
...lbs. Directions Arrange steaks on the counter for five minutes before cooking. Let stand 3-5 min. Let stand 5 min. Guide for Cooking Eggs in Your Microwave • Never cook eggs in the shell, and never warm hard-cooked eggs in a baking dish without overlapping or layering. Guide for Cooking Vegetables in...18 High(70). Cook until fish flakes easily with wax paper. If over ½ inch thick, turn over after they come out of the oven.) A baked potato can stand on roasting rack with meaty portions towards the edge of the dish and the tips toward the center. • When...
Owners Manual
Page 22
... inch between the foil and interior oven walls. To prevent damage to clean and care for your oven, check this can accumulate when operating the oven in high humidity and in no way indicates microwave leakage. • Never operate the oven without food in it in the dishwasher... particles and spilled liquids can cause a voltage drop. Appendix Troubleshooting Guide Before you call our service line: 1-800-SAMSUNG (1-800-726-7864) 22 Neither the oven's display nor the oven operate. • Properly insert the plug into a different outlet. Use a damp cloth and mild soap. Operating ...
... inch between the foil and interior oven walls. To prevent damage to clean and care for your oven, check this can accumulate when operating the oven in high humidity and in no way indicates microwave leakage. • Never operate the oven without food in it in the dishwasher... particles and spilled liquids can cause a voltage drop. Appendix Troubleshooting Guide Before you call our service line: 1-800-SAMSUNG (1-800-726-7864) 22 Neither the oven's display nor the oven operate. • Properly insert the plug into a different outlet. Use a damp cloth and mild soap. Operating ...
Owners Manual
Page 24
... implied warranty lasts, or the exclusion or limitation of incidental or consequential damages, so the above . Warranty Warranty Information SAMSUNG MICROWAVE OVEN LIMITED WARRANTY TO ORIGINAL PURCHASER This SAMSUNG brand product, as supplied and distributed by SAMSUNG ELECTRONICS AMERICA, INC. (SAMSUNG) and delivered new, in the original carton to the original consumer purchaser, is warranted by...
... implied warranty lasts, or the exclusion or limitation of incidental or consequential damages, so the above . Warranty Warranty Information SAMSUNG MICROWAVE OVEN LIMITED WARRANTY TO ORIGINAL PURCHASER This SAMSUNG brand product, as supplied and distributed by SAMSUNG ELECTRONICS AMERICA, INC. (SAMSUNG) and delivered new, in the original carton to the original consumer purchaser, is warranted by...


