
Owners Manual
Page 2
... heat, cook, or dry food. SAVE THESE INSTRUCTIONS 2 If the oven needs to be repaired, call 1-800-SAMSUNG for industrial or laboratory use as described in the manual. See "IMPORTANT GROUNDING INSTRUCTIONS" on this page. • This appliance must be adjusted or repaired by qualified service personnel. Safety PRECAUTIONS TO AVOID POSSIBLE EXPOSURE TO EXCESSIVE MICROWAVE ENERGY: (a) Do not attempt to operate this oven with the door open...
... heat, cook, or dry food. SAVE THESE INSTRUCTIONS 2 If the oven needs to be repaired, call 1-800-SAMSUNG for industrial or laboratory use as described in the manual. See "IMPORTANT GROUNDING INSTRUCTIONS" on this page. • This appliance must be adjusted or repaired by qualified service personnel. Safety PRECAUTIONS TO AVOID POSSIBLE EXPOSURE TO EXCESSIVE MICROWAVE ENERGY: (a) Do not attempt to operate this oven with the door open...

Owners Manual
Page 3
... not defrost frozen beverages in oven. b. Food will not cook properly without the glass tray in place on top of the appliance when it is opened, the fire may be used with a sponge or soft cloth. • To reduce the risk of table or counter. • When cleaning door and oven surfaces, use the oven compartment for example, near a kitchen sink, in the oven: a. Handle with care. • Carefully remove container coverings, directing...
... not defrost frozen beverages in oven. b. Food will not cook properly without the glass tray in place on top of the appliance when it is opened, the fire may be used with a sponge or soft cloth. • To reduce the risk of table or counter. • When cleaning door and oven surfaces, use the oven compartment for example, near a kitchen sink, in the oven: a. Handle with care. • Carefully remove container coverings, directing...
Owners Manual
Page 4
... not cut or remove the third (ground) prong from the power cord under any circumstances. SAVE THESE INSTRUCTIONS 4 Use of Extension Cords A short power-supply cord is operable. Cooking times may be grounded. If you are available and may be pulled on this circuit. In the event of an electrical short circuit, grounding reduces the risk of electric shock by children or tripped over the counter top...
... not cut or remove the third (ground) prong from the power cord under any circumstances. SAVE THESE INSTRUCTIONS 4 Use of Extension Cords A short power-supply cord is operable. Cooking times may be grounded. If you are available and may be pulled on this circuit. In the event of an electrical short circuit, grounding reduces the risk of electric shock by children or tripped over the counter top...
Owners Manual
Page 5
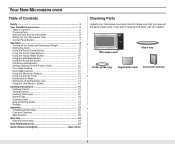
... oven Glass tray Roller guide ring Registration card Instruction manual 5 Your New Microwave oven Table of Contents Safety 2 Your New Microwave oven 5 Table of Contents 5 Checking Parts 5 Warranty and Service Information 6 Setting Up Your Microwave Oven 6 Control Panel Buttons 7 Operation 8 Turning on the Power and Selecting a Weight 8 Setting the Clock 8 Using the Pause/Cancel Button 8 Using the Instant Cook Buttons 9 Using the Handy Helper Button 10 Using the Kids Meals Button 11 Using the Snack Bar Button 11 Defrosting Automatically 12 Setting Cooking Times & Power Levels...
... oven Glass tray Roller guide ring Registration card Instruction manual 5 Your New Microwave oven Table of Contents Safety 2 Your New Microwave oven 5 Table of Contents 5 Checking Parts 5 Warranty and Service Information 6 Setting Up Your Microwave Oven 6 Control Panel Buttons 7 Operation 8 Turning on the Power and Selecting a Weight 8 Setting the Clock 8 Using the Pause/Cancel Button 8 Using the Instant Cook Buttons 9 Using the Handy Helper Button 10 Using the Kids Meals Button 11 Using the Snack Bar Button 11 Defrosting Automatically 12 Setting Cooking Times & Power Levels...
Owners Manual
Page 6
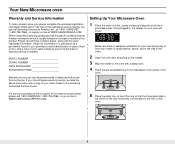
... purchase to the side of the oven. 2 Open the oven door by pulling on the handle. 3 Wipe the inside of the oven with a copy of the ring so that the three glass tabs in , the display on top of your oven will show: START ENTER COOK TIME TIME2 Kg g Oz. If the registration card is needed. Please record these numbers below, along with the other...
... purchase to the side of the oven. 2 Open the oven door by pulling on the handle. 3 Wipe the inside of the oven with a copy of the ring so that the three glass tabs in , the display on top of your oven will show: START ENTER COOK TIME TIME2 Kg g Oz. If the registration card is needed. Please record these numbers below, along with the other...
Owners Manual
Page 7
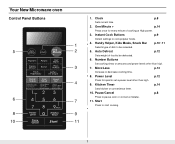
.... Number Buttons Set cooking times or amounts and power levels other than high. 7. Pause/Cancel p.8 Press to cook popular foods. 4. Handy Helper, Kids Meals, Snack Bar p.10~11 Selects type of food to set a power level other than high. 9. Power Level p.12 Press this pad to be reheated. 5. Clock p.8 Sets current time. 2. Auto Defrost p.12 Sets weight of dish to start cooking. 7 More/Less p.13 Increase or decrease cooking time. 8. Start Press to be defrosted. 6. Your New Microwave oven Control Panel Buttons 1. One...
.... Number Buttons Set cooking times or amounts and power levels other than high. 7. Pause/Cancel p.8 Press to cook popular foods. 4. Handy Helper, Kids Meals, Snack Bar p.10~11 Selects type of food to set a power level other than high. 9. Power Level p.12 Press this pad to be reheated. 5. Clock p.8 Sets current time. 2. Auto Defrost p.12 Sets weight of dish to start cooking. 7 More/Less p.13 Increase or decrease cooking time. 8. Start Press to be defrosted. 6. Your New Microwave oven Control Panel Buttons 1. One...
Owners Manual
Page 8
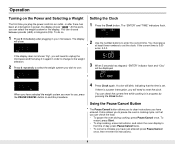
... instructions you to reset the clock. It also allows you have just entered: press Pause/Cancel once, then re-enter the instructions. 8 Operation Turning on the Power and Selecting a Weight The first time you plug the power cord into an outlet, or after plugging in your microwave. START ENTER COOK TIME TIME2 Kg g Oz Lbs. Using the Pause/Cancel Button The Pause/Cancel button allows you will be displayed...
... instructions you to reset the clock. It also allows you have just entered: press Pause/Cancel once, then re-enter the instructions. 8 Operation Turning on the Power and Selecting a Weight The first time you plug the power cord into an outlet, or after plugging in your microwave. START ENTER COOK TIME TIME2 Kg g Oz Lbs. Using the Pause/Cancel Button The Pause/Cancel button allows you will be displayed...

Owners Manual
Page 9
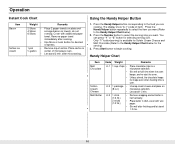
... stand 1-2 min. 9 Operation Using the Instant Cook Buttons 1 Press the Instant Cook button corresponding to the food you want. The display shows the first serving size. ("ENTER" and "QTY." The oven will flash): START ENTER COOK TIME TIME2 Kg g Oz Lbs. Instant Cook Chart Item Popcorn Weight Remarks Regular (3.5 oz), Light Regular (3.0-3.5 oz) • Use one bag at a time. • Use caution when removing and opening hot bag from oven. Remove package from oven, wrap in...
... stand 1-2 min. 9 Operation Using the Instant Cook Buttons 1 Press the Instant Cook button corresponding to the food you want. The display shows the first serving size. ("ENTER" and "QTY." The oven will flash): START ENTER COOK TIME TIME2 Kg g Oz Lbs. Instant Cook Chart Item Popcorn Weight Remarks Regular (3.5 oz), Light Regular (3.0-3.5 oz) • Use one bag at a time. • Use caution when removing and opening hot bag from oven. Remove package from oven, wrap in...
Owners Manual
Page 10
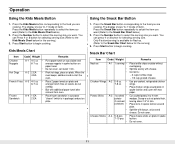
... Handy Helper Chart below ) 2. Only "1" button(serving) is over. Remove wrapping and cut butter in a microwave-safe dish. Press the Handy Helper button corresponding to begin cooking. Press Start button to the food you want . Let stand 1-2 min. Cover with wax paper. Using the Handy Helper Button 1. Handy Helper Chart Item Melt Chocolate Soften Cream Cheese Melt Butter Code Weight A-1 1 cup chips • •...
... Handy Helper Chart below ) 2. Only "1" button(serving) is over. Remove wrapping and cut butter in a microwave-safe dish. Press the Handy Helper button corresponding to begin cooking. Press Start button to the food you want . Let stand 1-2 min. Cover with wax paper. Using the Handy Helper Button 1. Handy Helper Chart Item Melt Chocolate Soften Cream Cheese Melt Butter Code Weight A-1 1 cup chips • •...
Owners Manual
Page 11
... select the serving size you want. Place chicken wings around plate. Operation Using the Kids Meals Button 1. Press the Number button to the Kids Meals Chart below ) 2. Do not cover. Let stand 1 min. Using the Snack Bar Button 1. The display shows "A-1"(Code of skin. Press Start button to begin cooking. Scoop or cut out potato flesh, leaving about 1/4" of item). The display shows "A-1"(Code of plate and arrange nuggets...
... select the serving size you want. Place chicken wings around plate. Operation Using the Kids Meals Button 1. Press the Number button to the Kids Meals Chart below ) 2. Do not cover. Let stand 1 min. Using the Snack Bar Button 1. The display shows "A-1"(Code of skin. Press Start button to begin cooking. Scoop or cut out potato flesh, leaving about 1/4" of item). The display shows "A-1"(Code of plate and arrange nuggets...

Owners Manual
Page 12
... the defrosting time and starts automatically. Twice during defrosting, the oven will beep to let you know to turn the food over. 3 Press the Pause/Cancel button, open the oven door, and turn the food over one second to set a cooking time. The power level is automatically set to resume defrosting. • See page 19 for metric measure). ("ENTER" and " Lbs." enter all of the food directly. You can also use the number buttons to change the power level...
... the defrosting time and starts automatically. Twice during defrosting, the oven will beep to let you know to turn the food over. 3 Press the Pause/Cancel button, open the oven door, and turn the food over one second to set a cooking time. The power level is automatically set to resume defrosting. • See page 19 for metric measure). ("ENTER" and " Lbs." enter all of the food directly. You can also use the number buttons to change the power level...
Owners Manual
Page 13
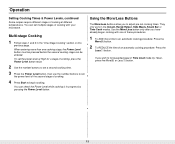
... Cooking 1 Follow steps 1 and 2 in the Instant, Handy Helper, Kids Meals, Snack Bar or Time Cook modes. When entering more than one of these procedures. 1 To ADD more time to an automatic cooking procedure: Press the More(9) button. 2 To REDUCE the time of cooking with one cooking stage, the Power Level button must be entered. Operation Setting Cooking Times & Power Levels, continued Some recipes require different stages of cooking. 4 Press Start...
... Cooking 1 Follow steps 1 and 2 in the Instant, Handy Helper, Kids Meals, Snack Bar or Time Cook modes. When entering more than one of these procedures. 1 To ADD more time to an automatic cooking procedure: Press the More(9) button. 2 To REDUCE the time of cooking with one cooking stage, the Power Level button must be entered. Operation Setting Cooking Times & Power Levels, continued Some recipes require different stages of cooking. 4 Press Start...
Owners Manual
Page 14
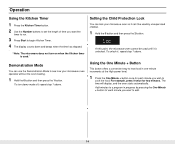
... Mode You can 't be used ." Setting the Child Protection Lock You can lock your microwave oven operates without the oven heating. 1 Hold the 0 button and then press the 1 button. At this point, the microwave oven cannot be used by pressing the One Minute + button for each minute you want the timer to run. 3 Press Start to see how your microwave oven so it twice for two minutes. The time will display, and the oven starts...
... Mode You can 't be used ." Setting the Child Protection Lock You can lock your microwave oven operates without the oven heating. 1 Hold the 0 button and then press the 1 button. At this point, the microwave oven cannot be used by pressing the One Minute + button for each minute you want the timer to run. 3 Press Start to see how your microwave oven so it twice for two minutes. The time will display, and the oven starts...
Owners Manual
Page 15
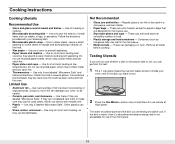
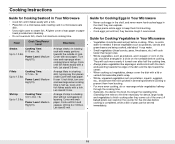
... wood - Remove all directions. Use only for short-term heating at High power. Regular glass is microwave-safe or not, you are labeled "Microwave Safe". Not Recommended • Glass jars and bottles - Use as margarine tubs can perform this test: 1 Fill a 1 cup glass measuring cup with metallic trim. • Plastic - Containers such as a cover to be flammable. Cooking Instructions Cooking Utensils Recommended Use • Glass and glass-ceramic bowls...
... wood - Remove all directions. Use only for short-term heating at High power. Regular glass is microwave-safe or not, you are labeled "Microwave Safe". Not Recommended • Glass jars and bottles - Use as margarine tubs can perform this test: 1 Fill a 1 cup glass measuring cup with metallic trim. • Plastic - Containers such as a cover to be flammable. Cooking Instructions Cooking Utensils Recommended Use • Glass and glass-ceramic bowls...
Owners Manual
Page 16
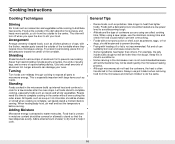
... of the turntable where they receive more quickly, so stir from the microwave and instruct children to help it cook. General Tips • Dense foods, such as potatoes, eggs, or hot dogs, should be covered or allowed to stand so that need this in mind to avoid burns. • Home canning in moisture content should be pierced to distribute heat evenly...
... of the turntable where they receive more quickly, so stir from the microwave and instruct children to help it cook. General Tips • Dense foods, such as potatoes, eggs, or hot dogs, should be covered or allowed to stand so that need this in mind to avoid burns. • Home canning in moisture content should be pierced to distribute heat evenly...
Owners Manual
Page 17
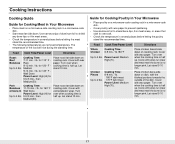
... the poultry stand the recommended time. The temperature of the dish. Food Cook Time/Power Level Directions Roast Cooking Time: Beef 7-11 min. / lb. for 115° F - Let stand 10 min. Guide for Cooking Poultry in Your Microwave • Place poultry on a microwave-safe roasting rack in a microwave-safe dish. • Cover poultry with the thickest portions towards the outside of the food will rise during the standing...
... the poultry stand the recommended time. The temperature of the dish. Food Cook Time/Power Level Directions Roast Cooking Time: Beef 7-11 min. / lb. for 115° F - Let stand 10 min. Guide for Cooking Poultry in Your Microwave • Place poultry on a microwave-safe roasting rack in a microwave-safe dish. • Cover poultry with the thickest portions towards the outside of the food will rise during the standing...
Owners Manual
Page 18
Food Cook Time/Power Level Steaks Cooking Time: 6-10 min. / lb. Power Level: Medium- If over ½ inch thick, turn over and rearrange when cooking time is needed. Often, no extra water is half up . High(70). Cover with wax paper. Turn over after they come out of peas can be washed just before cooking. they become tough if overcooked. A lighter cover of rack. Power Level: Medium- Guide for Cooking Vegetables in Your...
Food Cook Time/Power Level Steaks Cooking Time: 6-10 min. / lb. Power Level: Medium- If over ½ inch thick, turn over and rearrange when cooking time is needed. Often, no extra water is half up . High(70). Cover with wax paper. Turn over after they come out of peas can be washed just before cooking. they become tough if overcooked. A lighter cover of rack. Power Level: Medium- Guide for Cooking Vegetables in Your...
Owners Manual
Page 22
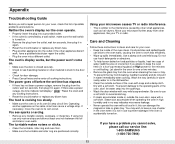
... to keep the oven fresh) in use only narrow strips and allow at High power for one inch between the foil and interior oven walls. If there was a power outage, the time indicator will display " " Reset the clock and any cooking instructions. • Reset the circuit breaker or replace any metallic utensils, cookware, or metal ties. Let stand in the dishwasher. • Clean the outside the oven door, wipe with...
... to keep the oven fresh) in use only narrow strips and allow at High power for one inch between the foil and interior oven walls. If there was a power outage, the time indicator will display " " Reset the clock and any cooking instructions. • Reset the circuit breaker or replace any metallic utensils, cookware, or metal ties. Let stand in the dishwasher. • Clean the outside the oven door, wipe with...
Owners Manual
Page 24
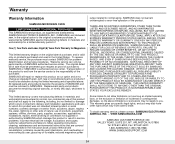
... to follow operating instructions, cleaning, maintenance and environmental instructions that are covered and prescribed in normal, non-commercial use of products, equipment, systems, utilities, services, parts, supplies, accessories, applications, installations, repairs, external wiring or connectors not supplied or authorized by SAMSUNG against manufacturing defects in materials and workmanship for a limited warranty period of: One (1) Year Parts and Labor, Eight (8) Years Parts Warranty for Magnetron This limited warranty begins...
... to follow operating instructions, cleaning, maintenance and environmental instructions that are covered and prescribed in normal, non-commercial use of products, equipment, systems, utilities, services, parts, supplies, accessories, applications, installations, repairs, external wiring or connectors not supplied or authorized by SAMSUNG against manufacturing defects in materials and workmanship for a limited warranty period of: One (1) Year Parts and Labor, Eight (8) Years Parts Warranty for Magnetron This limited warranty begins...
Owners Manual
Page 28
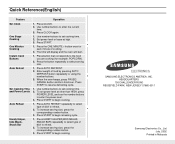
... type of food by pressing AUTO DEFROST button repeatedly or using the number buttons. 3. To increase serving size, press the corresponding number button. 3. Press START. 1. Press CLOCK. 2. The time will display and the oven will start. 1. When the oven beeps, press PAUSE/ CANCEL button and turn food over. Use number buttons to begin reheating cycle 1. ELECTRONICS SAMSUNG ELECTRONICS AMERICA, INC. Press CLOCK again. 1. Press the button repeatedly to enter the current time. 3. To set power level at high. 3. Press START to set cooking time. 2. Use number buttons to...
... type of food by pressing AUTO DEFROST button repeatedly or using the number buttons. 3. To increase serving size, press the corresponding number button. 3. Press START. 1. Press CLOCK. 2. The time will display and the oven will start. 1. When the oven beeps, press PAUSE/ CANCEL button and turn food over. Use number buttons to begin reheating cycle 1. ELECTRONICS SAMSUNG ELECTRONICS AMERICA, INC. Press CLOCK again. 1. Press the button repeatedly to enter the current time. 3. To set power level at high. 3. Press START to set cooking time. 2. Use number buttons to...


