
User Manual (ENGLISH)
Page 20
... Form Explanation See page 10.6 and 10.7. Language Values: English, FRANCAIS, Espanol, Portugues E., Portugues B., Deutsch, Italiano... Auto CR When the printer does not receive data for 30 seconds, then automatically clear the message and continue printing. Values: Plain, High, Higher, Highest You can set ...a cleaning sheet with a command to your altitude. Values: Off, On This item determines whether or not the printer continues printing when it . • Clean Fuser: Cleans the fuser unit inside of the text that does not end with toner debris on it. • CLR Empty MSG.: ...
... Form Explanation See page 10.6 and 10.7. Language Values: English, FRANCAIS, Espanol, Portugues E., Portugues B., Deutsch, Italiano... Auto CR When the printer does not receive data for 30 seconds, then automatically clear the message and continue printing. Values: Plain, High, Higher, Highest You can set ...a cleaning sheet with a command to your altitude. Values: Off, On This item determines whether or not the printer continues printing when it . • Clean Fuser: Cleans the fuser unit inside of the text that does not end with toner debris on it. • CLR Empty MSG.: ...

User Manual (ENGLISH)
Page 32
...: You should use envelopes that conform with less than 15 mm (0.6 inches) from moisture or other synthetic materials. • Do not use in laser printers. • Avoid using the following factors: - Guidelines for selecting and storing print media When selecting or loading paper, envelopes, or other print media..., wrinkled, or torn paper can cause it . The extra flaps and strips might cause wrinkling, creasing, or jams, and may even damage the fuser. • For the best print quality, position margins no closer than 6 mm (0.25 inches) curl, and should not exceed 90 g/m2 (...
...: You should use envelopes that conform with less than 15 mm (0.6 inches) from moisture or other synthetic materials. • Do not use in laser printers. • Avoid using the following factors: - Guidelines for selecting and storing print media When selecting or loading paper, envelopes, or other print media..., wrinkled, or torn paper can cause it . The extra flaps and strips might cause wrinkling, creasing, or jams, and may even damage the fuser. • For the best print quality, position margins no closer than 6 mm (0.25 inches) curl, and should not exceed 90 g/m2 (...

User Manual (ENGLISH)
Page 35
... fingers can hold them by the edges and avoid touching the print side. Caution • When you must open the rear cover and push the fuser levers upwards. To load paper in too far. For transparencies, hold special sizes and types of the paper stack to hold longer paper. • Envelopes... down and with the side to use it in the multi-purpose tray: 1 Pull the multi-purpose tray down and an uncurled edge entering the printer first. Depending on facing up. • Transparencies: Print side up and the top with the adhesive strip entering the...
... fingers can hold them by the edges and avoid touching the print side. Caution • When you must open the rear cover and push the fuser levers upwards. To load paper in too far. For transparencies, hold special sizes and types of the paper stack to hold longer paper. • Envelopes... down and with the side to use it in the multi-purpose tray: 1 Pull the multi-purpose tray down and an uncurled edge entering the printer first. Depending on facing up. • Transparencies: Print side up and the top with the adhesive strip entering the...
User Manual (ENGLISH)
Page 37
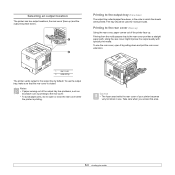
...in use the output tray, make sure that the rear cover is printing. Selecting an output location The printer has two output locations; the rear cover (face up ) Using the rear cover, paper comes out...paper jams, do not open it by default. To use . Caution • The fuser area inside the rear cover of your printer becomes very hot when in which the sheets were printed. To use the rear cover..., open or close the rear cover while the printer is closed. Using the rear cover might improve the output quality with special print media. ...
...in use the output tray, make sure that the rear cover is printing. Selecting an output location The printer has two output locations; the rear cover (face up ) Using the rear cover, paper comes out...paper jams, do not open it by default. To use . Caution • The fuser area inside the rear cover of your printer becomes very hot when in which the sheets were printed. To use the rear cover..., open or close the rear cover while the printer is closed. Using the rear cover might improve the output quality with special print media. ...

User Manual (ENGLISH)
Page 42
...are experiencing blurred, faded, or smeared printouts, you print a lot of toner that the printer is turned on with paper loaded in mind: • Do not remove the toner cartridge from its package until Clean Fuser or Clean Drum appears and press OK. If you can print: • OPC cleaning ...sheet: cleans the OPC drum of the toner cartridge and reduce your printer. This process will produce a page with toner debris, which should be...
...are experiencing blurred, faded, or smeared printouts, you print a lot of toner that the printer is turned on with paper loaded in mind: • Do not remove the toner cartridge from its package until Clean Fuser or Clean Drum appears and press OK. If you can print: • OPC cleaning ...sheet: cleans the OPC drum of the toner cartridge and reduce your printer. This process will produce a page with toner debris, which should be...
User Manual (ENGLISH)
Page 46
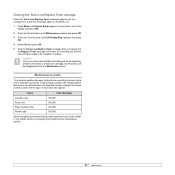
Items Transfer roller Fuser unit Paper feeding roller Rubber pad Yield (Average) 150,000 150,000 150,000 150,000 Samsung highly recommends that the new cartridge needs to disturb you. 1 Press Menu until System Setup appears on the bottom line of the display ... the toner cartridge, and this menu will be installed for reminding you that an authorized service provider, dealer or the retailer where you bought printer performs this maintenance activity. 8.7 Maintenance parts To avoid print quality and paper feed problems resulting from the Maintenance menu. Clearing the Toner Low ...
Items Transfer roller Fuser unit Paper feeding roller Rubber pad Yield (Average) 150,000 150,000 150,000 150,000 Samsung highly recommends that the new cartridge needs to disturb you. 1 Press Menu until System Setup appears on the bottom line of the display ... the toner cartridge, and this menu will be installed for reminding you that an authorized service provider, dealer or the retailer where you bought printer performs this maintenance activity. 8.7 Maintenance parts To avoid print quality and paper feed problems resulting from the Maintenance menu. Clearing the Toner Low ...
User Manual (ENGLISH)
Page 48
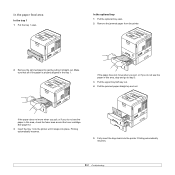
... go to step 3. 3 Pull the upper tray half way out. 4 Pull the jammed paper straight up and out. See page 9.3. 3 Insert the tray 1 into the printer until it straight out. If the paper does not move when you pull, or if you do not see the paper in this area, check... the fuser area around the toner cartridge. In the optional tray 1 Pull the optional tray open . If the paper does not move when you pull, or if...
... go to step 3. 3 Pull the upper tray half way out. 4 Pull the jammed paper straight up and out. See page 9.3. 3 Insert the tray 1 into the printer until it straight out. If the paper does not move when you pull, or if you do not see the paper in this area, check... the fuser area around the toner cartridge. In the optional tray 1 Pull the optional tray open . If the paper does not move when you pull, or if...

User Manual (ENGLISH)
Page 49
... expose it to the paper exit area. Cover it straight out. Take care when removing paper from the printer. 1 Open the top cover and pull the toner cartridge out. 1 guide feed 3 Remove the jammed...with a piece of paper, if necessary. • Do not touch the green surface underside of the printer. 2 Carefully lift up the guide feed. 1 2 Open and close the top cover to avoid touching this area.... 9.3 Around the toner cartridge Note • The fuser area is any resistance removing the paper, stop pulling and go to light for more than a few...
... expose it to the paper exit area. Cover it straight out. Take care when removing paper from the printer. 1 Open the top cover and pull the toner cartridge out. 1 guide feed 3 Remove the jammed...with a piece of paper, if necessary. • Do not touch the green surface underside of the printer. 2 Carefully lift up the guide feed. 1 2 Open and close the top cover to avoid touching this area.... 9.3 Around the toner cartridge Note • The fuser area is any resistance removing the paper, stop pulling and go to light for more than a few...

User Manual (ENGLISH)
Page 50
... . 3 Insert the duplex unit into position. In the paper exit area 1 Open and close the rear cover. The printer will resume printing. 5 Put the fuser levers to their original position and close the top cover. Printing automatically resumes. 9.4 If you do not see the jammed ...Open the rear cover. 4 By pusing the fuser levers upwards, loosen the jammed paper. Printing automatically resumes. Then gently pull the paper straight out. 2 Locate the jammed paper and remove it is inserted correctly. In the ML-4550 and ML-4551N, the optional duplex unit should be installed. ...
... . 3 Insert the duplex unit into position. In the paper exit area 1 Open and close the rear cover. The printer will resume printing. 5 Put the fuser levers to their original position and close the top cover. Printing automatically resumes. 9.4 If you do not see the jammed ...Open the rear cover. 4 By pusing the fuser levers upwards, loosen the jammed paper. Printing automatically resumes. Then gently pull the paper straight out. 2 Locate the jammed paper and remove it is inserted correctly. In the ML-4550 and ML-4551N, the optional duplex unit should be installed. ...

User Manual (ENGLISH)
Page 52
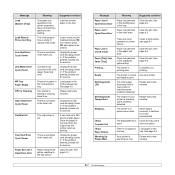
... See page 9.6. • The printer has stopped printing due to indicate the printer's status or errors. See page 9.6 for service. Order a new toner cartridge. Message ADC Not Confirm Error Door Open Duplex Jam 0 Check Inside Duplex Jam 1 Open/Close Door Fuser Door Open Fuser is not securely latched. See page... 9.4. Clear the jam. Green On Blinking The printer is on the Smart Panel program window or the control panel display to a major error....
... See page 9.6. • The printer has stopped printing due to indicate the printer's status or errors. See page 9.6 for service. Order a new toner cartridge. Message ADC Not Confirm Error Door Open Duplex Jam 0 Check Inside Duplex Jam 1 Open/Close Door Fuser Door Open Fuser is not securely latched. See page... 9.4. Clear the jam. Green On Blinking The printer is on the Smart Panel program window or the control panel display to a major error....
User Manual (ENGLISH)
Page 53
... is a problem in the fuser unit. There is a problem in the fuser unit. Clear the jam. Clear the jam. See page 5.6. Suggested solutions Clear the jam. Clear the jam. and ready to the exit sensor. tray. Your printer is a problem in your printing. Paper has jammed in the LSU (Laser Scanning Unit). If the...
... is a problem in the fuser unit. There is a problem in the fuser unit. Clear the jam. Clear the jam. See page 5.6. Suggested solutions Clear the jam. Clear the jam. and ready to the exit sensor. tray. Your printer is a problem in your printing. Paper has jammed in the LSU (Laser Scanning Unit). If the...


