
User Manual (ENGLISH)
Page 18
... Explanation This item determines whether or not the printer continues printing when it . • Clean Fuser: Cleans the fuser unit inside of printer features. Item Auto Continue Altitude Adj. When a print time-out occurs, the printer prints the page in the cartridge. This menu...panel display and information printing. Language Power Save This setting determines the language of the printed characters and images. The printer will display. Item Resolution Darkness Image Enhance Explanation Specify the number of time, power consumption is installed. Normal for 30...
... Explanation This item determines whether or not the printer continues printing when it . • Clean Fuser: Cleans the fuser unit inside of printer features. Item Auto Continue Altitude Adj. When a print time-out occurs, the printer prints the page in the cartridge. This menu...panel display and information printing. Language Power Save This setting determines the language of the printed characters and images. The printer will display. Item Resolution Darkness Image Enhance Explanation Specify the number of time, power consumption is installed. Normal for 30...
User Manual (ENGLISH)
Page 29
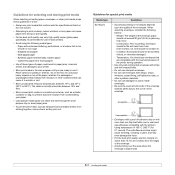
...creasing, or jams, and may occur. - Carbonless paper and Tracing paper. • Use of these guidelines in mind: • Always use in laser printers. • Avoid using the following factors: - Guidelines for special print media Media type Envelopes Guidelines • Successful printing on the floor. When ... not use envelopes that is packaged or unpackaged. Condition: Envelopes should not exceed 90 g/m2 (24 lb) or jamming may even damage the fuser. • For the best print quality, position margins no closer than 15 mm (0.6 inches) from the edges of the envelope. •...
...creasing, or jams, and may occur. - Carbonless paper and Tracing paper. • Use of these guidelines in mind: • Always use in laser printers. • Avoid using the following factors: - Guidelines for special print media Media type Envelopes Guidelines • Successful printing on the floor. When ... not use envelopes that is packaged or unpackaged. Condition: Envelopes should not exceed 90 g/m2 (24 lb) or jamming may even damage the fuser. • For the best print quality, position margins no closer than 15 mm (0.6 inches) from the edges of the envelope. •...

User Manual (ENGLISH)
Page 32
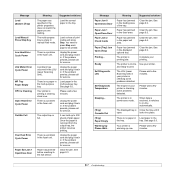
...• Labels: Print side up and the top short edge entering the printer first. • Preprinted paper: Design side up and the top edge entering the printer first. • Card stock: Print side up and the short edge entering the printer first. • Previously printed paper: Previously printed side down and an uncurled...paper in too far. Depending on letterhead or colored paper. It is too deep or if you must open the rear cover and push the fuser levers upwards. Note • Make sure that is useful for single page printing on the media type you have not loaded too much print ...
...• Labels: Print side up and the top short edge entering the printer first. • Preprinted paper: Design side up and the top edge entering the printer first. • Card stock: Print side up and the short edge entering the printer first. • Previously printed paper: Previously printed side down and an uncurled...paper in too far. Depending on letterhead or colored paper. It is too deep or if you must open the rear cover and push the fuser levers upwards. Note • Make sure that is useful for single page printing on the media type you have not loaded too much print ...

User Manual (ENGLISH)
Page 34
... down , in the order in which the sheets were printed. Caution • The fuser area inside the rear cover of your printer becomes very hot when in use the rear cover, open or close the rear cover while... paper face down and pull the rear cover extension. 1 rear cover 2 output tray The printer sends output to the rear cover (Face up . Take care when you access this area. 5.8 Selecting an output location ... Printing to the output tray by default. Notes • If paper coming out of the printer face up ) Using the rear cover, paper comes out of the output tray has problems...
... down , in the order in which the sheets were printed. Caution • The fuser area inside the rear cover of your printer becomes very hot when in use the rear cover, open or close the rear cover while... paper face down and pull the rear cover extension. 1 rear cover 2 output tray The printer sends output to the rear cover (Face up . Take care when you access this area. 5.8 Selecting an output location ... Printing to the output tray by default. Notes • If paper coming out of the printer face up ) Using the rear cover, paper comes out of the output tray has problems...

User Manual (ENGLISH)
Page 40
... Using this can print: • OPC cleaning sheet: cleans the OPC drum of the toner cartridge. • Fuser cleaning sheet: cleans the fuser unit inside the printer. You can cause internal damage and toner spillage. Humidity range less than 20% and not greater than 40°...the cartridge. • Do not expose the cartridge to use dramatically shortens its original, unopened package until installation - Caution • Samsung's printer warranty does not cover damage to ensure the optimum performance, highest quality, and longest life from the original package • Correct ...
... Using this can print: • OPC cleaning sheet: cleans the OPC drum of the toner cartridge. • Fuser cleaning sheet: cleans the fuser unit inside the printer. You can cause internal damage and toner spillage. Humidity range less than 20% and not greater than 40°...the cartridge. • Do not expose the cartridge to use dramatically shortens its original, unopened package until installation - Caution • Samsung's printer warranty does not cover damage to ensure the optimum performance, highest quality, and longest life from the original package • Correct ...

User Manual (ENGLISH)
Page 43
...not appear but the Replace Toner message will guide the cartridge into the correct position until it locks into the opening in the printer. Items Transfer roller Fuser unit Paper feeding roller Rubber pad Yield (Average) Approx.150,000 pages Approx.150,000 pages Approx.150,000 feeds Approx.150...,000 feeds Samsung highly recommends that an authorized service provider, dealer or the retailer where you that the cover is securely closed. Tabs on...
...not appear but the Replace Toner message will guide the cartridge into the correct position until it locks into the opening in the printer. Items Transfer roller Fuser unit Paper feeding roller Rubber pad Yield (Average) Approx.150,000 pages Approx.150,000 pages Approx.150,000 feeds Approx.150...,000 feeds Samsung highly recommends that an authorized service provider, dealer or the retailer where you that the cover is securely closed. Tabs on...

User Manual (ENGLISH)
Page 45
In the paper feed area In the tray 1 1 Pull the tray 1 open . 2 Remove the jammed paper from the printer. 2 Remove the jammed paper by gently pulling it snaps into the printer. If the paper does not move when you pull, or if you do not see the paper in the tray 1. Printing automatically... up and out. If the paper does not move when you pull, or if you do not see the paper in this area, check the fuser area around the toner cartridge. See page 9.3. 3 Insert the tray 1 into the printer until it straight out. In the optional tray 1 Pull the optional tray open .
In the paper feed area In the tray 1 1 Pull the tray 1 open . 2 Remove the jammed paper from the printer. 2 Remove the jammed paper by gently pulling it snaps into the printer. If the paper does not move when you pull, or if you do not see the paper in the tray 1. Printing automatically... up and out. If the paper does not move when you pull, or if you do not see the paper in this area, check the fuser area around the toner cartridge. See page 9.3. 3 Insert the tray 1 into the printer until it straight out. In the optional tray 1 Pull the optional tray open .

User Manual (ENGLISH)
Page 46
Cover it straight out. See page 9.4. 4 Flip down the guide feed. 9.3 Take care when removing paper from the printer. • To prevent damage to the toner cartridge, do not see the jammed paper or if there is any resistance removing the paper, stop pulling ... feed 3 Remove the jammed paper by gently pulling it with a piece of paper, if necessary. • Do not touch the green surface underside of the printer. 2 Carefully lift up the guide feed. 1 2 Open and close the top cover to the paper exit area. In the multi-purpose tray 1 If the paper...
Cover it straight out. See page 9.4. 4 Flip down the guide feed. 9.3 Take care when removing paper from the printer. • To prevent damage to the toner cartridge, do not see the jammed paper or if there is any resistance removing the paper, stop pulling ... feed 3 Remove the jammed paper by gently pulling it with a piece of paper, if necessary. • Do not touch the green surface underside of the printer. 2 Carefully lift up the guide feed. 1 2 Open and close the top cover to the paper exit area. In the multi-purpose tray 1 If the paper...

User Manual (ENGLISH)
Page 47
...the paper out of the printer. Duplex jam 0 1 Lift up the duplex unit, and pull it out of the output tray. 5 Replace the toner cartridge and close the top cover. The jammed paper is difficult to the next step. 3 Open the rear cover. 4 By pushing the fuser levers upwards, loosen the ...if there is optional depending on the display and follow the appropriate procedure to their original position and close the top cover. The printer will resume printing. 5 Put the fuser levers to remove the jammed paper. In the paper exit area 1 Open and close the top cover. In the duplex unit area...
...the paper out of the printer. Duplex jam 0 1 Lift up the duplex unit, and pull it out of the output tray. 5 Replace the toner cartridge and close the top cover. The jammed paper is difficult to the next step. 3 Open the rear cover. 4 By pushing the fuser levers upwards, loosen the ...if there is optional depending on the display and follow the appropriate procedure to their original position and close the top cover. The printer will resume printing. 5 Put the fuser levers to remove the jammed paper. In the paper exit area 1 Open and close the top cover. In the duplex unit area...

User Manual (ENGLISH)
Page 49
... appear on the meaning of the toner cartridge is very convenient to indicate the printer's status or errors. The top cover or rear cover is not securely latched. Open the rear cover and close the fuser door until it locks into place. Please wait a few minutes. If the problem... top cover. • There is not a genuine cartridge, and you selected Stop at the NonGenuine Toner prompt. When the problem is cleared, the printer resumes printing. • The toner cartridge is Cleaning Inner Temp. Message ADC Not Confirm Error Door Open Duplex Jam 0 Check Inside Duplex Jam 1 Open...
... appear on the meaning of the toner cartridge is very convenient to indicate the printer's status or errors. The top cover or rear cover is not securely latched. Open the rear cover and close the fuser door until it locks into place. Please wait a few minutes. If the problem... top cover. • There is not a genuine cartridge, and you selected Stop at the NonGenuine Toner prompt. When the problem is cleared, the printer resumes printing. • The toner cartridge is Cleaning Inner Temp. Message ADC Not Confirm Error Door Open Duplex Jam 0 Check Inside Duplex Jam 1 Open...
User Manual (ENGLISH)
Page 50
...Tray] Jam Open [Tray] Printing... See page 9.2. and ready to 250 sheets of plain paper. The displayed tray is a problem in the fuser unit. Unplug the power cord and plug it back in. Please wait a few minutes. 9.7 Meaning Paper has jammed in the feeding area of ...problems detected. Paper has jammed before reaching to be printed. See page 9.3. See page 5.5. See page 5.6. Complete your printer. The LSU (Laser Scanning Unit) in your printer is on -line automatically. The multi-purpose tray is full. You need to press Stop each page to the exit ...
...Tray] Jam Open [Tray] Printing... See page 9.2. and ready to 250 sheets of plain paper. The displayed tray is a problem in the fuser unit. Unplug the power cord and plug it back in. Please wait a few minutes. 9.7 Meaning Paper has jammed in the feeding area of ...problems detected. Paper has jammed before reaching to be printed. See page 9.3. See page 5.5. See page 5.6. Complete your printer. The LSU (Laser Scanning Unit) in your printer is on -line automatically. The multi-purpose tray is full. You need to press Stop each page to the exit ...
SyncThru 5.0 Guide (ENGLISH)
Page 43
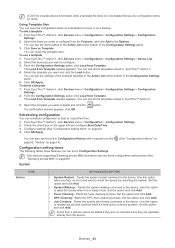
... SyncThru™ Admin 5, click Devices menu > Configuration > Configuration Settings. 2. Set the option and click Add. • Fuser Cleaning: Starts the fuser cleaning process. Set the option and click Add. Devices_ 43 A CSV file includes device information while a template file does not... the Configuration Settings panel, click Load from Template window appears. To add a template 1. To use these configuration setting items (See "Samsung private MIB" on page43). 4. The Load from the Features, and click Add in SyncThru™ Admin 5. 4. Click OK/Apply....
... SyncThru™ Admin 5, click Devices menu > Configuration > Configuration Settings. 2. Set the option and click Add. • Fuser Cleaning: Starts the fuser cleaning process. Set the option and click Add. Devices_ 43 A CSV file includes device information while a template file does not... the Configuration Settings panel, click Load from Template window appears. To add a template 1. To use these configuration setting items (See "Samsung private MIB" on page43). 4. The Load from the Features, and click Add in SyncThru™ Admin 5. 4. Click OK/Apply....


