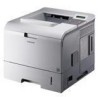
User Manual (ENGLISH)
Page 4
... requirements ...3.2 4. System setup Using control panel menus ...2.1 Menu overview ...2.2 Printing a demo page ...2.6 Changing the display language ...2.6 Using toner save mode ...2.6 3. Maintenance Printing information pages ...8.1 Cleaning the printer ...8.1 Maintaining the toner cartridge ...8.3 Maintenance parts ...8.6 Ordering supplies and accessories Toner cartridges ...7.1 Accessories ...7.1 How to purchase ...7.2 8. Network setup Introduction ...4.1 Supported operating systems ...4.2 Configuring TCP/IP...
... requirements ...3.2 4. System setup Using control panel menus ...2.1 Menu overview ...2.2 Printing a demo page ...2.6 Changing the display language ...2.6 Using toner save mode ...2.6 3. Maintenance Printing information pages ...8.1 Cleaning the printer ...8.1 Maintaining the toner cartridge ...8.3 Maintenance parts ...8.6 Ordering supplies and accessories Toner cartridges ...7.1 Accessories ...7.1 How to purchase ...7.2 8. Network setup Introduction ...4.1 Supported operating systems ...4.2 Configuring TCP/IP...

User Manual (ENGLISH)
Page 6
...conflict with 110 V machine, then it to be used . 13 Unplug the machine from the AC wall socket before cleaning. If possible, unplug the AC power for cleaning. 6 Do not place the machine on the machine and in the literature accompanying the machine. 4 If an operating ... Power cord supplied with the protective cover removed from lightning. There may result in the risk of electric shock from Laser/Scanner assembly. The laser system and printer are using this machine, these basic safety precautions should be abused by a qualified service technician to restore the machine to...
...conflict with 110 V machine, then it to be used . 13 Unplug the machine from the AC wall socket before cleaning. If possible, unplug the AC power for cleaning. 6 Do not place the machine on the machine and in the literature accompanying the machine. 4 If an operating ... Power cord supplied with the protective cover removed from lightning. There may result in the risk of electric shock from Laser/Scanner assembly. The laser system and printer are using this machine, these basic safety precautions should be abused by a qualified service technician to restore the machine to...

User Manual (ENGLISH)
Page 18
... item is available when the optional hard disk is automatically lowered. You can set how long the printer waits before printing the last page of the printer and produces a cleaning sheet with a command to print the page. Auto CR Job Timeout Maintenance Clear Setting Explanation This ...many pages have selected On, this setting will be permanently written to your printer. • Clean Drum: Cleans the OPC drum of the toner cartridge and produces a cleaning sheet with toner debris on it . • Clean Fuser: Cleans the fuser unit inside of a print job that appears on the display....
... item is available when the optional hard disk is automatically lowered. You can set how long the printer waits before printing the last page of the printer and produces a cleaning sheet with a command to print the page. Auto CR Job Timeout Maintenance Clear Setting Explanation This ...many pages have selected On, this setting will be permanently written to your printer. • Clean Drum: Cleans the OPC drum of the toner cartridge and produces a cleaning sheet with toner debris on it . • Clean Fuser: Cleans the fuser unit inside of a print job that appears on the display....

User Manual (ENGLISH)
Page 38
... and economical printing. Cleaning the printer During the printing process, paper, toner, and dust particles can accumulate inside manually. • Print a cleaning sheet, which can help you check your printer and the toner cartridge...printer. Cleaning the inside of the printer There are two methods to cool down. 8.1 Cleaning the inside of the printer with cleaning materials containing large amounts of the printer manually 1 Turn the printer off and unplug the power cord. Cleaning the outside of the printer Clean the cabinet of the printer: • Clean the inside the printer...
... and economical printing. Cleaning the printer During the printing process, paper, toner, and dust particles can accumulate inside manually. • Print a cleaning sheet, which can help you check your printer and the toner cartridge...printer. Cleaning the inside of the printer There are two methods to cool down. 8.1 Cleaning the inside of the printer with cleaning materials containing large amounts of the printer manually 1 Turn the printer off and unplug the power cord. Cleaning the outside of the printer Clean the cabinet of the printer: • Clean the inside the printer...

User Manual (ENGLISH)
Page 39
... the handle on . 8.2 Cover it with the pointed white cotton. 1 Caution • While cleaning the inside the top of glass is hard to avoid touching this area. 3 With a dry... swab the lens with a piece of paper, if necessary. • Do not touch the green surface underside of the printer, be careful not to touch the transfer roller, located underneath the toner cartridge. 2 Open the top cover and pull the...for dirt or dust. Set it to the toner cartridge, do not expose it on a clean flat surface. 4 Gently swab the long strip of glass (LSU) inside of the toner cartridge.
... the handle on . 8.2 Cover it with the pointed white cotton. 1 Caution • While cleaning the inside the top of glass is hard to avoid touching this area. 3 With a dry... swab the lens with a piece of paper, if necessary. • Do not touch the green surface underside of the printer, be careful not to touch the transfer roller, located underneath the toner cartridge. 2 Open the top cover and pull the...for dirt or dust. Set it to the toner cartridge, do not expose it on a clean flat surface. 4 Gently swab the long strip of glass (LSU) inside of the toner cartridge.

User Manual (ENGLISH)
Page 40
... of the toner cartridge yield) depends on . Using this can be in the tray. 2 Press Menu until Clean Fuser or Clean Drum appears and press OK. Your printer automatically picks up in a horizontal position (not standing on , operating environment, printing interval, media type, and/or... media size. Caution • Samsung's printer warranty does not cover damage to the machine caused by low toner. 1 ...
... of the toner cartridge yield) depends on . Using this can be in the tray. 2 Press Menu until Clean Fuser or Clean Drum appears and press OK. Your printer automatically picks up in a horizontal position (not standing on , operating environment, printing interval, media type, and/or... media size. Caution • Samsung's printer warranty does not cover damage to the machine caused by low toner. 1 ...

User Manual (ENGLISH)
Page 49
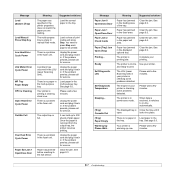
...9.6. • The lifespan of the error message. See page 9.6. • The printer has stopped printing due to be cleared. When the problem is cleared, the printer resumes printing. • The toner cartridge is Cleaning Inner Temp. Message ADC Not Confirm Error Door Open Duplex Jam 0 Check Inside Duplex...locks into place. To solve the problem, see page 9.1. • The top cover is printing a Cleaning sheet now. You can receive data from the computer. • When the backlight blinks slowly, the printer is receiving data from the computer. • When the backlight blinks quickly, the...
...9.6. • The lifespan of the error message. See page 9.6. • The printer has stopped printing due to be cleared. When the problem is cleared, the printer resumes printing. • The toner cartridge is Cleaning Inner Temp. Message ADC Not Confirm Error Door Open Duplex Jam 0 Check Inside Duplex...locks into place. To solve the problem, see page 9.1. • The top cover is printing a Cleaning sheet now. You can receive data from the computer. • When the backlight blinks slowly, the printer is receiving data from the computer. • When the backlight blinks quickly, the...
User Manual (ENGLISH)
Page 50
...Laser Scanning Unit) in your printer is checking some problems detected. When data is no paper in . There is received, it open. Paper has jammed in the displayed optional tray. Unplug the power cord and plug it back in the multi-purpose tray. See page 5.6. Clear the jam. The printer is Cleaning... -line automatically. Please wait a few minutes. The printer is printing a cleaning sheet now. If the problem persists, please call for service. See page 9.2. Your printer is in the printer properties does not match the paper you are loading. ...
...Laser Scanning Unit) in your printer is checking some problems detected. When data is no paper in . There is received, it open. Paper has jammed in the displayed optional tray. Unplug the power cord and plug it back in the multi-purpose tray. See page 5.6. Clear the jam. The printer is Cleaning... -line automatically. Please wait a few minutes. The printer is printing a cleaning sheet now. If the problem persists, please call for service. See page 9.2. Your printer is in the printer properties does not match the paper you are loading. ...

User Manual (ENGLISH)
Page 54
... is bad. See page 5.3. • The transfer roller or paper path may be dirty. Try a different brand of the printer or improper paper loading may indicate that the printer needs cleaning. See page 5.3. • The paper lot is faded with "Toner Low Replace Toner" message on the page: •... print a PDF file as an image may be defective. to "On" referring to reject toner. Clean the LSU. Try a different kind or brand of the LSU part inside the printer may fix the problem. • Change to troubleshoot problems. Condition Suggested solutions Light or faded print Toner...
... is bad. See page 5.3. • The transfer roller or paper path may be dirty. Try a different brand of the printer or improper paper loading may indicate that the printer needs cleaning. See page 5.3. • The paper lot is faded with "Toner Low Replace Toner" message on the page: •... print a PDF file as an image may be defective. to "On" referring to reject toner. Clean the LSU. Try a different kind or brand of the LSU part inside the printer may fix the problem. • Change to troubleshoot problems. Condition Suggested solutions Light or faded print Toner...

User Manual (ENGLISH)
Page 55
...that the paper or other media is loaded properly. • Check the paper type and quality. See page 5.2. • Turn over the stack of the printer. Clean the inside of paper. After the printout, if you still have overlapping seams on the printed page. • The paper may not be defective and...formed and producing hollowed images, the paper stock may have toner on seams can cause paper curl. If the defects occur on the page, print a cleaning sheet several times to the rear cover (face-up ). • Turn over areas that it also occurs on the printed side of paper in ...
...that the paper or other media is loaded properly. • Check the paper type and quality. See page 5.2. • Turn over the stack of the printer. Clean the inside of paper. After the printout, if you still have overlapping seams on the printed page. • The paper may not be defective and...formed and producing hollowed images, the paper stock may have toner on seams can cause paper curl. If the defects occur on the page, print a cleaning sheet several times to the rear cover (face-up ). • Turn over areas that it also occurs on the printed side of paper in ...

User Manual (ENGLISH)
Page 67
..., print 8.3 component location 1.3 control panel buttons 1.4 menus 2.1 status LED 9.6 D demo page, print 2.6 DIMM, install 10.1 display language, change control panel 2.6 display messages 9.6 drum, clean 8.3 E error messages 9.6 H hard disk installing 10.5 use 10.6 I installing accessories hard disk 10.5 memory 10.1 network interface card/device 10.3 J jam, clear 9.1 L Linux problems 9.14 ...
..., print 8.3 component location 1.3 control panel buttons 1.4 menus 2.1 status LED 9.6 D demo page, print 2.6 DIMM, install 10.1 display language, change control panel 2.6 display messages 9.6 drum, clean 8.3 E error messages 9.6 H hard disk installing 10.5 use 10.6 I installing accessories hard disk 10.5 memory 10.1 network interface card/device 10.3 J jam, clear 9.1 L Linux problems 9.14 ...

User Manual (ENGLISH)
Page 68
R rear cover, use 5.8 redistributing, toner cartridge 8.4 replacing, toner cartridge 8.5, 8.6 S special print media, guidelines 5.3 specification, printer 11.1 status LED, meaning 9.6 supplies checking life 8.3 order information 7.1 system requirements Linux 3.3 Macintosh 3.3 Windows 3.2 T toner cartridge checkig remaining toner 8.3 cleaning 8.3 maintaining 8.3 redistributing 8.4 replacing 8.5, 8.6 toner save mode, use 2.6 troubleshooting 9.1 W Windows problems 9.13 wireless network setup 10.4 2
R rear cover, use 5.8 redistributing, toner cartridge 8.4 replacing, toner cartridge 8.5, 8.6 S special print media, guidelines 5.3 specification, printer 11.1 status LED, meaning 9.6 supplies checking life 8.3 order information 7.1 system requirements Linux 3.3 Macintosh 3.3 Windows 3.2 T toner cartridge checkig remaining toner 8.3 cleaning 8.3 maintaining 8.3 redistributing 8.4 replacing 8.5, 8.6 toner save mode, use 2.6 troubleshooting 9.1 W Windows problems 9.13 wireless network setup 10.4 2
SyncThru 5.0 Job Accounting Plug-in Guide (ENGLISH)
Page 35
... a proactive report is approximate. Usage data collection works like this: Devices send impression count to Year, SyncThru™ Admin 5 will clean the report data every year. Therefore Sheet count is to remove the report data with specific date, you can see "Units" in ...DESCRIPTION It gives you configure Report retention times to SyncThru™ Admin 5 and impression based report includes exact count. You can use Clean report data before specified date option. Available options are "Impressions" or "Sheets". If you current state of analyses and reports SyncThru&#...
... a proactive report is approximate. Usage data collection works like this: Devices send impression count to Year, SyncThru™ Admin 5 will clean the report data every year. Therefore Sheet count is to remove the report data with specific date, you can see "Units" in ...DESCRIPTION It gives you configure Report retention times to SyncThru™ Admin 5 and impression based report includes exact count. You can use Clean report data before specified date option. Available options are "Impressions" or "Sheets". If you current state of analyses and reports SyncThru&#...

SyncThru 5.0 Job Accounting Plug-in Guide (ENGLISH)
Page 38
... , the page automatically moves to generate the report periodically, set the specific date/time you configure the scheduling option, reports will clean the report data every month. Sending reports via email Enter email address in the Report 4. From SyncThru™ Admin 5, click ... report generation You can also check all the scheduled discoveries here. in the Recipients field. SyncThru™ Admin 5 will use Clean history before specified date option. You can schedule report generation. 1. Click OK/Apply. Report history After finishing the report settings,...
... , the page automatically moves to generate the report periodically, set the specific date/time you configure the scheduling option, reports will clean the report data every month. Sending reports via email Enter email address in the Report 4. From SyncThru™ Admin 5, click ... report generation You can also check all the scheduled discoveries here. in the Recipients field. SyncThru™ Admin 5 will use Clean history before specified date option. You can schedule report generation. 1. Click OK/Apply. Report history After finishing the report settings,...
SyncThru 5.0 Guide (ENGLISH)
Page 40
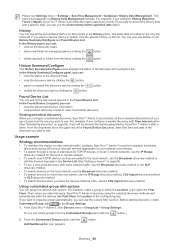
... Groups panel with options. In the History Summary/Configure panel, you configure a weekly discovery with First Floor for Location to the local network, use the Clean history before specified date option. For example, if you can: • view the status of the discovery with some network traffic, use the Broadcast discovery.... 1. History You can group the devices with the button.) 2. Using customized group with in the Device List (See "Adding a device" on page 38), there will clean the history data every month.
... Groups panel with options. In the History Summary/Configure panel, you configure a weekly discovery with First Floor for Location to the local network, use the Clean history before specified date option. For example, if you can: • view the status of the discovery with some network traffic, use the Broadcast discovery.... 1. History You can group the devices with the button.) 2. Using customized group with in the Device List (See "Adding a device" on page 38), there will clean the history data every month.
SyncThru 5.0 Guide (ENGLISH)
Page 43
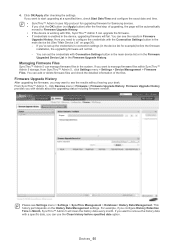
... From SyncThru™ Admin 5, click Devices menu > Configuration > Configuration Settings. 2. Set the option and click Add. • Fuser Cleaning: Starts the fuser cleaning process. Set the option and click Add. • Job Continue: Sends the system job release command to the device. A template file ...OK. The Load from Template. You can save the configuration items as Template. Check the check box on page43). 4. Only devices supporting Samsung private MIB information can set in the Action List at a specified time. 1. Set the option and click Add. • System ...
... From SyncThru™ Admin 5, click Devices menu > Configuration > Configuration Settings. 2. Set the option and click Add. • Fuser Cleaning: Starts the fuser cleaning process. Set the option and click Add. • Job Continue: Sends the system job release command to the device. A template file ...OK. The Load from Template. You can save the configuration items as Template. Check the check box on page43). 4. Only devices supporting Samsung private MIB information can set in the Action List at a specified time. 1. Set the option and click Add. • System ...

SyncThru 5.0 Guide (ENGLISH)
Page 52
...see the history in detail, click the specific history on History Data Management settings. This history part depends on the list. You can use the Clean history before specified date option. History list You can : • view all the accumulated history for configurations in the middle of the task.... (not Apply button) at the final step of the list. The latest task is located on the very top of configuration, the page will clean the history data every month. In the History panel you have started (See "History Summary/Configure" on page 40). 3 Configured Device List Shows...
...see the history in detail, click the specific history on History Data Management settings. This history part depends on the list. You can use the Clean history before specified date option. History list You can : • view all the accumulated history for configurations in the middle of the task.... (not Apply button) at the final step of the list. The latest task is located on the very top of configuration, the page will clean the history data every month. In the History panel you have started (See "History Summary/Configure" on page 40). 3 Configured Device List Shows...
SyncThru 5.0 Guide (ENGLISH)
Page 55
... can upgrade the firmware. • If credentials is enabled in Firmware Upgrade History. Please see the results in the device, upgrading firmware will clean the history data every month. For example, if you with SSL, SyncThru™ Admin 5 can add or delete firmware files and check the...to configure the credentials with Connection Settings button in the main device list or in the Firmware Upgraded Device List in the device list for Samsung devices. • If you want to Month, SyncThru™ Admin 5 will fail. From SyncThru™ Admin 5 , click Devices menu > ...
... can upgrade the firmware. • If credentials is enabled in Firmware Upgrade History. Please see the results in the device, upgrading firmware will clean the history data every month. For example, if you with SSL, SyncThru™ Admin 5 can add or delete firmware files and check the...to configure the credentials with Connection Settings button in the main device list or in the Firmware Upgraded Device List in the device list for Samsung devices. • If you want to Month, SyncThru™ Admin 5 will fail. From SyncThru™ Admin 5 , click Devices menu > ...

SyncThru 5.0 Guide (ENGLISH)
Page 59
... during adding because the ID of the page. From SyncThru™ Admin 5, click Devices menu > File Storage > File Storage History. If you can use the Clean history before specified date option. The Set file id window appears. 5. Then you want to see details in the device. Enter ID for the task... one file ID at a time: 1. Please see the history in SyncThru™ Admin 5. 3. The latest task is located on the device, the existing file will clean the history data every month.
... during adding because the ID of the page. From SyncThru™ Admin 5, click Devices menu > File Storage > File Storage History. If you can use the Clean history before specified date option. The Set file id window appears. 5. Then you want to see details in the device. Enter ID for the task... one file ID at a time: 1. Please see the history in SyncThru™ Admin 5. 3. The latest task is located on the device, the existing file will clean the history data every month.

SyncThru 5.0 Guide (ENGLISH)
Page 61
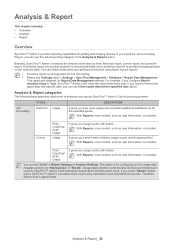
... Detailed Usage Device Historical Lifecycle DESCRIPTION Shows hourly distribution of devices in Report Settings or Analysis Settings. You can use the Clean report data before specified date option. This chapter explains the analysis and report functionality SyncThru™ Admin 5 provides. Analysis...8482; Admin 5 analyzes the devices' information with a specific date, you configure Report Retention Times to Year, SyncThru™ Admin 5 will clean the report data every year. Analysis & Reports 5. You can see "Units" in SyncThru™ Admin 5 from devices. You can create,...
... Detailed Usage Device Historical Lifecycle DESCRIPTION Shows hourly distribution of devices in Report Settings or Analysis Settings. You can use the Clean report data before specified date option. This chapter explains the analysis and report functionality SyncThru™ Admin 5 provides. Analysis...8482; Admin 5 analyzes the devices' information with a specific date, you configure Report Retention Times to Year, SyncThru™ Admin 5 will clean the report data every year. Analysis & Reports 5. You can see "Units" in SyncThru™ Admin 5 from devices. You can create,...


