

User Manual (ENGLISH)
Page 8
... Panel C.2 Reinstalling Remote Control Panel C.3 Removing Remote Control Panel C.3 Selecting Print Settings C.4 Starting the Remote Control Panel C.4 Using the Remote Control Panel Tabs C.5 Appendix D: INSTALLING PRINTER OPTIONS Precautions When Installing Printer Options D.2 Installing Memory and PostScript DIMMs D.3 Removing the Memory or PS DIMM D.6 Installing a Network Card D.7 Installing an Optional Paper Tray D.11 vii
... Panel C.2 Reinstalling Remote Control Panel C.3 Removing Remote Control Panel C.3 Selecting Print Settings C.4 Starting the Remote Control Panel C.4 Using the Remote Control Panel Tabs C.5 Appendix D: INSTALLING PRINTER OPTIONS Precautions When Installing Printer Options D.2 Installing Memory and PostScript DIMMs D.3 Removing the Memory or PS DIMM D.6 Installing a Network Card D.7 Installing an Optional Paper Tray D.11 vii
User Manual (ENGLISH)
Page 22
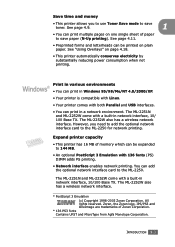
... Corporation. Save time and money • This printer allows you need to add the optional network interface card to the ML-2250 for network printing. All rights reserved. See page 4.9. 1 • You can be expanded to the ML-2250. You can print in network interface, 10/100... network environment. Zoran, the Zoran logo, IPS/PS3 and OneImage are trademarks of memory which can print in Windows 95/98/Me/NT 4.0/2000/XP. • Your printer is compatible with Linux. • Your printer comes with a built-in various environments • You can be printed on plain ...
... Corporation. Save time and money • This printer allows you need to add the optional network interface card to the ML-2250 for network printing. All rights reserved. See page 4.9. 1 • You can be expanded to the ML-2250. You can print in network interface, 10/100... network environment. Zoran, the Zoran logo, IPS/PS3 and OneImage are trademarks of memory which can print in Windows 95/98/Me/NT 4.0/2000/XP. • Your printer is compatible with Linux. • Your printer comes with a built-in various environments • You can be printed on plain ...
User Manual (ENGLISH)
Page 80
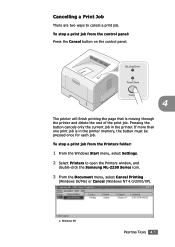
... cancel a print job. Cancelling a Print Job There are two ways to open the Printers window, and double-click the Samsung ML-2250 Series icon. 3 From the Document menu, select Cancel Printing (Windows 9x/Me) or Cancel (Windows NT 4.0/2000/XP). Windows 98 ...PRINTING TASKS 4.5 If more than one print job is moving through the printer and delete the rest of the print job. Pressing the button cancels only the current job in the printer memory...
... cancel a print job. Cancelling a Print Job There are two ways to open the Printers window, and double-click the Samsung ML-2250 Series icon. 3 From the Document menu, select Cancel Printing (Windows 9x/Me) or Cancel (Windows NT 4.0/2000/XP). Windows 98 ...PRINTING TASKS 4.5 If more than one print job is moving through the printer and delete the rest of the print job. Pressing the button cancels only the current job in the printer memory...
User Manual (ENGLISH)
Page 115
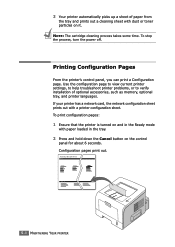
Samsung ML-2250 Series 5.8 MAINTAINING YOUR PRINTER 3 Your printer automatically picks up a sheet of optional accessories, such as memory, optional tray, and printer languages. Use the configuration page to view current printer settings, to help troubleshoot printer problems, or to verify installation of paper from the tray and prints out a cleaning sheet with dust or toner particles on the control...
Samsung ML-2250 Series 5.8 MAINTAINING YOUR PRINTER 3 Your printer automatically picks up a sheet of optional accessories, such as memory, optional tray, and printer languages. Use the configuration page to view current printer settings, to help troubleshoot printer problems, or to verify installation of paper from the tray and prints out a cleaning sheet with dust or toner particles on the control...
User Manual (ENGLISH)
Page 121
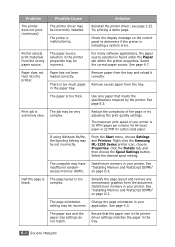
...Memory and PostScript DIMMs" on page D.3. The printer is too much paper Remove excess paper from the wrong paper source. Try printing a demo page. There is malfunctioning. Print job is too blank. Ensure that meets the specifications required by the printer. Right-click the Samsung ML-2250 Series printer...Reduce the complexity of your setting may be set incorrectly. Problem Possible Cause Solution The printer does not print. (continued) The printer driver may have insufficient randomaccess memory (RAM). see page 2.22. See page 4.3. Half the page is The page ...
...Memory and PostScript DIMMs" on page D.3. The printer is too much paper Remove excess paper from the wrong paper source. Try printing a demo page. There is malfunctioning. Print job is too blank. Ensure that meets the specifications required by the printer. Right-click the Samsung ML-2250 Series printer...Reduce the complexity of your setting may be set incorrectly. Problem Possible Cause Solution The printer does not print. (continued) The printer driver may have insufficient randomaccess memory (RAM). see page 2.22. See page 4.3. Half the page is The page ...
User Manual (ENGLISH)
Page 139
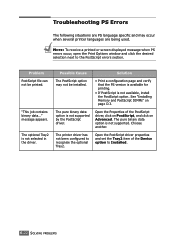
...verify that the PS version is available for printing. • If PostScript is not selected in the driver. message appears. The printer driver has not been configured to Installed. 6.22 SOLVING PROBLEMS The pure binary data option is not supported. Choose another. Open ...data option is not supported by the PostScript driver. Possible Cause Solution The PostScript option may occur when several printer languages are being used. See "Installing Memory and PostScript DIMMs" on Advanced. "This job contains binary data..." The optional Tray2 is not available, install ...
...verify that the PS version is available for printing. • If PostScript is not selected in the driver. message appears. The printer driver has not been configured to Installed. 6.22 SOLVING PROBLEMS The pure binary data option is not supported. Choose another. Open ...data option is not supported by the PostScript driver. Possible Cause Solution The PostScript option may occur when several printer languages are being used. See "Installing Memory and PostScript DIMMs" on Advanced. "This job contains binary data..." The optional Tray2 is not available, install ...
User Manual (ENGLISH)
Page 141
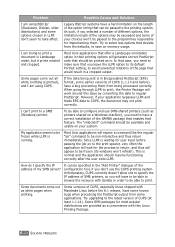
...address of CUPS, especially those shipped with this issue by converting the data to regular PostScript. This is . Some pages come out as printers shared on a Windows machine), you selected a number of different options, the limitation length of the options may not print correctly. Some ... before passing the job on your choices won 't refresh). Legacy BSD lpr systems have a hard limitation on memory usage. In that case, you don't use SMB-shared printers (such as white pages when printing. If the data being processed correctly. When going through LLPR to the latest...
...address of CUPS, especially those shipped with this issue by converting the data to regular PostScript. This is . Some pages come out as printers shared on a Windows machine), you selected a number of different options, the limitation length of the options may not print correctly. Some ... before passing the job on your choices won 't refresh). Legacy BSD lpr systems have a hard limitation on memory usage. In that case, you don't use SMB-shared printers (such as white pages when printing. If the data being processed correctly. When going through LLPR to the latest...
User Manual (ENGLISH)
Page 165
...Continue determines what action the printer should use when printing. The factory default is Auto. • Power Save determines the length of time the printer waits after fifteen seconds. If it goes to load paper in memory for a printed page until the printer signals that has jammed. ...C.6 PRINTING FROM DOS APPLICATIONS The default value is checked, the printer will wait for printing a document.
...Continue determines what action the printer should use when printing. The factory default is Auto. • Power Save determines the length of time the printer waits after fifteen seconds. If it goes to load paper in memory for a printed page until the printer signals that has jammed. ...C.6 PRINTING FROM DOS APPLICATIONS The default value is checked, the printer will wait for printing a document.

User Manual (ENGLISH)
Page 167
C.8 PRINTING FROM DOS APPLICATIONS A list of the user default settings and the amount of printer memory available prints. • Demo Page prints a demonstration page. It shows the printer features and specifications. Test Tab This tab allows you to print a resident page to test your printer's performance. • Self Test prints a configuration sheet.
C.8 PRINTING FROM DOS APPLICATIONS A list of the user default settings and the amount of printer memory available prints. • Demo Page prints a demonstration page. It shows the printer features and specifications. Test Tab This tab allows you to print a resident page to test your printer's performance. • Self Test prints a configuration sheet.

User Manual (ENGLISH)
Page 169
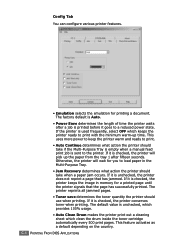
Flash Font and Macro Tab This tab allows you to add fonts and macros to the Flash memory of the printer. • Fonts adds or deletes fonts. You can also activate (Enable macro) or deactivate (Disable macro) them. • Delete all macros and fonts deletes all macros and fonts in the flash memory. • Refresh updates information about fonts and macros in the flash memory. You can also print the font sample list. • Macros adds or deletes macros. C.10 PRINTING FROM DOS APPLICATIONS
Flash Font and Macro Tab This tab allows you to add fonts and macros to the Flash memory of the printer. • Fonts adds or deletes fonts. You can also activate (Enable macro) or deactivate (Disable macro) them. • Delete all macros and fonts deletes all macros and fonts in the flash memory. • Refresh updates information about fonts and macros in the flash memory. You can also print the font sample list. • Macros adds or deletes macros. C.10 PRINTING FROM DOS APPLICATIONS
User Manual (ENGLISH)
Page 172
This chapter includes: • Precautions When Installing Printer Options • Installing Memory and PostScript DIMMs • Installing a Network Card • Installing an Optional Paper Tray Recognizing that has been optimised to enhance the printer's capabilities. D INSTALLING PRINTER OPTIONS Your printer is a full-featured laser printer that each user may have different requirements, however, Samsung makes several options available to meet most of your printing needs.
This chapter includes: • Precautions When Installing Printer Options • Installing Memory and PostScript DIMMs • Installing a Network Card • Installing an Optional Paper Tray Recognizing that has been optimised to enhance the printer's capabilities. D INSTALLING PRINTER OPTIONS Your printer is a full-featured laser printer that each user may have different requirements, however, Samsung makes several options available to meet most of your printing needs.

User Manual (ENGLISH)
Page 173
... table below. Item Memory DIMM PostScript DIMM Ethernet 10/100 Base TX (Internal) Ethernet 10/100 Base TX + 802.11b Wireless Lan (Internal) 250-sheet Paper Cassette Tray Order number ML-00MA (16 MB) ML-00MB (32 MB) ML-00MC (64 MB) ML-00MD (128 MB) ML-00PD (4 MB) ML-00NB ML-00LB ML-2250S3 D.2 INSTALLING PRINTER OPTIONS Precautions When...
... table below. Item Memory DIMM PostScript DIMM Ethernet 10/100 Base TX (Internal) Ethernet 10/100 Base TX + 802.11b Wireless Lan (Internal) 250-sheet Paper Cassette Tray Order number ML-00MA (16 MB) ML-00MB (32 MB) ML-00MC (64 MB) ML-00MD (128 MB) ML-00PD (4 MB) ML-00NB ML-00LB ML-2250S3 D.2 INSTALLING PRINTER OPTIONS Precautions When...

User Manual (ENGLISH)
Page 174
This procedure is applicable to either option. 1 Turn the printer power off and unplug all cables from the printer. 2 Remove the two screws on DIMMs (Dual In-line Memory Modules). Installing Memory and PostScript DIMMs Additional printer memory and the PostScript option are provided on the back of the printer. 3 Open the control board cover. D INSTALLING PRINTER OPTIONS D.3
This procedure is applicable to either option. 1 Turn the printer power off and unplug all cables from the printer. 2 Remove the two screws on DIMMs (Dual In-line Memory Modules). Installing Memory and PostScript DIMMs Additional printer memory and the PostScript option are provided on the back of the printer. 3 Open the control board cover. D INSTALLING PRINTER OPTIONS D.3

User Manual (ENGLISH)
Page 175
To install the PS DIMM, go to Step 6. 5 Hold the memory DIMM so that the notch and the connection point are not interchangeable. 4 Locate the memory DIMM slot (the upper slot) and the PS DIMM slot (the lower slot) on the control board. Memory DIMM PS DIMM To install the memory DIMM, continue with the slot as shown, and insert it all the way into the upper slot. D.4 INSTALLING PRINTER OPTIONS They are aligned with Step 5.
To install the PS DIMM, go to Step 6. 5 Hold the memory DIMM so that the notch and the connection point are not interchangeable. 4 Locate the memory DIMM slot (the upper slot) and the PS DIMM slot (the lower slot) on the control board. Memory DIMM PS DIMM To install the memory DIMM, continue with the slot as shown, and insert it all the way into the upper slot. D.4 INSTALLING PRINTER OPTIONS They are aligned with Step 5.

User Manual (ENGLISH)
Page 176
6 Hold the PS DIMM so that the notch and the connection point are using the printer as a PostScript device, you have installed. • For PS printing on a Windows system, refer to change the memory value in the printer properties as shown, and insert it all the way into the lower slot. 7 Close the control board cover. 8 Tighten the two screws. 9 Reconnect the power cord and printer cable, and turn the printer on. NOTES: • If you are aligned with the slot as you need to Appendix A, "Using Windows PostScript Driver." D INSTALLING PRINTER OPTIONS D.5
6 Hold the PS DIMM so that the notch and the connection point are using the printer as a PostScript device, you have installed. • For PS printing on a Windows system, refer to change the memory value in the printer properties as shown, and insert it all the way into the lower slot. 7 Close the control board cover. 8 Tighten the two screws. 9 Reconnect the power cord and printer cable, and turn the printer on. NOTES: • If you are aligned with the slot as you need to Appendix A, "Using Windows PostScript Driver." D INSTALLING PRINTER OPTIONS D.5

User Manual (ENGLISH)
Page 177
D.6 INSTALLING PRINTER OPTIONS Removing the Memory or PS DIMM 1 Follow steps 1 through 3 on page D.3 to access the control board. 2 Push the clips at each end of the connector slot away from the DIMM. 3 Place the DIMM in its original packaging or wrap it with paper and store it in a box. 4 Close the control board cover. 5 Tighten the two screws. 6 Reconnect the power cord and printer cable, and turn the printer on.
D.6 INSTALLING PRINTER OPTIONS Removing the Memory or PS DIMM 1 Follow steps 1 through 3 on page D.3 to access the control board. 2 Push the clips at each end of the connector slot away from the DIMM. 3 Place the DIMM in its original packaging or wrap it with paper and store it in a box. 4 Close the control board cover. 5 Tighten the two screws. 6 Reconnect the power cord and printer cable, and turn the printer on.

User Manual (ENGLISH)
Page 185
Printer Specifications Item Specifications and Description Print Speed * Up to 20 ppm in A4 (22 ppm in Letter) Resolution Up to 1200 x 1200 dpi effective output ... 6, SPL, IBM ProPrinter, EPSON, PostScript 3 (option) Random Access Memory (RAM) 16 MB (Max. 144 MB) Optional memory available: 16 MB (ML-00MA), 32 MB (ML-00MB), 64 MB (ML-00MC), 128 MB (ML-00MD) Fonts 1 bitmap, 45 scalable, 136 PS fonts (option) ML-2250 : USB 2.0, IEEE 1284 Parallel Interface ML-2251N : USB 2.0, IEEE 1284 Parallel, Ethernet 10/100 Base...
Printer Specifications Item Specifications and Description Print Speed * Up to 20 ppm in A4 (22 ppm in Letter) Resolution Up to 1200 x 1200 dpi effective output ... 6, SPL, IBM ProPrinter, EPSON, PostScript 3 (option) Random Access Memory (RAM) 16 MB (Max. 144 MB) Optional memory available: 16 MB (ML-00MA), 32 MB (ML-00MB), 64 MB (ML-00MC), 128 MB (ML-00MD) Fonts 1 bitmap, 45 scalable, 136 PS fonts (option) ML-2250 : USB 2.0, IEEE 1284 Parallel Interface ML-2251N : USB 2.0, IEEE 1284 Parallel, Ethernet 10/100 Base...
User Manual (ENGLISH)
Page 194
... load, paper in the Multi-Purpose Tray 3.8 in the Tray1/optional Tray 2 2.7 M memory DIMM, install D.3 Multi-Purpose Tray, use 3.8 N network interface card, install D.7 network printing cable/antenna, connect 2.13 card, install D.7 locally shared printer, set 4.29 n-up printing 4.11 O option, install memory DIMM D.3 paper tray 2 D.11 PS DIMM D.3 optional tray, install D.11 orientation...
... load, paper in the Multi-Purpose Tray 3.8 in the Tray1/optional Tray 2 2.7 M memory DIMM, install D.3 Multi-Purpose Tray, use 3.8 N network interface card, install D.7 network printing cable/antenna, connect 2.13 card, install D.7 locally shared printer, set 4.29 n-up printing 4.11 O option, install memory DIMM D.3 paper tray 2 D.11 PS DIMM D.3 optional tray, install D.11 orientation...
