

User Manual (ENGLISH)
Page 6
... report ...6.1 Cleaning your machine from the website ...6.7 7. Specifications General specifications ...9.1 Printer specifications ...9.1 10. Troubleshooting Tips for avoiding paper jams ...7.1 Clearing paper jams ...7.1 In the paper feed area and rear the machine ...7.1 Rear and inside ...6.1 Maintaining the cartridge ...6.3 Toner cartridge storage ...6.3 Handling instructions ...6.3 Use of non-Samsung and refilled toner cartridge 6.3 Estimated cartridge life ...6.3 Redistributing toner ...6.3 Replacing the...
... report ...6.1 Cleaning your machine from the website ...6.7 7. Specifications General specifications ...9.1 Printer specifications ...9.1 10. Troubleshooting Tips for avoiding paper jams ...7.1 Clearing paper jams ...7.1 In the paper feed area and rear the machine ...7.1 Rear and inside ...6.1 Maintaining the cartridge ...6.3 Toner cartridge storage ...6.3 Handling instructions ...6.3 Use of non-Samsung and refilled toner cartridge 6.3 Estimated cartridge life ...6.3 Redistributing toner ...6.3 Replacing the...

User Manual (ENGLISH)
Page 16
...machine has stopped for a few seconds. 4 Shows the status of toner is close, or toner cartridge is a paper jam in the tray is empty. • toner LED Blinks when the estimated cartridge life of wireless network. LEDs are working with specific LEDs as below. When the LED on your machine. Control panel overview...on a display. • error LED Blinks when the error occurs on , the machine is ready. 1.4 Check the display message and replace the toner cartridge. • paper jam LED Lights blink when there is invalid. Check the display message to solve the problem. •...
...machine has stopped for a few seconds. 4 Shows the status of toner is close, or toner cartridge is a paper jam in the tray is empty. • toner LED Blinks when the estimated cartridge life of wireless network. LEDs are working with specific LEDs as below. When the LED on your machine. Control panel overview...on a display. • error LED Blinks when the error occurs on , the machine is ready. 1.4 Check the display message and replace the toner cartridge. • paper jam LED Lights blink when there is invalid. Check the display message to solve the problem. •...

User Manual (ENGLISH)
Page 29
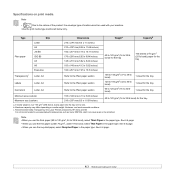
...media may meet these specifications may be the result of improper handling, unacceptable temperature and humidity levels, or other variables over which Samsung has no control. • Before purchasing large quantities of print media, ensure that does not meet all of print media, such... print materials, consider the following problems: • Poor print quality • Increased paper jams • Premature wear on the machine. This chapter includes: • Selecting print media • Loading paper in this section. • Desired outcome: The print media you choose should be ...
...media may meet these specifications may be the result of improper handling, unacceptable temperature and humidity levels, or other variables over which Samsung has no control. • Before purchasing large quantities of print media, ensure that does not meet all of print media, such... print materials, consider the following problems: • Poor print quality • Increased paper jams • Premature wear on the machine. This chapter includes: • Selecting print media • Loading paper in this section. • Desired outcome: The print media you choose should be ...

User Manual (ENGLISH)
Page 30
... damp, curled, wrinkled, or torn paper can cause it to use in laser machines. • Avoid using the following media types: - The relative humidity should be between 15 °C and 30 °C. Erasable bond paper - Synthetic paper and thermally reactive paper - Paper with the specifications listed on page 4.3. • Attempting to avoid paper jams. • To prevent print...
... damp, curled, wrinkled, or torn paper can cause it to use in laser machines. • Avoid using the following media types: - The relative humidity should be between 15 °C and 30 °C. Erasable bond paper - Synthetic paper and thermally reactive paper - Paper with the specifications listed on page 4.3. • Attempting to avoid paper jams. • To prevent print...
User Manual (ENGLISH)
Page 31
...lb bond) for the tray a. It is over 105 g/m2 (28lb bond), load a paper into the tray one . Note •When you use paperbacked transparencies such as Xerox 3R91334, which can cause a jam or be used with your machine. •Use the print media type mentioned below only....) for a Laser Printers produced by one by HP, Xerox and 3M. If media weight is not recommended to use the thin paper (under 70 g/m2, under 19 lb bond), select Thin Paper in the paper type. b. See 4.6 page. • When you use the recycled paper, select Recycled Paper in the paper type. Recommended media...
...lb bond) for the tray a. It is over 105 g/m2 (28lb bond), load a paper into the tray one . Note •When you use paperbacked transparencies such as Xerox 3R91334, which can cause a jam or be used with your machine. •Use the print media type mentioned below only....) for a Laser Printers produced by one by HP, Xerox and 3M. If media weight is not recommended to use the thin paper (under 70 g/m2, under 19 lb bond), select Thin Paper in the paper type. b. See 4.6 page. • When you use the recycled paper, select Recycled Paper in the paper type. Recommended media...

User Manual (ENGLISH)
Page 32
... Recommended media: Transparency for a Color Laser Printers produced by fingerprints, handle them , resulting in any torn edges. Adhesives: The adhesive material should be sealed in a moisture-proof wrapping to prevent changes during printing, which can cause paper jams. Exposed adhesive can also cause damage ...to view the fusing temperature, see page 9.1. • Letterhead ink must be non-flammable and should not adversely affect printer rollers. • Forms and letterhead should be...
... Recommended media: Transparency for a Color Laser Printers produced by fingerprints, handle them , resulting in any torn edges. Adhesives: The adhesive material should be sealed in a moisture-proof wrapping to prevent changes during printing, which can cause paper jams. Exposed adhesive can also cause damage ...to view the fusing temperature, see page 9.1. • Letterhead ink must be non-flammable and should not adversely affect printer rollers. • Forms and letterhead should be...

User Manual (ENGLISH)
Page 34
..., and change remain in the Printers folder. Note The following procedure is for Windows XP. 2 After inserting paper into the tray, while pinching the paper width guide as shown, move it toward the stack of paper until it may bend the paper. the guide may cause paper jams. Setting the paper size and type The settings you are...
..., and change remain in the Printers folder. Note The following procedure is for Windows XP. 2 After inserting paper into the tray, while pinching the paper width guide as shown, move it toward the stack of paper until it may bend the paper. the guide may cause paper jams. Setting the paper size and type The settings you are...

User Manual (ENGLISH)
Page 43
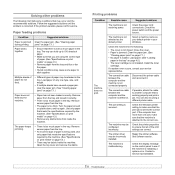
...; Do not overload the tray. Clearing paper jams Refer to the table below the paper capacity mark on what to clear the jam. Status display Explanation In the paper feed area and rear the machine Paper jam Rear and Inside the machine LED( )... blinks In the exit area Solution Clear the jam. (Page 7.1) Clear the jam. (Page 7.3) Clear the jam. (Page 7.5) Caution To avoid tearing the paper, pull the jammed paper out gently and slowly. When a paper jam...
...; Do not overload the tray. Clearing paper jams Refer to the table below the paper capacity mark on what to clear the jam. Status display Explanation In the paper feed area and rear the machine Paper jam Rear and Inside the machine LED( )... blinks In the exit area Solution Clear the jam. (Page 7.1) Clear the jam. (Page 7.3) Clear the jam. (Page 7.5) Caution To avoid tearing the paper, pull the jammed paper out gently and slowly. When a paper jam...

User Manual (ENGLISH)
Page 44
... careful not to pinch your fingers, since the top cover is very heavy. 5 Press the top cover lever, completely open the top cover. 7 If the paper jam LED blinks, go to next step. 8 Open the rear cover. 6 Hold the top cover and close it into the machine. 4 Align the tray with the... slot, and slide it slowly and carefully, until the cover is securely latched. 9 Carefully take the jammed paper out of the machine. It is very hot. Take care when removing paper from the machine. 7.2 Caution Do not touch the fuser inside the machine. Note If the top cover is not...
... careful not to pinch your fingers, since the top cover is very heavy. 5 Press the top cover lever, completely open the top cover. 7 If the paper jam LED blinks, go to next step. 8 Open the rear cover. 6 Hold the top cover and close it into the machine. 4 Align the tray with the... slot, and slide it slowly and carefully, until the cover is securely latched. 9 Carefully take the jammed paper out of the machine. It is very hot. Take care when removing paper from the machine. 7.2 Caution Do not touch the fuser inside the machine. Note If the top cover is not...

User Manual (ENGLISH)
Page 45
... Do not touch the fuser inside the machine, follow the next steps to release the jammed paper. 1 Open the rear cover. The machine will resume printing. Note If the rear cover is not completely closed , the paper jam may occur. 7.3 Press the rear cover firmly until it as shown in the following ...hot and could cause burns! It is very hot. Rear and inside the machine If paper is not completely closed , the paper jam may occur. 11 Open and close the top cover firmly. Take care when removing paper from the machine. 3 Hold both edges of the machine. 10 Hold both edges ...
... Do not touch the fuser inside the machine, follow the next steps to release the jammed paper. 1 Open the rear cover. The machine will resume printing. Note If the rear cover is not completely closed , the paper jam may occur. 7.3 Press the rear cover firmly until it as shown in the following ...hot and could cause burns! It is very hot. Rear and inside the machine If paper is not completely closed , the paper jam may occur. 11 Open and close the top cover firmly. Take care when removing paper from the machine. 3 Hold both edges of the machine. 10 Hold both edges ...

User Manual (ENGLISH)
Page 46
...it off with your fingers, since the top cover is very heavy. Hot water sets toner into fabric. 9 Carefully take the jammed paper out of the machine. 6 If the paper jam LED blinks, go to the OPC drum. Close the top cover should the installation need to be halted for more than a ... securely latched. Caution Do not touch the fuser inside the machine. The fuser's operating temperature is hot and could cause burns! Take care when removing paper from the machine. 7.4 4 Press the top cover lever, completely open the top cover. 7 Press the top cover lever, completely open the top cover. ...
...it off with your fingers, since the top cover is very heavy. Hot water sets toner into fabric. 9 Carefully take the jammed paper out of the machine. 6 If the paper jam LED blinks, go to the OPC drum. Close the top cover should the installation need to be halted for more than a ... securely latched. Caution Do not touch the fuser inside the machine. The fuser's operating temperature is hot and could cause burns! Take care when removing paper from the machine. 7.4 4 Press the top cover lever, completely open the top cover. 7 Press the top cover lever, completely open the top cover. ...

User Manual (ENGLISH)
Page 47
...not touch the fuser inside the machine. The fuser's operating temperature is visible, pull it straight out. 10 After removing the jammed paper, check for paper which may be jammed in the paper exit area, follow the next steps to step 4. The machine will resume printing. 2 If a long portion of the machine.... 11 Slide the toner cartridge back into the machine. It is any resistance removing the paper, stop pulling and go to release the jammed paper. 1 Press the top cover lever, completely open the top cover. 12 Close the top cover firmly. In the exit area...
...not touch the fuser inside the machine. The fuser's operating temperature is visible, pull it straight out. 10 After removing the jammed paper, check for paper which may be jammed in the paper exit area, follow the next steps to step 4. The machine will resume printing. 2 If a long portion of the machine.... 11 Slide the toner cartridge back into the machine. It is any resistance removing the paper, stop pulling and go to release the jammed paper. 1 Press the top cover lever, completely open the top cover. 12 Close the top cover firmly. In the exit area...

User Manual (ENGLISH)
Page 48
... cover and close it slowly and carefully, until the cover is very hot. Take care when removing paper from the machine. 5 Carefully take the jammed paper out of the machine. 6 Close the inner cover. 7 After removing the jammed paper, check for paper which may be jammed in other parts of the machine. 8 Close the top cover firmly.
... cover and close it slowly and carefully, until the cover is very hot. Take care when removing paper from the machine. 5 Carefully take the jammed paper out of the machine. 6 Close the inner cover. 7 After removing the jammed paper, check for paper which may be jammed in other parts of the machine. 8 Close the top cover firmly.

User Manual (ENGLISH)
Page 49
...paper in the machine. cartridge. (Page 6.5) a. Some amount of toner may be covered under the machine warranty. 7.7 Understanding display messages Messages appear on the Smart Panel program window or on and the printer stops printing. There is a problem in the tray. (Page 4.5) Clear the jam. (Page 7.1) Clear the jam. (Page 7.3) Clear the jam...detected. In the exit area. Small amount of toner is not a cartridge with the contents of using non-genuine Samsung toner cartridge such as a result of the display message. Unplug the power cord and plug it is not suitable for...
...paper in the machine. cartridge. (Page 6.5) a. Some amount of toner may be covered under the machine warranty. 7.7 Understanding display messages Messages appear on the Smart Panel program window or on and the printer stops printing. There is a problem in the tray. (Page 4.5) Clear the jam. (Page 7.1) Clear the jam. (Page 7.3) Clear the jam...detected. In the exit area. Small amount of toner is not a cartridge with the contents of using non-genuine Samsung toner cartridge such as a result of the display message. Unplug the power cord and plug it is not suitable for...
User Manual (ENGLISH)
Page 50
... too thick. Check the power cord connections. Select a machine name as the default printer. Clear the paper jam. (See "Clearing paper jams" on page 4.3.) • There may be debris inside the machine. Load paper. (See "Loading paper in the tray. The printer driver may be incorrectly installed. See Software section. Check the display message on page 4.3.) • Remove...
... too thick. Check the power cord connections. Select a machine name as the default printer. Clear the paper jam. (See "Clearing paper jams" on page 4.3.) • There may be debris inside the machine. Load paper. (See "Loading paper in the tray. The printer driver may be incorrectly installed. See Software section. Check the display message on page 4.3.) • Remove...

User Manual (ENGLISH)
Page 59
... paper jams 7.1 L Linux requirements 2.2 Linux problems 7.13 M Macintosh problems 7.13 requirements 2.3 Maintenance 6.1 maintenance parts 6.6 toner cartridge 6.3 message on the display screen 7.7 N Network port 1.3 network requirements 3.2 O ordering supplies 8.1 output support 1.2 output tray 1.2 P paper changing the size 4.5 clearing jam 7.1 paper feeding problems 7.8 setting the paper size of the tray 4.6 Power switch 1.3 print media guidelines 4.2 selecting print media 4.1 specification 4.3 Printer...
... paper jams 7.1 L Linux requirements 2.2 Linux problems 7.13 M Macintosh problems 7.13 requirements 2.3 Maintenance 6.1 maintenance parts 6.6 toner cartridge 6.3 message on the display screen 7.7 N Network port 1.3 network requirements 3.2 O ordering supplies 8.1 output support 1.2 output tray 1.2 P paper changing the size 4.5 clearing jam 7.1 paper feeding problems 7.8 setting the paper size of the tray 4.6 Power switch 1.3 print media guidelines 4.2 selecting print media 4.1 specification 4.3 Printer...

User Manual (ENGLISH)
Page 76
...first page to access the following procedure is checked, the printer retains the image of preprinted forms and letterhead paper. Print Odd Pages: Your printer prints only the odd numbered pages of the document. • Reprint When Jammed: When this feature, you use this option is for ...more information about accessing the printer properties. About Tab Use the About tab...
...first page to access the following procedure is checked, the printer retains the image of preprinted forms and letterhead paper. Print Odd Pages: Your printer prints only the odd numbered pages of the document. • Reprint When Jammed: When this feature, you use this option is for ...more information about accessing the printer properties. About Tab Use the About tab...


