
User Guide
Page 2
... provided for information purposes only. Samsung Electronics is not responsible for any damages, direct or indirect, arising from or related to change without notice. It also provides all of this guide provides information you need for installing the supplied software and using your printer. About the User's Guide This User's Guide provides information you need for setting up your printer and information for maintaining and troubleshooting the printer.
... provided for information purposes only. Samsung Electronics is not responsible for any damages, direct or indirect, arising from or related to change without notice. It also provides all of this guide provides information you need for installing the supplied software and using your printer. About the User's Guide This User's Guide provides information you need for setting up your printer and information for maintaining and troubleshooting the printer.

User Guide
Page 5
...Panel 1.6 On Line/Error and Toner Save LEDs 1.6 Cancel button 1.7 Chapter 2: SETTING UP YOUR PRINTER Unpacking 2.2 Selecting a Location 2.3 Installing the Toner Cartridge 2.4 Loading Paper 2.7 Connecting a Printer Cable 2.9 Turning the Printer on 2.10 Printing a Demo Page 2.11 Installing Printer Software 2.12 System Requirements 2.12 Chapter 3: USING PRINT MATERIALS Choosing Paper and Other Materials 3.2 Type and Capacities 3.3 Guidelines for Paper and Special Materials .......... 3.3 Verifying the Output Location 3.6 Loading Paper 3.6 Using the Tray 3.6 Using Manual Feed Mode...
...Panel 1.6 On Line/Error and Toner Save LEDs 1.6 Cancel button 1.7 Chapter 2: SETTING UP YOUR PRINTER Unpacking 2.2 Selecting a Location 2.3 Installing the Toner Cartridge 2.4 Loading Paper 2.7 Connecting a Printer Cable 2.9 Turning the Printer on 2.10 Printing a Demo Page 2.11 Installing Printer Software 2.12 System Requirements 2.12 Chapter 3: USING PRINT MATERIALS Choosing Paper and Other Materials 3.2 Type and Capacities 3.3 Guidelines for Paper and Special Materials .......... 3.3 Verifying the Output Location 3.6 Loading Paper 3.6 Using the Tray 3.6 Using Manual Feed Mode...

User Guide
Page 19
... Manual Feed mode, if there is experiencing an error, such as jammed paper, no paper in the tray, the On Line/Error LED blinks green. Load paper into the tray and the LED stops blinking. If you press the Cancel button while the printer is receiving data, the On Line/Error LED slowly blinks green. See "Troubleshooting Error Messages" on page 5.16. If the On Line/Error lights red, the printer is no paper, the open top or front cover, or the empty toner cartridge...
... Manual Feed mode, if there is experiencing an error, such as jammed paper, no paper in the tray, the On Line/Error LED blinks green. Load paper into the tray and the LED stops blinking. If you press the Cancel button while the printer is receiving data, the On Line/Error LED slowly blinks green. See "Troubleshooting Error Messages" on page 5.16. If the On Line/Error lights red, the printer is no paper, the open top or front cover, or the empty toner cartridge...

User Guide
Page 20
... problem, see Software User's Guide and page 4.5. Manual feeding Press this LED is off . LED Description If you press the Cancel button in the tray, when you select Manual Feed for about 2 seconds until all LEDs blink slowly, and release. For detailed information, see "Troubleshooting Error Messages" on or off and the Toner Save mode is cleared from both the printer and the computer, and then return to turn the Toner...
... problem, see Software User's Guide and page 4.5. Manual feeding Press this LED is off . LED Description If you press the Cancel button in the tray, when you select Manual Feed for about 2 seconds until all LEDs blink slowly, and release. For detailed information, see "Troubleshooting Error Messages" on or off and the Toner Save mode is cleared from both the printer and the computer, and then return to turn the Toner...

User Guide
Page 32
... full advantage of the printer. Use this driver to Software User's Guide for Windows. For details, see Software User's Guide. • Status Monitor allows you are printing from Windows 2 You can install the following table shows Windows requirements. See Software User's Guide. Installing Printer Software The supplied CD-ROM contains Windows printing software, Linux printing software, on-line User's Guide and Acrobat Reader to see the printing status of your printer's features. Item Operating System Requirements Windows 98/Me/2000/XP Windows 98/Me/2000...
... full advantage of the printer. Use this driver to Software User's Guide for Windows. For details, see Software User's Guide. • Status Monitor allows you are printing from Windows 2 You can install the following table shows Windows requirements. See Software User's Guide. Installing Printer Software The supplied CD-ROM contains Windows printing software, Linux printing software, on-line User's Guide and Acrobat Reader to see the printing status of your printer's features. Item Operating System Requirements Windows 98/Me/2000/XP Windows 98/Me/2000...

User Guide
Page 43
... printer. To stop a print job from the Printers folder 1 From the windows Start menu, select Settings. 2 Select Printers to open the Printers window, and double- To stop a print job from the Control Panel Press the Cancel button on special material, you must be pressed once for Source from the software application, and then select the correct paper size and type. Pressing the Cancel button cancels only the current job in the printer memory, the Cancel button must select Manual Feed...
... printer. To stop a print job from the Printers folder 1 From the windows Start menu, select Settings. 2 Select Printers to open the Printers window, and double- To stop a print job from the Control Panel Press the Cancel button on special material, you must be pressed once for Source from the software application, and then select the correct paper size and type. Pressing the Cancel button cancels only the current job in the printer memory, the Cancel button must select Manual Feed...

User Guide
Page 56
.... Check the power switch and the power source. Select your printer in the printer folder in Manual Feed mode. Check the printer for suggested solutions. the following: • Close the door. • The printer cover is incorrect. See "Clearing not closed. page 2.7. • The toner cartridge • Install the toner cartridge. You can also try using a different printer cable. The port setting is • Clear the paper jam. Check the Windows printer setting to make sure that the print job is jammed. • Load paper. Paper Jams" on the printer's control panel...
.... Check the power switch and the power source. Select your printer in the printer folder in Manual Feed mode. Check the printer for suggested solutions. the following: • Close the door. • The printer cover is incorrect. See "Clearing not closed. page 2.7. • The toner cartridge • Install the toner cartridge. You can also try using a different printer cable. The port setting is • Clear the paper jam. Check the Windows printer setting to make sure that the print job is jammed. • Load paper. Paper Jams" on the printer's control panel...

User Guide
Page 57
... error. The page orientation setting may be set incorrectly. The paper keeps jamming. Paper does not feed into the printer. Remove excess paper from the document. The paper is extremely slow. Select the desired spool setting. unnecessary graphics from the tray. Remove paper from the tray. Print job is too thick. The page layout is malfunctioning. Use only paper that meets the specifications required by the printer. Paper has not been loaded correctly. The job may be incorrectly installed. If using Windows...
... error. The page orientation setting may be set incorrectly. The paper keeps jamming. Paper does not feed into the printer. Remove excess paper from the document. The paper is extremely slow. Select the desired spool setting. unnecessary graphics from the tray. Remove paper from the tray. Print job is too thick. The page layout is malfunctioning. Use only paper that meets the specifications required by the printer. Paper has not been loaded correctly. The job may be incorrectly installed. If using Windows...

User Guide
Page 64
... of paper. See "Paper Specifications" on page 4.6. See "Vertical repetitive defects" on page 4.6. • The paper path may need cleaning. If this does not improve the print quality, install a new toner cartridge. • The paper may not meet specifications (for example, the paper is too moist or too rough). Try a different kind or brand of paper. • The toner cartridge may indicate that the toner cartridge needs cleaning. SOLVING PROBLEMS 5.11 For details, see Software User's Guide...
... of paper. See "Paper Specifications" on page 4.6. See "Vertical repetitive defects" on page 4.6. • The paper path may need cleaning. If this does not improve the print quality, install a new toner cartridge. • The paper may not meet specifications (for example, the paper is too moist or too rough). Try a different kind or brand of paper. • The toner cartridge may indicate that the toner cartridge needs cleaning. SOLVING PROBLEMS 5.11 For details, see Software User's Guide...

User Guide
Page 65
... repetitive defects If marks repeatedly appear on page 4.6. See "Cleaning the Inside" on the printed side of the page at even intervals: • The toner cartridge may be damaged. See "Cleaning the Inside" on page 2.4. Clean the inside the toner cartridge has probably been scratched. Install a new toner cartridge. See "Installing the Toner Cartridge" on page 4.6. • Check the paper type and quality. Problem Vertical lines Solution If black vertical streaks appear on the back of...
... repetitive defects If marks repeatedly appear on page 4.6. See "Cleaning the Inside" on the printed side of the page at even intervals: • The toner cartridge may be damaged. See "Cleaning the Inside" on page 2.4. Clean the inside the toner cartridge has probably been scratched. Install a new toner cartridge. See "Installing the Toner Cartridge" on page 4.6. • Check the paper type and quality. Problem Vertical lines Solution If black vertical streaks appear on the back of...

User Guide
Page 81
... connect power cord 2.10 USB cable 2.9 control panel, use 1.6 D demo page, print 2.11 E envelopes, print 3.8 error, solve 5.16 I install, toner 2.4 L labels, print 3.8 load paper 2.7, 3.6 O output tray 3.6 P paper guidelines 3.3 paper jams, clear 5.6 paper load capacity 3.3 paper load, in tray 2.7, 3.6 preprinted paper, print 3.9 print demo page 2.11 1 printer cable, connect 2.9 printer, clean 4.6 problem Linux 5.18 windows 5.17 problem, solving checklist 5.2 general 5.3 paper jams 5.6 Q quality problem, solve 5.11 S software overview 2.12 system requirements Windows 2.12 specification paper...
... connect power cord 2.10 USB cable 2.9 control panel, use 1.6 D demo page, print 2.11 E envelopes, print 3.8 error, solve 5.16 I install, toner 2.4 L labels, print 3.8 load paper 2.7, 3.6 O output tray 3.6 P paper guidelines 3.3 paper jams, clear 5.6 paper load capacity 3.3 paper load, in tray 2.7, 3.6 preprinted paper, print 3.9 print demo page 2.11 1 printer cable, connect 2.9 printer, clean 4.6 problem Linux 5.18 windows 5.17 problem, solving checklist 5.2 general 5.3 paper jams 5.6 Q quality problem, solve 5.11 S software overview 2.12 system requirements Windows 2.12 specification paper...

User Guide
Page 85
... a New Page Overlay 16 Using a Page Overlay ...17 Deleting a Page Overlay 17 Chapter 4: SHARING THE PRINTER LOCALLY Windows 9x/Me ...18 Setting Up a Host Computer 18 Setting Up a Client Computer 18 Windows NT 4.0 or higher ...18 Setting Up a Host Computer 18 Setting Up a Client Computer 18 Chapter 5: USING STATUS MONITOR Opening the Troubleshooting Guide 19 Changing the Status Monitor Program Settings 20 Chapter 6: USING YOUR PRINTER IN LINUX System Requirements ...21 Installing the Printer Driver...
... a New Page Overlay 16 Using a Page Overlay ...17 Deleting a Page Overlay 17 Chapter 4: SHARING THE PRINTER LOCALLY Windows 9x/Me ...18 Setting Up a Host Computer 18 Setting Up a Client Computer 18 Windows NT 4.0 or higher ...18 Setting Up a Host Computer 18 Setting Up a Client Computer 18 Chapter 5: USING STATUS MONITOR Opening the Troubleshooting Guide 19 Changing the Status Monitor Program Settings 20 Chapter 6: USING YOUR PRINTER IN LINUX System Requirements ...21 Installing the Printer Driver...
User Guide
Page 89
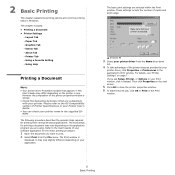
... your Printer User's Guide. • You can check your printer name in your printer driver from the File menu. The following procedure describes the general steps required for the exact printing procedure. 1 Open the document you want to the User's Guide of copies and print range. It may look slightly different depending on the next screen. 5 Click OK to the OS Compatibility section of the printer properties window is displayed. Using Help Printing a Document...
... your Printer User's Guide. • You can check your printer name in your printer driver from the File menu. The following procedure describes the general steps required for the exact printing procedure. 1 Open the document you want to the User's Guide of copies and print range. It may look slightly different depending on the next screen. 5 Click OK to the OS Compatibility section of the printer properties window is displayed. Using Help Printing a Document...
User Guide
Page 91
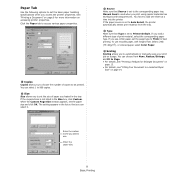
... tray. If you use cotton paper, set to Printer Default. You can choose from 20lb to 24lb (75~90g/m2), or colored paper, select Color Paper. 5 Scaling Scaling allows you to choose the number of print material, select the corresponding paper type. Click the Paper tab to access various paper properties. 1 2 3 4 5 1 Copies Copies allows you to automatically or manually scale your print job on accessing printer properties. When the Custom Page Size window appears, set the basic paper handling specifications...
... tray. If you use cotton paper, set to Printer Default. You can choose from 20lb to 24lb (75~90g/m2), or colored paper, select Color Paper. 5 Scaling Scaling allows you to choose the number of print material, select the corresponding paper type. Click the Paper tab to access various paper properties. 1 2 3 4 5 1 Copies Copies allows you to automatically or manually scale your print job on accessing printer properties. When the Custom Page Size window appears, set the basic paper handling specifications...

User Guide
Page 93
... notice and the version number of the document. - If you have cleared the jam. For details, see "Using Watermarks" on the printer driver icon and select Properties. 5 Click the Printer tab and set the printer configuration. 1 Click the Windows Start menu. 2 For Windows 95/98/Me/NT 4.0/2000, select Settings and then Printer. Reverse All Pages: Your printer prints all pages from the last page to the power save mode after you have...
... notice and the version number of the document. - If you have cleared the jam. For details, see "Using Watermarks" on the printer driver icon and select Properties. 5 Click the Printer tab and set the printer configuration. 1 Click the Windows Start menu. 2 For Windows 95/98/Me/NT 4.0/2000, select Settings and then Printer. Reverse All Pages: Your printer prints all pages from the last page to the power save mode after you have...
User Guide
Page 96
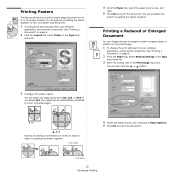
You can select the page layout from 2x2, 3x3, or 4x4. Printing a Reduced or Enlarged Document You can change the size of pasting the sheets together to form one poster-size document. 1 To change the print settings from your software application, access printer properties. down list. 3 Enter the scaling rate in the Type drop- See "Printing a Document" on the printed page. 1 To change the print settings from your software application, access printer properties. Printing Posters This feature allows...
You can select the page layout from 2x2, 3x3, or 4x4. Printing a Reduced or Enlarged Document You can change the size of pasting the sheets together to form one poster-size document. 1 To change the print settings from your software application, access printer properties. down list. 3 Enter the scaling rate in the Type drop- See "Printing a Document" on the printed page. 1 To change the print settings from your software application, access printer properties. Printing Posters This feature allows...

User Guide
Page 97
... the Type drop- This can be modified, or you can be useful when you to scale your software application, access printer properties. down list. 3 Select the correct size from your print job to Page in Paper Options. 5 Click OK and print the document. There are several predefined watermarks that come with the printer, and they can add new ones to the list. Using an Existing Watermark 1 To change the print settings...
... the Type drop- This can be modified, or you can be useful when you to scale your software application, access printer properties. down list. 3 Select the correct size from your print job to Page in Paper Options. 5 Click OK and print the document. There are several predefined watermarks that come with the printer, and they can add new ones to the list. Using an Existing Watermark 1 To change the print settings...
User Guide
Page 99
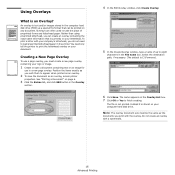
... overlay, access printer properties. See "Printing a Document" on page 6. 3 Click the Extras tab, and click Edit button in the File name box. Preview Image 4 In the Edit Overlay window, click Create Overlay. 5 In the Create Overlay window, type a name of preprinted forms and letterhead paper. Select the destination path, if necessary. (The default is text and/or images stored in the computer hard disk drive (HDD...
... overlay, access printer properties. See "Printing a Document" on page 6. 3 Click the Extras tab, and click Edit button in the File name box. Preview Image 4 In the Edit Overlay window, click Create Overlay. 5 In the Create Overlay window, type a name of preprinted forms and letterhead paper. Select the destination path, if necessary. (The default is text and/or images stored in the computer hard disk drive (HDD...

User Guide
Page 105
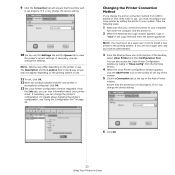
... a super user (root) to select the PS driver. 22 Using Your Printer in : [root@local /root]# cd /mnt/cdrom (the CD-ROM directory) [root@local cdrom]# ./setup.sh 4 Select the type of the window. The function tabs available for the selected printer appear at the bottom of the Add a Printer window. NOTE: If the printer supports PS printing, it is recommended to install the printer software. When...
... a super user (root) to select the PS driver. 22 Using Your Printer in : [root@local /root]# cd /mnt/cdrom (the CD-ROM directory) [root@local cdrom]# ./setup.sh 4 Select the type of the window. The function tabs available for the selected printer appear at the bottom of the Add a Printer window. NOTE: If the printer supports PS printing, it is recommended to install the printer software. When...
User Guide
Page 106
... the Add Printer icon on the printer in use . 11 To exit, click OK. 12 When the window indicates that the new printer is set properly. Turn both the computer and the printer on the printing system in use . You can use , you connect the printer to your printer driver. If it is not, change the device setting. 10 You can also access the Linux Printer Configuration window by typing in "linux-config" from USB to...
... the Add Printer icon on the printer in use . 11 To exit, click OK. 12 When the window indicates that the new printer is set properly. Turn both the computer and the printer on the printing system in use . You can use , you connect the printer to your printer driver. If it is not, change the device setting. 10 You can also access the Linux Printer Configuration window by typing in "linux-config" from USB to...


