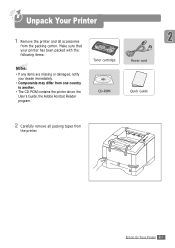
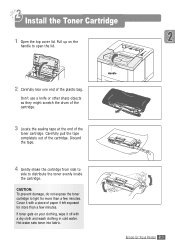
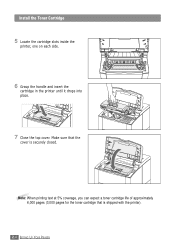
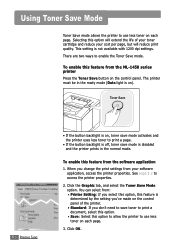
User Manual (user Manual) (ver.1.00) (English)
Page 3
Contents 1 Introduction Special Features 1.1 Printer Components 1.4 2 Setting Up Your Printer STEP 1: Unpack Your Printer 2.1 STEP 2: Install the Toner Cartridge 2.3 STEP 3: Load Paper 2.5 STEP 4: Connect to the Computer with a Parallel Cable ------- 2.8 STEP 5: Turn on the Printer 2.9 STEP 6: Print a Demo Page 2.9 STEP 7: Install the Printer Software 2.10 Installing USB Driver 2.17 3 Using the Control Panel Control Panel Buttons 3.1 Control...
User Manual (user Manual) (ver.1.00) (English)
Page 4
... Printing Watermarks 5.21 Using Page Overlay 5.24 Printing on Different Paper for the First Page 5.28 Reprinting the Last Page 5.29 6 Maintaining Your Printer Maintaining Toner Cartridge 6.1 Cleaning the Printer 6.4 7 Problem Solving Troubleshooting Checklist 7.1 Solving General Printing Problems 7.2 Printing Special Pages 7.6 Clearing Paper Jams 7.7 Solving Print Quality Problems 7.16 Troubleshooting Error Messages 7.22...
User Manual (user Manual) (ver.1.00) (English)
Page 17
Printer Components Front View Top output tray (Face down output ) Multi-Purpose Tray Control panel Control board cover (needed to access the control board to install printer options) Top cover (Inside) Tray 1 (550-sheet paper feeder) Tray 2 Paper level indicators (Optional 550-sheet paper feeder) Toner cartridge 1.4 INTRODUCTION
User Manual (user Manual) (ver.1.00) (English)
Page 19
Topics included in this chapter are: x step 1: Unpack Your Printer x step 2: Install the Toner Cartridge x step 3: Load Paper x step 4: Connect to the Computer with a Parallel Cable x step 5: Turn on setting up your printer. x step 7: Install the Printer Software Installing USB Driver 2CHAPTER Setting Up Your Printer This chapter provides step by step information on the Printer x step 6: Print a Demo Page!
User Manual (user Manual) (ver.1.00) (English)
Page 20
SETTING UP YOUR PRINTER 2.1 Make sure that your printer has been packed with the following items: Notes: • If any items are missing or damaged, notify your dealer immediately. • Components may differ from the packing carton. Unpack Your Printer 1 Remove the printer and all packing tapes from the printer. Toner cartridge CD-ROM Power cord Quick Guide 2 Carefully remove all accessories from one country to another. • The CD-ROM contains the printer driver, the User's Guide, the Adobe Acrobat Reader program.
User Manual (user Manual) (ver.1.00) (English)
Page 22
...the handle to light for more than a few minutes. Hot water sets toner into fabric. Handle SETTING UP YOUR PRINTER 2.3 CAUTION: To prevent damage, do not expose the toner cartridge to open the lid. 2 Carefully tear one end of paper if left exposed for more than a few minutes.... piece of the plastic bag. Install the Toner Cartridge 1 Open the top cover lid. Carefully pull the tape completely out of the toner cartridge. Discard the tape. 4 Gently shake the cartridge from side to side to distribute the toner evenly inside the cartridge. Don't use a knife or other sharp objects ...
User Manual (user Manual) (ver.1.00) (English)
Page 23
Note: When printing text at 5% coverage, you can expect a toner cartridge life of approximately 6,000 pages (3,000 pages for the toner cartridge that the cover is shipped with the printer). 2.4 SETTING UP YOUR PRINTER Make sure that is securely closed. Install the Toner Cartridge 5 Locate the cartridge slots inside the printer, one on each side. 6 Grasp the handle and insert the cartridge in the printer until it drops into place. 7 Close the top cover.
User Manual (user Manual) (ver.1.00) (English)
Page 77
... you 've made on the control panel of your toner cartridge and reduce your software application, access the printer properties. Click OK. Selecting this feature from the ML-1450 series printer Press the Toner Save button on the control panel. The printer must be in the ready mode (Data light is on).... 5.6 PRINTING TASKS • If the button backlight is on, toner save mode activates and the printer uses less toner to print a...
User Manual (user Manual) (ver.1.00) (English)
Page 101
Topics included in this chapter are: x Maintaining Toner Cartridge x Cleaning the Printer 6CHAPTER Maintaining Your Printer This chapter provides suggestions for high-quality and economical printing and information for maintaining the toner cartridge and the printer.
User Manual (user Manual) (ver.1.00) (English)
Page 102
... button will reduce print quality. Maintaining Toner Cartridge Toner cartridge storage To get the most from the toner cartridge, keep the following guidelines in your mind. • Do not remove the toner cartridge from the printer except to replace it, clean it to light...Do not refill toner cartridges. MAINTAINING YOUR PRINTER 6.1 Toner cartridge life expectancy The life of a cartridge in the toner cartridge box to "Using Toner Save Mode" on page 5.6. Refer to recycle the old cartridge. The shelf life of the toner cartridge depends on the printer control panel. You ...
User Manual (user Manual) (ver.1.00) (English)
Page 103
... the toner gets on a printed page. Hot water sets toner into the printer. CAUTIONS: • Avoid reaching too far into fabric. 6.2 MAINTAINING YOUR PRINTER The following procedures may allow you to temporarily improve print quality by redistributing the toner. Toner Cartridge Redistributing Toner When toner is low, faded or light areas may appear...
User Manual (user Manual) (ver.1.00) (English)
Page 104
Be sure that the toner cartridge is firmly in its place. 4 Reinsert the toner cartridge into the printer. Toner Cartridge 5 Firmly close the cover. If the print remains light Remove the old cartridge and install a new toner cartridge. See "Install the Toner Cartridge" on page 2.3. MAINTAINING YOUR PRINTER 6.3
User Manual (user Manual) (ver.1.00) (English)
Page 105
... to be let any dust and spilled toner from the toner cartridge area and the toner cartridge cavity. 6.4 MAINTAINING YOUR PRINTER Also, do not expose it . Cleaning inside the printer will eliminate or reduce these problems. Cleaning inside the printer. By doing so, you can dampen the cloth slightly with ...inside of paper, if necessary. The oil from dust and debris. Note: To prevent damage to the toner cartridge, do not touch the black transfer roller inside the 1 Turn the printer off and unplug the power cord, then wait for more than a few minutes. Notes: • Do ...
User Manual (user Manual) (ver.1.00) (English)
Page 106
... 2 Press and hold Demo on the control panel for about 10 seconds until all control panel lights remain steadily lit, then release. 3 Your printer automatically picks up a sheet of paper from the paper tray and prints out a cleaning sheet with the dust or toner particles on . Printing ... a cleaning sheet cleans the drum inside the top of the cartridge compartment, and gently swab the glass to see if dirt turns the white cotton black. 5 Reinsert the toner cartridge and close the top cover. MAINTAINING YOUR PRINTER 6.5 Cleaning the Printer 4 Locate the long strip of glass (LSU) inside the...
User Manual (user Manual) (ver.1.00) (English)
Page 109
...cartridge is not connected properly. If possible, attach the cable to the correct port (for example, LPT1). Possible Cause The printer is not selected as your ML-1450 series printer, refer to the table for the following: The printer may also try using a different printer cable. Problem The printer does not print. Your printer...and the Data lights are on the printer's control panel. Check the printer for suggested solutions. Select Samsung ML-1450 Series or Samsung ML-1450 Series PS as the default printer. Disconnect the printer cable and reconnect it. Contact a service ...
User Manual (user Manual) (ver.1.00) (English)
Page 112
... you know works. Try a print job that your printer is selected. Pages print, but The printer cable is the text is Replace the toner cartridge. The toner cartridge is wrong, loose or defective. Remove the toner cartridge and pull out the sealing tape. Check the application's printer selection menu to another is malfunctioning. The operating system...
User Manual (user Manual) (ver.1.00) (English)
Page 113
... Sheet Samsung ML-1450 Series The configuration sheet lists many of the current settings and properties of the printer. Press and hold Demo for about problems with your printer. Discard the blank page produced from the cleaning process. Printing the demo page will help you are special pages within the memory of the toner cartridge. To...
User Manual (user Manual) (ver.1.00) (English)
Page 117
.... 1 Slide out Tray 1 to remove such jams from the inside the printer, remove Tray 1 from the printer and carefully pull the jammed paper free from the tray. Clearing Paper Jams Input Area Note: If paper has entered the toner cartridge area, follow the instructions on page 7.12. It is properly aligned in... the paper feed area and cannot be accessed from inside of the paper is easier to expose the jammed paper. 2 Remove any misfed paper by pulling it out by the visible edge from the printer. 7.10...
User Manual (user Manual) (ver.1.00) (English)
Page 119
CAUTION: To prevent damage to the toner cartridge, do not expose it to remove it is out of the printer. 2 Carefully lift up the guide feed. If you to light for more than a few minutes. Clearing Paper Jams Inside the Printer Note: Paper jams in this area may result in loose toner on your... clothes, wash them in cold water because hot water will set the toner into the fabric. 1 Open the top cover and remove the toner cartridge. Guide feed 3 Gently pull the paper...
User Manual (user Manual) (ver.1.00) (English)
Page 120
See the next page to reinstall, make sure the guide feed has been flipped back down the guide feed, and reinstall the toner cartridge. Note: If the toner cartridge is difficult to clear the jammed paper in the optional Tray 2. PROBLEM SOLVING 7.13 Printing can be resumed. Note: If you have the optional Tray 2 installed, and cannot find the jammed paper in the output or input area, or inside the printer, the paper jam may have occurred in the optional tray. Clearing Paper Jams 4 Flip down into position. 5 Close the top cover.