
User Guide
Page 20
...YOUR PRINTER 2.5 Then, reinsert them with the new paper. Load Paper Notes: • Do not push the width guide far enough to cause the media to warp. • If you do not adjust the width guide, it may cause paper jams or multiple feeding. Keep the paper below this height mark. 5 Adjust the paper ...guides to 150 sheets. This tray holds up to the width of paper while printing, remove the remaining paper from the tray at first. Note that adding new...
...YOUR PRINTER 2.5 Then, reinsert them with the new paper. Load Paper Notes: • Do not push the width guide far enough to cause the media to warp. • If you do not adjust the width guide, it may cause paper jams or multiple feeding. Keep the paper below this height mark. 5 Adjust the paper ...guides to 150 sheets. This tray holds up to the width of paper while printing, remove the remaining paper from the tray at first. Note that adding new...

User Guide
Page 36
... 10 seconds until the control panel lights blink slowly to print a demo page. After cleaning the printer, one cleaning sheet prints. Start manual feeding When you select Manual for Paper Source from your software application, you should press Demo each time you load a sheet of the... printer Press and hold Demo for about 2 seconds until the control panel lights remain lit. Control Panel Buttons The printer has three buttons...
... 10 seconds until the control panel lights blink slowly to print a demo page. After cleaning the printer, one cleaning sheet prints. Start manual feeding When you select Manual for Paper Source from your software application, you should press Demo each time you load a sheet of the... printer Press and hold Demo for about 2 seconds until the control panel lights remain lit. Control Panel Buttons The printer has three buttons...

User Guide
Page 38
... for about 2 seconds, a demo page will return to be pressed In the Manual Feed mode, the printer is receiving or processing data. Press the Demo button to print. Error Paper Data Processing The printer is waiting the Demo button to the Ready mode after the job has been canceled.... an error. Control Panel Light Message Error Paper Data Ready mode The Data light is on and the printer is out of your printer. For the manual tray, press the Demo button after loading paper into the printer. Error Paper Data Paper out The printer is ready to start printing. Control Panel...
... for about 2 seconds, a demo page will return to be pressed In the Manual Feed mode, the printer is receiving or processing data. Press the Demo button to print. Error Paper Data Processing The printer is waiting the Demo button to the Ready mode after the job has been canceled.... an error. Control Panel Light Message Error Paper Data Ready mode The Data light is on and the printer is out of your printer. For the manual tray, press the Demo button after loading paper into the printer. Error Paper Data Paper out The printer is ready to start printing. Control Panel...

User Guide
Page 45
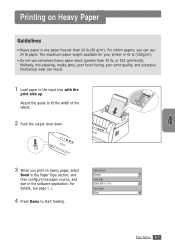
... MEDIA After you finish using the face-up output slot, you must select Manual for Paper Source from the software application, and then select the correct paper size and type. For details, see page 5.3. 4 Press Demo to start feeding. Demo Notes: • The face-up output slot may not hold the printed pages... output slot. 3 When you print a document, you are printing multiple pages, load the next sheet after the first page prints out. 7 Press Demo to start feeding. 5 Print the document. 6 If you must change output lever position.
... MEDIA After you finish using the face-up output slot, you must select Manual for Paper Source from the software application, and then select the correct paper size and type. For details, see page 5.3. 4 Press Demo to start feeding. Demo Notes: • The face-up output slot may not hold the printed pages... output slot. 3 When you print a document, you are printing multiple pages, load the next sheet after the first page prints out. 7 Press Demo to start feeding. 5 Print the document. 6 If you must change output lever position.

User Guide
Page 47
Printing on envelopes, configure the paper source, type and size properly in the Paper Source and load the envelope one by one, you print on Envelopes 4 Push the output lever down. 5 When you need not press the Demo button. 7 Print the document. 8 After printing, push the output lever up. 4.8 PRINT MEDIA For details, see page 5.3. 6 Press Demo to start feeding. Note: If you select Auto Select in the software application.
Printing on envelopes, configure the paper source, type and size properly in the Paper Source and load the envelope one by one, you print on Envelopes 4 Push the output lever down. 5 When you need not press the Demo button. 7 Print the document. 8 After printing, push the output lever up. 4.8 PRINT MEDIA For details, see page 5.3. 6 Press Demo to start feeding. Note: If you select Auto Select in the software application.
User Guide
Page 48
... paper weight available for your printer is any paper heavier than 43 lb, or 163 g/m2 bond). For details, see page 5.3. 4 Press Demo to fit the width of the labels. 2 Push the output lever down. 3 When you can result. 1 Load paper in the software application. PRINT MEDIA 4.9 Adjust the guide to start feeding. For cotton papers...
... paper weight available for your printer is any paper heavier than 43 lb, or 163 g/m2 bond). For details, see page 5.3. 4 Press Demo to fit the width of the labels. 2 Push the output lever down. 3 When you can result. 1 Load paper in the software application. PRINT MEDIA 4.9 Adjust the guide to start feeding. For cotton papers...

User Guide
Page 49
For details, see page 5.3. 4 Press Demo to printer components. • Do not feed a sheet of labels through the printer. • Do not use labels recommended for one pass through the printer more than once. Printing on labels, configure the paper source, type and size in the input tray with print side... Adjust the guide to fit the width of 200°C (392°F) for 0.1 second. • Make sure that there is designed for laser printers. • Verify that are separating from sticking, do not let the printed label sheets stack up . Exposed areas can cause labels to peel ...
For details, see page 5.3. 4 Press Demo to printer components. • Do not feed a sheet of labels through the printer. • Do not use labels recommended for one pass through the printer more than once. Printing on labels, configure the paper source, type and size in the input tray with print side... Adjust the guide to fit the width of 200°C (392°F) for 0.1 second. • Make sure that there is designed for laser printers. • Verify that are separating from sticking, do not let the printed label sheets stack up . Exposed areas can cause labels to peel ...

User Guide
Page 50
... the top with the adhesive strip going first. Printing on a flat surface after removing them from the printer. Adjust the guide to scratch or leave fingerprints on transparencies, configure the paper source, type and size in laser printers. • Insure transparencies are printed out. • Place transparencies on Transparencies Guidelines • Only use transparencies... have any torn edges. • Hold the transparencies by the edges and avoid touching the print side. For details, see page 5.3. 4 Press Demo to start feeding.
... the top with the adhesive strip going first. Printing on a flat surface after removing them from the printer. Adjust the guide to scratch or leave fingerprints on transparencies, configure the paper source, type and size in laser printers. • Insure transparencies are printed out. • Place transparencies on Transparencies Guidelines • Only use transparencies... have any torn edges. • Hold the transparencies by the edges and avoid touching the print side. For details, see page 5.3. 4 Press Demo to start feeding.

User Guide
Page 52
... first . Adjust the guide to start feeding. Printing on card stock that is 216 X 356 mm (8.5" X 14"). • Set margins at least 6.4 mm (0.25 in.) away from the edges of the media in the software application. 1 Load print media in the printer driver's properties (see page 5.3) and ...print. 4 Press Demo to fit the width of the media. 2 Push the output lever down. 3 Configure the paper source, type in the input tray with the Samsung ML-1430 Series printer. To print in landscape mode, make this...
... first . Adjust the guide to start feeding. Printing on card stock that is 216 X 356 mm (8.5" X 14"). • Set margins at least 6.4 mm (0.25 in.) away from the edges of the media in the software application. 1 Load print media in the printer driver's properties (see page 5.3) and ...print. 4 Press Demo to fit the width of the media. 2 Push the output lever down. 3 Configure the paper source, type in the input tray with the Samsung ML-1430 Series printer. To print in landscape mode, make this...

User Guide
Page 56
... media, select the corresponding print media name in the Paper Type options box. Select Use Printer Default from the Paper Source options box unless you are printing with special media, select Manual and feed one sheet at a time into the printer. For more information, refer to Chapter 4 'Print Media...'. PRINTING TASKS 5.3 To print with special media. See page 4.5. Printing a Document Select Auto Select from the Paper Type options box unless you want ...
... media, select the corresponding print media name in the Paper Type options box. Select Use Printer Default from the Paper Source options box unless you are printing with special media, select Manual and feed one sheet at a time into the printer. For more information, refer to Chapter 4 'Print Media...'. PRINTING TASKS 5.3 To print with special media. See page 4.5. Printing a Document Select Auto Select from the Paper Type options box unless you want ...
User Guide
Page 87
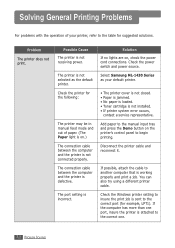
...is working properly and print a job. Check the printer for the following: The printer may be in manual feed mode and out of your default printer. • The printer cover is not closed. • Paper is jammed. • No paper is loaded. • Toner cartridge is not installed... the power switch and power source. Disconnect the printer cable and reconnect it. Select Samsung ML-1430 Series as the default printer. Solving General Printing Problems For problems with the operation of paper. (The Paper light is on the printer's control panel to the manual input tray and press...
...is working properly and print a job. Check the printer for the following: The printer may be in manual feed mode and out of your default printer. • The printer cover is not closed. • Paper is jammed. • No paper is loaded. • Toner cartridge is not installed... the power switch and power source. Disconnect the printer cable and reconnect it. Select Samsung ML-1430 Series as the default printer. Solving General Printing Problems For problems with the operation of paper. (The Paper light is on the printer's control panel to the manual input tray and press...
User Guide
Page 88
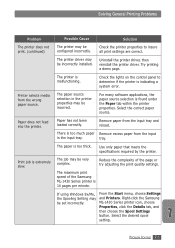
... correct paper source. Paper does not feed into the printer. If using Windows 9x/Me, the Spooling Setting may be set incorrectly. Right-click the Samsung ML-1430 Series printer icon, choose Properties, click the Details tab, and then choose the Spool Settings button. Uninstall the printer driver, then reinstall the printer driver. Reduce the complexity of the Samsung ML-1430 Series printer is...
... correct paper source. Paper does not feed into the printer. If using Windows 9x/Me, the Spooling Setting may be set incorrectly. Right-click the Samsung ML-1430 Series printer icon, choose Properties, click the Details tab, and then choose the Spool Settings button. Uninstall the printer driver, then reinstall the printer driver. Reduce the complexity of the Samsung ML-1430 Series printer is...

User Guide
Page 103
... on the control panel to start printing. Error Paper Data Toner Save LSU error • Reset the printer by removing any unnecessary fonts, macros, or any data currently in the manual feed mode, the printer is complete, the message will automatically clear. Error Paper Data Door open The printer front cover may be open. • Check...
... on the control panel to start printing. Error Paper Data Toner Save LSU error • Reset the printer by removing any unnecessary fonts, macros, or any data currently in the manual feed mode, the printer is complete, the message will automatically clear. Error Paper Data Door open The printer front cover may be open. • Check...

User Guide
Page 115
..., loose particles, dust, wrinkles, voids, and curled or bent edges. Paper Specifications Guidelines for 0.1 second). Symptom Poor print quality or toner adhesion, problems with feeding Dropout, jamming, curl Increased gray background shading /printer wear Excessive curl problems with feeding Jamming, damage to printer Problems with feeding Problem with cutouts or perforations. The following problems may cause...
..., loose particles, dust, wrinkles, voids, and curled or bent edges. Paper Specifications Guidelines for 0.1 second). Symptom Poor print quality or toner adhesion, problems with feeding Dropout, jamming, curl Increased gray background shading /printer wear Excessive curl problems with feeding Jamming, damage to printer Problems with feeding Problem with cutouts or perforations. The following problems may cause...

User Guide
Page 117
... to increase in sealed reams can become distorted. The paper storage environment should be used in its moisture-proof wrapping. Paper Specifications Printer and Paper Storage Environment A.6 APPENDIX Paper storage environmental conditions directly affect the feed operation. Heat works with humidity to ensure optimum printer performance. Also, as paper loses and gains moisture it absorbs and loses moisture...
... to increase in sealed reams can become distorted. The paper storage environment should be used in its moisture-proof wrapping. Paper Specifications Printer and Paper Storage Environment A.6 APPENDIX Paper storage environmental conditions directly affect the feed operation. Heat works with humidity to ensure optimum printer performance. Also, as paper loses and gains moisture it absorbs and loses moisture...

User Guide
Page 127
Using Your Printer with Macintosh Color Select grayscale mode. œ Grayscale œ Black&White Background Printing Turns background printing on hold to hold the print job in the ... at: to print at the specific time you are ready to release it. Select the corresponding paper source. Paper Source A.16 APPENDIX Select a priority for your print job in the order the job is set, the printer automatically selects the print media according to the following : • Normal to print in the queue...
Using Your Printer with Macintosh Color Select grayscale mode. œ Grayscale œ Black&White Background Printing Turns background printing on hold to hold the print job in the ... at: to print at the specific time you are ready to release it. Select the corresponding paper source. Paper Source A.16 APPENDIX Select a priority for your print job in the order the job is set, the printer automatically selects the print media according to the following : • Normal to print in the queue...


