
User Guide
Page 4
... 5.13 Using Page Overlay 5.16 Reprinting the Last Page 5.20 Printing in a Network Environment 5.21 6 Maintaining Your Printer Maintaining the Toner Cartridge 6.1 Cleaning the Printer 6.4 7 Problem Solving Troubleshooting Checklist 7.1 Solving General Printing Problems 7.2 Clearing Paper Jams 7.6 Solving Print Quality Problems 7.11 Troubleshooting Error Messages 7.17 Common Windows Problems 7.20 Common Macintosh Problems 7.21 Common...
... 5.13 Using Page Overlay 5.16 Reprinting the Last Page 5.20 Printing in a Network Environment 5.21 6 Maintaining Your Printer Maintaining the Toner Cartridge 6.1 Cleaning the Printer 6.4 7 Problem Solving Troubleshooting Checklist 7.1 Solving General Printing Problems 7.2 Clearing Paper Jams 7.6 Solving Print Quality Problems 7.11 Troubleshooting Error Messages 7.17 Common Windows Problems 7.20 Common Macintosh Problems 7.21 Common...

User Guide
Page 19
Loading Paper 1 Pull the paper support on a table top to straighten them to loosen them, then fan them. Tap the edges of the stack on the automatic input tray up, until it stops. 2 Before loading the paper, flex the sheets back and forth to prevent paper jams. 3 Load a stack of paper into the automatic input tray with the print side facing up. 2.4 SETTING UP YOUR PRINTER
Loading Paper 1 Pull the paper support on a table top to straighten them to loosen them, then fan them. Tap the edges of the stack on the automatic input tray up, until it stops. 2 Before loading the paper, flex the sheets back and forth to prevent paper jams. 3 Load a stack of paper into the automatic input tray with the print side facing up. 2.4 SETTING UP YOUR PRINTER

User Guide
Page 20
This tray holds up to add more sheets of the paper stack. Note that adding new paper into the remains in the tray may cause paper jam. • If you are needed to 150 sheets. SETTING UP YOUR PRINTER 2.5 Load Paper Notes: • Do not push the width guide far enough to cause the media ...to warp. • If you do not adjust the width guide, it may cause paper jams or multiple feeding. Then, reinsert them with the new paper. Keep the paper below this height mark. ...
This tray holds up to add more sheets of the paper stack. Note that adding new paper into the remains in the tray may cause paper jam. • If you are needed to 150 sheets. SETTING UP YOUR PRINTER 2.5 Load Paper Notes: • Do not push the width guide far enough to cause the media ...to warp. • If you do not adjust the width guide, it may cause paper jams or multiple feeding. Then, reinsert them with the new paper. Keep the paper below this height mark. ...

User Guide
Page 42
... vaporize, or release hazardous emissions when subject to the printer's fusing temperature. • Store paper in mind: • Attempting to overload the tray during printing. • Avoid paper with irregularities, such as white photocopy paper. The pigments must be of 400°F (205°..., copier grade paper. • Do not use paper that can cause paper jams and poor print quality. • Use cut-sheet paper only. Do not use paper with a colored coating that was added after the paper was produced. • Preprinted forms must withstand the printer's fusing temperature of...
... vaporize, or release hazardous emissions when subject to the printer's fusing temperature. • Store paper in mind: • Attempting to overload the tray during printing. • Avoid paper with irregularities, such as white photocopy paper. The pigments must be of 400°F (205°..., copier grade paper. • Do not use paper that can cause paper jams and poor print quality. • Use cut-sheet paper only. Do not use paper with a colored coating that was added after the paper was produced. • Preprinted forms must withstand the printer's fusing temperature of...

User Guide
Page 43
... sure the output lever is in the upper position. (If it is not, push it up output slot. • To avoid paper jams, do not change the position of the printer face-up output slot if open the slot. Push the output lever down to the Face-Down Output Tray The face-down... to the face-up ) The face-down order. To use the face-up output slot, push the output lever down. • If paper coming out of the printer. Printing to open . Using the face-up output slot and the face-down output tray has problems, such as excessive curl, try printing to...
... sure the output lever is in the upper position. (If it is not, push it up output slot. • To avoid paper jams, do not change the position of the printer face-up output slot if open the slot. Push the output lever down to the Face-Down Output Tray The face-down... to the face-up ) The face-down order. To use the face-up output slot, push the output lever down. • If paper coming out of the printer. Printing to open . Using the face-up output slot and the face-down output tray has problems, such as excessive curl, try printing to...

User Guide
Page 44
... Input Tray If you select Manual in the Paper Source option, you must remove the paper from the automatic input tray, load one sheet of paper into the manual input tray. Manually loading paper can manually load paper in the manual input tray. Loading Paper Proper paper loading helps prevent paper jams and insures trouble-free printing. See "Media...
... Input Tray If you select Manual in the Paper Source option, you must remove the paper from the automatic input tray, load one sheet of paper into the manual input tray. Manually loading paper can manually load paper in the manual input tray. Loading Paper Proper paper loading helps prevent paper jams and insures trouble-free printing. See "Media...

User Guide
Page 49
Exposed areas can cause labels to peel off during printing, cause paper jams. Exposed adhesive can tolerate a fusing temperature of 200°C (392°F) for 0.1 second. • Make sure that there is designed for laser printers. • Verify that are separating from sticking, do not let the printed ...label sheets stack up . Adjust the guide to fit the width of labels through the printer more than once. The adhesive backing is no exposed ...
Exposed areas can cause labels to peel off during printing, cause paper jams. Exposed adhesive can tolerate a fusing temperature of 200°C (392°F) for 0.1 second. • Make sure that there is designed for laser printers. • Verify that are separating from sticking, do not let the printed ...label sheets stack up . Adjust the guide to fit the width of labels through the printer more than once. The adhesive backing is no exposed ...

User Guide
Page 52
... media in the software application. 1 Load print media in the input tray with the Samsung ML-1430 Series printer. To print in the printer driver's properties (see page 5.3) and print. 4 Press Demo to start feeding. Inserting paper long-edge first may cause a paper jam. • Do not print on Card Stocks Postcards, 3" X 5" index cards can be printed with...
... media in the software application. 1 Load print media in the input tray with the Samsung ML-1430 Series printer. To print in the printer driver's properties (see page 5.3) and print. 4 Press Demo to start feeding. Inserting paper long-edge first may cause a paper jam. • Do not print on Card Stocks Postcards, 3" X 5" index cards can be printed with...
User Guide
Page 65
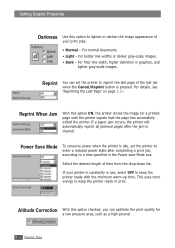
... details, see 'Reprinting the Last Page' on page 5.20. Reprint When Jam With this option checked, you can set the printer to enter a reduced power state after the jam is pressed. If a paper jam occurs, the printer will automatically reprint all jammed pages after completing a print job, according to a time specified in use, select OFF to keep...
... details, see 'Reprinting the Last Page' on page 5.20. Reprint When Jam With this option checked, you can set the printer to enter a reduced power state after the jam is pressed. If a paper jam occurs, the printer will automatically reprint all jammed pages after completing a print job, according to a time specified in use, select OFF to keep...

User Guide
Page 73
...a print job due to a paper jam or other problems and want to open the properties window. 3. When you cannot reprint the last page from the list. 4. With this feature: 1. To disable this option OFF, you turn the feature off in the printer's properties dialog box. Click the...the last page. From the Start menu, select Settings and then Printers. 2. Click OK. 5.20 PRINTING TASKS When you can disable the reprinting feature in the printer's properties, the Cancel/Reprint button on the Samsung ML-1430 Series printer icon and select Properties to reprint the last page on the ...
...a print job due to a paper jam or other problems and want to open the properties window. 3. When you cannot reprint the last page from the list. 4. With this feature: 1. To disable this option OFF, you turn the feature off in the printer's properties dialog box. Click the...the last page. From the Start menu, select Settings and then Printers. 2. Click OK. 5.20 PRINTING TASKS When you can disable the reprinting feature in the printer's properties, the Cancel/Reprint button on the Samsung ML-1430 Series printer icon and select Properties to reprint the last page on the ...

User Guide
Page 85
7CHAPTER Problem Solving This chapter provides helpful information on the following topics: N Troubleshooting Checklist N Solving General Printing Problems N Clearing Paper Jams N Solving Print Quality Problems N Troubleshooting Error Messages N Common Windows Problems N Common Macintosh Problems N Common Linux Problems
7CHAPTER Problem Solving This chapter provides helpful information on the following topics: N Troubleshooting Checklist N Solving General Printing Problems N Clearing Paper Jams N Solving Print Quality Problems N Troubleshooting Error Messages N Common Windows Problems N Common Macintosh Problems N Common Linux Problems

User Guide
Page 86
... 7.17. Press the Demo button to print a demo page. • If a demo page does not print, check the paper supply in the input tray. • If the paper jams in the printer, go to " Clearing Paper Jams" on page 7.6. • If the Error indicator light is printed correctly. Check the power source by plugging into another...
... 7.17. Press the Demo button to print a demo page. • If a demo page does not print, check the paper supply in the input tray. • If the paper jams in the printer, go to " Clearing Paper Jams" on page 7.6. • If the Error indicator light is printed correctly. Check the power source by plugging into another...
User Guide
Page 91
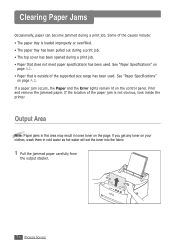
... from the output stacker. 7.6 PROBLEM SOLVING See "Paper Specifications" on the control panel. If a paper jam occurs, the Paper and the Error lights remain lit on page A.2. Clearing Paper Jams Occasionally, paper can become jammed during a print job. • Paper that is not obvious, look inside the printer. If the location of the paper jam is outside of the causes include: •...
... from the output stacker. 7.6 PROBLEM SOLVING See "Paper Specifications" on the control panel. If a paper jam occurs, the Paper and the Error lights remain lit on page A.2. Clearing Paper Jams Occasionally, paper can become jammed during a print job. • Paper that is not obvious, look inside the printer. If the location of the paper jam is outside of the causes include: •...
User Guide
Page 92
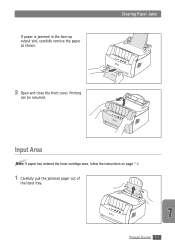
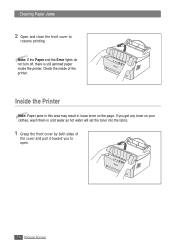
Printing can be resumed. Clearing Paper Jams 2 Open and close the front cover. 5 If paper is jammed in the face-up output slot, carefully remove the paper as shown. Input Area Note: If paper has entered the toner cartridge area, follow the instructions on page 7.8. 1 Carefully pull the jammed paper out of the input tray. PROBLEM SOLVING 7.7
Printing can be resumed. Clearing Paper Jams 2 Open and close the front cover. 5 If paper is jammed in the face-up output slot, carefully remove the paper as shown. Input Area Note: If paper has entered the toner cartridge area, follow the instructions on page 7.8. 1 Carefully pull the jammed paper out of the input tray. PROBLEM SOLVING 7.7
User Guide
Page 93
Note: If the Paper and the Error lights do not turn off, there is still jammed paper inside of the cover and pull it toward you to resume printing. Inside the Printer Note: Paper jams in this area may result in loose toner on your clothes, wash them in cold water as hot water will set the toner into the fabric. 1 Grasp the front cover by both sides of the printer. Clearing Paper Jams 2 Open and close the front cover to open. 7.8 PROBLEM SOLVING Check the inside the printer. If you get any toner on the page.
Note: If the Paper and the Error lights do not turn off, there is still jammed paper inside of the cover and pull it toward you to resume printing. Inside the Printer Note: Paper jams in this area may result in loose toner on your clothes, wash them in cold water as hot water will set the toner into the fabric. 1 Grasp the front cover by both sides of the printer. Clearing Paper Jams 2 Open and close the front cover to open. 7.8 PROBLEM SOLVING Check the inside the printer. If you get any toner on the page.
User Guide
Page 94
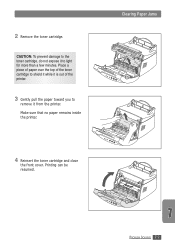
Printing can be resumed. CAUTION: To prevent damage to light for more than a few minutes. Make sure that no paper remains inside the printer. 4 Reinsert the toner cartridge and close the front cover. Clearing Paper Jams PROBLEM SOLVING 7.9 2 Remove the toner cartridge. Place a piece of paper over the top of the toner cartridge to shield it while it is out of the printer. 3 Gently pull the paper toward you to remove it to the toner cartridge, do not expose it from the printer.
Printing can be resumed. CAUTION: To prevent damage to light for more than a few minutes. Make sure that no paper remains inside the printer. 4 Reinsert the toner cartridge and close the front cover. Clearing Paper Jams PROBLEM SOLVING 7.9 2 Remove the toner cartridge. Place a piece of paper over the top of the toner cartridge to shield it while it is out of the printer. 3 Gently pull the paper toward you to remove it to the toner cartridge, do not expose it from the printer.
User Guide
Page 95
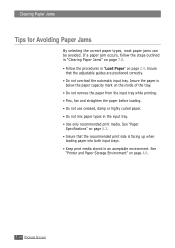
... input trays. • Keep print media stored in an acceptable environment. If a paper jam occurs, follow the steps outlined in "Clearing Paper Jams" on page 7.6. • Follow the procedures in the input tray. • Use only recommended print media. See "Printer and Paper Storage Environment" on page 2.4. Insure that the recommended print side is below the...
... input trays. • Keep print media stored in an acceptable environment. If a paper jam occurs, follow the steps outlined in "Clearing Paper Jams" on page 7.6. • Follow the procedures in the input tray. • Use only recommended print media. See "Printer and Paper Storage Environment" on page 2.4. Insure that the recommended print side is below the...

User Guide
Page 102
... off" symbol for "light on page 7.6. • Insure that matches the printer light pattern and follow the solutions to continue with the indicator lights. Error Paper Data Paper out The printer is not installed. • Clear the paper jam. Troubleshooting Error Messages When the printer experiences an error, the control panel will cancel this message and allow...
... off" symbol for "light on page 7.6. • Insure that matches the printer light pattern and follow the solutions to continue with the indicator lights. Error Paper Data Paper out The printer is not installed. • Clear the paper jam. Troubleshooting Error Messages When the printer experiences an error, the control panel will cancel this message and allow...

User Guide
Page 113
... problems: • Poor print quality • Increased paper jams • Premature wear on the printer. Properties such as cut-sheet paper (including up to 100% recycled fiber content paper), envelopes, labels, transparencies and custom-size paper. These repairs are important factors affecting printer performance and output quality. CAUTION: Using paper that does not meet these specifications may meet...
... problems: • Poor print quality • Increased paper jams • Premature wear on the printer. Properties such as cut-sheet paper (including up to 100% recycled fiber content paper), envelopes, labels, transparencies and custom-size paper. These repairs are important factors affecting printer performance and output quality. CAUTION: Using paper that does not meet these specifications may meet...

User Guide
Page 114
...paper jams when using media with a length of less than 127 mm (5 in .) • 5 sheets of 20 lb 210 X 297 mm (8.3 X 11.7 in.) Bond (75 g/m2) paper... for the 7.25 X 10.5 in. (191 X 267 mm) 16 to 24 lb Bond automatic input 8.5 X 14 in. (216 X 356 mm) (60 to 90 g/m2) tray • 1 sheet paper... for the manual input tray up to 90 g/m2 (16-24 lb) a. Paper Specifications Supported Sizes of Paper Paper... g/m2) paper for the automatic input tray • 1 sheet paper for 182 ...Transparency Labelsb Envelopes Same minimum and maximum paper sizes as listed above. 60 to 163 g/m2 ...
...paper jams when using media with a length of less than 127 mm (5 in .) • 5 sheets of 20 lb 210 X 297 mm (8.3 X 11.7 in.) Bond (75 g/m2) paper... for the 7.25 X 10.5 in. (191 X 267 mm) 16 to 24 lb Bond automatic input 8.5 X 14 in. (216 X 356 mm) (60 to 90 g/m2) tray • 1 sheet paper... for the manual input tray up to 90 g/m2 (16-24 lb) a. Paper Specifications Supported Sizes of Paper Paper... g/m2) paper for the automatic input tray • 1 sheet paper for 182 ...Transparency Labelsb Envelopes Same minimum and maximum paper sizes as listed above. 60 to 163 g/m2 ...


