User Manual
Page 3
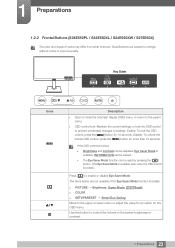
...57 57 58 58 60 60 62 62 Installation Attaching the Stand Adjusting the Product Tilt and Height Rotating the Monitor Installing a Wall-mount Kit or Desktop Stand Anti-theft Lock Before Connecting Pre-connection Checkpoints Connecting and Using a PC Connecting to a PC Connecting the Power Driver Installation Setting Optimum Resolution Brightness Configuring Brightness Contrast Configuring Contrast Sharpness Configuring Sharpness Eye Saver Mode Configuring Eye Saver Mode Game Mode Configuring Game Mode SAMSUNG MAGIC Bright Configuring SAMSUNG MAGIC Bright SAMSUNG MAGIC Angle (S22E450F / S24E450F...
...57 57 58 58 60 60 62 62 Installation Attaching the Stand Adjusting the Product Tilt and Height Rotating the Monitor Installing a Wall-mount Kit or Desktop Stand Anti-theft Lock Before Connecting Pre-connection Checkpoints Connecting and Using a PC Connecting to a PC Connecting the Power Driver Installation Setting Optimum Resolution Brightness Configuring Brightness Contrast Configuring Contrast Sharpness Configuring Sharpness Eye Saver Mode Configuring Eye Saver Mode Game Mode Configuring Game Mode SAMSUNG MAGIC Bright Configuring SAMSUNG MAGIC Bright SAMSUNG MAGIC Angle (S22E450F / S24E450F...

User Manual
Page 12
... power cable to an increased internal temperature. Before Using the Product Caution Do not unplug the power cord when the product is connected unobstructed. z The product may result due to completely ! Keep the power socket where the power cord is in a narrow space with the power button. cut off with bad ventilation, such as a bookshelf or wall closet. Hold the plug when disconnecting the power cord...
... power cable to an increased internal temperature. Before Using the Product Caution Do not unplug the power cord when the product is connected unobstructed. z The product may result due to completely ! Keep the power socket where the power cord is in a narrow space with the power button. cut off with bad ventilation, such as a bookshelf or wall closet. Hold the plug when disconnecting the power cord...
User Manual
Page 21
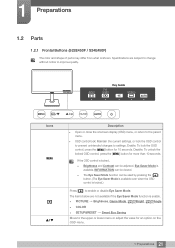
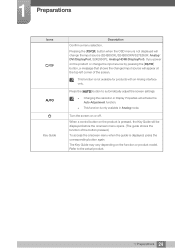
... parent menu. EYE MENU SAVER SOURCE AUTO Key Guide EYE MENU SAVER SOURCE AUTO Icons MENU Description z Open or close the onscreen display (OSD) menu, or return to improve quality. INFORMATION can be used by pressing the [ ] button. (The Eye Saver Mode is available even when the OSD control is locked, z Brightness and Contrast can be viewed. z PICTURE Brightness, Game Mode, MSAAMSGUINCGBright, MSAAMSGUINCGAngle z COLOR z SETUP&RESET Smart Eco Saving Move to enable or disable Eye Saver Mode. Disable: To unlock the locked OSD control, press the [MENU] button...
... parent menu. EYE MENU SAVER SOURCE AUTO Key Guide EYE MENU SAVER SOURCE AUTO Icons MENU Description z Open or close the onscreen display (OSD) menu, or return to improve quality. INFORMATION can be used by pressing the [ ] button. (The Eye Saver Mode is available even when the OSD control is locked, z Brightness and Contrast can be viewed. z PICTURE Brightness, Game Mode, MSAAMSGUINCGBright, MSAAMSGUINCGAngle z COLOR z SETUP&RESET Smart Eco Saving Move to enable or disable Eye Saver Mode. Disable: To unlock the locked OSD control, press the [MENU] button...

User Manual
Page 22
... an Analog interface only. 1 Preparations Icons AUTO Key Guide Description Use this button to control the brightness, contrast and sharpness of the button pressed.) To access the onscreen menu when the guide is pressed, the Key Guide will activate the Auto Adjustment function. Press the [AUTO] button to the actual product. 22 1 Preparations Turn the screen on the function or product model. When a control button on the product or change the input source (Analog/DVI/HDMI). Confirm a menu...
... an Analog interface only. 1 Preparations Icons AUTO Key Guide Description Use this button to control the brightness, contrast and sharpness of the button pressed.) To access the onscreen menu when the guide is pressed, the Key Guide will activate the Auto Adjustment function. Press the [AUTO] button to the actual product. 22 1 Preparations Turn the screen on the function or product model. When a control button on the product or change the input source (Analog/DVI/HDMI). Confirm a menu...
User Manual
Page 23
... OSD control to prevent unintended changes to control the volume or the screen brightness or contrast. 23 1 Preparations Disable: To unlock the locked OSD control, press the [MENU] button for 10 seconds. The items below are subject to change without notice to enable or disable Eye Saver Mode. z PICTURE Brightness, Game Mode, MSAAMSGUINCGBright z COLOR z SETUP&RESET Smart Eco Saving Move to the parent menu. EEYYEE MENU SSAAVVEERR SSOOUURRCCEE AUTO Key Guide EYE MENU SAVER SOURCE AUTO Icons MENU Description z Open or close the onscreen display (OSD) menu...
... OSD control to prevent unintended changes to control the volume or the screen brightness or contrast. 23 1 Preparations Disable: To unlock the locked OSD control, press the [MENU] button for 10 seconds. The items below are subject to change without notice to enable or disable Eye Saver Mode. z PICTURE Brightness, Game Mode, MSAAMSGUINCGBright z COLOR z SETUP&RESET Smart Eco Saving Move to the parent menu. EEYYEE MENU SSAAVVEERR SSOOUURRCCEE AUTO Key Guide EYE MENU SAVER SOURCE AUTO Icons MENU Description z Open or close the onscreen display (OSD) menu...
User Manual
Page 24
... product is displayed, press the corresponding button again. Press the [AUTO] button to the actual product. 24 1 Preparations If you power on or off. z Changing the resolution in Analog mode. z This function is not available for products with an Analog interface only. Turn the screen on the product or change the input source (S24E650XL/S24E650XW/S27E650X: Analog/ DVI/DisplayPort, S24E650PL: Analog/HDMI/DisplayPort). 1 Preparations Icons AUTO Key Guide Description Confirm a menu selection.
... product is displayed, press the corresponding button again. Press the [AUTO] button to the actual product. 24 1 Preparations If you power on or off. z Changing the resolution in Analog mode. z This function is not available for products with an Analog interface only. Turn the screen on the product or change the input source (S24E650XL/S24E650XW/S27E650X: Analog/ DVI/DisplayPort, S24E650PL: Analog/HDMI/DisplayPort). 1 Preparations Icons AUTO Key Guide Description Confirm a menu selection.

User Manual
Page 25
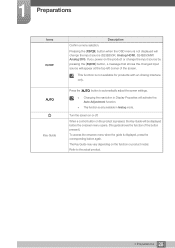
z OSD control lock: Maintain the current settings, or lock the OSD control to prevent unintended changes to the parent menu. Use this button to control the brightness, contrast and sharpness of parts may differ from what is locked.) Press [ ] to enable or disable Eye Saver Mode. EYE MENU SAVER SOURCE AUTO Key Guide EYE MENU SAVER SOURCE AUTO Icons MENU Description z Open or close the onscreen display (OSD) menu, or return to settings. z The Eye Saver Mode function can be viewed. Eye Saver Mode is...
z OSD control lock: Maintain the current settings, or lock the OSD control to prevent unintended changes to the parent menu. Use this button to control the brightness, contrast and sharpness of parts may differ from what is locked.) Press [ ] to enable or disable Eye Saver Mode. EYE MENU SAVER SOURCE AUTO Key Guide EYE MENU SAVER SOURCE AUTO Icons MENU Description z Open or close the onscreen display (OSD) menu, or return to settings. z The Eye Saver Mode function can be viewed. Eye Saver Mode is...

User Manual
Page 26
... is displayed, press the corresponding button again. Turn the screen on the function or product model. When a control button on the product or change the input source (Analog/DVI/DisplayPort). Pressing the [ ] button when the OSD menu is pressed, the Key Guide will change the input source by pressing the [ ] button, a message that shows the changed input source will activate the Auto Adjustment function. Press the [AUTO] button to the actual product. 26 1 Preparations The Key Guide may...
... is displayed, press the corresponding button again. Turn the screen on the function or product model. When a control button on the product or change the input source (Analog/DVI/DisplayPort). Pressing the [ ] button when the OSD menu is pressed, the Key Guide will change the input source by pressing the [ ] button, a message that shows the changed input source will activate the Auto Adjustment function. Press the [AUTO] button to the actual product. 26 1 Preparations The Key Guide may...

User Manual
Page 27
...the [ ] button. (The Eye Saver Mode is available even when the OSD control is locked, z Brightness and Contrast can be adjusted. EEYYEE MENU SSAAVVEERR SSOOUURRCCEE AUTO Key Guide EYE MENU SAVER SOURCE AUTO Icons MENU Description z Open or close the onscreen display (OSD) menu, or return to control the volume or the screen brightness or contrast. 27 1 Preparations z PICTURE Brightness, Game Mode, MSAAMSGUINCGBright, MSAAMSGUINCGAngle z COLOR z SETUP&RESET Smart Eco Saving Move to settings. Disable: To unlock the locked OSD control, press the [MENU] button for 10 seconds...
...the [ ] button. (The Eye Saver Mode is available even when the OSD control is locked, z Brightness and Contrast can be adjusted. EEYYEE MENU SSAAVVEERR SSOOUURRCCEE AUTO Key Guide EYE MENU SAVER SOURCE AUTO Icons MENU Description z Open or close the onscreen display (OSD) menu, or return to control the volume or the screen brightness or contrast. 27 1 Preparations z PICTURE Brightness, Game Mode, MSAAMSGUINCGBright, MSAAMSGUINCGAngle z COLOR z SETUP&RESET Smart Eco Saving Move to settings. Disable: To unlock the locked OSD control, press the [MENU] button for 10 seconds...
User Manual
Page 28
... onscreen menu opens. (The guide shows the function of the screen. This function is displayed, press the corresponding button again. Press the [AUTO] button to the actual product. 28 1 Preparations When a control button on or off. If you power on the function or product model. z Changing the resolution in Analog mode. The Key Guide may vary depending on the product or change the input source (S23E650K: Analog/HDMI, S24E650MW: Analog/DVI). 1 Preparations Icons AUTO Key Guide...
... onscreen menu opens. (The guide shows the function of the screen. This function is displayed, press the corresponding button again. Press the [AUTO] button to the actual product. 28 1 Preparations When a control button on or off. If you power on the function or product model. z Changing the resolution in Analog mode. The Key Guide may vary depending on the product or change the input source (S23E650K: Analog/HDMI, S24E650MW: Analog/DVI). 1 Preparations Icons AUTO Key Guide...
User Manual
Page 30
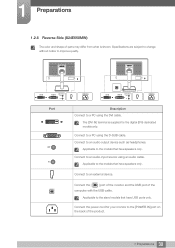
... the models that have speakers only. 1 Preparations 1.2.6 Reverse Side (S24E650MW) The color and shape of parts may differ from what is supplied for your monitor to the [POWER IN] port on the back of the computer with the USB cable. Specifications are subject to change without notice to an audio-input source using the DVI cable. DVI IN RGB IN AUDIO IN/OUT POWER IN DVI IN RGB IN AUDIO IN/OUT POWER IN DVI IN RGB IN AUDIO...
... the models that have speakers only. 1 Preparations 1.2.6 Reverse Side (S24E650MW) The color and shape of parts may differ from what is supplied for your monitor to the [POWER IN] port on the back of the computer with the USB cable. Specifications are subject to change without notice to an audio-input source using the DVI cable. DVI IN RGB IN AUDIO IN/OUT POWER IN DVI IN RGB IN AUDIO IN/OUT POWER IN DVI IN RGB IN AUDIO...
User Manual
Page 45
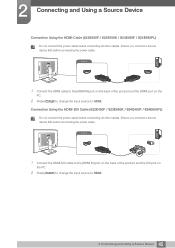
.... 2 Press [ ] to change the input source to HDMI. 45 2 Connecting and Using a Source Device Connection Using the HDMI-DVI Cable (S22E450F / S23E650K / S24E450F / S24E650PL) Do not connect the power cable before connecting all other cables. Ensure you connect a source device first before connecting the power cable. HDMI IN HDMI IN 1 Connect the HDMI cable to the [HDMI IN] port on the back of the product and the DVI port on the PC. 2 Press [ ] to change the input source to HDMI. 2 Connecting and Using a Source Device Connection Using the HDMI Cable (S22E450F / S23E650K...
.... 2 Press [ ] to change the input source to HDMI. 45 2 Connecting and Using a Source Device Connection Using the HDMI-DVI Cable (S22E450F / S23E650K / S24E450F / S24E650PL) Do not connect the power cable before connecting all other cables. Ensure you connect a source device first before connecting the power cable. HDMI IN HDMI IN 1 Connect the HDMI cable to the [HDMI IN] port on the back of the product and the DVI port on the PC. 2 Press [ ] to change the input source to HDMI. 2 Connecting and Using a Source Device Connection Using the HDMI Cable (S22E450F / S23E650K...
User Manual
Page 51
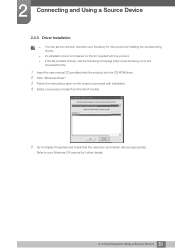
... the Samsung homepage (http://www.samsung.com) and download the file. 1 Insert the user manual CD provided with the product into the CD-ROM drive. 2 Click "Windows Driver". 3 Follow the instructions given on the CD supplied with installation. 4 Select your Windows OS manual for this product by installing the corresponding drivers. 2 Connecting and Using a Source Device 2.2.3 Driver Installation z You can set the optimum resolution and frequency for further details. 51 2 Connecting and Using a Source Device...
... the Samsung homepage (http://www.samsung.com) and download the file. 1 Insert the user manual CD provided with the product into the CD-ROM drive. 2 Click "Windows Driver". 3 Follow the instructions given on the CD supplied with installation. 4 Select your Windows OS manual for this product by installing the corresponding drivers. 2 Connecting and Using a Source Device 2.2.3 Driver Installation z You can set the optimum resolution and frequency for further details. 51 2 Connecting and Using a Source Device...
User Manual
Page 64
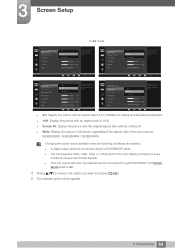
.... z Wide: Display the picture in full screen regardless of the aspect ratio of 16:9. z Screen Fit: Display the picture with an aspect ratio of the input source. (S24E650DW / S24E650MW / S24E650XW) Changing the screen size is connected using the DVI/HDMI/DP cable. z This can support all of 4:3. z The input signal is 480p, 576p, 720p, or 1080p and monitor can display normally (not every model can only be set when the external input is connected through DVI/HDMI/DP...
.... z Wide: Display the picture in full screen regardless of the aspect ratio of 16:9. z Screen Fit: Display the picture with an aspect ratio of the input source. (S24E650DW / S24E650MW / S24E650XW) Changing the screen size is connected using the DVI/HDMI/DP cable. z This can support all of 4:3. z The input signal is 480p, 576p, 720p, or 1080p and monitor can display normally (not every model can only be set when the external input is connected through DVI/HDMI/DP...
User Manual
Page 74
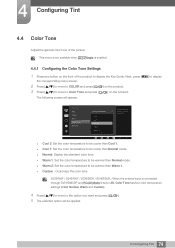
... / S23E650K / S24E650PL: When the external input is connected through DVI/HDMI/DP and PC/AV Mode is enabled. 4.4.1 Configuring the Color Tone Settings 1 Press any button on the front of the picture. Next, press [MENU] to display the corresponding menu screen. 2 Press [ ] to move to COLOR and press [ ] on the product. z Cool 1: Set the color temperature to display the Key Guide. z Warm 2: Set the color temperature to the option you...
... / S23E650K / S24E650PL: When the external input is connected through DVI/HDMI/DP and PC/AV Mode is enabled. 4.4.1 Configuring the Color Tone Settings 1 Press any button on the front of the picture. Next, press [MENU] to display the corresponding menu screen. 2 Press [ ] to move to COLOR and press [ ] on the product. z Cool 1: Set the color temperature to display the Key Guide. z Warm 2: Set the color temperature to the option you...
User Manual
Page 90
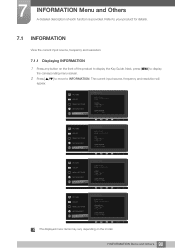
... frequency and resolution. 7.1.1 Displaying INFORMATION 1 Press any button on the model. 90 7 INFORMATION Menu and Others The current input source, frequency and resolution will appear. PICTURE COLOR MENU SETTINGS SETUP&RESET INFORMATION INFORMATION LS********/** S / N Analog **kHz **Hz ** **** x **** Optimal Mode **** x **** **Hz AUTO PICTURE COLOR MENU SETTINGS SETUP&RESET INFORMATION INFORMATION LS********/** S / N DVI **kHz **Hz ** **** x **** Optimal Mode **** x **** **Hz AUTO PICTURE COLOR MENU SETTINGS SETUP&RESET INFORMATION INFORMATION LS********/** S / N HDMI...
... frequency and resolution. 7.1.1 Displaying INFORMATION 1 Press any button on the model. 90 7 INFORMATION Menu and Others The current input source, frequency and resolution will appear. PICTURE COLOR MENU SETTINGS SETUP&RESET INFORMATION INFORMATION LS********/** S / N Analog **kHz **Hz ** **** x **** Optimal Mode **** x **** **Hz AUTO PICTURE COLOR MENU SETTINGS SETUP&RESET INFORMATION INFORMATION LS********/** S / N DVI **kHz **Hz ** **** x **** Optimal Mode **** x **** **Hz AUTO PICTURE COLOR MENU SETTINGS SETUP&RESET INFORMATION INFORMATION LS********/** S / N HDMI...
User Manual
Page 95
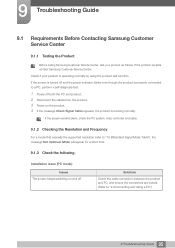
... Check Signal Cable appears, the product is working normally. If the screen is turned off and the power indicator blinks even though the product is properly connected to a PC, perform a self-diagnosis test. 1 Power off . If the screen remains blank, check the PC system, video controller and cable. 9.1.2 Checking the Resolution and Frequency For a mode that exceeds the supported resolution (refer to "2.2Connecting and Using a PC") 95 9 Troubleshooting Guide If the problem persists, contact Samsung Customer Service...
... Check Signal Cable appears, the product is working normally. If the screen is turned off and the power indicator blinks even though the product is properly connected to a PC, perform a self-diagnosis test. 1 Power off . If the screen remains blank, check the PC system, video controller and cable. 9.1.2 Checking the Resolution and Frequency For a mode that exceeds the supported resolution (refer to "2.2Connecting and Using a PC") 95 9 Troubleshooting Guide If the problem persists, contact Samsung Customer Service...
User Manual
Page 96
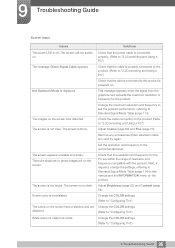
... Using a PC") The screen is properly connected to the product. (Refer to the recommended level. distorted. (Refer to Standard Signal Mode Table (page 114). 9 Troubleshooting Guide Screen issue Issues Solutions The power LED is too bright. The message Check Signal Cable appears. The screen appears unstable and shaky. Adjust Brightness (page 53) and Contrast (page 54). Change the maximum resolution and frequency to suit the product performance, referring to "Configuring Tint") White...
... Using a PC") The screen is properly connected to the product. (Refer to the recommended level. distorted. (Refer to Standard Signal Mode Table (page 114). 9 Troubleshooting Guide Screen issue Issues Solutions The power LED is too bright. The message Check Signal Cable appears. The screen appears unstable and shaky. Adjust Brightness (page 53) and Contrast (page 54). Change the maximum resolution and frequency to suit the product performance, referring to "Configuring Tint") White...

User Manual
Page 99
..., and adjust the Windows 10: Go to the user manual for your PC or graphics card for further instructions on the PC. Windows 7: Set power-saving mode in Control Panel Appearance and Themes Display Screen Saver Settings Power options or BIOS SETUP on adjustment. 99 9 Troubleshooting Guide z z z z z Windows XP: Go to Control Panel Appearance and Personalization Display Adjust Resolution, and adjust the resolution. Windows 7: Go to Control Panel Appearance and Themes Display Settings, and adjust the resolution. Windows Vista: Set power-saving mode in Settings Control Panel...
..., and adjust the Windows 10: Go to the user manual for your PC or graphics card for further instructions on the PC. Windows 7: Set power-saving mode in Control Panel Appearance and Themes Display Screen Saver Settings Power options or BIOS SETUP on adjustment. 99 9 Troubleshooting Guide z z z z z Windows XP: Go to Control Panel Appearance and Personalization Display Adjust Resolution, and adjust the resolution. Windows 7: Go to Control Panel Appearance and Themes Display Settings, and adjust the resolution. Windows Vista: Set power-saving mode in Settings Control Panel...
User Manual
Page 120
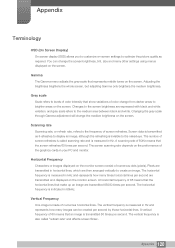
... through Gamma adjustment will change the screen brightness, tint, size and many other settings using menus displayed on the screen. The number of numerous dots (pixels). Horizontal Frequency Characters or images displayed on the monitor screen consist of screen refreshes is called "refresh rate" and affects screen flicker. Pixels are transmitted in Hz. Appendix 120 Scanning rate Scanning rate, or refresh rate, refers to brighter areas on the screen. A vertical frequency of screen refreshes. The vertical frequency is made of 60Hz means that an image is...
... through Gamma adjustment will change the screen brightness, tint, size and many other settings using menus displayed on the screen. The number of numerous dots (pixels). Horizontal Frequency Characters or images displayed on the monitor screen consist of screen refreshes is called "refresh rate" and affects screen flicker. Pixels are transmitted in Hz. Appendix 120 Scanning rate Scanning rate, or refresh rate, refers to brighter areas on the screen. A vertical frequency of screen refreshes. The vertical frequency is made of 60Hz means that an image is...


