Owners Manual
Page 3
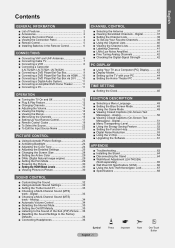
... V-Chip 54 Upgrading the Software 61 Appendix Troubleshooting 62 Installing the Stand 64 Disconnecting the Stand 64 Wall-Mount Adjustment (LN-T4032H) (Sold separately 65 Wall ... 4 Remote Control 5 Installing Batteries in the Remote Control 6 Connections Connecting VHF and UHF Antennas 6 Connecting Cable TV 7 Connecting a VCR 8 Connecting a Camcorder (LN-T3232H, LN-T3732H, LN-T4032H 9 Connecting a DVD Player... 30 Viewing Picture-in-Picture 30 Sound Control Customizing the Sound 32 Using Automatic Sound Settings 32 Setting the TruSurround XT 33 Choosing a Multi-Channel Sound (MTS...
... V-Chip 54 Upgrading the Software 61 Appendix Troubleshooting 62 Installing the Stand 64 Disconnecting the Stand 64 Wall-Mount Adjustment (LN-T4032H) (Sold separately 65 Wall ... 4 Remote Control 5 Installing Batteries in the Remote Control 6 Connections Connecting VHF and UHF Antennas 6 Connecting Cable TV 7 Connecting a VCR 8 Connecting a Camcorder (LN-T3232H, LN-T3732H, LN-T4032H 9 Connecting a DVD Player... 30 Viewing Picture-in-Picture 30 Sound Control Customizing the Sound 32 Using Automatic Sound Settings 32 Setting the TruSurround XT 33 Choosing a Multi-Channel Sound (MTS...
Owners Manual
Page 4
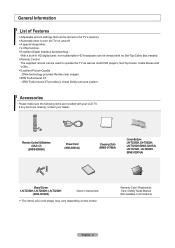
... sure the following items are missing, contact your LCD TV. If any items are included with no Set-Top/Cable Box needed. Remote Control The supplied remote can be stored in the TV's memory. Automatic timer to operate the TV as well as most DVD players, Set-Top boxes... (3903-000144) Cleaning Cloth (BN63-01798A) Cover-Bottom LN-T2332H, LN-T2632H, LN-T3232H (BN63-02415A) LN-T3732H , LN-T4032H (BN63-02416A) Stand Screw LN-T2332H, LN-T2632H, LN-T3232H (6002-001294) Owner's Instructions The items color and shape may vary depending on and off. A special...
... sure the following items are missing, contact your LCD TV. If any items are included with no Set-Top/Cable Box needed. Remote Control The supplied remote can be stored in the TV's memory. Automatic timer to operate the TV as well as most DVD players, Set-Top boxes... (3903-000144) Cleaning Cloth (BN63-01798A) Cover-Bottom LN-T2332H, LN-T2632H, LN-T3232H (BN63-02415A) LN-T3732H , LN-T4032H (BN63-02416A) Stand Screw LN-T2332H, LN-T2632H, LN-T3232H (6002-001294) Owner's Instructions The items color and shape may vary depending on and off. A special...
Owners Manual
Page 5
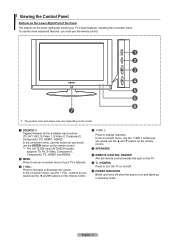
In the on and lights up in stand-by mode. In the on-screen menu, use the CH buttons as you would use the &#... channels. Viewing the Control Panel Buttons on the Lower-Right Part of your TV's basic features, including the on the remote control. The LN-T2332H and LN-T2632H models supports TV, AV, S-Video, Component1, Component2, PC, HDMI1 and HDMI2. 2 MENU...to see an on-screen menu of the Panel The buttons on the lower-right panel control your TV's features. 3 + VOL Press to turn the TV on and off. 8 POWER INDICATOR Blinks and turns off when the power is on -screen menu...
In the on and lights up in stand-by mode. In the on-screen menu, use the CH buttons as you would use the &#... channels. Viewing the Control Panel Buttons on the Lower-Right Part of your TV's basic features, including the on the remote control. The LN-T2332H and LN-T2632H models supports TV, AV, S-Video, Component1, Component2, PC, HDMI1 and HDMI2. 2 MENU...to see an on-screen menu of the Panel The buttons on the lower-right panel control your TV's features. 3 + VOL Press to turn the TV on and off. 8 POWER INDICATOR Blinks and turns off when the power is on -screen menu...

Owners Manual
Page 66
Place the TV face down on a soft cloth or cushion on a table. 2. Put the stand into the hole indicated and tighten. < 3 > Disconnecting the Stand < 2 > < 3 > 1. Installing the Stand < 2 > 1. Insert screw into the hole at the bottom of the TV. 3. Place the TV face down on a soft cloth or cushion on a table. 2. Remove four screws from the TV. 4. Separate the stand from the back of the TV. 3. Cover the bottom hole with a cap. < 4 > English - 64
Place the TV face down on a soft cloth or cushion on a table. 2. Put the stand into the hole indicated and tighten. < 3 > Disconnecting the Stand < 2 > < 3 > 1. Installing the Stand < 2 > 1. Insert screw into the hole at the bottom of the TV. 3. Place the TV face down on a soft cloth or cushion on a table. 2. Remove four screws from the TV. 4. Separate the stand from the back of the TV. 3. Cover the bottom hole with a cap. < 4 > English - 64
Owners Manual
Page 70
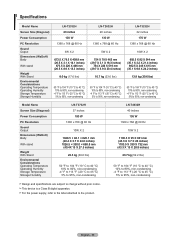
... (10 °C to 40 °C) 10% to 80%, non-condensing -4 °F to 113 °F (-20 °C to 45 °C) 5% to 95%, non-condensing LN-T3232H 32 inches 170 W 1360 x 768 @ 60 Hz 10W X 2 892.5 X 82 X 544 mm (35.1 X 3.2 X 21.4 inches) 892.5 X 249 X 615 mm (35.1 X...45 °C) 5% to 95%, non-condensing Model Name Screen Size (Diagonal) Power Consumption PC Resolution Sound Output Dimensions (WxDxH) Body With stand Weight With Stand Environmental Considerations Operating Temperature Operating Humidity Storage Temperature Storage Humidity LN-T3732H 37 inches 180 W 1360 x 768 @ 60 Hz 10W X 2 1026...
... (10 °C to 40 °C) 10% to 80%, non-condensing -4 °F to 113 °F (-20 °C to 45 °C) 5% to 95%, non-condensing LN-T3232H 32 inches 170 W 1360 x 768 @ 60 Hz 10W X 2 892.5 X 82 X 544 mm (35.1 X 3.2 X 21.4 inches) 892.5 X 249 X 615 mm (35.1 X...45 °C) 5% to 95%, non-condensing Model Name Screen Size (Diagonal) Power Consumption PC Resolution Sound Output Dimensions (WxDxH) Body With stand Weight With Stand Environmental Considerations Operating Temperature Operating Humidity Storage Temperature Storage Humidity LN-T3732H 37 inches 180 W 1360 x 768 @ 60 Hz 10W X 2 1026...


