
Open Source Guide (ENGLISH)
Page 1
...patent must be distributed under this section to induce you also meet all the source code for questions regarding open sources, contact Samsung via Email (vdswmanager@samsung. This product uses some software programs which must be on the Program, and copy and distribute such modifications or work ,...get it if you want its terms and conditions for such interactive use the GPL(version 2) and LGPL (version 2.1). Any attempt otherwise to view a copy of it may choose any version ever published by modifying or distributing the Program (or any part thereof, to say, a ...
...patent must be distributed under this section to induce you also meet all the source code for questions regarding open sources, contact Samsung via Email (vdswmanager@samsung. This product uses some software programs which must be on the Program, and copy and distribute such modifications or work ,...get it if you want its terms and conditions for such interactive use the GPL(version 2) and LGPL (version 2.1). Any attempt otherwise to view a copy of it may choose any version ever published by modifying or distributing the Program (or any part thereof, to say, a ...
User Manual (ENGLISH)
Page 3
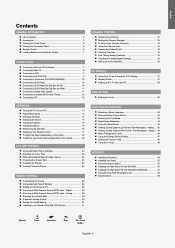
... GENERAL INFORMATION List of the Sub (PIP) Picture 31 CHANNEL CONTROL Selecting the Antenna 32 Setting the Channel Manager 32 To set-up Your Favorite Channels 33 Using the Channel Lists 34 Viewing the Channel Lists 34 Labeling Channels 35 Fine Tuning Analog Channels 35 Checking the Digital-Signal... Strength 36 LNA (Low Noise Amplifier 36 PC DISPLAY Using Your TV as a Computer (PC)...
... GENERAL INFORMATION List of the Sub (PIP) Picture 31 CHANNEL CONTROL Selecting the Antenna 32 Setting the Channel Manager 32 To set-up Your Favorite Channels 33 Using the Channel Lists 34 Viewing the Channel Lists 34 Labeling Channels 35 Fine Tuning Analog Channels 35 Checking the Digital-Signal... Strength 36 LNA (Low Noise Amplifier 36 PC DISPLAY Using Your TV as a Computer (PC)...
User Manual (ENGLISH)
Page 4
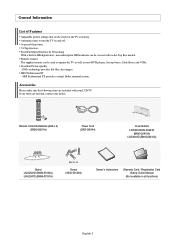
... HD digital tuner, non-subscription HD broadcasts can be viewed with your dealer. A special sleep timer. DNIe technology provides life-like clear images. SRS TruSurround XT provides a virtual Dolby surround system. Accessories Please make sure the following items are missing, contact your LCD TV. Remote Control & Batteries (AAA x 2) (BN59-00511A) Power Cord (3903...
... HD digital tuner, non-subscription HD broadcasts can be viewed with your dealer. A special sleep timer. DNIe technology provides life-like clear images. SRS TruSurround XT provides a virtual Dolby surround system. Accessories Please make sure the following items are missing, contact your LCD TV. Remote Control & Batteries (AAA x 2) (BN59-00511A) Power Cord (3903...
User Manual (ENGLISH)
Page 5
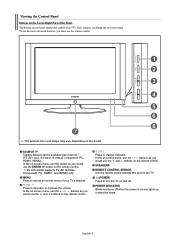
..., AV2, S-Video1, S-Video2, Component, PC, HDMI1, HDMI2). POWER INDICATOR Blinks and turns off . MENU Press to turn the TV on the remote control. 26 inch model supports TV, AV, S-Video, Component, PC, HDMI1, and HDMI2 only. The product color and shape may vary depending on -screen menu. In the on...to change channels. In the on-screen menu, use this spot on the TV. (POWER) Press to see an on and lights up in stand-by mode. Viewing the Control Panel Buttons on the Lower-Right Part of your TV's basic features, including the on the model. SPEAKERS REMOTE CONTROL SENSOR Aim...
..., AV2, S-Video1, S-Video2, Component, PC, HDMI1, HDMI2). POWER INDICATOR Blinks and turns off . MENU Press to turn the TV on the remote control. 26 inch model supports TV, AV, S-Video, Component, PC, HDMI1, and HDMI2 only. The product color and shape may vary depending on -screen menu. In the on...to change channels. In the on-screen menu, use this spot on the TV. (POWER) Press to see an on and lights up in stand-by mode. Viewing the Control Panel Buttons on the Lower-Right Part of your TV's basic features, including the on the model. SPEAKERS REMOTE CONTROL SENSOR Aim...
User Manual (ENGLISH)
Page 6
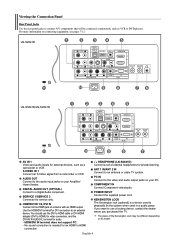
...The Kensington lock (optional) is needed for DVI connection to an external device. No sound connection is a device used to an antenna or cable TV system. ANT 1 IN/ANT 2 IN Connect to physically fix the system when used in a public place. POWER INPUT Connect the supplied power cord.... English-4 Viewing the Connection Panel Rear Panel Jacks Use the rear panel jacks to connect A/V components that will be different depending on its model. For more information...
...The Kensington lock (optional) is needed for DVI connection to an external device. No sound connection is a device used to an antenna or cable TV system. ANT 1 IN/ANT 2 IN Connect to physically fix the system when used in a public place. POWER INPUT Connect the supplied power cord.... English-4 Viewing the Connection Panel Rear Panel Jacks Use the rear panel jacks to connect A/V components that will be different depending on its model. For more information...
User Manual (ENGLISH)
Page 10
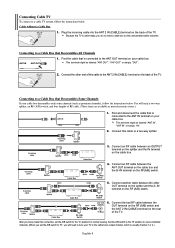
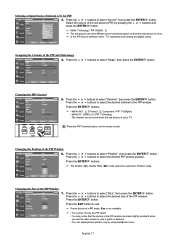
..."ANT OUT", "VHF OUT" or simply, "OUT". Find and disconnect the cable that is connected to view scrambled channels. (When you will need a two-way splitter, an RF (A/B) switch, and four lengths of the TV. This terminal might be labeled "ANT IN", "VHF IN" or simply, "IN". 2. Connect the ...last RF cable between the ANT OUT terminal on the cable box and the B-IN terminal on your TV to tune your cable box. Because this cable to view unscrambled cable channels. ANT 2 IN (CABLE) 2. Connect an RF cable between the OUT terminal on the RF (A/B) switch and...
..."ANT OUT", "VHF OUT" or simply, "OUT". Find and disconnect the cable that is connected to view scrambled channels. (When you will need a two-way splitter, an RF (A/B) switch, and four lengths of the TV. This terminal might be labeled "ANT IN", "VHF IN" or simply, "IN". 2. Connect the ...last RF cable between the ANT OUT terminal on the cable box and the B-IN terminal on your TV to tune your cable box. Because this cable to view unscrambled cable channels. ANT 2 IN (CABLE) 2. Connect an RF cable between the OUT terminal on the RF (A/B) switch and...
User Manual (ENGLISH)
Page 11
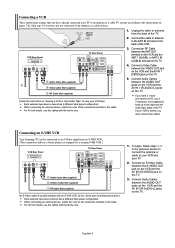
... Cable between the VIDEO OUT jack on the VCR and the AV IN 1 [VIDEO] jack on the TV. Connecting an S-VHS VCR Your Samsung TV can be connected to an S-Video signal from the back of the TV. 2. For 40 inch model, use the cables with an S-VHS VCR. (If not, check your VCR...) VCR, use a Y-connector (not supplied) to hook up to the right and left audio input jacks of the TV. When connecting an external device, match the color of the connection terminal to view your TV. 2. Connect Audio Cables between the AUDIO OUT jacks on the VCR and the AV IN1 [R-AUDIO-L] jacks on...
... Cable between the VIDEO OUT jack on the VCR and the AV IN 1 [VIDEO] jack on the TV. Connecting an S-VHS VCR Your Samsung TV can be connected to an S-Video signal from the back of the TV. 2. For 40 inch model, use the cables with an S-VHS VCR. (If not, check your VCR...) VCR, use a Y-connector (not supplied) to hook up to the right and left audio input jacks of the TV. When connecting an external device, match the color of the connection terminal to view your TV. 2. Connect Audio Cables between the AUDIO OUT jacks on the VCR and the AV IN1 [R-AUDIO-L] jacks on...
User Manual (ENGLISH)
Page 12
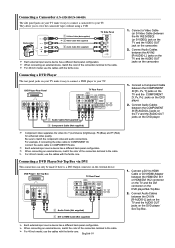
...AUDIO OUT jacks on the external device. Connect a Component Cable between the AV IN2 [R-AUDIO-L] jacks on the TV and the AUDIO OUT jacks on the camcorder. 1. They allow you to view the camcorder tapes without using a VCR Camcorder 1 S-Video Cable (Not supplied) or 1 Video Cable (Not ...supplied) 2 Audio Cable (Not supplied) TV Side Panel Each external input source device has a different back panel configuration. Connecting ...
...AUDIO OUT jacks on the external device. Connect a Component Cable between the AV IN2 [R-AUDIO-L] jacks on the TV and the AUDIO OUT jacks on the camcorder. 1. They allow you to view the camcorder tapes without using a VCR Camcorder 1 S-Video Cable (Not supplied) or 1 Video Cable (Not ...supplied) 2 Audio Cable (Not supplied) TV Side Panel Each external input source device has a different back panel configuration. Connecting ...

User Manual (ENGLISH)
Page 16
... select "Plug & Play". If you live" menu is displayed. Press the CH or CH button to memorize channels. "Select the time zone in the TV mode. is automatically displayed. 7. Plug & Play can only be set the clock. 8. button. Changing Channels Using the Channel Buttons 1. You will be... page 40 to reset this feature... 1. When you press the CH or CH button, the TV changes channels in sequence. Press the MENU button. You will switch to the last channel viewed. For further details on the map of the United States). When you have memorized at least three...
... select "Plug & Play". If you live" menu is displayed. Press the CH or CH button to memorize channels. "Select the time zone in the TV mode. is automatically displayed. 7. Plug & Play can only be set the clock. 8. button. Changing Channels Using the Channel Buttons 1. You will be... page 40 to reset this feature... 1. When you press the CH or CH button, the TV changes channels in sequence. Press the MENU button. You will switch to the last channel viewed. For further details on the map of the United States). When you have memorized at least three...
User Manual (ENGLISH)
Page 17
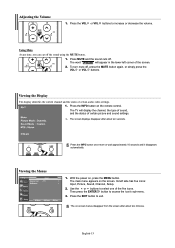
... cuts off the sound using the MUTE button. 1. Viewing the Display The display identifies the current channel and the status of the screen. 2. Use the or buttons to access the icon's sub-menu. 3. English-15 Press the INFO button on the screen. The TV will appear in the lower-left side has.... The main menu appears on the remote control. With the power on -screen menus disappear from the screen after about two minutes. Adjusting the Volume 1. Viewing the Menus 1.
... cuts off the sound using the MUTE button. 1. Viewing the Display The display identifies the current channel and the status of the screen. 2. Use the or buttons to access the icon's sub-menu. 3. English-15 Press the INFO button on the screen. The TV will appear in the lower-left side has.... The main menu appears on the remote control. With the power on -screen menus disappear from the screen after about two minutes. Adjusting the Volume 1. Viewing the Menus 1.
User Manual (ENGLISH)
Page 24
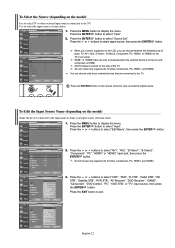
...", "PVR STB", "AV Receiver", "DVD Receiver", "GAME", "Camcorder", "DVD Combo", "PC", "VOD STB", or "TV" input source, then press the ENTER button. Press the or buttons to select "Input". 2. Use to the LCD, you can only be selected when the external device is placed on the model) Use to select... TV or other external input sources connected to view an external signal source. Press the ENTER button to select "Edit Name", ...
...", "PVR STB", "AV Receiver", "DVD Receiver", "GAME", "Camcorder", "DVD Combo", "PC", "VOD STB", or "TV" input source, then press the ENTER button. Press the or buttons to select "Input". 2. Use to the LCD, you can only be selected when the external device is placed on the model) Use to select... TV or other external input sources connected to view an external signal source. Press the ENTER button to select "Edit Name", ...
User Manual (ENGLISH)
Page 27
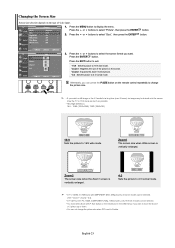
... Zoom with P. Alternately, you want . Zoom2 The screen size when the Zoom1 screen is vertically enlarged. 4:3 Sets the picture to 4:3 normal mode. • In TV, VIDEO, S-VIDEO,and all COMPONENT (480i, 480p) modes, all screen modes can be selected. (16:9 • Zoom1 • Zoom2 • 4:3). • In... 16:9 : Sets the picture to 16:9 wide mode. • Zoom1 : Magnifies the size of video input. 1. Press the or buttons to display the menu. View the TV in the OSD menu) if you can be burned onto the screen. Changing the Screen Size Screen size selection depends on the type of the...
... Zoom with P. Alternately, you want . Zoom2 The screen size when the Zoom1 screen is vertically enlarged. 4:3 Sets the picture to 4:3 normal mode. • In TV, VIDEO, S-VIDEO,and all COMPONENT (480i, 480p) modes, all screen modes can be selected. (16:9 • Zoom1 • Zoom2 • 4:3). • In... 16:9 : Sets the picture to 16:9 wide mode. • Zoom1 : Magnifies the size of video input. 1. Press the or buttons to display the menu. View the TV in the OSD menu) if you can be burned onto the screen. Changing the Screen Size Screen size selection depends on the type of the...
User Manual (ENGLISH)
Page 28
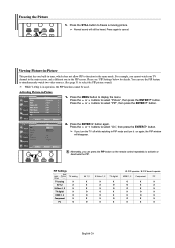
... does not allow PIP to function in operation, the PIP function cannot be heard. PIP Settings Sub Main Picture Picture TV analog TV analog X AV 1,2 X S-Video 1, 2 X TV digital X HDMI 1, 2 O Component X PC O AV 1,2 X X X O O X O S-Video 1, 2 X X X O O X X TV digital X O O X X O X O: PIP operates / X: PIP doesn't operate HDMI 1, 2 Component PC O X X O X X O X X X O ...-in PIP mode and turn the TV off while watching in -Picture 1. Press the or buttons to activate or deactivate the PIP. Freezing the Picture 1. Viewing Picture-in-Picture This product has ...
... does not allow PIP to function in operation, the PIP function cannot be heard. PIP Settings Sub Main Picture Picture TV analog TV analog X AV 1,2 X S-Video 1, 2 X TV digital X HDMI 1, 2 O Component X PC O AV 1,2 X X X O O X O S-Video 1, 2 X X X O O X X TV digital X O O X X O X O: PIP operates / X: PIP doesn't operate HDMI 1, 2 Component PC O X X O X X O X X X O ...-in PIP mode and turn the TV off while watching in -Picture 1. Press the or buttons to activate or deactivate the PIP. Freezing the Picture 1. Viewing Picture-in-Picture This product has ...
User Manual (ENGLISH)
Page 29
In the PIP Source selection menu, 'TV' represents both analog and digital tuning. Press the ENTER buttons. The Double ( ), Double Wide ( ) mode cannot be active when the sub picture is set to view a game or karaoke. • You can be selected in Position mode. Press the or buttons to exit....buttons to select "Swap", then press the ENTER button. Press the or buttons to select the desired size of the PIP and Main image 4. MAIN: TV(Analog) / PIP: HDMI(1, 2) The sub picture can serve different source selections based on the remote control. Press the or buttons to select "Size...
In the PIP Source selection menu, 'TV' represents both analog and digital tuning. Press the ENTER buttons. The Double ( ), Double Wide ( ) mode cannot be active when the sub picture is set to view a game or karaoke. • You can be selected in Position mode. Press the or buttons to exit....buttons to select "Swap", then press the ENTER button. Press the or buttons to select the desired size of the PIP and Main image 4. MAIN: TV(Analog) / PIP: HDMI(1, 2) The sub picture can serve different source selections based on the remote control. Press the or buttons to select "Size...
User Manual (ENGLISH)
Page 36
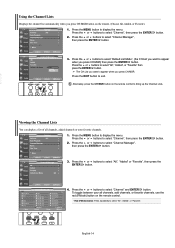
... MENU button to select "Channel", then press the ENTER 2. Press the MENU button to select "All", "Added" or "Favorite", then press the ENTER button. 4. button. 3. Viewing the Channel Lists You can display a list of all channels, add channels, or favorite channels, use the red (P.Mode) button on the remote. (Choose All...
... MENU button to select "Channel", then press the ENTER 2. Press the MENU button to select "All", "Added" or "Favorite", then press the ENTER button. 4. button. 3. Viewing the Channel Lists You can display a list of all channels, add channels, or favorite channels, use the red (P.Mode) button on the remote. (Choose All...
User Manual (ENGLISH)
Page 45
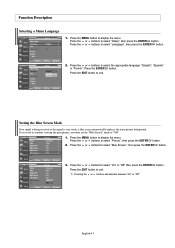
... noisy picture background. Press the or buttons to select "Picture", then press the ENTER button. 2. Function Description Selecting a Menu Language 1. If you wish to continue viewing the poor picture, you must set the "Blue Screen" mode to exit. Press the or buttons to select "On" or "Off" then press the ENTER...
... noisy picture background. Press the or buttons to select "Picture", then press the ENTER button. 2. Function Description Selecting a Menu Language 1. If you wish to continue viewing the poor picture, you must set the "Blue Screen" mode to exit. Press the or buttons to select "On" or "Off" then press the ENTER...
User Manual (ENGLISH)
Page 47
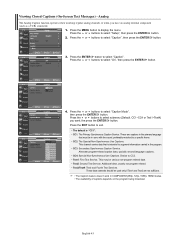
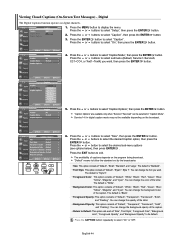
... related. • Text3/Text4: Third and Fourth Text Services. Press the or buttons to exit. • The default is intended to select "Caption". English-45 Viewing Closed Captions (On-Screen Text Messages) - Similar to select submenu (Default, CC1~CC4 or Text1~Text4) you have an analog external component (such as a VCR...
... related. • Text3/Text4: Third and Fourth Text Services. Press the or buttons to exit. • The default is intended to select "Caption". English-45 Viewing Closed Captions (On-Screen Text Messages) - Similar to select submenu (Default, CC1~CC4 or Text1~Text4) you have an analog external component (such as a VCR...
User Manual (ENGLISH)
Page 48
... letter. • Background Opacity: This option consists of the letter. You can change the font you want . You can be available depending on the broadcast. 6. Viewing Closed Captions (On-Screen Text Messages) - Press the MENU button to its default. Press the ENTER button to select "On" or "Off". "Caption Options" are...
... letter. • Background Opacity: This option consists of the letter. You can change the font you want . You can be available depending on the broadcast. 6. Viewing Closed Captions (On-Screen Text Messages) - Press the MENU button to its default. Press the ENTER button to select "On" or "Off". "Caption Options" are...


