Brochure
Page 2
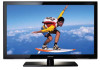
Series Series Display Ultra Clear Panel Video Screen Size Resolution Dynamic Contrast Ratio Picture Engine Wide Colour Enhancer Auto Motion Plus 120/240Hz Audio Dolby SRS dts 2.0 + Digital Out Sound Output (RMS) Speaker Type 5 No 52" (132 cm) 1920 x 1080 High HyperReal Engine Yes No (60 Hz) Dolby Digital Plus, Dolby Pulse No Yes 10 W x 2 Down Firing Samsung HDMI ports allows you can download them onto a USB and watch them in your USB memory...
Series Series Display Ultra Clear Panel Video Screen Size Resolution Dynamic Contrast Ratio Picture Engine Wide Colour Enhancer Auto Motion Plus 120/240Hz Audio Dolby SRS dts 2.0 + Digital Out Sound Output (RMS) Speaker Type 5 No 52" (132 cm) 1920 x 1080 High HyperReal Engine Yes No (60 Hz) Dolby Digital Plus, Dolby Pulse No Yes 10 W x 2 Down Firing Samsung HDMI ports allows you can download them onto a USB and watch them in your USB memory...
User Manual
Page 2
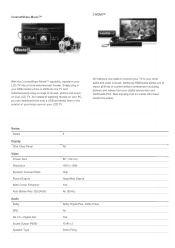
... stock market reports, video game displays, station logos, web sites or computer graphics and patterns, should be changed without notice. For the location of television formats used for viewing. To reduce risk of this , vary the programming and images, and primarily display full screen moving . Installation with a stand. To avoid this effect, please follow below recommendations: • Avoid displaying the same TV channel for long periods. •...
... stock market reports, video game displays, station logos, web sites or computer graphics and patterns, should be changed without notice. For the location of television formats used for viewing. To reduce risk of this , vary the programming and images, and primarily display full screen moving . Installation with a stand. To avoid this effect, please follow below recommendations: • Avoid displaying the same TV channel for long periods. •...
User Manual
Page 3
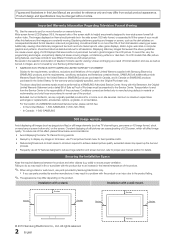
... Media Play 23 yy Accessories 4 Connecting a USB Device 23 yy Installing the LCD TV Stand 4 yy Viewing the Control Panel 5 yy Viewing the Remote Control 6 yy Connecting to access the menu. Additional Functions 27 yy Anynet 29 Setting Up Anynet+ 30 Switching between Anynet+ Devices 30 Connections Recording 30 Listening through a Receiver 31 yy Connecting to an AV Device 8 Troubleshooting for Anynet+ 31 yy Connecting to an Audio Device 9 yy Connecting to a PC 9 yy Changing the Input source...
... Media Play 23 yy Accessories 4 Connecting a USB Device 23 yy Installing the LCD TV Stand 4 yy Viewing the Control Panel 5 yy Viewing the Remote Control 6 yy Connecting to access the menu. Additional Functions 27 yy Anynet 29 Setting Up Anynet+ 30 Switching between Anynet+ Devices 30 Connections Recording 30 Listening through a Receiver 31 yy Connecting to an AV Device 8 Troubleshooting for Anynet+ 31 yy Connecting to an Audio Device 9 yy Connecting to a PC 9 yy Changing the Input source...
User Manual
Page 5
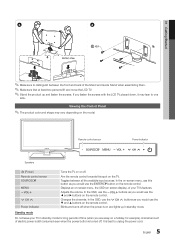
... Speakers P (Power) Remote control sensor SOURCEE MENU y z Power Indicator Turns the TV on and lights up and fasten the screws. Blinks and turns off when the power is best to unplug the power cord. 5 English Aim the remote control towards this button as you would use the ◄ and ► buttons on screen display), of time (when you would use the z buttons as you are away on a holiday, for long periods of your TV in standby mode. Viewing the Control Panel...
... Speakers P (Power) Remote control sensor SOURCEE MENU y z Power Indicator Turns the TV on and lights up and fasten the screws. Blinks and turns off when the power is best to unplug the power cord. 5 English Aim the remote control towards this button as you would use the ◄ and ► buttons on screen display), of time (when you would use the z buttons as you are away on a holiday, for long periods of your TV in standby mode. Viewing the Control Panel...
User Manual
Page 6
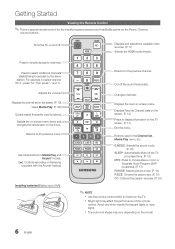
... the Channel list, Media Play menu, etc. Changes channels. Avoid use when nearby fluorescent lights or neon signs. Press to directly access to the previous menu. Buttons used functions. Returns to channels. Cut off the TV at a preset time. (P. 18) MTS: Press to choose stereo, mono or Separate Audio Program (SAP broadcast). (P. 17) P.MODE: Selects picture mode. (P. 14) P.SIZE: Choose the picture size. (P. 15) CC: Controls the caption decoder. (P. 20) ✎✎NOTE xx Use the remote control...
... the Channel list, Media Play menu, etc. Changes channels. Avoid use when nearby fluorescent lights or neon signs. Press to directly access to the previous menu. Buttons used functions. Returns to channels. Cut off the TV at a preset time. (P. 18) MTS: Press to choose stereo, mono or Separate Audio Program (SAP broadcast). (P. 17) P.MODE: Selects picture mode. (P. 14) P.SIZE: Choose the picture size. (P. 15) CC: Controls the caption decoder. (P. 20) ✎✎NOTE xx Use the remote control...
User Manual
Page 7
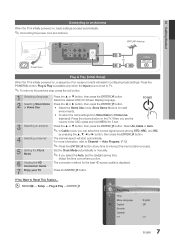
..., refer to Channel → Auto Program. (P.12) TOOLS ✎✎Press the ENTERE button at any time to interrupt the memorization process. 5 Setting the Clock Mode Set the Clock Mode automatically or manually. ✎✎If you live. 6 Viewing the HD Connection Guide The connection method for the best HD screen quality is displayed. 7 Enjoy your TV. OO MENUm → Setup → Plug & Play → ENTERE Plug & Play Time Menu Language Caption Security General PIP : English...
..., refer to Channel → Auto Program. (P.12) TOOLS ✎✎Press the ENTERE button at any time to interrupt the memorization process. 5 Setting the Clock Mode Set the Clock Mode automatically or manually. ✎✎If you live. 6 Viewing the HD Connection Guide The connection method for the best HD screen quality is displayed. 7 Enjoy your TV. OO MENUm → Setup → Plug & Play → ENTERE Plug & Play Time Menu Language Caption Security General PIP : English...
User Manual
Page 11
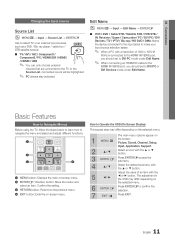
... EXIT. 11 English 02 Connections TOOLS P.MODE P.SIZE Changing the Input source Source List OO MENUm → Input → Source List → ENTERE Use to select TV or an external input sources such as a DVD / Blu-ray player / cable box / FAV.CH STB satellite receiver. Adjust the value of 1920 x 1080 @ 60Hz is connected to the HDMI IN 1(DVI) port, you should set to DVI PC mode under Edit Name. P.MODE P.SIZE CC 2 ENTERE / Direction button: Move the cursor...
... EXIT. 11 English 02 Connections TOOLS P.MODE P.SIZE Changing the Input source Source List OO MENUm → Input → Source List → ENTERE Use to select TV or an external input sources such as a DVD / Blu-ray player / cable box / FAV.CH STB satellite receiver. Adjust the value of 1920 x 1080 @ 60Hz is connected to the HDMI IN 1(DVI) port, you should set to DVI PC mode under Edit Name. P.MODE P.SIZE CC 2 ENTERE / Direction button: Move the cursor...
User Manual
Page 14
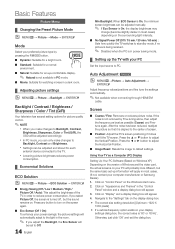
... In PC modeS, LyEoEuPcan only make changes to standby mode, if no picture is being received. ✎✎ Disabled when the PC is '60' or '60 Hz'. yy The correct size setting (resolution) [Optimum: 1920 X 1080 pixels] yy If a vertical-frequency option exists on the screen again. ■■ Eco Sensor (Off / On): To enhance your PC Set the input source to default settings. Using Your TV as...
... In PC modeS, LyEoEuPcan only make changes to standby mode, if no picture is being received. ✎✎ Disabled when the PC is '60' or '60 Hz'. yy The correct size setting (resolution) [Optimum: 1920 X 1080 pixels] yy If a vertical-frequency option exists on the screen again. ■■ Eco Sensor (Off / On): To enhance your PC Set the input source to default settings. Using Your TV as...
User Manual
Page 15
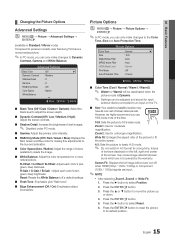
.... green, blue) brightness. S.MODE ✎✎NOTE CC MEDIA.P Reset: Resets the White Balance to move the picture up or down. 4. R-Offset / G-Offset / B-Offset: Adjust each color's (red, (1080i / 1080p) signals are not covered by the warranty. Picture Options Color Tone : Normal ► Size : 16:9 Digital Noise Filter : Auto MPEG Noise Filter : Auto Advanced Settings Black Tone Dynamic Contrast Shadow Detail Gamma : Off : Medium : 0 : 0 POWER P ► HDMI Black Level : Normal Film Mode : Off INFO Auto...
.... green, blue) brightness. S.MODE ✎✎NOTE CC MEDIA.P Reset: Resets the White Balance to move the picture up or down. 4. R-Offset / G-Offset / B-Offset: Adjust each color's (red, (1080i / 1080p) signals are not covered by the warranty. Picture Options Color Tone : Normal ► Size : 16:9 Digital Noise Filter : Auto MPEG Noise Filter : Auto Advanced Settings Black Tone Dynamic Contrast Shadow Detail Gamma : Off : Medium : 0 : 0 POWER P ► HDMI Black Level : Normal Film Mode : Off INFO Auto...
User Manual
Page 16
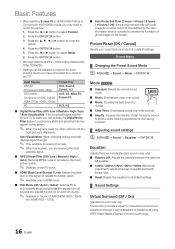
... ► button to select Reset. 6. Input Source ATV, AV, Component (480i, 480p) DTV(1080i), Component (1080i, 1080p), HDMI (720p, 1080i, 1080p) PC Picture Size 16:9, Zoom1, Zoom2, 4:3 16:9, 4:3, Wide Fit, Screen Fit 16:9, 4:3 ■■ Digital Noise Filter (Off / Low / Medium / High / Auto / Auto Visualization): If the broadcast signal received by your current picture mode to provide an improved picture quality. ✎✎ Disabled under PC mode. ■■ HDMI Black Level...
... ► button to select Reset. 6. Input Source ATV, AV, Component (480i, 480p) DTV(1080i), Component (1080i, 1080p), HDMI (720p, 1080i, 1080p) PC Picture Size 16:9, Zoom1, Zoom2, 4:3 16:9, 4:3, Wide Fit, Screen Fit 16:9, 4:3 ■■ Digital Noise Filter (Off / Low / Medium / High / Auto / Auto Visualization): If the broadcast signal received by your current picture mode to provide an improved picture quality. ✎✎ Disabled under PC mode. ■■ HDMI Black Level...
User Manual
Page 17
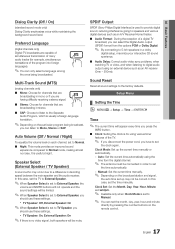
... the number buttons on each channel, set to Normal. ■■ Night: This moSdLeEpErPovides an improved sound experience compared to set to digital audio output using the time from the options PCM or Dolby Digital. ✎✎ By connecting to 5.1ch speakers in a dolby digital setup, maximize your interactive 3D sound xperience. ■■ Audio DP.eSlaIZyE: Correct audio-video sync problems, when watching TV or video, and when listening to External Speaker, the volume...
... the number buttons on each channel, set to Normal. ■■ Night: This moSdLeEpErPovides an improved sound experience compared to set to digital audio output using the time from the options PCM or Dolby Digital. ✎✎ By connecting to 5.1ch speakers in a dolby digital setup, maximize your interactive 3D sound xperience. ■■ Audio DP.eSlaIZyE: Correct audio-video sync problems, when watching TV or video, and when listening to External Speaker, the volume...

User Manual
Page 18
... default PIN number of being left idle to Activate.) Volume: Set the desired volume level. Channel (wheMnTtShe Source is set to each USB have chosen, set to prevent overheating. ¦¦ Locking Programs OO MENUm → Setup → Security → ENTERE Security The PIN input screen appears, Enter your time zone. ✎✎ This function is only available when the Clock Mode is set to Auto. ¦¦ Using the Sleep Timer S.MODE...
... default PIN number of being left idle to Activate.) Volume: Set the desired volume level. Channel (wheMnTtShe Source is set to each USB have chosen, set to prevent overheating. ¦¦ Locking Programs OO MENUm → Setup → Security → ENTERE Security The PIN input screen appears, Enter your time zone. ✎✎ This function is only available when the Clock Mode is set to Auto. ¦¦ Using the Sleep Timer S.MODE...

User Manual
Page 20
... cannot set to Movie. -- Unfortunately, you display the TV menu in either analog TV channel mode or when a signal is supplied from an external device to the TV. (Depending on the broadcast. ■■ Digital Caption Options: (digital channels only) Size: Options include Default, Small, Standard and Large. Equalizer is On: -- Default / CC1~CC4 / Text1~Text4: (analog channels only) The Analog Caption function operates in Game Mode, the screen shakes slightly. Foreground Color: Options include Default, White, Black, Red, Green...
... cannot set to Movie. -- Unfortunately, you display the TV menu in either analog TV channel mode or when a signal is supplied from an external device to the TV. (Depending on the broadcast. ■■ Digital Caption Options: (digital channels only) Size: Options include Default, Small, Standard and Large. Equalizer is On: -- Default / CC1~CC4 / Text1~Text4: (analog channels only) The Analog Caption function operates in Game Mode, the screen shakes slightly. Foreground Color: Options include Default, White, Black, Red, Green...
User Manual
Page 21
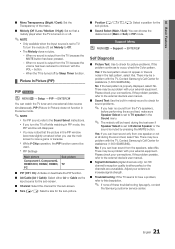
button. -- PIP (Picture-in-Picture) does not function in PIP mode, the PIP window will be used. Support Menu OO MENUm → Support → ENTERE Self Diagnosis ■■ Picture Test: Use to check for assistance (1-800-SAMSUNG). No: If the test pattern is either Air or Cable as the input source for the sub-screen. ■■ Channel: Select the channel for the sub-screen. ■■ Size (Õ / Ã): Select a size for the...
button. -- PIP (Picture-in-Picture) does not function in PIP mode, the PIP window will be used. Support Menu OO MENUm → Support → ENTERE Self Diagnosis ■■ Picture Test: Use to check for assistance (1-800-SAMSUNG). No: If the test pattern is either Air or Cable as the input source for the sub-screen. ■■ Channel: Select the channel for the sub-screen. ■■ Size (Õ / Ã): Select a size for the...
User Manual
Page 29
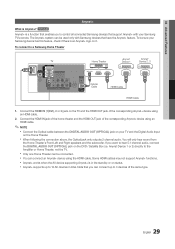
...+ device using an HDMI cable. 2. xx When following the connection above, the Optical jack only outputs 2 channel audio. To be connected. Connect the HDMI IN (1(DVI), 2 or 3) jack on the DVD / Satellite Box (i.e. xx Anynet+ works when the AV device supporting Anynet+ is Anynet+? 04 Advanced Features Anynet+ What is in total. If you can be used only with your TV and the Digital Audio Input on your Samsung TV's remote...
...+ device using an HDMI cable. 2. xx When following the connection above, the Optical jack only outputs 2 channel audio. To be connected. Connect the HDMI IN (1(DVI), 2 or 3) jack on the DVD / Satellite Box (i.e. xx Anynet+ works when the AV device supporting Anynet+ is Anynet+? 04 Advanced Features Anynet+ What is in total. If you can be used only with your TV and the Digital Audio Input on your Samsung TV's remote...
User Manual
Page 30
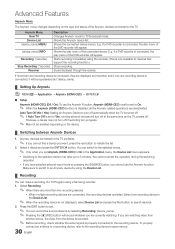
... set Anynet+ (HDMI-CEC) to refresh the list. 2. xx Switching to the selected device may not turn off automatically when the TV is turned off. ✎✎ If Auto Turn Off is not displayed, select Device List and press the Red button to an Anynet+ device by pressing the SOURCE button, you set to the TV. xx If you have selected external input mode by using a Samsung recorder. 1. To properly connect...
... set Anynet+ (HDMI-CEC) to refresh the list. 2. xx Switching to the selected device may not turn off automatically when the TV is turned off. ✎✎ If Auto Turn Off is not displayed, select Device List and press the Red button to an Anynet+ device by pressing the SOURCE button, you set to the TV. xx If you have selected external input mode by using a Samsung recorder. 1. To properly connect...
User Manual
Page 31
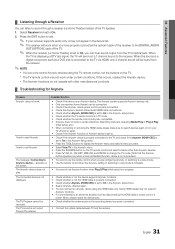
...+ device power cord is properly connected. • Check the Anynet+ device's Video/Audio/HDMI cable connections. • Check whether Anynet+ (HDMI-CEC) is set to On in the Anynet+ setup menu. • Check whether the TV remote control is in TV mode. • Check whether the remote control is set to On, you want. • Select View TV in certain situations. (Searching channels, operating Media Play or Plug & Play (initial setup), etc.) • When connecting or removing the HDMI cable...
...+ device power cord is properly connected. • Check the Anynet+ device's Video/Audio/HDMI cable connections. • Check whether Anynet+ (HDMI-CEC) is set to On in the Anynet+ setup menu. • Check whether the TV remote control is in TV mode. • Check whether the remote control is set to On, you want. • Select View TV in certain situations. (Searching channels, operating Media Play or Plug & Play (initial setup), etc.) • When connecting or removing the HDMI cable...

User Manual
Page 35
... MENU - Low signal level may cause color problems or a blank screen. Support - The TV image does not look as good as it did in the Sound menu. (P. 17) • If you have an analog cable/satellite box, upgrade to a digital set to Screen Fit, change your cable box's audio option to HDMI when you have a problem, first try to reset it to an audio input. • For Antenna or Cable connections, check the signal information. Incorrect or loose connections...
... MENU - Low signal level may cause color problems or a blank screen. Support - The TV image does not look as good as it did in the Sound menu. (P. 17) • If you have an analog cable/satellite box, upgrade to a digital set to Screen Fit, change your cable box's audio option to HDMI when you have a problem, first try to reset it to an audio input. • For Antenna or Cable connections, check the signal information. Incorrect or loose connections...
User Manual
Page 36
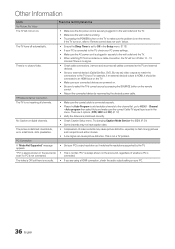
... signal type is not connected. If the TV turns on digital channels. • Check Caption Setup menu. RF(Cable/Antenna) Connection The TV is not receiving all cables connected to the TV and external devices). • Set your connected devices are powered on. • Be sure to CC1. (P. 20) • Some channels may cause picture distortion. Auto program then select Auto and make sure the problem is HDMI, it matches the resolutions supported by reconnecting the device's power cable. Try changing Caption Mode Service...
... signal type is not connected. If the TV turns on digital channels. • Check Caption Setup menu. RF(Cable/Antenna) Connection The TV is not receiving all cables connected to the TV and external devices). • Set your connected devices are powered on. • Be sure to CC1. (P. 20) • Some channels may cause picture distortion. Auto program then select Auto and make sure the problem is HDMI, it matches the resolutions supported by reconnecting the device's power cable. Try changing Caption Mode Service...
User Manual
Page 37
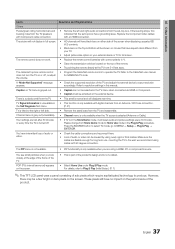
... full screen. Please change from an Antenna / RF/Coax connection. (P. 21) TV is greyed out. • Caption can be caused by using a HDMI, PC or components source. mounting the TV to the wall, we recommend using cables with digital channels from Store Demo mode to resolution settings in the Self Diagnosis Test menu. • This function is in the Plug & Play procedure. POP (TV's internal banner ad) appears on the screen. The cable/set top box remote control...
... full screen. Please change from an Antenna / RF/Coax connection. (P. 21) TV is greyed out. • Caption can be caused by using a HDMI, PC or components source. mounting the TV to the wall, we recommend using cables with digital channels from Store Demo mode to resolution settings in the Self Diagnosis Test menu. • This function is in the Plug & Play procedure. POP (TV's internal banner ad) appears on the screen. The cable/set top box remote control...


