User Manual (user Manual) (ver.1.0) (Korean)
Page 3
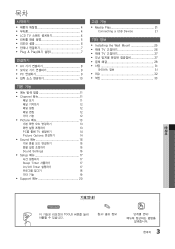
...44592; yy 4 yy 4 yy LCD TV 4 yy 5 yy 6 yy 7 yy Plug & Play 7 연결하기 yy AV 8 yy 9 yy PC 9 yy 10 yy 11 yy Channel 11 11 12 12 12 12 yy Picture 13 13 13 PC를 통해 TV 14 Picture Options 14 yy Sound....Pt 20 yy Media Play 21 Connecting a USB Device 21 yy Installing the Wall Mount 25 yy 벽에 TV 26 yy 벽에 TV 27 yy 27 yy 28 yy 31 31 yy 32 yy 33 한국어 t ✎ TOOLS O 3 한국어
...44592; yy 4 yy 4 yy LCD TV 4 yy 5 yy 6 yy 7 yy Plug & Play 7 연결하기 yy AV 8 yy 9 yy PC 9 yy 10 yy 11 yy Channel 11 11 12 12 12 12 yy Picture 13 13 13 PC를 통해 TV 14 Picture Options 14 yy Sound....Pt 20 yy Media Play 21 Connecting a USB Device 21 yy Installing the Wall Mount 25 yy 벽에 TV 26 yy 벽에 TV 27 yy 27 yy 28 yy 31 31 yy 32 yy 33 한국어 t ✎ TOOLS O 3 한국어
User Manual (user Manual) (ver.1.0) (Korean)
Page 25
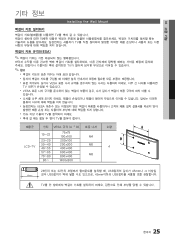
04 Installing the Wall Mount TV TV VESA) TV xx xx xx VESA TV xxVESA xx xx VESA xx15 TV xx TV 제품군 인치 VESA 규격 (A * B 수량 LCD-TV 19~22 23~29 30~40 46~55 57~65 70~80 80~ 75x75 100x100 200x100 200x200 400x400 600x400 800x400 1400x800 M4 M6 4 M8 26 32 USB 45mm 45mm 경우 USB 45mm이하의 USB TV 한국어 25
04 Installing the Wall Mount TV TV VESA) TV xx xx xx VESA TV xxVESA xx xx VESA xx15 TV xx TV 제품군 인치 VESA 규격 (A * B 수량 LCD-TV 19~22 23~29 30~40 46~55 57~65 70~80 80~ 75x75 100x100 200x100 200x200 400x400 600x400 800x400 1400x800 M4 M6 4 M8 26 32 USB 45mm 45mm 경우 USB 45mm이하의 USB TV 한국어 25
User Manual (user Manual) (ver.1.0) (English)
Page 3
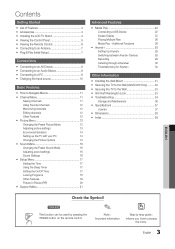
... Important information Step by pressing the TOOLS button on the remote control. Contents Getting Started yy List of Features 4 yy Accessories 4 yy Installing the LCD TV Stand 4 yy Viewing the Control Panel 5 yy Viewing the Remote Control 6 yy Connecting to an Antenna 7 yy Plug & Play (Initial Setup ...a Receiver 30 Troubleshooting for Anynet+ 30 Other Information yy Installing the Wall Mount 31 yy Securing the TV to the Wall (LN32C450 Only).......... 32 yy Securing the TV to the Wall 33 yy Anti-theft Kensington Lock 33 yy Troubleshooting 34 Storage and Maintenance 36 yy ...
... Important information Step by pressing the TOOLS button on the remote control. Contents Getting Started yy List of Features 4 yy Accessories 4 yy Installing the LCD TV Stand 4 yy Viewing the Control Panel 5 yy Viewing the Remote Control 6 yy Connecting to an Antenna 7 yy Plug & Play (Initial Setup ...a Receiver 30 Troubleshooting for Anynet+ 30 Other Information yy Installing the Wall Mount 31 yy Securing the TV to the Wall (LN32C450 Only).......... 32 yy Securing the TV to the Wall 33 yy Anti-theft Kensington Lock 33 yy Troubleshooting 34 Storage and Maintenance 36 yy ...

User Manual (user Manual) (ver.1.0) (English)
Page 33
...the screws into the wall. ✎✎ Screw Specifications ▪▪ For a 17 ~ 29 Inches LCD TV: M4 ▪▪ For a 32 ~ 40 Inches LCD TV: M6 2. Untie the string before moving the TV. Wrap the Kensington lock cable around a large, stationary object such 1 as follows. For added stability, ...and firmly fasten them onto the wall. doing so may cause the TV to tip over or destabilize the TV; Make sure the screws are general instructions. A kensington slot is not supplied by Samsung. For exact instructions, see the User manual supplied with a strong cable...
...the screws into the wall. ✎✎ Screw Specifications ▪▪ For a 17 ~ 29 Inches LCD TV: M4 ▪▪ For a 32 ~ 40 Inches LCD TV: M6 2. Untie the string before moving the TV. Wrap the Kensington lock cable around a large, stationary object such 1 as follows. For added stability, ...and firmly fasten them onto the wall. doing so may cause the TV to tip over or destabilize the TV; Make sure the screws are general instructions. A kensington slot is not supplied by Samsung. For exact instructions, see the User manual supplied with a strong cable...

User Manual (user Manual) (ver.1.0) (English, French)
Page 3
Contents Getting Started yy List of Features 4 yy Accessories 4 yy Installing the LCD TV Stand 4 yy Viewing the Control Panel 5 yy Viewing the Remote Control 6 yy Connecting to an Antenna 7 yy Plug & Play (Initial Setup 7 Connections yy Connecting...29 Listening through a Receiver 30 Troubleshooting for Anynet+ 30 Other Information yy Installing the Wall Mount 31 yy Securing the TV to the Wall (LN32C450 Only).......... 32 yy Securing the TV to Navigate Menus 11 yy Channel Menu 11 Seeing Channels 11 Using Favorite Channels 12 Memorizing channels 12 Editing channels 12...
Contents Getting Started yy List of Features 4 yy Accessories 4 yy Installing the LCD TV Stand 4 yy Viewing the Control Panel 5 yy Viewing the Remote Control 6 yy Connecting to an Antenna 7 yy Plug & Play (Initial Setup 7 Connections yy Connecting...29 Listening through a Receiver 30 Troubleshooting for Anynet+ 30 Other Information yy Installing the Wall Mount 31 yy Securing the TV to the Wall (LN32C450 Only).......... 32 yy Securing the TV to Navigate Menus 11 yy Channel Menu 11 Seeing Channels 11 Using Favorite Channels 12 Memorizing channels 12 Editing channels 12...

User Manual (user Manual) (ver.1.0) (English, French)
Page 33
...Kensington Lock for safety purposes, as desk or chair. 2. doing so may cause the TV to fall backwards. ✎✎It is not supplied by Samsung. Connect the clamps fixed onto the TV and the clamps fixed onto the wall with the lock attached through the looped end of...Wall Caution: Pulling, pushing, or climbing onto the TV may cause the TV to tip over or destabilize the TV; Drive the screws into the wall. ✎✎ Screw Specifications ▪▪ For a 17 ~ 29 Inches LCD TV: M4 ▪▪ For a 32 ~ 40 Inches LCD TV: M6 2. Make sure the screws are properly secured...
...Kensington Lock for safety purposes, as desk or chair. 2. doing so may cause the TV to fall backwards. ✎✎It is not supplied by Samsung. Connect the clamps fixed onto the TV and the clamps fixed onto the wall with the lock attached through the looped end of...Wall Caution: Pulling, pushing, or climbing onto the TV may cause the TV to tip over or destabilize the TV; Drive the screws into the wall. ✎✎ Screw Specifications ▪▪ For a 17 ~ 29 Inches LCD TV: M4 ▪▪ For a 32 ~ 40 Inches LCD TV: M6 2. Make sure the screws are properly secured...


