
User Manual (ENGLISH)
Page 3
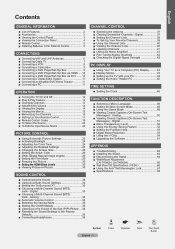
... Closed Captions (On-Screen Text Messages) - English Contents General Information List of the Sub (PIP) Picture.....36 Resetting the Sound Settings to the Sound of Features 2 Accessories 2 Viewing the Control Panel 3 Viewing the Connection Panel 4 Remote Control 5 Installing Batteries in the Remote... V-Chip 54 Upgrading the Software 61 Appendix Troubleshooting 62 Installing the Stand 64 Disconnecting the Stand 64 Wall-Mount Adjustment (LN-T4042H ,LN-T4642H 65 Wall Mount Kit Specifications ( VESA 66 Using the Anti-Theft Kensington Lock 67 Specifications 68 Symbol English -...
... Closed Captions (On-Screen Text Messages) - English Contents General Information List of the Sub (PIP) Picture.....36 Resetting the Sound Settings to the Sound of Features 2 Accessories 2 Viewing the Control Panel 3 Viewing the Connection Panel 4 Remote Control 5 Installing Batteries in the Remote... V-Chip 54 Upgrading the Software 61 Appendix Troubleshooting 62 Installing the Stand 64 Disconnecting the Stand 64 Wall-Mount Adjustment (LN-T4042H ,LN-T4642H 65 Wall Mount Kit Specifications ( VESA 66 Using the Anti-Theft Kensington Lock 67 Specifications 68 Symbol English -...
User Manual (ENGLISH)
Page 6
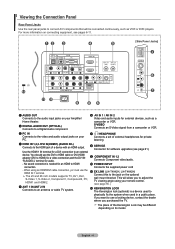
...the dealer where you want to the HDMI jack of the Kensington Lock may be connected continuously, such as a camcorder or VCR. No sound connection is a device used to physically fix the system when used in a public place. This will be different depending on the optional ...video connection,and the DVI IN 'R-AUDIO-L' terminal for an HDMI to HDMI 0 POWER INPUT connection Connects the supplied power cord - EX LINK (LN-T4042H, LN-T4642H) Connect this to the jack on its model. Viewing the Connection Panel Rear Panel Jacks Use the rear panel jacks to connect A/V components...
...the dealer where you want to the HDMI jack of the Kensington Lock may be connected continuously, such as a camcorder or VCR. No sound connection is a device used to physically fix the system when used in a public place. This will be different depending on the optional ...video connection,and the DVI IN 'R-AUDIO-L' terminal for an HDMI to HDMI 0 POWER INPUT connection Connects the supplied power cord - EX LINK (LN-T4042H, LN-T4642H) Connect this to the jack on its model. Viewing the Connection Panel Rear Panel Jacks Use the rear panel jacks to connect A/V components...
User Manual (ENGLISH)
Page 7
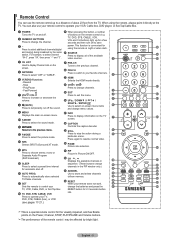
... the batteries and press the RESET button for using the remote, always point it directly at night or when dark. ) SOURCE Press to select the sound mode. ! This function is a special remote control for automatic shut off . 2 NUMERIC BUTTONS Press to select additional channels(digital and analog) being broadcast by bright... Picture ON/OFF. When using the remote at the TV. You can use the remote control up for a few seconds and then turn off the sound. 9 MENU Displays the main on the TV screen. Play/Pause -
... the batteries and press the RESET button for using the remote, always point it directly at night or when dark. ) SOURCE Press to select the sound mode. ! This function is a special remote control for automatic shut off . 2 NUMERIC BUTTONS Press to select additional channels(digital and analog) being broadcast by bright... Picture ON/OFF. When using the remote at the TV. You can use the remote control up for a few seconds and then turn off the sound. 9 MENU Displays the main on the TV screen. Play/Pause -
User Manual (ENGLISH)
Page 13
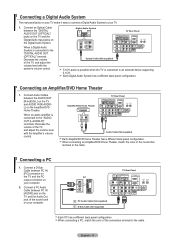
... Digital Audio System has a different back panel configuration. When an audio amplifier is connected to the "AUDIO OUT [L-AUDIO-R]" terminals: Decrease the volume of the sound card on your computer. Connecting a PC 1. Connect a D-Sub Cable between PC IN [AUDIO] jack on the TV and the Audio Out jack of the TV...
... Digital Audio System has a different back panel configuration. When an audio amplifier is connected to the "AUDIO OUT [L-AUDIO-R]" terminals: Decrease the volume of the sound card on your computer. Connecting a PC 1. Connect a D-Sub Cable between PC IN [AUDIO] jack on the TV and the Audio Out jack of the TV...
User Manual (ENGLISH)
Page 16
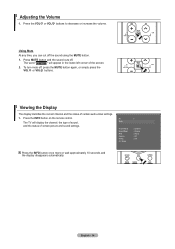
...the lower-left corner of the screen. 2. Viewing the Display The display identifies the current channel and the status of certain picture and sound settings. Air 7 Mono Picture Mode Sound Mode MTS Caption V-Chip 05 : 54 pm : Dynamic : Custom : Stereo : Off : Off Press the INFO button once more... 10 seconds and the display disappears automatically. Adjusting the Volume 1. Press MUTE button and the sound cuts off the sound using the MUTE button. 1. The word will display the channel, the type of sound, and the status of certain audio-video settings. 1. Using Mute At any time, you ...
...the lower-left corner of the screen. 2. Viewing the Display The display identifies the current channel and the status of certain picture and sound settings. Air 7 Mono Picture Mode Sound Mode MTS Caption V-Chip 05 : 54 pm : Dynamic : Custom : Stereo : Off : Off Press the INFO button once more... 10 seconds and the display disappears automatically. Adjusting the Volume 1. Press MUTE button and the sound cuts off the sound using the MUTE button. 1. The word will display the channel, the type of sound, and the status of certain audio-video settings. 1. Using Mute At any time, you ...
User Manual (ENGLISH)
Page 17
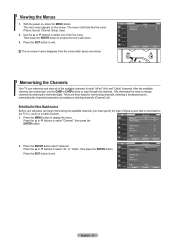
... buttons to exit. Viewing the Menus 1. an Air or a Cable system). 1. Press the ENTER button select "Antenna". The menu' s left side has five icons: Picture, Sound, Channel, Setup, Input. 2. The on-screen menus disappear from the screen after about one of the five icons. Press the ▲ or ▼ buttons to...
... buttons to exit. Viewing the Menus 1. an Air or a Cable system). 1. Press the ENTER button select "Antenna". The menu' s left side has five icons: Picture, Sound, Channel, Setup, Input. 2. The on-screen menus disappear from the screen after about one of the five icons. Press the ▲ or ▼ buttons to...
User Manual (ENGLISH)
Page 32
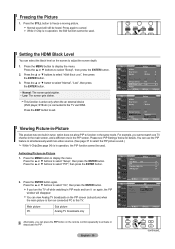
Normal sound will disappear You can select the black level on the PIP screen (sub-picture) when the main picture is in operation, the Still function cannot ...; button to select "Setup", then press the ENTER button. For example, you cannot watch two video sources. (See page 37 to select the PIP picture sound.) While V-Chip(See page 54) is from an connected PC to this TV. Activating Picture-in the PIP screen. Press the ▲ or ▼ buttons...
Normal sound will disappear You can select the black level on the PIP screen (sub-picture) when the main picture is in operation, the Still function cannot ...; button to select "Setup", then press the ENTER button. For example, you cannot watch two video sources. (See page 37 to select the PIP picture sound.) While V-Chip(See page 54) is from an connected PC to this TV. Activating Picture-in the PIP screen. Press the ▲ or ▼ buttons...

User Manual (ENGLISH)
Page 34
...9650; or ▼ buttons to adjust. Press the ◄ or ► buttons to select a particular frequency to select "Sound", then press the ENTER button. 2. Press the MENU button to increase or decrease the level of the particular frequency. TV ...button. Or, you can select "Custom", which automatically recalls your personalized settings (see "Customizing the Sound"). Press the ▲ or ▼ buttons to exit. • L/R Sound Balance Adjustment : To adjust the sound balance of the L/R speakers. • Bandwidth Adjustment (100Hz, 300Hz, 1KHz, 3KHz, 10KHz) ...
...9650; or ▼ buttons to adjust. Press the ◄ or ► buttons to select a particular frequency to select "Sound", then press the ENTER button. 2. Press the MENU button to increase or decrease the level of the particular frequency. TV ...button. Or, you can select "Custom", which automatically recalls your personalized settings (see "Customizing the Sound"). Press the ▲ or ▼ buttons to exit. • L/R Sound Balance Adjustment : To adjust the sound balance of the L/R speakers. • Bandwidth Adjustment (100Hz, 300Hz, 1KHz, 3KHz, 10KHz) ...
User Manual (ENGLISH)
Page 35
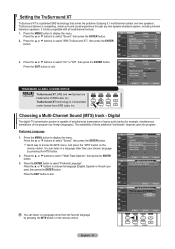
...in a language other than your chosen language by pressing the MTS button on the remote control. Press the EXIT button to select "Sound", then press the ENTER button. Press the ▲ or ▼ buttons to display the menu. Press the MENU button to ... the ▲ or ▼ buttons to select ""Multi-Track Options", then press the ENTER button. 3. TruSurround delivers a compelling, virtual surround sound experience through any two-speaker playback system, including internal television speakers. Press the ▲ or ▼ buttons to choose the language (English, Spanish...
...in a language other than your chosen language by pressing the MTS button on the remote control. Press the EXIT button to select "Sound", then press the ENTER button. Press the ▲ or ▼ buttons to display the menu. Press the MENU button to ... the ▲ or ▼ buttons to select ""Multi-Track Options", then press the ENTER button. 3. TruSurround delivers a compelling, virtual surround sound experience through any two-speaker playback system, including internal television speakers. Press the ▲ or ▼ buttons to choose the language (English, Spanish...
User Manual (ENGLISH)
Page 36
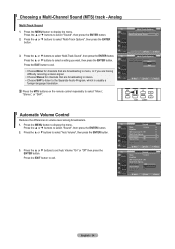
...▼ buttons to the Separate Audio Program, which is usually a foreign-language translation. Enter Return Multi-Track Options Preferred Language : English Multi-Track Sound : StereoMono Stereo SAP • Choose Mono for channels that are broadcasting in volume level among broadcasters. 1. Press the ▲ or ▼ ...that are broadcasting in stereo. • Choose SAP to listen to select "Auto Volume", then press the ENTER button. 3. Analog Multi-Track Sound TV 1. Press the MENU button to set Auto Volume "On" or "Off" then press the ENTER button. Press the ▲ or ...
...▼ buttons to the Separate Audio Program, which is usually a foreign-language translation. Enter Return Multi-Track Options Preferred Language : English Multi-Track Sound : StereoMono Stereo SAP • Choose Mono for channels that are broadcasting in volume level among broadcasters. 1. Press the ▲ or ▼ ...that are broadcasting in stereo. • Choose SAP to listen to select "Auto Volume", then press the ENTER button. 3. Analog Multi-Track Sound TV 1. Press the MENU button to set Auto Volume "On" or "Off" then press the ENTER button. Press the ▲ or ...

User Manual (ENGLISH)
Page 37
...Off Speaker Output Speaker Output Speaker Output Sound Output Sound Output Sound Output Internal Mute On Mute Mute Mute Sound Output Sound Output Sound Output Video No Signal Mute Mute Mute Mute Mute When "Internal mute" is set to "On", Sound menus except "Multi-Track Options" cannot ... to display the menu. Press the MENU button to select "On", then press the ENTER button. English - 35 Selecting the Internal Mute Sound output from Dolby Laboratories. TV Setup ▲More Blue Screen : Off ► Melody : Off ► PC ► Home Theater PC...
...Off Speaker Output Speaker Output Speaker Output Sound Output Sound Output Sound Output Internal Mute On Mute Mute Mute Sound Output Sound Output Sound Output Video No Signal Mute Mute Mute Mute Mute When "Internal mute" is set to "On", Sound menus except "Multi-Track Options" cannot ... to display the menu. Press the MENU button to select "On", then press the ENTER button. English - 35 Selecting the Internal Mute Sound output from Dolby Laboratories. TV Setup ▲More Blue Screen : Off ► Melody : Off ► PC ► Home Theater PC...
User Manual (ENGLISH)
Page 38
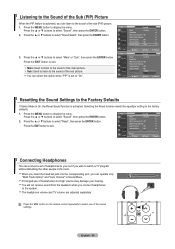
...program without disturbing the other people in the room. Press the MENU button to select one of the sound settings. Press the ▲ or ▼ buttons to display the menu. When you insert the ...head set jack into the corresponding port, you can connect a set to "On". Listening to the Sound of the Sub (PIP) Picture When the PIP feature is activated, you can select this option when ... listen to exit. Press the ▲ or ▼ buttons to exit. Press the EXIT button to the sound of the main picture.. • Sub: Used to listen to select "Main" or "Sub", then press ...
...program without disturbing the other people in the room. Press the MENU button to select one of the sound settings. Press the ▲ or ▼ buttons to display the menu. When you insert the ...head set jack into the corresponding port, you can connect a set to "On". Listening to the Sound of the Sub (PIP) Picture When the PIP feature is activated, you can select this option when ... listen to exit. Press the ▲ or ▼ buttons to exit. Press the EXIT button to the sound of the main picture.. • Sub: Used to listen to select "Main" or "Sub", then press ...
User Manual (ENGLISH)
Page 52
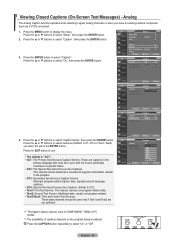
... component (such as a VCR) connected. 1. Press the ▲ or ▼ buttons to select "Caption". This channel carries data that must be in sync with the sound, preferably matched to augment information carried in the program. • CC3: Secondary Synchronous Caption Service. The availability of captions depends on the program being broadcast...
... component (such as a VCR) connected. 1. Press the ▲ or ▼ buttons to select "Caption". This channel carries data that must be in sync with the sound, preferably matched to augment information carried in the program. • CC3: Secondary Synchronous Caption Service. The availability of captions depends on the program being broadcast...
User Manual (ENGLISH)
Page 64
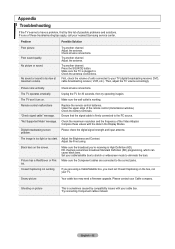
...Digital broadcasting screen problem. Adjust the Brightness and Contrast. Picture has a Red/Green or Pink tint. Try connecting Component cables instead. No sound or sound is High Definition (HD). Adjust the antenna. Remote control malfunctions "Check signal cable" message. Check the battery terminals. "Not Supported Mode... TV. Closed Captioning not working . Snowy picture Your cable box may need a firmware upgrade. Please contact your nearest Samsung service center. Ghosting on the box, not your cable/satellite box to stretch or widescreen mode to the correct jacks.
...Digital broadcasting screen problem. Adjust the Brightness and Contrast. Picture has a Red/Green or Pink tint. Try connecting Component cables instead. No sound or sound is High Definition (HD). Adjust the antenna. Remote control malfunctions "Check signal cable" message. Check the battery terminals. "Not Supported Mode... TV. Closed Captioning not working . Snowy picture Your cable box may need a firmware upgrade. Please contact your nearest Samsung service center. Ghosting on the box, not your cable/satellite box to stretch or widescreen mode to the correct jacks.
User Manual (ENGLISH)
Page 70
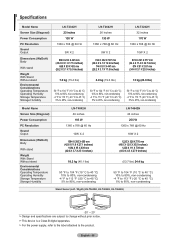
... to 95%, non-condensing Model Name Screen Size (Diagonal) Power Consumption PC Resolution Sound Output Dimensions (WxDxH) Body With stand Weight With Stand Without stand Environmental Considerations Operating Temperature Operating Humidity Storage Temperature Storage Humidity LN-T4042H 40 inches 195 W 1360 x 768 @ 60 Hz 10W X 2 1084 X...176;F to 113 °F (-20 °C to 45 °C) 5% to 95%, non-condensing Stand Swivel (Left / Right) (LN-T3242H, LN-T4042H, LN-T4642H) -20˚ ~ 20˚ Design and specifications are subject to the product. This device is a Class B digital apparatus.
... to 95%, non-condensing Model Name Screen Size (Diagonal) Power Consumption PC Resolution Sound Output Dimensions (WxDxH) Body With stand Weight With Stand Without stand Environmental Considerations Operating Temperature Operating Humidity Storage Temperature Storage Humidity LN-T4042H 40 inches 195 W 1360 x 768 @ 60 Hz 10W X 2 1084 X...176;F to 113 °F (-20 °C to 45 °C) 5% to 95%, non-condensing Stand Swivel (Left / Right) (LN-T3242H, LN-T4042H, LN-T4642H) -20˚ ~ 20˚ Design and specifications are subject to the product. This device is a Class B digital apparatus.


