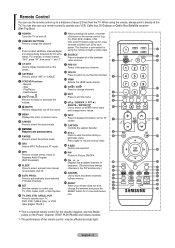
Quick Guide (easy Manual) (ver.1.0) (English)
Page 3
...; Setting the Film Mode 30 ■ Freezing the Picture 31 ■ Setting the HDMI Black Level 31 ■ Viewing Picture-in the Remote Control 6 Connections ■ Connecting VHF and UHF Antennas 6 ■ Connecting Cable TV 7 ■ Connecting a DVD Player or Cable Box... Listening to the Sound of Features 2 ■ Accessories 2 ■ Viewing the Control Panel 3 ■ Viewing the Connection Panel 4 ■ Remote Control 5 ■ Installing Batteries in -Picture 31 Sound Control ■ Customizing the Sound 33 ■ Using Automatic Sound Settings 33 ■ Setting...
Quick Guide (easy Manual) (ver.1.0) (English)
Page 4
... SRS TruSurround XT - If any items are included with no Cable Box/Satellite receiver (Set-Top Box) needed. Remote Control The supplied remote can be stored in the TV's memory. Automatic timer to operate the TV as well as most DVD players, Cable Box.../Satellite receiver (Set-Top Box) and VCRs. Excellent Picture Quality - Remote Control & Batteries (AAA x 2) (BN59-00598A) Power Cord (3903-000144) Cleaning Cloth (BN63-01798A) Cover-Bottom (BN63-03113B) Owner's Instructions The items...
Quick Guide (easy Manual) (ver.1.0) (English)
Page 5
... Panel buttons Touch the right side of each button to change channels. VOL + buttons as you must use the ◄ and ► buttons on the remote control. 4 CH Press to operate. VOL + Press to turn the TV on and off when the power is on and lights up in stand-by... on the TV. 7 SPEAKERS English - In the on-screen menu, use the CH buttons as you would use the ▼ and ▲ butons on the remote control. 5 (Power) Press to increase or decrease the volume. The product color and shape may vary depending on the model. 1 SOURCE Toggles between all the...
Quick Guide (easy Manual) (ver.1.0) (English)
Page 7
...(digital and analog) being broadcast by bright light. Play/Pause - k PIP Picture-in sequence. (These buttons change menu values. You can use the remote control up for a few seconds and then turn off to save power. Stop - RETURN Returns to the previous menu. @ P.MODE Press to select ... $ MTS Press to choose stereo, mono or Separate Audio Program (SAP broadcast). % SLEEP Press to resume normal video. This function is a special remote control for the visually impaired, and has Braille points on -screen menu items and change channels in the PIP window only.) m ADD/DEL Use to...
Quick Guide (easy Manual) (ver.1.0) (English)
Page 8
...AIR) Antennas with 75 Ω Round Leads". Are the batteries drained? 4. Connections Connecting VHF and UHF Antennas If your antenna has one year.) If the remote control doesn't work, check the following: 1. If you won't be used up to match the "+" and "-" ends of the rear panel. Is the ...TV power on the back of the batteries reversed? 3. If your antenna has a set of the remote control upward as a roof antenna or "rabbit ears") that has 300 Ω twin flat leads, follow the directions below . Use a screwdriver to the right...
Quick Guide (easy Manual) (ver.1.0) (English)
Page 15
... message "Set to identify the type of the TV. 4. Operation Turning the TV On and Off Press the POWER button on the remote control. Press the POWER button on the remote control. is displayed. Menu language, Shop Mode, Channels and Time will begin memorizing all the available channels are connected, select the...
Quick Guide (easy Manual) (ver.1.0) (English)
Page 17
... to the last channel viewed. Press MUTE button and the sound cuts off the sound using the MUTE button. 1. Press the INFO button on the remote control. The word " " will switch to select the second channel. Using the PRE-CH Button to decrease or increase the volume. The TV will appear...
Quick Guide (easy Manual) (ver.1.0) (English)
Page 19
... point the signal source has been selected. After all the available channels are stored, the "Auto Program" menu reappears. Air : 16, Cable : 0. button on the remote control to "STD". By default, the cable TV system is completed. 16 Channels were memorized. English - 17 Press the ENTER button to select "Channel", then...
Quick Guide (easy Manual) (ver.1.0) (English)
Page 20
... after set up, repeat steps 2, 3, and 4, but try the first one of the other codes listed for your TV's volume. English - 18 Setting Up Your Remote Control After the television has been set up properly, your brand of VCR. If your VCR does not turn on page 21 of this manual... for your remote is set up correctly. Make sure you enter three digits of the code, even if the first digit is a "0". (If there is more than one...
Quick Guide (easy Manual) (ver.1.0) (English)
Page 21
... listed for your brand of the code, even if the first digit is a "0". (If there is in "DVD" mode, the volume buttons still control your remote control is set up correctly. If your STB does not turn on after set up , repeat steps 2, 3 and 4, but try each code, 000 through 141... correctly. Make sure you enter three digits of DVD. If no other codes are listed, try the first one .) 5. Press the POWER button on the remote control. Your DVD should turn on if your brand of STB. Press the DVD button on your TV's volume. Press the SET button on your...
Quick Guide (easy Manual) (ver.1.0) (English)
Page 25
... the input source of jacks: AV1, S-Video1, Component1, Component2, PC, HDMI1, or HDMI2 on the TV's rear panel and AV2, S-Video2, or HDMI3 on the remote control to make your choice. 1. Component1 : ---- Press the SOURCE button on the TV's side panel. S-Video1 : ---- Press the ▲ or ▼ buttons to the TV...
Quick Guide (easy Manual) (ver.1.0) (English)
Page 26
... Color 55 Tint G 50 R 50 Backlight 10 ▼More Move Enter Return ▲ Contrast ▼ Move Adjust 100 Return Press the P.MODE button on the remote control repeatedly to select the "Dynamic", "Standard", "Movie" picture setting. For example, if you make changes to increase the clarity and sharpness of a particular item...
Quick Guide (easy Manual) (ver.1.0) (English)
Page 31
...two hours. Picture 1. Press the ▲ or ▼ buttons to select the screen format you may occur when viewing a static image on the remote control repeatedly to work best with the P. Wide Fit Enlarges the aspect ratio of video input. Just Scan Use the function to change the picture...Press the EXIT button to exit. • 16:9 : Sets the picture to 16:9 wide mode. • Zoom1 : Magnifies the size of the picture on the remote if you want to 16:9. Press the ENTER button to 16:9 wide mode. HD (High Definition) 16:9 - 1080i (1920x1080), 720P (1280x720) 16:9 Zoom1 Sets...
Quick Guide (easy Manual) (ver.1.0) (English)
Page 33
...). Freezing the Picture 1. While V-Chip is active only when the external input connects to this TV. If you can select the black level on the remote control repeatedly to select "Setup", then press the ENTER button. Press the ▲ or ▼ button to freeze a moving picture. Press the MENU button to...
Quick Guide (easy Manual) (ver.1.0) (English)
Page 34
... PIP Position Channel : On : : Cable 3 Move Enter Return English - 32 Changing the PIP Channel 3. Press the ENTER buttons. Press the PIP Channel buttons on the remote control. Press the ▲ or ▼ button to TV. Press the ▲ or ▼ buttons to select "Channel", then press the ENTER button.
Quick Guide (easy Manual) (ver.1.0) (English)
Page 35
... Multi-Track Options Movie Speech Custom Auto Volume : Off Internal Mute : Off Sound Select : Main Reset Move Enter Return Press the S.MODE button on the remote control repeatedly to exit. • Choose Standard for the standard factory settings. • Choose Music when watching music videos or concerts. • Choose Movie when...
Quick Guide (easy Manual) (ver.1.0) (English)
Page 36
...only in TV mode. You can listen in a language other than your chosen language by pressing the MTS button on the remote control. Choosing a Multi-Channel Sound (MTS) track - Press the EXIT button to select "Preferred Language". TruSurround delivers a compelling..., virtual surround sound experience through any two-speaker playback system, including internal television speakers. Press the SRS button on the remote control. Digital The digital-TV transmission system is capable of simultaneous transmission of many audio tracks (for example, simultaneous translations ...
Quick Guide (easy Manual) (ver.1.0) (English)
Page 37
... ▲ or ▼ buttons to exit. Press the EXIT button to select "Auto Volume", then press the ENTER button. 3. Press the MTS buttons on the remote control repeatedly to exit. • Choose Mono for channels that are broadcasting in TV mode. Press the EXIT button to select "Mono", "Stereo", or "SAP...
Quick Guide (easy Manual) (ver.1.0) (English)
Page 40
... the digital cable channels. When the scrambled channel searching is available. Press the MENU button to 20~30 minutes. 1. This process may appear on the remote control. Press the ▲ or ▼ buttons to ANT 2 IN (CABLE), select "Cable". Cable Channel 3-1 50% Stop Enter Return Clear Scrambled Channel Scrambled Channel SearchingDiTsVcComabplleet3e...
Quick Guide (easy Manual) (ver.1.0) (English)
Page 41
.... Press the ▲ or ▼ buttons to select "Delete", then press the ENTER button to directly select the channel that will be shown on the remote control. The mark will be added or erased. Air 5 DTV Air 2-1 Air3 Air4 Air 5 Air 6 Air 7 DTV Air 7-1 Air 8 Move Air 5 DTV Air 2-1 Air3 Air4...