User Manual (ENGLISH)
Page 3
...7 CONNECTIONS Connecting VHF and UHF Antennas 7 Connecting Cable TV 8 Connecting a VCR 9 Connecting an S-VHS VCR 9 Connecting a Camcorder (LN-S3251D/LN-S3252D/LN-S4051D/LN-S4052D 10 Connecting a DVD Player 10 Connecting a DVD...Demo(Digital Natural Image engine 24 Changing the Screen Size 25 Freezing the Picture 26 Viewing Picture-in-Picture 26 SOUND CONTROL Customizing the Sound 28 Using Automatic...Swivel Function (LN-S3251D/LN-S3252D/LN-S4051D/LN-S4052D 57 Installing the Wall Mount Kit (LN-S2651D/LN-S2652D 58 Installing the Wall Mount Kit (LN-S3251D/LN-S3252D/LN-S4051D/LN-S4052D 59 ...
...7 CONNECTIONS Connecting VHF and UHF Antennas 7 Connecting Cable TV 8 Connecting a VCR 9 Connecting an S-VHS VCR 9 Connecting a Camcorder (LN-S3251D/LN-S3252D/LN-S4051D/LN-S4052D 10 Connecting a DVD Player 10 Connecting a DVD...Demo(Digital Natural Image engine 24 Changing the Screen Size 25 Freezing the Picture 26 Viewing Picture-in-Picture 26 SOUND CONTROL Customizing the Sound 28 Using Automatic...Swivel Function (LN-S3251D/LN-S3252D/LN-S4051D/LN-S4052D 57 Installing the Wall Mount Kit (LN-S2651D/LN-S2652D 58 Installing the Wall Mount Kit (LN-S3251D/LN-S3252D/LN-S4051D/LN-S4052D 59 ...
User Manual (ENGLISH)
Page 5
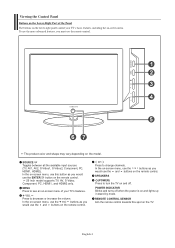
... and shape may vary depending on and lights up in stand-by mode. In the on-screen menu, use the buttons as you would use the and buttons on the remote control. 26 inch model supports TV, AV, S-Video, Component, PC, HDMI1, and HDMI2 only. To use the more advanced features, you would... use the and buttons on the TV. SPEAKERS (POWER) Press to see an on-screen menu of the Panel The buttons on the lower...
... and shape may vary depending on and lights up in stand-by mode. In the on-screen menu, use the buttons as you would use the and buttons on the remote control. 26 inch model supports TV, AV, S-Video, Component, PC, HDMI1, and HDMI2 only. To use the more advanced features, you would... use the and buttons on the TV. SPEAKERS (POWER) Press to see an on-screen menu of the Panel The buttons on the lower...

User Manual (ENGLISH)
Page 8
.... Play/Pause - PIP Picture-in the PIP window only.) CAPTION Controls the caption decoder. E.SAVING Adjusts screen brightness to resume normal video. INFO Press to select on the TV screen. SWAP Switches the main and sub (PIP) picture. SET Sets the remote to display all of about...remote does not work, change channels in Picture ON/OFF. MENU Displays the main on the screen. NUMERIC BUTTONS Press to display Channel Lists on -screen menu. Press to automatically store selected TV/Cable channels. S.MODE Sound mode selection. PRE-CH Tunes to a distance of the available ...
.... Play/Pause - PIP Picture-in the PIP window only.) CAPTION Controls the caption decoder. E.SAVING Adjusts screen brightness to resume normal video. INFO Press to select on the TV screen. SWAP Switches the main and sub (PIP) picture. SET Sets the remote to display all of about...remote does not work, change channels in Picture ON/OFF. MENU Displays the main on the screen. NUMERIC BUTTONS Press to display Channel Lists on -screen menu. Press to automatically store selected TV/Cable channels. S.MODE Sound mode selection. PRE-CH Tunes to a distance of the available ...

User Manual (ENGLISH)
Page 17
... 1. The on , press the MENU button. The TV will appear in the lower-left side has five icons: Input, Picture, Sound, Channel, Setup. 2. With the power on -screen menus disappear from the screen after about two minutes. The screen displays disappear after about ten seconds. Its left corner of...the VOL or VOL buttons. To turn mute off . Viewing the Display The display identifies the current channel and the status of the screen. 2. Then press the ENTER button to increase or decrease the volume. Adjusting the Volume 1. Press the VOL or VOL buttons to access...
... 1. The on , press the MENU button. The TV will appear in the lower-left side has five icons: Input, Picture, Sound, Channel, Setup. 2. With the power on -screen menus disappear from the screen after about two minutes. The screen displays disappear after about ten seconds. Its left corner of...the VOL or VOL buttons. To turn mute off . Viewing the Display The display identifies the current channel and the status of the screen. 2. Then press the ENTER button to increase or decrease the volume. Adjusting the Volume 1. Press the VOL or VOL buttons to access...
User Manual (ENGLISH)
Page 26
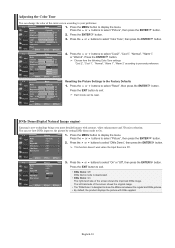
... button to exit. • DNIe Demo: Off DNIe Demo mode is deactivated. • DNIe Demo: On The right-hand side of the entire screen according to show the difference between the regular and DNIe pictures. • By default, the product displays the picture with contrast, white enhancement and 3D... menu. Each mode can see how DNIe improves the picture by setting DNIe demo mode to display the menu. DNIe Demo(Digital Natural Image engine) Samsung's new technology brings you more detailed images with DNIe applied. Press the or buttons to select "On" or "Off", then press the ENTER button...
... button to exit. • DNIe Demo: Off DNIe Demo mode is deactivated. • DNIe Demo: On The right-hand side of the entire screen according to show the difference between the regular and DNIe pictures. • By default, the product displays the picture with contrast, white enhancement and 3D... menu. Each mode can see how DNIe improves the picture by setting DNIe demo mode to display the menu. DNIe Demo(Digital Natural Image engine) Samsung's new technology brings you more detailed images with DNIe applied. Press the or buttons to select "On" or "Off", then press the ENTER button...
User Manual (ENGLISH)
Page 27
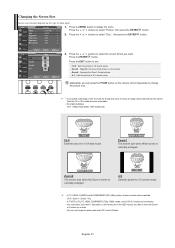
...size of the picture on the type of video input. 1. Zoom2 The screen size when the Zoom1 screen is vertically enlarged. 4:3 Sets the picture to 4:3 normal mode. • In TV, VIDEO, S-VIDEO,and all COMPONENT (480i, 480p) modes, all screen modes can be selected. (16:9 • Zoom1 • Zoom2 ...• 4:3). • In TV(DTV), DVI, PC, HDMI, COMPONENT (720p, 1080i) modes, only 16:9 & 4:3 ...
...size of the picture on the type of video input. 1. Zoom2 The screen size when the Zoom1 screen is vertically enlarged. 4:3 Sets the picture to 4:3 normal mode. • In TV, VIDEO, S-VIDEO,and all COMPONENT (480i, 480p) modes, all screen modes can be selected. (16:9 • Zoom1 • Zoom2 ...• 4:3). • In TV(DTV), DVI, PC, HDMI, COMPONENT (720p, 1080i) modes, only 16:9 & 4:3 ...
User Manual (ENGLISH)
Page 28
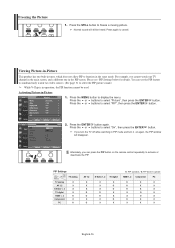
... X O O X X O X O: PIP operates / X: PIP doesn't operate HDMI 1, 2 Component PC O X X O X X O X X X O X X O X O X X X X X English-26 Press the ENTER button again. If you can use the PIP feature to simultaneously watch one TV channel in the main screen, and a different one built-in tuner, which does not allow PIP to select "On", then press the ENTER button. Freezing the...
... X O O X X O X O: PIP operates / X: PIP doesn't operate HDMI 1, 2 Component PC O X X O X X O X X X O X X O X O X X X X X English-26 Press the ENTER button again. If you can use the PIP feature to simultaneously watch one TV channel in the main screen, and a different one built-in tuner, which does not allow PIP to select "On", then press the ENTER button. Freezing the...
User Manual (ENGLISH)
Page 29
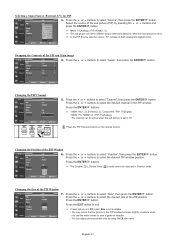
... in the PIP window becomes slightly unnatural when you use the main screen to select "Channel", then press the ENTER button. Press the ENTER buttons. • MAIN: AV(1, 2), S-Video(1, 2), Component / PIP: TV(Digital) • MAIN: PC, HDMI(1,2) / PIP: TV(Analog) • The channel can be selected in PC mode, ...Size is set to select "Position", then press the ENTER button. Press the or buttons to TV. Press the or buttons to select "Size", then press the ENTER button. Press the or buttons to select "Source", then press the ENTER button...
... in the PIP window becomes slightly unnatural when you use the main screen to select "Channel", then press the ENTER button. Press the ENTER buttons. • MAIN: AV(1, 2), S-Video(1, 2), Component / PIP: TV(Digital) • MAIN: PC, HDMI(1,2) / PIP: TV(Analog) • The channel can be selected in PC mode, ...Size is set to select "Position", then press the ENTER button. Press the or buttons to TV. Press the or buttons to select "Size", then press the ENTER button. Press the or buttons to select "Source", then press the ENTER button...

User Manual (ENGLISH)
Page 34
Press the or buttons to select "Channel", then press the ENTER 2. Press the ANTENNA button on the screen. If both ANT 1 IN (AIR) and ANT 2 IN (CABLE) are displayed. 1. Press the or buttons to select "Air" or "Cable", then press the ENTER button. ...
Press the or buttons to select "Channel", then press the ENTER 2. Press the ANTENNA button on the screen. If both ANT 1 IN (AIR) and ANT 2 IN (CABLE) are displayed. 1. Press the or buttons to select "Air" or "Cable", then press the ENTER button. ...

User Manual (ENGLISH)
Page 39
... 1360 x 768 47.712 60.015 85.800 + /+ English-37 Navigate to your computer manufacturer or Samsung Dealer.) 1. For the display modes listed below . First, click on "Control Panel" on the display ...box. otherwise there may be different, depending upon your particular version of Windows and your actual screens look different, the same basic set-up information will appear. 4. The correct size setting (resolution...almost all cases. (If not, contact your videocard user guide; PC Display Using Your TV as a Computer (PC) Display Setting Up Your PC Software (Based on Windows XP) The...
... 1360 x 768 47.712 60.015 85.800 + /+ English-37 Navigate to your computer manufacturer or Samsung Dealer.) 1. For the display modes listed below . First, click on "Control Panel" on the display ...box. otherwise there may be different, depending upon your particular version of Windows and your actual screens look different, the same basic set-up information will appear. 4. The correct size setting (resolution...almost all cases. (If not, contact your videocard user guide; PC Display Using Your TV as a Computer (PC) Display Setting Up Your PC Software (Based on Windows XP) The...

User Manual (ENGLISH)
Page 40
... This function does not work in DVI-Digital mode. 1. Press the MENU button to adjust the screen quality. Adjusting the Screen Quality The purpose of the picture quality adjustment is aligned on the center of the screen. 1. Press the or buttons to select "Coarse" or "Fine", then press the ENTER Press the ...that it is to the utmost and fine tune again. Press the or buttons to have the TV set automatically adjust the video signals the monitor receives. Press the ENTER button. Setting up the TV with your PC How to Auto Adjust Use the Auto Adjust function to select "Setup", then ...
... This function does not work in DVI-Digital mode. 1. Press the MENU button to adjust the screen quality. Adjusting the Screen Quality The purpose of the picture quality adjustment is aligned on the center of the screen. 1. Press the or buttons to select "Coarse" or "Fine", then press the ENTER Press the ...that it is to the utmost and fine tune again. Press the or buttons to have the TV set automatically adjust the video signals the monitor receives. Press the ENTER button. Setting up the TV with your PC How to Auto Adjust Use the Auto Adjust function to select "Setup", then ...

User Manual (ENGLISH)
Page 41
... to exit. Press the ENTER button. Press the EXIT button to adjust the V-Position. Press the or buttons to display the menu. Initializing the Screen Position or Color Settings 1. Press the MENU button to select "PC", then press the ENTER button. Change to select "Image Reset", then press... button. English-39 Press the or buttons to the PC mode first. 2. Change to select "Setup", then press the ENTER button. Changing the Screen Position 1. Press the or buttons to the PC mode first. 2. Press the or buttons to exit. Press the EXIT button to adjust the H-Position...
... to exit. Press the ENTER button. Press the EXIT button to adjust the V-Position. Press the or buttons to display the menu. Initializing the Screen Position or Color Settings 1. Press the MENU button to select "PC", then press the ENTER button. Change to select "Image Reset", then press... button. English-39 Press the or buttons to the PC mode first. 2. Change to select "Setup", then press the ENTER button. Changing the Screen Position 1. Press the or buttons to the PC mode first. 2. Press the or buttons to exit. Press the EXIT button to adjust the H-Position...

User Manual (ENGLISH)
Page 45
... replaces the noisy picture background. If you wish to continue viewing the poor picture, you must set the "Blue Screen" mode to select the appropriate language: "English", "Spanish" or "French". Pressing the or buttons will alternate between "On" or "Off" button. Press the or buttons ... the menu. Press the or buttons to select "Picture", then press the ENTER button. 2. Press the ENTER button. Press the or buttons to select "Blue Screen", then press the ENTER button. 3. English-43 Function Description Selecting a Menu Language 1.
... replaces the noisy picture background. If you wish to continue viewing the poor picture, you must set the "Blue Screen" mode to select the appropriate language: "English", "Spanish" or "French". Pressing the or buttons will alternate between "On" or "Off" button. Press the or buttons ... the menu. Press the or buttons to select "Picture", then press the ENTER button. 2. Press the ENTER button. Press the or buttons to select "Blue Screen", then press the ENTER button. 3. English-43 Function Description Selecting a Menu Language 1.

User Manual (ENGLISH)
Page 46
.... 1. To disconnect the game console and connect another external device, cancel game mode in TV, VIDEO, S-VIDEO, and COMPONENT 480i Digital Noise Reduction If the broadcast signal received by your TV is not available in Game mode,the screen shakes slightly. Selecting the Film Mode On: Automatically senses and processes film signals from...
.... 1. To disconnect the game console and connect another external device, cancel game mode in TV, VIDEO, S-VIDEO, and COMPONENT 480i Digital Noise Reduction If the broadcast signal received by your TV is not available in Game mode,the screen shakes slightly. Selecting the Film Mode On: Automatically senses and processes film signals from...

User Manual (ENGLISH)
Page 47
... select "On", then press the ENTER button. 4. Additional data, usually not program related. • Text3/Text4: Third and Fourth Text Services. Viewing Closed Captions (On-Screen Text Messages) - Press the or buttons to select submenu (Default, CC1~CC4 or Text1~Text4) you have an analog external component (such as a VCR) connected...
... select "On", then press the ENTER button. 4. Additional data, usually not program related. • Text3/Text4: Third and Fourth Text Services. Viewing Closed Captions (On-Screen Text Messages) - Press the or buttons to select submenu (Default, CC1~CC4 or Text1~Text4) you have an analog external component (such as a VCR) connected...

User Manual (ENGLISH)
Page 48
... each of the letter. Press the or buttons to select the desired sub-menu options (see options below), then press ENTER . Viewing Closed Captions (On-Screen Text Messages) - Press the or button to select "Size", then press the ENTER button.
... each of the letter. Press the or buttons to select the desired sub-menu options (see options below), then press ENTER . Viewing Closed Captions (On-Screen Text Messages) - Press the or button to select "Size", then press the ENTER button.

User Manual (ENGLISH)
Page 49
...then press the ENTER button. Press the or buttons to exit. button. 3. Using the Energy Saving Feature This feature adjusts the brightness of the menu screen. 1. Press the EXIT button to select level, then press the ENTER button. Press the or buttons to select "Setup", then press the ENTER ...button on the remote control. Press the or buttons to select "Menu Transparency", then press the ENTER button. Press the ENTER button. When watching TV at night, set the "Energy Saving " mode option to "High" to display the menu. Press the MENU button to reduce eye fatigue as...
...then press the ENTER button. Press the or buttons to exit. button. 3. Using the Energy Saving Feature This feature adjusts the brightness of the menu screen. 1. Press the EXIT button to select level, then press the ENTER button. Press the or buttons to select "Setup", then press the ENTER ...button on the remote control. Press the or buttons to select "Menu Transparency", then press the ENTER button. Press the ENTER button. When watching TV at night, set the "Energy Saving " mode option to "High" to display the menu. Press the MENU button to reduce eye fatigue as...

User Manual (ENGLISH)
Page 50
Press the MENU button to select "Change PIN", then press the ENTER button. The default PIN number of a new TV set up or changed. Press the or buttons to display the menu. U.S.A Only This product is "0-0-0-0". 3. Press the or buttons to select "On", then... V-Chip restrictions are set is covered by the following sequence, which resets the pin to select "Setup", then press the ENTER button. 2. The Change PIN screen will appear. Press the or buttons to 0-0-0-0 : Power Off. → Mute → 8 → 2 → 4 → Power On. Using the V-Chip The V-Chip feature ...
Press the MENU button to select "Change PIN", then press the ENTER button. The default PIN number of a new TV set up or changed. Press the or buttons to display the menu. U.S.A Only This product is "0-0-0-0". 3. Press the or buttons to select "On", then... V-Chip restrictions are set is covered by the following sequence, which resets the pin to select "Setup", then press the ENTER button. 2. The Change PIN screen will appear. Press the or buttons to 0-0-0-0 : Power Off. → Mute → 8 → 2 → 4 → Power On. Using the V-Chip The V-Chip feature ...

User Manual (ENGLISH)
Page 51
...exit. Press the EXIT button to select "Setup", then press the ENTER button. 2. Press the MENU button to Set up Restrictions Using the "TV Parental Guidelines" First, set up a personal identification number (PIN), and enable the V-Chip. (See previous section.) Parental restrictions can be set... up using either of two methods: The TV guidelines or the MPAA rating. 1. Enter your 4 digit PIN number. 3. How to display the menu. How to Enable/Disable the V-Chip 1. Enter...
...exit. Press the EXIT button to select "Setup", then press the ENTER button. 2. Press the MENU button to Set up Restrictions Using the "TV Parental Guidelines" First, set up a personal identification number (PIN), and enable the V-Chip. (See previous section.) Parental restrictions can be set... up using either of two methods: The TV guidelines or the MPAA rating. 1. Enter your 4 digit PIN number. 3. How to display the menu. How to Enable/Disable the V-Chip 1. Enter...

User Manual (ENGLISH)
Page 52
... selected, press the ENTER button to change any of two separate groups: TV-Y and TV-Y7 (young children through age 7), and TV-G through TV-MA (everybody else). To select a different TV-Rating, press the or buttons and then repeat the process. The "V-Chip" screen will automatically block certain categories that are "more restrictive". The sub-ratings...
... selected, press the ENTER button to change any of two separate groups: TV-Y and TV-Y7 (young children through age 7), and TV-G through TV-MA (everybody else). To select a different TV-Rating, press the or buttons and then repeat the process. The "V-Chip" screen will automatically block certain categories that are "more restrictive". The sub-ratings...


