
Quick Guide (easy Manual) (ver.1.0) (English)
Page 9
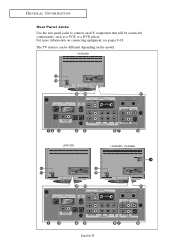
LN-R269D LN-R329D LN-R409D / LN-R469D English-3 G E N E R A L I N F O R M AT I O N Rear Panel Jacks Use the rear panel jacks to connect an A/V component that will be different depending on connecting equipment, see pages 8-18. The TV surface can be connected continuously, such as a VCR or a DVD player. For more information on the model.
LN-R269D LN-R329D LN-R409D / LN-R469D English-3 G E N E R A L I N F O R M AT I O N Rear Panel Jacks Use the rear panel jacks to connect an A/V component that will be different depending on connecting equipment, see pages 8-18. The TV surface can be connected continuously, such as a VCR or a DVD player. For more information on the model.
Quick Guide (easy Manual) (ver.1.0) (English)
Page 27
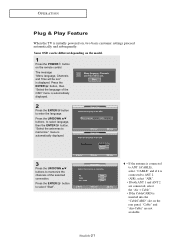
... enter the language. O P E R AT I O N Plug & Play Feature When the TV is displayed. The message "Menu language, Channels and Time will be different depending on the model. 1 Press the POWER button on the rear panel, "Cable" and "Air+Cable" are connected, select the "Air + Cable". • If the CableCARD is automatically displayed...
... enter the language. O P E R AT I O N Plug & Play Feature When the TV is displayed. The message "Menu language, Channels and Time will be different depending on the model. 1 Press the POWER button on the rear panel, "Cable" and "Air+Cable" are connected, select the "Air + Cable". • If the CableCARD is automatically displayed...
Quick Guide (easy Manual) (ver.1.0) (English)
Page 32
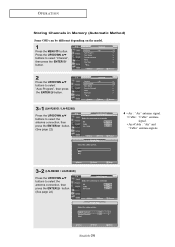
... to select "Channel", then press the ENTER button. 2 Press the UP/DOWN buttons to select "Auto Program", then press the ENTER button. 3-1 (LN-R269D / LN-R329D) Press the UP/DOWN buttons to select the antenna connection, then press the ENTER button. (See page 22) • Air : "Air" ...antenna signal. • Cable : "Cable" antenna signal. • Air+Cable : "Air" and "Cable" antenna signals. 3-2 (LN-R409D / LN-R469D) Press the UP/DOWN buttons to select the antenna connection, then press the ENTER button. (See page 22) English-26 O P E R AT I O N Storing ...
... to select "Channel", then press the ENTER button. 2 Press the UP/DOWN buttons to select "Auto Program", then press the ENTER button. 3-1 (LN-R269D / LN-R329D) Press the UP/DOWN buttons to select the antenna connection, then press the ENTER button. (See page 22) • Air : "Air" ...antenna signal. • Cable : "Cable" antenna signal. • Air+Cable : "Air" and "Cable" antenna signals. 3-2 (LN-R409D / LN-R469D) Press the UP/DOWN buttons to select the antenna connection, then press the ENTER button. (See page 22) English-26 O P E R AT I O N Storing ...
Quick Guide (easy Manual) (ver.1.0) (English)
Page 39
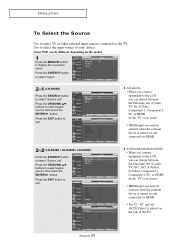
... the ENTER button to select signal source, then press the ENTER button. Press the EXIT button to exit. (LN-R269D) • When you can choose between the following sets of jacks: TV, AV, S-Video, Component 1, Component 2, PC, or HDMI on the TV's rear panel. • ... be selected when the external device is turned on and connected via HDMI. • For 32", 40" and 46", AV2/S-Video2 is turned on the model. 1 Press the MENU button to select signal source, then press the ENTER button. Press the UP/DOWN buttons to select "Source List". O P E R AT I O N To Select...
... the ENTER button to select signal source, then press the ENTER button. Press the EXIT button to exit. (LN-R269D) • When you can choose between the following sets of jacks: TV, AV, S-Video, Component 1, Component 2, PC, or HDMI on the TV's rear panel. • ... be selected when the external device is turned on and connected via HDMI. • For 32", 40" and 46", AV2/S-Video2 is turned on the model. 1 Press the MENU button to select signal source, then press the ENTER button. Press the UP/DOWN buttons to select "Source List". O P E R AT I O N To Select...
Quick Guide (easy Manual) (ver.1.0) (English)
Page 41
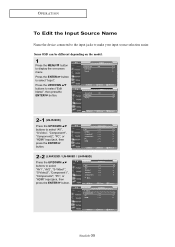
Press the UP/DOWN buttons to select "Edit Name", then pressthe ENTER button. 2-1 (LN-R269D) Press the UP/DOWN buttons to select "AV", "S-Video", "Component1", "Component2", "PC", or "HDMI" input jack, then press the ENTER button. 2-2 (LN-R329D / LN-R409D / LN-R469D) Press the UP/DOWN buttons to select "Input". English-35 Press the ENTER button... different depending on -screen menu. O P E R AT I O N To Edit the Input Source Name Name the device connected to the input jacks to display the on the model. 1 Press the MENU button to make your input source selection easier.
Press the UP/DOWN buttons to select "Edit Name", then pressthe ENTER button. 2-1 (LN-R269D) Press the UP/DOWN buttons to select "AV", "S-Video", "Component1", "Component2", "PC", or "HDMI" input jack, then press the ENTER button. 2-2 (LN-R329D / LN-R409D / LN-R469D) Press the UP/DOWN buttons to select "Input". English-35 Press the ENTER button... different depending on -screen menu. O P E R AT I O N To Edit the Input Source Name Name the device connected to the input jacks to display the on the model. 1 Press the MENU button to make your input source selection easier.
Quick Guide (easy Manual) (ver.1.0) (English)
Page 51
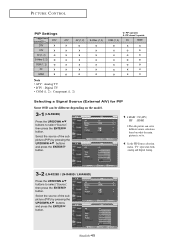
... X: PIP doesn't operate PC HDMI O X X X O O X O O X O O X O O X X X O X X Selecting a Signal Source (External A/V) for PIP Some OSD can serve different source selections based on the model. 3-1 (LN-R269D) Press the UP/DOWN buttons to select "Source", then press the ENTER button. Select the source of the sub picture (PIP) by pressing the UP... button. In the PIP Source selection menu, 'TV' represents both analog and digital tuning. 3-2 (LN-R329D / LN-R409D / LN-R469D) Press the UP/DOWN buttons to select "Source", then press the ENTER button. Select the ...
... X: PIP doesn't operate PC HDMI O X X X O O X O O X O O X O O X X X O X X Selecting a Signal Source (External A/V) for PIP Some OSD can serve different source selections based on the model. 3-1 (LN-R269D) Press the UP/DOWN buttons to select "Source", then press the ENTER button. Select the source of the sub picture (PIP) by pressing the UP... button. In the PIP Source selection menu, 'TV' represents both analog and digital tuning. 3-2 (LN-R329D / LN-R409D / LN-R469D) Press the UP/DOWN buttons to select "Source", then press the ENTER button. Select the ...
Quick Guide (easy Manual) (ver.1.0) (English)
Page 76
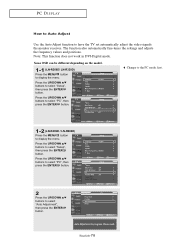
... to select "PC", then press the ENTER button. 2 Press the UP/DOWN buttons to display the menu. Some OSD can be different depending on the model. 1-1 (LN-R269D/ LN-R329D) Press the MENU button to select "Auto Adjustment", then press the ENTER button. Press the UP/DOWN buttons to have the TV set automatically... the settings and adjusts the frequency values and positions. Note: This function does not work in DVI-Digital mode. Change to the PC mode first. 1-2 (LN-R409D / LN-R469D) Press the MENU button to display the menu.
... to select "PC", then press the ENTER button. 2 Press the UP/DOWN buttons to display the menu. Some OSD can be different depending on the model. 1-1 (LN-R269D/ LN-R329D) Press the MENU button to select "Auto Adjustment", then press the ENTER button. Press the UP/DOWN buttons to have the TV set automatically... the settings and adjusts the frequency values and positions. Note: This function does not work in DVI-Digital mode. Change to the PC mode first. 1-2 (LN-R409D / LN-R469D) Press the MENU button to display the menu.
Quick Guide (easy Manual) (ver.1.0) (English)
Page 77
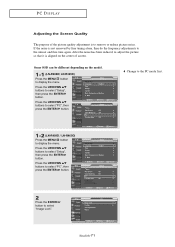
...that it is to display the menu. Press the UP/DOWN buttons to the utmost and fine tune again. Change to the PC mode first. 1-2 (LN-R409D / LN-R469D) Press the MENU button to select "Image Lock". Press the UP/DOWN buttons to select "PC", then press the ENTER button. 2 Press ... "Setup", then press the ENTER button. Some OSD can be different depending on the center of the picture quality adjustment is aligned on the model. 1-1 (LN-R269D/ LN-R329D) Press the MENU button to remove or reduce picture noise. Press the UP/DOWN buttons to select "Setup", then press the ENTER button.
...that it is to display the menu. Press the UP/DOWN buttons to the utmost and fine tune again. Change to the PC mode first. 1-2 (LN-R409D / LN-R469D) Press the MENU button to select "Image Lock". Press the UP/DOWN buttons to select "PC", then press the ENTER button. 2 Press ... "Setup", then press the ENTER button. Some OSD can be different depending on the center of the picture quality adjustment is aligned on the model. 1-1 (LN-R269D/ LN-R329D) Press the MENU button to remove or reduce picture noise. Press the UP/DOWN buttons to select "Setup", then press the ENTER button.
Quick Guide (easy Manual) (ver.1.0) (English)
Page 79
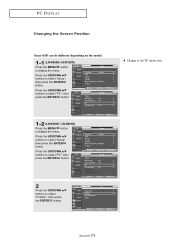
Change to the PC mode first. 1-2 (LN-R409D / LN-R469D) Press the MENU button to select "Setup", then press the ENTER button. Press the UP/DOWN buttons to display the menu. Press the UP/... ENTER button. Press the UP/DOWN buttons to display the menu. PC DISPLAY Changing the Screen Position Some OSD can be different depending on the model. 1-1 (LN-R269D/ LN-R329D) Press the MENU button to select "Setup", then press the ENTER button.
Change to the PC mode first. 1-2 (LN-R409D / LN-R469D) Press the MENU button to select "Setup", then press the ENTER button. Press the UP/DOWN buttons to display the menu. Press the UP/... ENTER button. Press the UP/DOWN buttons to display the menu. PC DISPLAY Changing the Screen Position Some OSD can be different depending on the model. 1-1 (LN-R269D/ LN-R329D) Press the MENU button to select "Setup", then press the ENTER button.
Quick Guide (easy Manual) (ver.1.0) (English)
Page 81
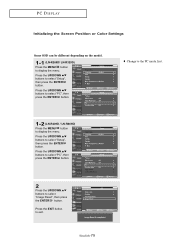
PC DISPLAY Initializing the Screen Position or Color Settings Some OSD can be different depending on the model. 1-1 (LN-R269D/ LN-R329D) Press the MENU button to select "Image Reset", then press the ENTER button. Press the UP/DOWN buttons to select "PC", then press the ... button to select "Setup", then press the ENTER button. English-75 Press the UP/DOWN buttons to exit. Change to the PC mode first. 1-2 (LN-R409D / LN-R469D) Press the MENU button to select "Setup", then press the ENTER button. Press the UP/DOWN buttons to display the menu. Press the UP...
PC DISPLAY Initializing the Screen Position or Color Settings Some OSD can be different depending on the model. 1-1 (LN-R269D/ LN-R329D) Press the MENU button to select "Image Reset", then press the ENTER button. Press the UP/DOWN buttons to select "PC", then press the ... button to select "Setup", then press the ENTER button. English-75 Press the UP/DOWN buttons to exit. Change to the PC mode first. 1-2 (LN-R409D / LN-R469D) Press the MENU button to select "Setup", then press the ENTER button. Press the UP/DOWN buttons to display the menu. Press the UP...
Quick Guide (easy Manual) (ver.1.0) (English)
Page 91
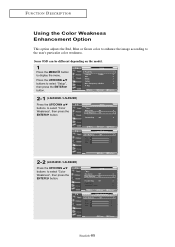
Press the UP/DOWN buttons to select "Setup", then press the ENTER button. 2-1 (LN-R269D / LN-R329D) Press the UP/DOWN buttons to select "Color Weakness", then press the ENTER button. 2-2 (LN-R409D / LN-R469D) Press the UP/DOWN buttons to the user's particular color weakness. English-85 FUNCTION DESCRIPTION Using the Color Weakness Enhancement Option This option adjusts the Red, Blue or Green color to enhance the image according to select "Color Weakness", then press the ENTER button. Some OSD can be different depending on the model. 1 Press the MENU button to display the menu.
Press the UP/DOWN buttons to select "Setup", then press the ENTER button. 2-1 (LN-R269D / LN-R329D) Press the UP/DOWN buttons to select "Color Weakness", then press the ENTER button. 2-2 (LN-R409D / LN-R469D) Press the UP/DOWN buttons to the user's particular color weakness. English-85 FUNCTION DESCRIPTION Using the Color Weakness Enhancement Option This option adjusts the Red, Blue or Green color to enhance the image according to select "Color Weakness", then press the ENTER button. Some OSD can be different depending on the model. 1 Press the MENU button to display the menu.
Quick Guide (easy Manual) (ver.1.0) (English)
Page 99
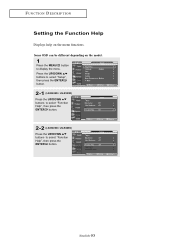
FUNCTION DESCRIPTION Setting the Function Help Displays help on the model. 1 Press the MENU button to select "Function Help", then press the ENTER button. Some OSD can be different depending on the menu functions. Press the UP/DOWN buttons to select "Setup", then press the ENTER button. 2-1 (LN-R269D / LN-R329D) Press the UP/DOWN buttons to select "Function Help", then press the ENTER button. 2-2 (LN-R409D / LN-R469D) Press the UP/DOWN buttons to display the menu. English-93
FUNCTION DESCRIPTION Setting the Function Help Displays help on the model. 1 Press the MENU button to select "Function Help", then press the ENTER button. Some OSD can be different depending on the menu functions. Press the UP/DOWN buttons to select "Setup", then press the ENTER button. 2-1 (LN-R269D / LN-R329D) Press the UP/DOWN buttons to select "Function Help", then press the ENTER button. 2-2 (LN-R409D / LN-R469D) Press the UP/DOWN buttons to display the menu. English-93
Quick Guide (easy Manual) (ver.1.0) (English)
Page 124
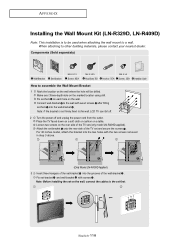
... dealer. When attaching to the wall with wood screws after fitting anchors into the grooves of the set and secure the screws . For 40 inches model, attach the bracket into the two holes with screws . Make over 35mm-depth-hole on the rear side of the TV set -bracket into the... . Attach the set-bracket onto the rear side of the TV set -bracket and wall-bracket with the two screws removed in step 3 above. (Only Model LN-R409D Applied) 3 Insert three Hangers of the wall-bracket . Loosen two screws on the marked location using drill. Note: If the bracket is to be...
... dealer. When attaching to the wall with wood screws after fitting anchors into the grooves of the set and secure the screws . For 40 inches model, attach the bracket into the two holes with screws . Make over 35mm-depth-hole on the rear side of the TV set -bracket into the... . Attach the set-bracket onto the rear side of the TV set -bracket and wall-bracket with the two screws removed in step 3 above. (Only Model LN-R409D Applied) 3 Insert three Hangers of the wall-bracket . Loosen two screws on the marked location using drill. Note: If the bracket is to be...
Quick Guide (easy Manual) (ver.1.0) (English)
Page 127
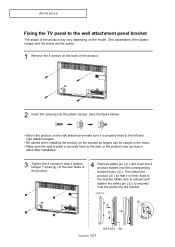
...-121 Wall Bracket Wall APPENDIX Fixing the TV panel to the wall attachment panel bracket The shape of the product may vary depending on the model. (The assemblies of the plastic hanger and the screw are the same) 1 Remove the 4 screws on the bracket as fingers can be caught in the...
...-121 Wall Bracket Wall APPENDIX Fixing the TV panel to the wall attachment panel bracket The shape of the product may vary depending on the model. (The assemblies of the plastic hanger and the screw are the same) 1 Remove the 4 screws on the bracket as fingers can be caught in the...
Quick Guide (easy Manual) (ver.1.0) (English)
Page 132
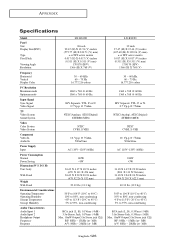
... N. 0.7 Vp-p @ 75ohm NTSC(Analog), ATSC(Digital) STEREO(MTS) NTSC CVBS, S-VHS 10. APPENDIX Specifications Model Panel Size Display Size(HXV) Type Pixel Pitch Viewing Angle Resolution Frequency Horizontal Vertical Display Color PC Resolution Maximum mode Optimum... With Stand Weight With Stand Environmental Considerations Operating Temperature Operating Humidity Storage Temperature Storage Humidity Audio Characteristics Audio Input 1 Audio Input 2 Headphone Output Frequency Response LN-R269D 26 inch 22.67 (H) X 12.74 (V) inches (575.77 (H) X 323.71 (V) mm) a-si TFT active matrix 0.017 (H) X...
... N. 0.7 Vp-p @ 75ohm NTSC(Analog), ATSC(Digital) STEREO(MTS) NTSC CVBS, S-VHS 10. APPENDIX Specifications Model Panel Size Display Size(HXV) Type Pixel Pitch Viewing Angle Resolution Frequency Horizontal Vertical Display Color PC Resolution Maximum mode Optimum... With Stand Weight With Stand Environmental Considerations Operating Temperature Operating Humidity Storage Temperature Storage Humidity Audio Characteristics Audio Input 1 Audio Input 2 Headphone Output Frequency Response LN-R269D 26 inch 22.67 (H) X 12.74 (V) inches (575.77 (H) X 323.71 (V) mm) a-si TFT active matrix 0.017 (H) X...
Quick Guide (easy Manual) (ver.1.0) (English)
Page 133
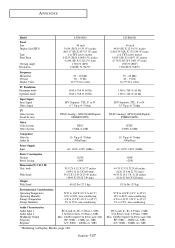
... Input AC 110V~120V (60Hz) Power Consumption Normal Power Saving Dimensions(W X D X H) Unit: body With Stand Weight With Stand 285W APPENDIX Model Panel Size Display Size(HXV) Type Pixel Pitch Viewing Angle Resolution LN-R409D 40 inch 34.84 (H) X 19.59 (V) inches (885.17 (H) X 497.67 (V) mm) a-si TFT active matrix 0.0255 (H) X 0.0085...
... Input AC 110V~120V (60Hz) Power Consumption Normal Power Saving Dimensions(W X D X H) Unit: body With Stand Weight With Stand 285W APPENDIX Model Panel Size Display Size(HXV) Type Pixel Pitch Viewing Angle Resolution LN-R409D 40 inch 34.84 (H) X 19.59 (V) inches (885.17 (H) X 497.67 (V) mm) a-si TFT active matrix 0.0255 (H) X 0.0085...


