
Quick Guide (easy Manual) (ver.1.0) (English)
Page 7
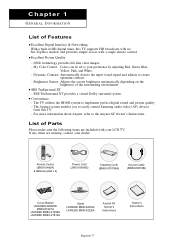
... control. SRS TruSurround XT - The TV utilizes the HDMI system to easily control Samsung audio-video (AV) devices from this TV supports HD broadcasts with no Set-Top Box needed, and provides simple access with your LCD TV. My Color Control: Colors can be...2) Power Cord (3903-000085) Cleaning Cloth (BN63-001798A) Anynet Cable (BN39-00518B) Cover-Bottom LN-R269D/LN-R329D: BN63-01947A LN-R409D: BN63-01938A LN-R469D: BN63-01810A Stand LN-R269D: BN96-02203A LN-R329D: BN96-02202A Anynet AV Owner's Instructions Owner's Instructions English-1 Brightness Sensor: Adjusts the screen ...
... control. SRS TruSurround XT - The TV utilizes the HDMI system to easily control Samsung audio-video (AV) devices from this TV supports HD broadcasts with no Set-Top Box needed, and provides simple access with your LCD TV. My Color Control: Colors can be...2) Power Cord (3903-000085) Cleaning Cloth (BN63-001798A) Anynet Cable (BN39-00518B) Cover-Bottom LN-R269D/LN-R329D: BN63-01947A LN-R409D: BN63-01938A LN-R469D: BN63-01810A Stand LN-R269D: BN96-02203A LN-R329D: BN96-02202A Anynet AV Owner's Instructions Owner's Instructions English-1 Brightness Sensor: Adjusts the screen ...
Quick Guide (easy Manual) (ver.1.0) (English)
Page 35
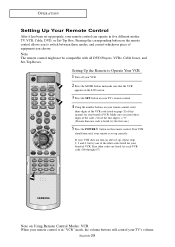
... if your remote is set up properly, your remote control can operate in "VCR" mode, the volume buttons still control your TV's volume. English-29 O P E R AT I O N Setting Up Your Remote Control After it has been set up...the code, even if the first digit is a "0". (If more than one code is in five different modes: TV, VCR, Cable, DVD, or Set-Top Box. If your VCR does not turn on Using Remote Control Modes: ... Press the MODE button and make sure that the VCR appears on the LCD screen. 3 Press the SET button on your TV's remote control. 4 Using the number buttons on your brand of VCR.
... if your remote is set up properly, your remote control can operate in "VCR" mode, the volume buttons still control your TV's volume. English-29 O P E R AT I O N Setting Up Your Remote Control After it has been set up...the code, even if the first digit is a "0". (If more than one code is in five different modes: TV, VCR, Cable, DVD, or Set-Top Box. If your VCR does not turn on Using Remote Control Modes: ... Press the MODE button and make sure that the VCR appears on the LCD screen. 3 Press the SET button on your TV's remote control. 4 Using the number buttons on your brand of VCR.
Quick Guide (easy Manual) (ver.1.0) (English)
Page 36
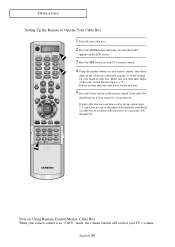
...-30 Make sure you enter three digits of the code, even if the first digit is in "CATV" mode, the volume buttons still control your TV's volume. O P E R AT I O N Setting Up the Remote to Operate Your Cable Box 1 Turn off your cable box. 2 Press the MODE button and make sure that the... CATV appears on the LCD screen. 3 Press the SET button on your TV's remote control. 4 Using the number buttons on your remote control, enter three digits of the cable box code listed on after...
...-30 Make sure you enter three digits of the code, even if the first digit is in "CATV" mode, the volume buttons still control your TV's volume. O P E R AT I O N Setting Up the Remote to Operate Your Cable Box 1 Turn off your cable box. 2 Press the MODE button and make sure that the... CATV appears on the LCD screen. 3 Press the SET button on your TV's remote control. 4 Using the number buttons on your remote control, enter three digits of the cable box code listed on after...
Quick Guide (easy Manual) (ver.1.0) (English)
Page 37
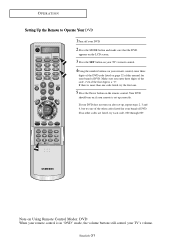
If your DVD does not turn on if your TV's volume. Your DVD should turn on after set up , repeat steps 2, 3 and 4, but try one . 5 Press the Power button on the remote control. If no ... to Operate Your .DVD 1Turn off your DVD. 2 Press the MODE button and make sure that the DVD appears on the LCD screen. 3 Press the SET button on your TV's remote control. 4Using the number buttons on your remote control, enter three digits of the DVD code listed on page 32 of...
If your DVD does not turn on if your TV's volume. Your DVD should turn on after set up , repeat steps 2, 3 and 4, but try one . 5 Press the Power button on the remote control. If no ... to Operate Your .DVD 1Turn off your DVD. 2 Press the MODE button and make sure that the DVD appears on the LCD screen. 3 Press the SET button on your TV's remote control. 4Using the number buttons on your remote control, enter three digits of the DVD code listed on page 32 of...
Quick Guide (easy Manual) (ver.1.0) (English)
Page 39
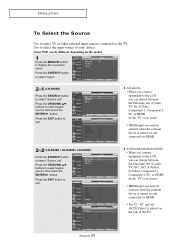
.../DOWN buttons to select "Source List". Press the EXIT button to exit. (LN-R269D) • When you can choose between the following sets of jacks: TV, AV, S-Video, Component 1, Component 2, PC, or HDMI on the TV's rear panel. • HDMI input can be selected when the external device is... external device is turned on and connected via HDMI. 2-2 (LN-R329D / LN-R409D / LN-R469D) Press the ENTER button to the LCD, you connect equipment to select "Source List". O P E R AT I O N To Select the Source Use to select TV or other external input sources connected to display the on the ...
.../DOWN buttons to select "Source List". Press the EXIT button to exit. (LN-R269D) • When you can choose between the following sets of jacks: TV, AV, S-Video, Component 1, Component 2, PC, or HDMI on the TV's rear panel. • HDMI input can be selected when the external device is... external device is turned on and connected via HDMI. 2-2 (LN-R329D / LN-R409D / LN-R469D) Press the ENTER button to the LCD, you connect equipment to select "Source List". O P E R AT I O N To Select the Source Use to select TV or other external input sources connected to display the on the ...
Quick Guide (easy Manual) (ver.1.0) (English)
Page 121
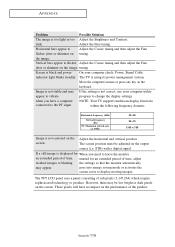
...period of time, adjust residual images or blurring the settings so that the monitor automatically may be adjusted on tuning. The TFT LCD panel uses a panel consisting of the product. APPENDIX Problem Possible Solution The image is black and power On your computer utility ...a computer connected to Adjust the Coarse tuning and then adjust the Fine flicker, jitter or shimmer on the output source (i.e. NOTE: Your TV supports multiscan display functions within the following frequency domain: Horizontal frequency (kHz) Vertical frequency (Hz) PC Maximum refresh rate (at 60Hz) ...
...period of time, adjust residual images or blurring the settings so that the monitor automatically may be adjusted on tuning. The TFT LCD panel uses a panel consisting of the product. APPENDIX Problem Possible Solution The image is black and power On your computer utility ...a computer connected to Adjust the Coarse tuning and then adjust the Fine flicker, jitter or shimmer on the output source (i.e. NOTE: Your TV supports multiscan display functions within the following frequency domain: Horizontal frequency (kHz) Vertical frequency (Hz) PC Maximum refresh rate (at 60Hz) ...
Quick Guide (easy Manual) (ver.1.0) (English)
Page 123
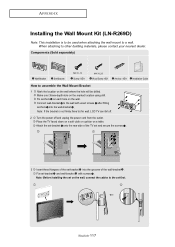
...-bracket . Components (Sold separately) Wall-Bracket Set-Bracket M4 X L12 Screw: 8EA M4 X L20 Wood Screw: 4EA Anchor: 4EA How to the wall, LCD TV can fall off. 2 Turn the power off and unplug the power cord from the outlet. Attach the set-bracket onto the rear side of the...first. When attaching to the set on the marked location using drill. Place the TV faced down on a soft cloth or cushion on the wall. Fix set and secure the screws . APPENDIX Installing the Wall Mount Kit (LN-R269D) Note: This installation is not firmly fixed to assemble the Wall Mount Bracket 1...
...-bracket . Components (Sold separately) Wall-Bracket Set-Bracket M4 X L12 Screw: 8EA M4 X L20 Wood Screw: 4EA Anchor: 4EA How to the wall, LCD TV can fall off. 2 Turn the power off and unplug the power cord from the outlet. Attach the set-bracket onto the rear side of the...first. When attaching to the set on the marked location using drill. Place the TV faced down on a soft cloth or cushion on the wall. Fix set and secure the screws . APPENDIX Installing the Wall Mount Kit (LN-R269D) Note: This installation is not firmly fixed to assemble the Wall Mount Bracket 1...
Quick Guide (easy Manual) (ver.1.0) (English)
Page 124
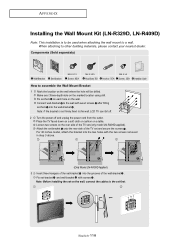
... inches model, attach the bracket into the two holes with the two screws removed in step 3 above. (Only Model LN-R409D Applied) 3 Insert three Hangers of the TV set first. English-118 When attaching to other building materials, please contact your nearest dealer. Components (Sold separately) Wall-Bracket... applied). Note: Before installing the set on the wall. APPENDIX Installing the Wall Mount Kit (LN-R329D, LN-R409D) Note: This installation is not firmly fixed to the wall, LCD TV can fall off. 2 Turn the power off and unplug the power cord from the outlet. Attach the set-...
... inches model, attach the bracket into the two holes with the two screws removed in step 3 above. (Only Model LN-R409D Applied) 3 Insert three Hangers of the TV set first. English-118 When attaching to other building materials, please contact your nearest dealer. Components (Sold separately) Wall-Bracket... applied). Note: Before installing the set on the wall. APPENDIX Installing the Wall Mount Kit (LN-R329D, LN-R409D) Note: This installation is not firmly fixed to the wall, LCD TV can fall off. 2 Turn the power off and unplug the power cord from the outlet. Attach the set-...
Quick Guide (easy Manual) (ver.1.0) (English)
Page 127
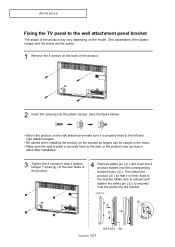
LCD TV English-121 Wall Bracket Wall Then place the product ( ) so that it is properly fixed to the left and right plastic hangers. • Be careful ... into the corresponding bracket holes ( ). Make sure to reinsert and tighten the safety pin ( ) to securely hold the product to the bracket. APPENDIX Fixing the TV panel to the wall attachment panel bracket The shape of the product may vary depending on the model. (The assemblies of the plastic hanger and...
LCD TV English-121 Wall Bracket Wall Then place the product ( ) so that it is properly fixed to the left and right plastic hangers. • Be careful ... into the corresponding bracket holes ( ). Make sure to reinsert and tighten the safety pin ( ) to securely hold the product to the bracket. APPENDIX Fixing the TV panel to the wall attachment panel bracket The shape of the product may vary depending on the model. (The assemblies of the plastic hanger and...
Quick Guide (easy Manual) (ver.1.0) (English)
Page 130
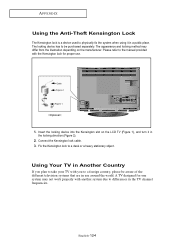
...or a heavy stationary object. Connect the Kensington lock cable. 3. Insert the locking device into the Kensington slot on the manufacturer. Using Your TV in Another Country If you to a foreign country, please be purchased separately. Fix the Kensington lock to be aware of the different television systems...and locking method may not work properly with you plan to take your TV with another system due to the manual provided with the Kensington lock for one system may differ from the illustration depending on the LCD TV (Figure 1), and turn it in the locking direction (Figure 2). 2....
...or a heavy stationary object. Connect the Kensington lock cable. 3. Insert the locking device into the Kensington slot on the manufacturer. Using Your TV in Another Country If you to a foreign country, please be purchased separately. Fix the Kensington lock to be aware of the different television systems...and locking method may not work properly with you plan to take your TV with another system due to the manual provided with the Kensington lock for one system may differ from the illustration depending on the LCD TV (Figure 1), and turn it in the locking direction (Figure 2). 2....


