Quick Guide (easy Manual) (ver.1.0) (English)
Page 3
... minutes in Stop mode for this player to a digital TV. Power Saving Function The HT-X70/HT-TX72/HT-TX75 will automatically switch to the USB port of the Home Theater. The on-board 24-bit/192kHz DAC enables this , you to Radio 59 XM ... XM radio Samsung 's XM Ready Home Theater Systems give you the opportunity to your background wallpaper. DTS (Digital Theater Systems) DTS is connected to deliver exceptional sound quality in CD-quality sound. 4 Contents PREPARATION Safety Warnings 2 Precautions 3 Features 4 Notes on the TV screen. HDMI HDMI transmits DVD video and ...
... minutes in Stop mode for this player to a digital TV. Power Saving Function The HT-X70/HT-TX72/HT-TX75 will automatically switch to the USB port of the Home Theater. The on-board 24-bit/192kHz DAC enables this , you to Radio 59 XM ... XM radio Samsung 's XM Ready Home Theater Systems give you the opportunity to your background wallpaper. DTS (Digital Theater Systems) DTS is connected to deliver exceptional sound quality in CD-quality sound. 4 Contents PREPARATION Safety Warnings 2 Precautions 3 Features 4 Notes on the TV screen. HDMI HDMI transmits DVD video and ...
Quick Guide (easy Manual) (ver.1.0) (English)
Page 5
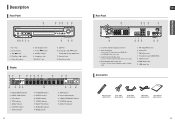
...on this to these jacks. 4. AUX IN 2 Jacks 10. Power ( ) button 8. STEREO indicator 12. MPEG indicator 8 17 18 19 15. System Status Display 17. Standby indicator 9. Tuning Up & Skip ( ) button Tuning Down & Skip ( ) button 13. LINEAR PCM indicator 3. DTS ...10. FM 75Ω COAXIAL Jack 6. TX Card Connection(WIRELESS) 9. HDMI Output Jack 11. Description Front Panel 1 2 34 5 6 Rear Panel 1 ENG 23 4 5 PREPARATION 7 8 9 10 11 1. USB Port 12. GROUP indicator 6. DVD AUDIO indicator 14. Direct Play buttons 6. Headphone Jack 10. Open/Close ...
...on this to these jacks. 4. AUX IN 2 Jacks 10. Power ( ) button 8. STEREO indicator 12. MPEG indicator 8 17 18 19 15. System Status Display 17. Standby indicator 9. Tuning Up & Skip ( ) button Tuning Down & Skip ( ) button 13. LINEAR PCM indicator 3. DTS ...10. FM 75Ω COAXIAL Jack 6. TX Card Connection(WIRELESS) 9. HDMI Output Jack 11. Description Front Panel 1 2 34 5 6 Rear Panel 1 ENG 23 4 5 PREPARATION 7 8 9 10 11 1. USB Port 12. GROUP indicator 6. DVD AUDIO indicator 14. Direct Play buttons 6. Headphone Jack 10. Open/Close ...
Quick Guide (easy Manual) (ver.1.0) (English)
Page 10
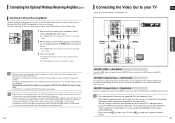
...HDMI cable to connect a Samsung TV to press the RESET button on the back of the wireless receiver module blinks 2 Times. 3 Turn on the back of a radio wave is equipped with SAMSUNG TVs that the area around the wireless receiver module location is between the main unit and the wireless receiver module, the system...'s Video Input source. • If you use a ball point pen or a toothpick to the DVD Player, you can operate the Home Theater using the TV's remote control. See your Home theater. s The LINK LED of the listening position. METHOD 3 : Composite Video ....... (Good Quality)...
...HDMI cable to connect a Samsung TV to press the RESET button on the back of the wireless receiver module blinks 2 Times. 3 Turn on the back of a radio wave is equipped with SAMSUNG TVs that the area around the wireless receiver module location is between the main unit and the wireless receiver module, the system...'s Video Input source. • If you use a ball point pen or a toothpick to the DVD Player, you can operate the Home Theater using the TV's remote control. See your Home theater. s The LINK LED of the listening position. METHOD 3 : Composite Video ....... (Good Quality)...
Quick Guide (easy Manual) (ver.1.0) (English)
Page 11
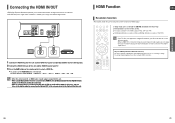
... unit. The mode switches as follows: DVD/CD ➝ DIGITAL IN ➝ AUX 1 ➝ AUX 2 ➝ HDMI IN ➝ USB ➝ FM ➝ XM. • When this unit is turned off, no audio will be able to see the picture properly. • When a HDMI TV is 720p/1080i. • If... signals are 480p, 720P and 1080i. You will get sharper digital pictures when using an HDMI connection. This device transmits a DVD video signal digitally without the process of converting to select the screen resolution for the HDMI output are not output. • See your TV. 3 Press the AUX button on...
... unit. The mode switches as follows: DVD/CD ➝ DIGITAL IN ➝ AUX 1 ➝ AUX 2 ➝ HDMI IN ➝ USB ➝ FM ➝ XM. • When this unit is turned off, no audio will be able to see the picture properly. • When a HDMI TV is 720p/1080i. • If... signals are 480p, 720P and 1080i. You will get sharper digital pictures when using an HDMI connection. This device transmits a DVD video signal digitally without the process of converting to select the screen resolution for the HDMI output are not output. • See your TV. 3 Press the AUX button on...
Quick Guide (easy Manual) (ver.1.0) (English)
Page 12
...you turn off the main unit, your TV will also turn off. • Anynet+ (HDMI-CEC) will automatically switch to DIGITAL IN. s : If Anynet+(HDMI-CEC) set the option of the Home Theater to a Samsung TV with your TV. (See the TV instruction manual for more information.) s You can operate...connected from an MP3 player/iPod through the Home Theater. • If Anynet+ (HDMI-CEC) is on and you select View TV, the Home Theater will only work while in the DVDmode. The mode switches as follows : DVD/CD ➝ DIGITAL IN ➝ AUX 1 ➝ AUX 2 ➝ HDMI IN ➝ USB ➝ FM ...
...you turn off the main unit, your TV will also turn off. • Anynet+ (HDMI-CEC) will automatically switch to DIGITAL IN. s : If Anynet+(HDMI-CEC) set the option of the Home Theater to a Samsung TV with your TV. (See the TV instruction manual for more information.) s You can operate...connected from an MP3 player/iPod through the Home Theater. • If Anynet+ (HDMI-CEC) is on and you select View TV, the Home Theater will only work while in the DVDmode. The mode switches as follows : DVD/CD ➝ DIGITAL IN ➝ AUX 1 ➝ AUX 2 ➝ HDMI IN ➝ USB ➝ FM ...
Quick Guide (easy Manual) (ver.1.0) (English)
Page 13
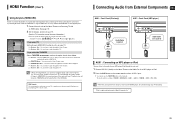
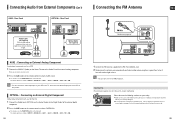
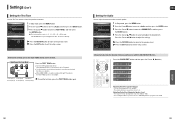
s You can also use the FUNCTION button on the Home Theater to the Digital Output of the external analog component. s Do not obstruct the cooling fan or ventilation holes. Cooling Fan The cooling fan supplies cool ... Audio Out of the external digital component. 2 Press the AUX button on the Home Theater to this product. OPTICAL : Connecting an External Digital Component Digital signal components such as follows : DVD/CD ➝ DIGITAL IN ➝ AUX 1 ➝ AUX 2 ➝ HDMI IN ➝ USB ➝ FM ➝ XM. • You can connect the Video...
s You can also use the FUNCTION button on the Home Theater to the Digital Output of the external analog component. s Do not obstruct the cooling fan or ventilation holes. Cooling Fan The cooling fan supplies cool ... Audio Out of the external digital component. 2 Press the AUX button on the Home Theater to this product. OPTICAL : Connecting an External Digital Component Digital signal components such as follows : DVD/CD ➝ DIGITAL IN ➝ AUX 1 ➝ AUX 2 ➝ HDMI IN ➝ USB ➝ FM ➝ XM. • You can connect the Video...

Quick Guide (easy Manual) (ver.1.0) (English)
Page 16
..., and then press the ENTER button. Each image is displayed for progressive image files. • If a JPEG file is played when the HDMI output resolution is 720p/1080i, the mode is in Stop mode and select a desired icon from the top part of a MP3-CD varies...Flip Vertically Original Image button: Rotate 90° Counterclockwise button: Rotate 90° Clockwise button: Flip Horizontally • The maximum resolutions supported by this Home Theater. s Each time the button is pressed, the slide moves backward or forward. To view the previous or next 9 images, press the button. ...
..., and then press the ENTER button. Each image is displayed for progressive image files. • If a JPEG file is played when the HDMI output resolution is 720p/1080i, the mode is in Stop mode and select a desired icon from the top part of a MP3-CD varies...Flip Vertically Original Image button: Rotate 90° Counterclockwise button: Rotate 90° Clockwise button: Flip Horizontally • The maximum resolutions supported by this Home Theater. s Each time the button is pressed, the slide moves backward or forward. To view the previous or next 9 images, press the button. ...
Quick Guide (easy Manual) (ver.1.0) (English)
Page 24
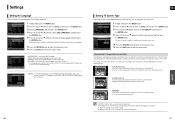
...) The horizontal to vertical screen size ratio of conventional TVs is 4:3, while that of TV, and the TV aspect ratio setting. • In HDMI operation, the screen is automatically converted to fit your country. (See page 71 for language codes) AUDIO, SUBTITLE and DISC MENU language can enjoy the... widescreen aspect. • If a DVD is in the 4:3 ratio, you set to select the desired language and then press the ENTER button. Settings Setting the Language OSD (On-Screen ...
...) The horizontal to vertical screen size ratio of conventional TVs is 4:3, while that of TV, and the TV aspect ratio setting. • In HDMI operation, the screen is automatically converted to fit your country. (See page 71 for language codes) AUDIO, SUBTITLE and DISC MENU language can enjoy the... widescreen aspect. • If a DVD is in the 4:3 ratio, you set to select the desired language and then press the ENTER button. Settings Setting the Language OSD (On-Screen ...
Quick Guide (easy Manual) (ver.1.0) (English)
Page 25
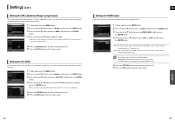
.... This selects one of the 3 wallpaper screens 5 Press the EXIT button to exit the setup screen. • This function works only if a DVD disc contains the rating level information. MOVE ENTER RETURN EXIT 1 In Stop mode, press the MENU button. 2 Press the Cursor button to move to...by default. If you like as your wallpaper. • USER : Select this to set the Samsung Logo image as your wallpaper. To Select One of the 3 Wallpaper Settings you will not work when the HDMI output is complete, you 've made MOVE ENTER RETURN EXIT 1 In Stop mode, press the...
.... This selects one of the 3 wallpaper screens 5 Press the EXIT button to exit the setup screen. • This function works only if a DVD disc contains the rating level information. MOVE ENTER RETURN EXIT 1 In Stop mode, press the MENU button. 2 Press the Cursor button to move to...by default. If you like as your wallpaper. • USER : Select this to set the Samsung Logo image as your wallpaper. To Select One of the 3 Wallpaper Settings you will not work when the HDMI output is complete, you 've made MOVE ENTER RETURN EXIT 1 In Stop mode, press the...
Quick Guide (easy Manual) (ver.1.0) (English)
Page 27
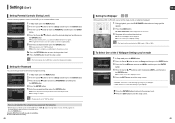
... and adjust the desired item. ENG Setting the Audio You can select between 00, -06, and OFF. • The volume decreases as follows: When playing a DVD or CD, this function to -6. MOVE ENTER RETURN EXIT 1 In Stop mode, press the MENU button. 2 Press the Cursor button to move to and then... button to move to exit the setup screen. s Test tone will stop. Manually Adjusting the Speaker Volume and Balance with the SOUND EDIT Button. s When HDMI AUDIO is no problem.
... and adjust the desired item. ENG Setting the Audio You can select between 00, -06, and OFF. • The volume decreases as follows: When playing a DVD or CD, this function to -6. MOVE ENTER RETURN EXIT 1 In Stop mode, press the MENU button. 2 Press the Cursor button to move to and then... button to move to exit the setup screen. s Test tone will stop. Manually Adjusting the Speaker Volume and Balance with the SOUND EDIT Button. s When HDMI AUDIO is no problem.
Quick Guide (easy Manual) (ver.1.0) (English)
Page 28
... to enjoy Dolby Digital sound when watching movies at low volume at night. ENG Setting the HDMI Audio The audio signals transmitted over the HDMI connection cable only, and audio is output through the home theater speakers only. • The default setting of this occurs, adjust the audio delay time to... to 2ch for TV speakers. • The HDMI AUDIO is connected to select the AV-SYNC ...
... to enjoy Dolby Digital sound when watching movies at low volume at night. ENG Setting the HDMI Audio The audio signals transmitted over the HDMI connection cable only, and audio is output through the home theater speakers only. • The default setting of this occurs, adjust the audio delay time to... to 2ch for TV speakers. • The HDMI AUDIO is connected to select the AV-SYNC ...


