User Manual
Page 2
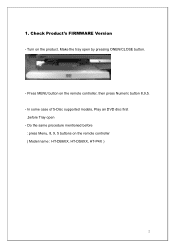
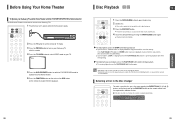
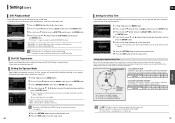
Press MENU button on the remote controller ( Model name : HT-DB6XX, HT-DS6XX, HT-P4X ) 2 Do the same procedure mentioned before Tray open by pressing ONEN/CLOSE button. - In some case of 5-Disc supported models, Play an DVD disc first ,before : press Menu, 8, 9, 5 buttons on the remote controller, then press Numeric button 8,9,5. - Turn on the product. Make the tray open - 1. Check Product's FIRMWARE Version -
Press MENU button on the remote controller ( Model name : HT-DB6XX, HT-DS6XX, HT-P4X ) 2 Do the same procedure mentioned before Tray open by pressing ONEN/CLOSE button. - In some case of 5-Disc supported models, Play an DVD disc first ,before : press Menu, 8, 9, 5 buttons on the remote controller, then press Numeric button 8,9,5. - Turn on the product. Make the tray open - 1. Check Product's FIRMWARE Version -
User Manual
Page 4
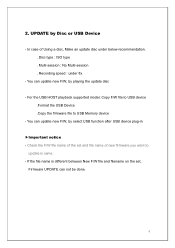
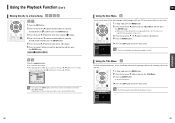
... the file name is same - In case of the set , Firmware UPDATE can not be done. 4 You can update new F/W, by playing the update disc - Disc type : ISO type . You can update new F/W, by select USB function after USB device plug-in ▶Important notice - 2. Check the F/W file name of Using a disc, Make an update disc under 8x - Recording speed : under below recommendation. . Multi-session : No Multi-session . UPDATE by Disc or USB Device -
... the file name is same - In case of the set , Firmware UPDATE can not be done. 4 You can update new F/W, by playing the update disc - Disc type : ISO type . You can update new F/W, by select USB function after USB device plug-in ▶Important notice - 2. Check the F/W file name of Using a disc, Make an update disc under 8x - Recording speed : under below recommendation. . Multi-session : No Multi-session . UPDATE by Disc or USB Device -
Quick Guide (easy Manual) (ver.1.0) (English)
Page 2
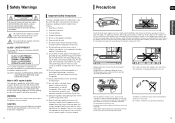
... trash. 3 Switching off the Home Theater to direct sunlight or other apparatus (including amplifiers) that produce heat. 9) Do not defeat the safety purpose of cable entry as a CLASS 1 LASER product. The Mains plug is classified as practical. This could damage the unit. The batteries used as close to qualified service personnel. CLASS 1 LASER PRODUCT This Compact Disc player is used with liquids...
... trash. 3 Switching off the Home Theater to direct sunlight or other apparatus (including amplifiers) that produce heat. 9) Do not defeat the safety purpose of cable entry as a CLASS 1 LASER product. The Mains plug is classified as practical. This could damage the unit. The batteries used as close to qualified service personnel. CLASS 1 LASER PRODUCT This Compact Disc player is used with liquids...
Quick Guide (easy Manual) (ver.1.0) (English)
Page 3
... Setting the Speaker Mode 50 Setting the Delay Time 51 Setting the Test Tone 52 Setting the Audio 53 Setting the DRC (Dynamic Range Compression)...54 Setting the AV SYNC 54 Setting the HDMI Audio 55 Sound Field (DSP)/EQ Function 56 Dolby Pro Logic II Mode 57 Dolby Pro Logic II Effect 58 MISCELLANEOUS Listening to a Scene/Song 42 Using the Disc Menu 43 Using the Title Menu 43 Playing Media Files using a Samsung TV remote control, by Digital Theater Systems Inc. AV SYNC Function Video...
... Setting the Speaker Mode 50 Setting the Delay Time 51 Setting the Test Tone 52 Setting the Audio 53 Setting the DRC (Dynamic Range Compression)...54 Setting the AV SYNC 54 Setting the HDMI Audio 55 Sound Field (DSP)/EQ Function 56 Dolby Pro Logic II Mode 57 Dolby Pro Logic II Effect 58 MISCELLANEOUS Listening to a Scene/Song 42 Using the Disc Menu 43 Using the Title Menu 43 Playing Media Files using a Samsung TV remote control, by Digital Theater Systems Inc. AV SYNC Function Video...
Quick Guide (easy Manual) (ver.1.0) (English)
Page 5
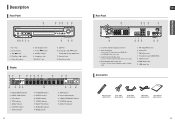
...with Component video inputs to connect external equipment capable of digital output. 5. Disc Change button 7. DTS indicator 4. CHAPTER indicator 7. MPEG indicator 8 17 18 19 15. External Digital Optical Input Jack Use this unit. 3. Description Front Panel 1 2 34 5 6 Rear Panel 1 ENG 23 4 5 PREPARATION 7 8 9 10 11 1. STEREO indicator 12. HDMI Input Jack Accessories Remote Control (AH59-01778J) Video Cable (AH39-40001V) Audio Cable (AH39-00954A) FM Antenna (AH42-00017A) User's Manual (AH68-01951C) 9 DISC(1~5) indicator 6 78 9 10 11 1. 5.1 Channel Speaker...
...with Component video inputs to connect external equipment capable of digital output. 5. Disc Change button 7. DTS indicator 4. CHAPTER indicator 7. MPEG indicator 8 17 18 19 15. External Digital Optical Input Jack Use this unit. 3. Description Front Panel 1 2 34 5 6 Rear Panel 1 ENG 23 4 5 PREPARATION 7 8 9 10 11 1. STEREO indicator 12. HDMI Input Jack Accessories Remote Control (AH59-01778J) Video Cable (AH39-40001V) Audio Cable (AH39-00954A) FM Antenna (AH42-00017A) User's Manual (AH68-01951C) 9 DISC(1~5) indicator 6 78 9 10 11 1. 5.1 Channel Speaker...
Quick Guide (easy Manual) (ver.1.0) (English)
Page 7
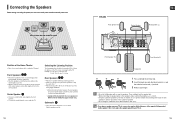
.... * Unlike the front and center speakers, the rear speakers are used to prevent children from them slightly in DVD 5.1-CH or Dolby Pro Logic II mode only. Selecting the Listening Position The listening position should be distorted because of the center speakers. They could get hurt if a speaker falls. • When connecting the speaker wires to turn off the power and disconnect the power cord. Example : For 32" TVs...
.... * Unlike the front and center speakers, the rear speakers are used to prevent children from them slightly in DVD 5.1-CH or Dolby Pro Logic II mode only. Selecting the Listening Position The listening position should be distorted because of the center speakers. They could get hurt if a speaker falls. • When connecting the speaker wires to turn off the power and disconnect the power cord. Example : For 32" TVs...
Quick Guide (easy Manual) (ver.1.0) (English)
Page 9
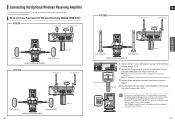
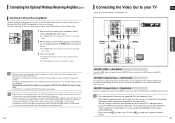
... Subwoofer Rear Speaker (L) Rear Speaker (R) WIRELESS RECEIVER MODULE HT-TX72 Front Speaker (R) Front Speaker (L) Center Speaker Rear Speaker (L) WIRELESS RECEIVER MODULE Rear Speaker (R) 16 Subwoofer Subwoofer Rear Speaker (L) Rear Speaker (R) WIRELESS RECEIVER MODULE Slanted side faces left and right rear speakers to the wireless receiving module. 4 Plug the power cord of the main unit. The TX card enables communication between the main unit and the wireless receiver. 3 Connect the left TX card 1 Connect the Front, Center and Subwoofer speakers to the DVD Player...
... Subwoofer Rear Speaker (L) Rear Speaker (R) WIRELESS RECEIVER MODULE HT-TX72 Front Speaker (R) Front Speaker (L) Center Speaker Rear Speaker (L) WIRELESS RECEIVER MODULE Rear Speaker (R) 16 Subwoofer Subwoofer Rear Speaker (L) Rear Speaker (R) WIRELESS RECEIVER MODULE Slanted side faces left and right rear speakers to the wireless receiving module. 4 Plug the power cord of the main unit. The TX card enables communication between the main unit and the wireless receiver. 3 Connect the left TX card 1 Connect the Front, Center and Subwoofer speakers to the DVD Player...
Quick Guide (easy Manual) (ver.1.0) (English)
Page 10
... Component Video Output (Pr, Pb and Y) jacks on the back of the DVD Player to the VIDEO IN jack on your TV. • This product operates in Power Standby mode. 1 With the main unit turned off, press and hold the remote control's REMAIN button for Component Output. • After making the video connection, set the Video input source on your TV has an logo, then it supports the Anynet+ function. 19 Keep the unit away from the wireless rear speakers...
... Component Video Output (Pr, Pb and Y) jacks on the back of the DVD Player to the VIDEO IN jack on your TV. • This product operates in Power Standby mode. 1 With the main unit turned off, press and hold the remote control's REMAIN button for Component Output. • After making the video connection, set the Video input source on your TV has an logo, then it supports the Anynet+ function. 19 Keep the unit away from the wireless rear speakers...
Quick Guide (easy Manual) (ver.1.0) (English)
Page 11
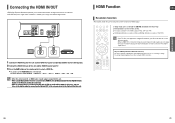
... multi-channel digital audio. 1 Connect the HDMI IN jack of this unit and the HDMI OUT jack of a Cable Box/Satellite receiver (Set-Top Box). 2 Connect the HDMI OUT jack of your TV owner's manual for more information on the remote control to select . In this case, you will get sharper digital pictures when using an HDMI connection. This device transmits a DVD video signal digitally without the process of video and audio data with just a single cable. CONNECTIONS 20 21 The mode switches as follows: DVD/CD ➝ DIGITAL...
... multi-channel digital audio. 1 Connect the HDMI IN jack of this unit and the HDMI OUT jack of a Cable Box/Satellite receiver (Set-Top Box). 2 Connect the HDMI OUT jack of your TV owner's manual for more information on the remote control to select . In this case, you will get sharper digital pictures when using an HDMI connection. This device transmits a DVD video signal digitally without the process of video and audio data with just a single cable. CONNECTIONS 20 21 The mode switches as follows: DVD/CD ➝ DIGITAL...
Quick Guide (easy Manual) (ver.1.0) (English)
Page 12
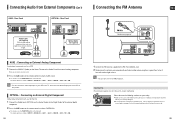
... the AUX button on the main unit. s : You can operate the Home Theater by pressing the Play button on and you must have a digital optical cable connected from an MP3 player/iPod through the TV. • When selecting View TV, you connect an iPod MP3 player, the unit will be used by connecting this unit, power on your TV, or watch a movie by using an HDMI Cable. s : You can operate this Home Theater to a SAMSUNG TV using the TV remote control...
... the AUX button on the main unit. s : You can operate the Home Theater by pressing the Play button on and you must have a digital optical cable connected from an MP3 player/iPod through the TV. • When selecting View TV, you connect an iPod MP3 player, the unit will be used by connecting this unit, power on your TV, or watch a movie by using an HDMI Cable. s : You can operate this Home Theater to a SAMSUNG TV using the TV remote control...
Quick Guide (easy Manual) (ver.1.0) (English)
Page 13
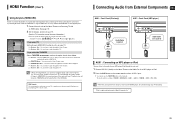
... : Rear Panel OPTICAL : Rear Panel CONNECTIONS Audio Cable (not supplied) If the external analog component has only one Audio Out, connect either left or right. s You can connect the Video Output jack of your safety. Optical Cable (not supplied) FM Antenna (supplied) SPEAKERS OUT (IMPEDANCE 3§ ) AUX2 : Connecting an External Analog Component Analog signal components such as a Set-Top Box. 1 Connect the Digital Input (OPTICAL) on the Home Theater to the Digital Output of the external digital component. 2 Press the AUX button on the Home Theater to select . The mode switches as...
... : Rear Panel OPTICAL : Rear Panel CONNECTIONS Audio Cable (not supplied) If the external analog component has only one Audio Out, connect either left or right. s You can connect the Video Output jack of your safety. Optical Cable (not supplied) FM Antenna (supplied) SPEAKERS OUT (IMPEDANCE 3§ ) AUX2 : Connecting an External Analog Component Analog signal components such as a Set-Top Box. 1 Connect the Digital Input (OPTICAL) on the Home Theater to the Digital Output of the external digital component. 2 Press the AUX button on the Home Theater to select . The mode switches as...
Quick Guide (easy Manual) (ver.1.0) (English)
Page 15
... function works only with the HT-X70/HT-TX72/HT-TX75's Remote Control The DVD Home Theater's remote can load the third, fourth, and fifth discs. 4 Close the compartment by pressing the OPEN/CLOSE button again. s Playback starts automatically. VIDEO 5 Press the DVD RECEIVER button to switch to DVD RECEIVER mode to operate the DVD Home Theater 6 Press the FUNCTION button on the main unit or DVD button on your Samsung TV with this player because it violates the CSS (Content Scrambling System : a copy protection system...
... function works only with the HT-X70/HT-TX72/HT-TX75's Remote Control The DVD Home Theater's remote can load the third, fourth, and fifth discs. 4 Close the compartment by pressing the OPEN/CLOSE button again. s Playback starts automatically. VIDEO 5 Press the DVD RECEIVER button to switch to DVD RECEIVER mode to operate the DVD Home Theater 6 Press the FUNCTION button on the main unit or DVD button on your Samsung TV with this player because it violates the CSS (Content Scrambling System : a copy protection system...
Quick Guide (easy Manual) (ver.1.0) (English)
Page 22
... to exit the setup screen. s When you may vary. 1 In Stop mode, press the MENU button. 2 Press the Cursor , button to move to a folder. Using the Title Menu DVD For DVDs containing multiple titles, you cannot use the menus for the audio language, subtitle language, profile, etc. s When playing an MP3 or JPEG disc, you can press the button on the remote control to move directly to the...
... to exit the setup screen. s When you may vary. 1 In Stop mode, press the MENU button. 2 Press the Cursor , button to move to a folder. Using the Title Menu DVD For DVDs containing multiple titles, you cannot use the menus for the audio language, subtitle language, profile, etc. s When playing an MP3 or JPEG disc, you can press the button on the remote control to move directly to the...
Quick Guide (easy Manual) (ver.1.0) (English)
Page 23
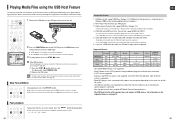
... program installation when connected to your music files with 5.1 channel home theater sound, you press the button, the next file is connected. • Does not operate with 5.1 channel Home Theater sound by its manufacturerspecific program is selected. For information on the sector size of their file system. • The USB host function is not supported if a product that operate as a removable disc in Windows (2000 or later) without additional driver installation. 4. MP3 Player: HDD and flash type MP3 players. 3. USB...
... program installation when connected to your music files with 5.1 channel home theater sound, you press the button, the next file is connected. • Does not operate with 5.1 channel Home Theater sound by its manufacturerspecific program is selected. For information on the sector size of their file system. • The USB host function is not supported if a product that operate as a removable disc in Windows (2000 or later) without additional driver installation. 4. MP3 Player: HDD and flash type MP3 players. 3. USB...
Quick Guide (easy Manual) (ver.1.0) (English)
Page 25
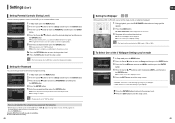
... button. You can set to "7890" by default. This selects one of the 3 wallpaper screens 5 Press the EXIT button to exit the setup screen. • This function works only if a DVD disc contains the rating level information. SETUP 49 Setting the Password You can select up to 3 wallpaper settings. • This function will be displayed. The setting is to violent or adult material. 5 Enter the password and then press the ENTER button. Using the RESET function...
... button. You can set to "7890" by default. This selects one of the 3 wallpaper screens 5 Press the EXIT button to exit the setup screen. • This function works only if a DVD disc contains the rating level information. SETUP 49 Setting the Password You can select up to 3 wallpaper settings. • This function will be displayed. The setting is to violent or adult material. 5 Enter the password and then press the ENTER button. Using the RESET function...
Quick Guide (easy Manual) (ver.1.0) (English)
Page 26
... adjust the delay time of the audio signals from SURROUND SPEAKER Setting REAR (SURROUND) SPEAKERS If the distance of Df is connected. • Depending on 5.1 channel discs. 51 MOVE CHANGE RETURN EXIT Press the RETURN button to return to the sound of the Center and Surround Speakers. Since the sounds arrive at the listening position at equal distances from the listening position, you want to switch to DVD AUDIO Play mode. • DVD VIDEO : set to play back the DVD-Video...
... adjust the delay time of the audio signals from SURROUND SPEAKER Setting REAR (SURROUND) SPEAKERS If the distance of Df is connected. • Depending on 5.1 channel discs. 51 MOVE CHANGE RETURN EXIT Press the RETURN button to return to the sound of the Center and Surround Speakers. Since the sounds arrive at the listening position at equal distances from the listening position, you want to switch to DVD AUDIO Play mode. • DVD VIDEO : set to play back the DVD-Video...
Quick Guide (easy Manual) (ver.1.0) (English)
Page 28
... Cursor button is pressed, the effect is transmitted over the HDMI Cable can use this occurs, adjust the audio delay time to to 2ch for TV speakers. • The HDMI AUDIO is not available when using the HDMI IN function. MOVE SELECT RETURN EXIT • ON : Both video and audio signals are transmitted over the HDMI connection cable, and audio is output through the home theater speakers only. • The default setting of this function is HDMI AUDIO OFF. • HDMI AUDIO...
... Cursor button is pressed, the effect is transmitted over the HDMI Cable can use this occurs, adjust the audio delay time to to 2ch for TV speakers. • The HDMI AUDIO is not available when using the HDMI IN function. MOVE SELECT RETURN EXIT • ON : Both video and audio signals are transmitted over the HDMI connection cable, and audio is output through the home theater speakers only. • The default setting of this function is HDMI AUDIO OFF. • HDMI AUDIO...
Quick Guide (easy Manual) (ver.1.0) (English)
Page 30
... FUNCTION button to automatically search for a clear, interference-free broadcast. MISCELLANEOUS 58 59 This mode extends the front stereo image to include the surround speakers for an exciting "wraparound" effect with two or more channels, multi-channel mode will be selected automatically and the (Dolby Pro Logic II) button does not work. Manual Tuning : Press the STOP ( ) button to select and then briefly press the button to tune in Dolby Pro Logic MUSIC mode...
... FUNCTION button to automatically search for a clear, interference-free broadcast. MISCELLANEOUS 58 59 This mode extends the front stereo image to include the surround speakers for an exciting "wraparound" effect with two or more channels, multi-channel mode will be selected automatically and the (Dolby Pro Logic II) button does not work. Manual Tuning : Press the STOP ( ) button to select and then briefly press the button to tune in Dolby Pro Logic MUSIC mode...
Quick Guide (easy Manual) (ver.1.0) (English)
Page 35
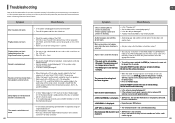
... 5.1 channel sound. • Is the audio language correctly set C, SL, and SR to the front speakers (L/R) only. If the problem you set to the default values. • Press the POWER button. Playback does not start immediately when the Play/Pause button is displayed. • Reposition your XM Antenna. Playback does not start . • Check the region number of the remote control (TV or DVD) correctly? The remote control does not work if...
... 5.1 channel sound. • Is the audio language correctly set C, SL, and SR to the front speakers (L/R) only. If the problem you set to the default values. • Press the POWER button. Playback does not start immediately when the Play/Pause button is displayed. • Reposition your XM Antenna. Playback does not start . • Check the region number of the remote control (TV or DVD) correctly? The remote control does not work if...
Quick Guide (easy Manual) (ver.1.0) (English)
Page 38
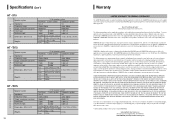
... receive warranty service, the purchaser must contact SAMSUNG for which occurs in the applicable end user license agreement. Non-SAMSUNG manufacturers, suppliers, publishers, and service providers may not apply to SAMSUNG. cosmetic damage or exterior finish; Some states do not allow limitations on products purchased and used in service problems; TX72 Speaker system S Impedance P Frequency range E Output sound pressure level A Rated input K Maximum input E R Dimensions (W x H x D) Weights 5.1ch speaker system Front/Rear /Center speaker Subwoofer speaker 3Ω...
... receive warranty service, the purchaser must contact SAMSUNG for which occurs in the applicable end user license agreement. Non-SAMSUNG manufacturers, suppliers, publishers, and service providers may not apply to SAMSUNG. cosmetic damage or exterior finish; Some states do not allow limitations on products purchased and used in service problems; TX72 Speaker system S Impedance P Frequency range E Output sound pressure level A Rated input K Maximum input E R Dimensions (W x H x D) Weights 5.1ch speaker system Front/Rear /Center speaker Subwoofer speaker 3Ω...


