
Safety Guide (ENGLISH)
Page 5
...5:06:47 This device must use only UL Listed detachable power cord with picture screens 13 inches or larger in accordance with similar configuration. Voluntary Control Council for product compliance: SAMSUNG ELECTRONICS CO., LTD. FCC Class B Notice This device complies with NEMA ... not expressly approved by the Federal Communications Commission. Korea Communications Commission(KCC) - Consult the dealer or an experienced radio/TV technician for Digital Equipment (ICES-003) - Industry Canada Equipment Standard for help. This equipment generates, uses and can...
...5:06:47 This device must use only UL Listed detachable power cord with picture screens 13 inches or larger in accordance with similar configuration. Voluntary Control Council for product compliance: SAMSUNG ELECTRONICS CO., LTD. FCC Class B Notice This device complies with NEMA ... not expressly approved by the Federal Communications Commission. Korea Communications Commission(KCC) - Consult the dealer or an experienced radio/TV technician for Digital Equipment (ICES-003) - Industry Canada Equipment Standard for help. This equipment generates, uses and can...

User Manual (ENGLISH)
Page 2
... conforming to private non-commercial use of this product unit to encode and/or decode audio files conforming to fill the screen if your Samsung limited warranty. The license only covers the use by end-user consumers for viewing. No rights are granted under this user manual is... No rights are granted under certain intellectual property rights of certain third parties. No rights are granted for product features or functions that offer picture sizing features, use of this product unit to encode and/or decode audio files conforming to no more than this license for commercial use ,...
... conforming to private non-commercial use of this product unit to encode and/or decode audio files conforming to fill the screen if your Samsung limited warranty. The license only covers the use by end-user consumers for viewing. No rights are granted under this user manual is... No rights are granted under certain intellectual property rights of certain third parties. No rights are granted for product features or functions that offer picture sizing features, use of this product unit to encode and/or decode audio files conforming to no more than this license for commercial use ,...
User Manual (ENGLISH)
Page 4
Digital....50 ■ Viewing Closed Captions (On-Screen Text Messages) - Analog.. 36 ■ Automatic Volume Control 36 ■ Selecting the Internal Mute 36 ■ Adjusting the Melody Sound 37 ■ Listening to assemble the Stand-Base (depending on the Picture 29 ■ ...7 ■ Remote Control 8 ■ Installing Batteries in the Remote Control 9 CONNECTIONS ■ Connecting VHF and UHF Antennas 9 ■ Connecting Cable TV 10 ■ Connecting a VCR 11 ■ Connecting an S-VHS VCR 11 ■ Connecting a Camcorder 12 ■ Connecting a DVD Player/Set-Top...
Digital....50 ■ Viewing Closed Captions (On-Screen Text Messages) - Analog.. 36 ■ Automatic Volume Control 36 ■ Selecting the Internal Mute 36 ■ Adjusting the Melody Sound 37 ■ Listening to assemble the Stand-Base (depending on the Picture 29 ■ ...7 ■ Remote Control 8 ■ Installing Batteries in the Remote Control 9 CONNECTIONS ■ Connecting VHF and UHF Antennas 9 ■ Connecting Cable TV 10 ■ Connecting a VCR 11 ■ Connecting an S-VHS VCR 11 ■ Connecting a Camcorder 12 ■ Connecting a DVD Player/Set-Top...
User Manual (ENGLISH)
Page 5
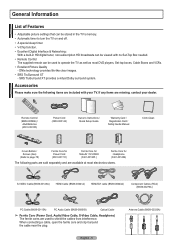
...are used to operate the TV as well as most electronics stores. When connecting a cable, open the ferrite core and clip it around the cable near the plug. General Information List of Features • Adjustable picture settings that can be stored in the TV's memory. • ...Automatic timer to turn the TV on and off. • A special sleep timer. • V-Chip function. • Excellent Digital Interface ...
...are used to operate the TV as well as most electronics stores. When connecting a cable, open the ferrite core and clip it around the cable near the plug. General Information List of Features • Adjustable picture settings that can be stored in the TV's memory. • ...Automatic timer to turn the TV on and off. • A special sleep timer. • V-Chip function. • Excellent Digital Interface ...
User Manual (ENGLISH)
Page 8
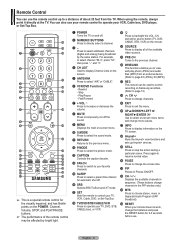
... volume. 8 MUTE Press to change menu values. k PIP Picture-in the PIP window only.) m MTS Press to select the sound mode. ! Remote Control You can use . Press to select additional channels (digital and analog) being broadcast by bright light. 1 POWER Turns the TV on Samsung recorders. (Refer to page 74) d CH Press to...
... volume. 8 MUTE Press to change menu values. k PIP Picture-in the PIP window only.) m MTS Press to select the sound mode. ! Remote Control You can use . Press to select additional channels (digital and analog) being broadcast by bright light. 1 POWER Turns the TV on Samsung recorders. (Refer to page 74) d CH Press to...
User Manual (ENGLISH)
Page 11
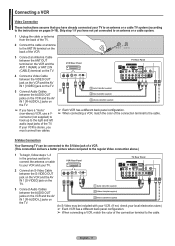
...- 11 S-Video Connection Your Samsung TV can be included with your VCR. (If not, check your local electronics store.) ➢ Each VCR has a different back panel configuration. ➢ When connecting a VCR, match the color of a VCR. (This connection delivers a better picture when compared to the regular ...Video connection above.) 1 To begin, follow steps 1-3 in the previous section to connect the antenna or cable to your VCR and your TV. VCR Rear Panel TV Rear Panel 2 Connect an S-Video Cable between...
...- 11 S-Video Connection Your Samsung TV can be included with your VCR. (If not, check your local electronics store.) ➢ Each VCR has a different back panel configuration. ➢ When connecting a VCR, match the color of a VCR. (This connection delivers a better picture when compared to the regular ...Video connection above.) 1 To begin, follow steps 1-3 in the previous section to connect the antenna or cable to your VCR and your TV. VCR Rear Panel TV Rear Panel 2 Connect an S-Video Cable between...
User Manual (ENGLISH)
Page 13
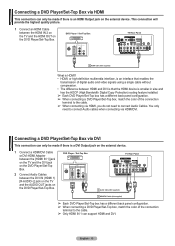
...Output jack on the external device. This connection will provide the highest quality picture. 1 Connect an HDMI Cable between the HDMI IN 2 on the TV and the HDMI OUT on the DVD Player/Set-Top Box. You only ...need to connect Audio Cables. DVD Player / Set-Top Box TV Rear Panel 1 HDMI Cable (Not supplied) What is HDMI? • HDMI, or high-definition multimedia ... device. 1 Connect a HDMI/DVI Cable or DVI-HDMI Adapter between the [HDMI IN 1] jack on the TV and the DVI jack on the DVD Player/Set-Top Box. 2 Connect Audio Cables between the DVI IN (HDMI 1) ...
...Output jack on the external device. This connection will provide the highest quality picture. 1 Connect an HDMI Cable between the HDMI IN 2 on the TV and the HDMI OUT on the DVD Player/Set-Top Box. You only ...need to connect Audio Cables. DVD Player / Set-Top Box TV Rear Panel 1 HDMI Cable (Not supplied) What is HDMI? • HDMI, or high-definition multimedia ... device. 1 Connect a HDMI/DVI Cable or DVI-HDMI Adapter between the [HDMI IN 1] jack on the TV and the DVI jack on the DVD Player/Set-Top Box. 2 Connect Audio Cables between the DVI IN (HDMI 1) ...
User Manual (ENGLISH)
Page 15
... ENTER button. ➢ The default selection is Home. ➢ We recommend setting the TV to Home mode for the best picture in your particular area. You can also use in your TV starts. is initially powered On, basic settings proceed automatically and subsequently: 1 Press the POWER... button on the TV. ➢ It may take a while when your particular area. To memorize ...
... ENTER button. ➢ The default selection is Home. ➢ We recommend setting the TV to Home mode for the best picture in your particular area. You can also use in your TV starts. is initially powered On, basic settings proceed automatically and subsequently: 1 Press the POWER... button on the TV. ➢ It may take a while when your particular area. To memorize ...

User Manual (ENGLISH)
Page 18
...Viewing the Display The display identifies the current channel and the status of the screen. 2 To turn mute off . The TV will appear in the lower-left side has five icons: Picture, Sound, Channel, Setup, Input. 2 Use the ▲ or ▼ button to select one minute until the on... Custom MTS : Stereo 12 : 00 am Viewing the Menus 1 With the power on the remote control. T V Picture Mode Contrast Brightness Sharpness Color Tint G 50 : Dynamic ► 100 45 75 55 R 50 ▼ More Move Enter Exit English - 18 Its left corner of certain audio-video settings. 1 Press the INFO ...
...Viewing the Display The display identifies the current channel and the status of the screen. 2 To turn mute off . The TV will appear in the lower-left side has five icons: Picture, Sound, Channel, Setup, Input. 2 Use the ▲ or ▼ button to select one minute until the on... Custom MTS : Stereo 12 : 00 am Viewing the Menus 1 With the power on the remote control. T V Picture Mode Contrast Brightness Sharpness Color Tint G 50 : Dynamic ► 100 45 75 55 R 50 ▼ More Move Enter Exit English - 18 Its left corner of certain audio-video settings. 1 Press the INFO ...
User Manual (ENGLISH)
Page 26
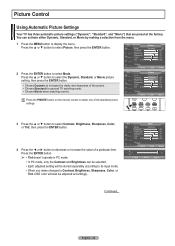
.... • Choose Dynamic to display the menu. Picture Control Using Automatic Picture Settings Your TV has three automatic picture settings ("Dynamic", "Standard", and "Movie") that are preset at the factory. T V Picture Mode Contrast Brightness Sharpness Color Tint G 50 : Dynamic ► 100 45 75 55 R 50 ▼ More Move Enter Return T V Picture Mode : DDyynnaammicic Contrast Standard 100 Brightness Movie...
.... • Choose Dynamic to display the menu. Picture Control Using Automatic Picture Settings Your TV has three automatic picture settings ("Dynamic", "Standard", and "Movie") that are preset at the factory. T V Picture Mode Contrast Brightness Sharpness Color Tint G 50 : Dynamic ► 100 45 75 55 R 50 ▼ More Move Enter Return T V Picture Mode : DDyynnaammicic Contrast Standard 100 Brightness Movie...
User Manual (ENGLISH)
Page 27
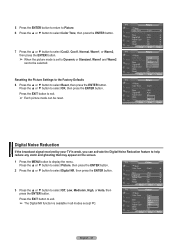
...16:9 Digital NR : Auto Active Color : On DNIe : OCnancle Reset : OK Move Enter Return Digital Noise Reduction If the broadcast signal received by your TV is available in all modes except PC. Press the EXIT button to exit. ➢ The Digital NR function is weak, you can be selected. 5... ENTER button. Press the ▲ or ▼ button to select Reset, then press the ENTER button. Press the ▲ or ▼ button to select Picture, then press the ENTER button. 2 Press the ▲ or ▼ button to select Digital NR, then press the ENTER button. 3 Press the ▲...
...16:9 Digital NR : Auto Active Color : On DNIe : OCnancle Reset : OK Move Enter Return Digital Noise Reduction If the broadcast signal received by your TV is available in all modes except PC. Press the EXIT button to exit. ➢ The Digital NR function is weak, you can be selected. 5... ENTER button. Press the ▲ or ▼ button to select Reset, then press the ENTER button. Press the ▲ or ▼ button to select Picture, then press the ENTER button. 2 Press the ▲ or ▼ button to select Digital NR, then press the ENTER button. 3 Press the ▲...
User Manual (ENGLISH)
Page 28
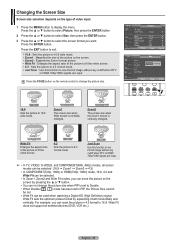
... button on the type of the picture to fit the entire screen. • 4:3 : Sets the picture to 4:3 normal mode. • Just Scan : Use this function to see the full image without any cutoff when DTV or HDMI 720p/1080i signals are input. ➢ • In TV, VIDEO, S-VIDEO, and COMPONENT...(480i, 480p) modes, all external devices (DVD, VCR etc.). Wide Fit Enlarges the aspect ratio of the picture on the screen by expanding it both horizontally and vertically. Press the EXIT button...
... button on the type of the picture to fit the entire screen. • 4:3 : Sets the picture to 4:3 normal mode. • Just Scan : Use this function to see the full image without any cutoff when DTV or HDMI 720p/1080i signals are input. ➢ • In TV, VIDEO, S-VIDEO, and COMPONENT...(480i, 480p) modes, all external devices (DVD, VCR etc.). Wide Fit Enlarges the aspect ratio of the picture on the screen by expanding it both horizontally and vertically. Press the EXIT button...
User Manual (ENGLISH)
Page 29
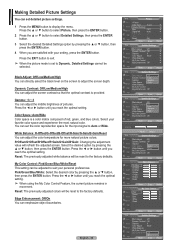
...Dynamic Contrast: Off/Low/Medium/High You can adjust the screen contrast so that the optimal contrast is a color matrix composed of pictures. Color Space: Auto/Wide Color space is provided. R-Offset/G-Offset/B-Offset/R-Gain/G-Gain/B-Gain: Changing the adjustment value will be adjusted ...will refresh the adjusted screen. My Color Control: Pink/Green/Blue/White/Reset This setting can be reset to the factory defaults. English - 29 T V Picture ▲ More Color Tone : Cool1 Detailed Settings Size : 16:9 Digital NR : Auto Active Color : On DNIe : On Reset : OK Move Enter...
...Dynamic Contrast: Off/Low/Medium/High You can adjust the screen contrast so that the optimal contrast is a color matrix composed of pictures. Color Space: Auto/Wide Color space is provided. R-Offset/G-Offset/B-Offset/R-Gain/G-Gain/B-Gain: Changing the adjustment value will be adjusted ...will refresh the adjusted screen. My Color Control: Pink/Green/Blue/White/Reset This setting can be reset to the factory defaults. English - 29 T V Picture ▲ More Color Tone : Cool1 Detailed Settings Size : 16:9 Digital NR : Auto Active Color : On DNIe : On Reset : OK Move Enter...
User Manual (ENGLISH)
Page 30
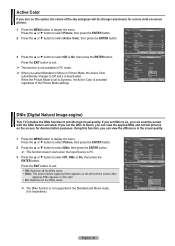
...DNIe : On Reset : OK Move Enter Return T V Picture ▲ More Color Tone : Cool1 Detailed Settings Size : 16:9 Digital NR : Auto Active Color : OOnff DNIe : OOnn Reset : OK Move Enter Return DNIe (Digital Natural Image engine) This TV includes the DNIe function to select Off, DNIe or On,... then press the ENTER button. Press the ▲ or ▼ button to select Picture, then press the ENTER button. 2 Press the ▲ or ▼...
...DNIe : On Reset : OK Move Enter Return T V Picture ▲ More Color Tone : Cool1 Detailed Settings Size : 16:9 Digital NR : Auto Active Color : OOnff DNIe : OOnn Reset : OK Move Enter Return DNIe (Digital Natural Image engine) This TV includes the DNIe function to select Off, DNIe or On,... then press the ENTER button. Press the ▲ or ▼ button to select Picture, then press the ENTER button. 2 Press the ▲ or ▼...
User Manual (ENGLISH)
Page 31
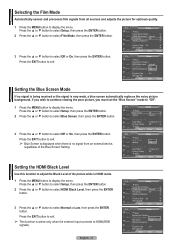
... On PIP Function Help : On SW Upgrade Move Enter Return Setting the Blue Screen Mode If no signal from all sources and adjusts the picture for optimum quality. 1 Press the MENU button to HDMI(RGB signals). English - 31 T V Setup ▲ More Screen Burn Protection ...T V Setup ▲ More Blue Screen Melody : Off ► : Medium ► PC ► Home Theater PC : Off ► Light Effect : In Watching TV ► Energy Saving : Off ► ▼ More Move Enter Return T V Setup ▲ More Blue Screen Melody : OOfff : MOendium PC Home Theater PC ...
... On PIP Function Help : On SW Upgrade Move Enter Return Setting the Blue Screen Mode If no signal from all sources and adjusts the picture for optimum quality. 1 Press the MENU button to HDMI(RGB signals). English - 31 T V Setup ▲ More Screen Burn Protection ...T V Setup ▲ More Blue Screen Melody : Off ► : Medium ► PC ► Home Theater PC : Off ► Light Effect : In Watching TV ► Energy Saving : Off ► ▼ More Move Enter Return T V Setup ▲ More Blue Screen Melody : OOfff : MOendium PC Home Theater PC ...
User Manual (ENGLISH)
Page 32
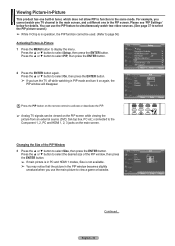
...viewed on the main screen. You can be used. (Refer to page 56) Activating Picture-in-Picture 1 Press the MENU button to function in PIP mode and turn it on the remote control to activate or deactivate the PIP. ➢ Analog TV signals can use the PIP feature to simultaneously watch one... TV channel in the main screen, and a different one built-in tuner, which does not ...
...viewed on the main screen. You can be used. (Refer to page 56) Activating Picture-in-Picture 1 Press the MENU button to function in PIP mode and turn it on the remote control to activate or deactivate the PIP. ➢ Analog TV signals can use the PIP feature to simultaneously watch one... TV channel in the main screen, and a different one built-in tuner, which does not ...
User Manual (ENGLISH)
Page 33
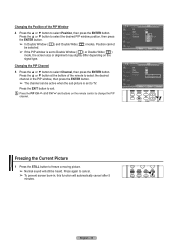
...Return T V PIP Size Position Channel PIP : On : : : DTDVTAVirA3▲ ▲ir- 30 - 0 Move Enter Return Freezing the Current Picture 1 Press the STILL button to freeze a moving picture. ➢ Normal sound will automatically cancel after 5 minutes. Press the ▲ or ▼ button at the bottom of the PIP Window 4...To prevent screen burn-in the PIP window, then press the ENTER button. ➢ The channel can be active when the sub picture is set to TV. English - 33 Changing the Position of the remote to select the desired channel in , this function will still be selected. ...
...Return T V PIP Size Position Channel PIP : On : : : DTDVTAVirA3▲ ▲ir- 30 - 0 Move Enter Return Freezing the Current Picture 1 Press the STILL button to freeze a moving picture. ➢ Normal sound will automatically cancel after 5 minutes. Press the ▲ or ▼ button at the bottom of the PIP Window 4...To prevent screen burn-in the PIP window, then press the ENTER button. ➢ The channel can be active when the sub picture is set to TV. English - 33 Changing the Position of the remote to select the desired channel in , this function will still be selected. ...
User Manual (ENGLISH)
Page 37
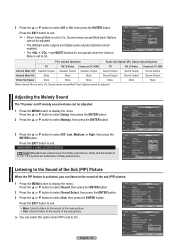
... ▲ More Blue Screen : OOffff Melody : MLeodwium PC Medium Home Theater PC : OHffigh Light Effect : In Watching TV Energy Saving : Off ▼ More Move Enter Return Listening to the Sound of the Sub (PIP) Picture When the PIP feature is set to On, Sound menus except Multi-track Options cannot be adjusted...
... ▲ More Blue Screen : OOffff Melody : MLeodwium PC Medium Home Theater PC : OHffigh Light Effect : In Watching TV Energy Saving : Off ▼ More Move Enter Return Listening to the Sound of the Sub (PIP) Picture When the PIP feature is set to On, Sound menus except Multi-track Options cannot be adjusted...
User Manual (ENGLISH)
Page 42
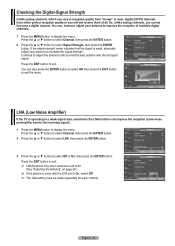
...the antenna until you find the best position with the LNA set to Air. (See "Selecting the Antenna" on page 38) ➢ If the picture is noisy with the strongest signal. T V Channel Antenna : Air Auto Program Clear Scrambled Channel Channel List Name Fine Tune Signal Strength LNA : ...On Move Enter Return T V Signal Strength OK Enter Return LNA (Low Noise Amplifier) If the TV is weak, physically adjust your antenna to improve the reception of available digital channels. 1 Press the MENU button to display the menu. So, ...
...the antenna until you find the best position with the LNA set to Air. (See "Selecting the Antenna" on page 38) ➢ If the picture is noisy with the strongest signal. T V Channel Antenna : Air Auto Program Clear Scrambled Channel Channel List Name Fine Tune Signal Strength LNA : ...On Move Enter Return T V Signal Strength OK Enter Return LNA (Low Noise Amplifier) If the TV is weak, physically adjust your antenna to improve the reception of available digital channels. 1 Press the MENU button to display the menu. So, ...
User Manual (ENGLISH)
Page 44
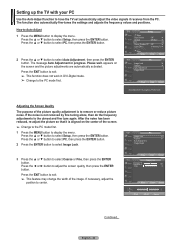
... the center of the screen. ➢ Change to the PC mode first. 1 Press the MENU button to remove or reduce picture noise. Setting up the TV with your PC Use the Auto Adjust function to select Auto Adjustment, then press the ENTER button. Press the ▲ or ...; Auto Adjustment Image Reset Move Enter Return T V Image Lock Coarse 50 Fine 0 Move Enter Return Coarse Move Adjust 50 Return Continued... The message Auto Adjustment in progress. After the noise has been reduced, re-adjust the picture so that it receives from the PC. Please wait. Press the &#...
... the center of the screen. ➢ Change to the PC mode first. 1 Press the MENU button to remove or reduce picture noise. Setting up the TV with your PC Use the Auto Adjust function to select Auto Adjustment, then press the ENTER button. Press the ▲ or ...; Auto Adjustment Image Reset Move Enter Return T V Image Lock Coarse 50 Fine 0 Move Enter Return Coarse Move Adjust 50 Return Continued... The message Auto Adjustment in progress. After the noise has been reduced, re-adjust the picture so that it receives from the PC. Please wait. Press the &#...


