
User Manual (ENGLISH)
Page 6
... on the remote control. ¨ CH Press to see an on-screen menu of the Panel The buttons on the lower-right panel control your TV's features. ˇ + VOL - Power Indicator Blinks and turns off . To use the more advanced features, you would use the + VOL - ...confirm a selection. Ø POWER Press to increase or decrease the volume. The product color and shape may vary depending on the model. Œ SOURCE Toggles between all the available input sources (TV, AV1, AV2, S-Video1, S-Video2, Component1, Component2, PC, HDMI1, or HDMI2). ´ MENU Press to change channels. ...
... on the remote control. ¨ CH Press to see an on-screen menu of the Panel The buttons on the lower-right panel control your TV's features. ˇ + VOL - Power Indicator Blinks and turns off . To use the more advanced features, you would use the + VOL - ...confirm a selection. Ø POWER Press to increase or decrease the volume. The product color and shape may vary depending on the model. Œ SOURCE Toggles between all the available input sources (TV, AV1, AV2, S-Video1, S-Video2, Component1, Component2, PC, HDMI1, or HDMI2). ´ MENU Press to change channels. ...
User Manual (ENGLISH)
Page 7
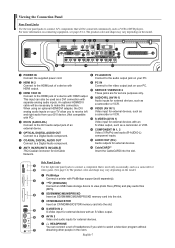
...on your PC. ´ HDMI IN 2 ' PC IN Connect to the HDMI jack of a device with Connect to the video output jack on the model. Œ POWER IN Connect the supplied power cord. " PC AUDIO IN Connect to the audio output jack on your PC. component inputs. Ø ...; AV IN 2 Video and audio inputs for external devices. ∏ HEADPHONE You can also be used only occasionally, such as and right audio from your TV allow you wish to a Digital Audio component. external device. Ú COMPONENT IN 1, 2 ˆ OPTICAL DIGITAL AUDIO OUT Video (Y/PB/PR) and audio (R-...
...on your PC. ´ HDMI IN 2 ' PC IN Connect to the HDMI jack of a device with Connect to the video output jack on the model. Œ POWER IN Connect the supplied power cord. " PC AUDIO IN Connect to the audio output jack on your PC. component inputs. Ø ...; AV IN 2 Video and audio inputs for external devices. ∏ HEADPHONE You can also be used only occasionally, such as and right audio from your TV allow you wish to a Digital Audio component. external device. Ú COMPONENT IN 1, 2 ˆ OPTICAL DIGITAL AUDIO OUT Video (Y/PB/PR) and audio (R-...

User Manual (ENGLISH)
Page 65
Zoom function information icon (Displayed at the top left of the image might be cut and may not be printed depending on your printer model. ➢ The printed image may be printed. Turn your printer's power on the remote control. ➢ Note that you have installed. (Refer to... Do you can send photo images from the memory device directly to the printer with PictBridge support (sold separately) between the PictBridge jack on the TV and the USB jack on the printer. 3. Icon Current OSD Zoom (x 2) Zoom (x 3) Zoom (x 4) Zoom (x 1) Function Zoom-in to display the option (Slide...
Zoom function information icon (Displayed at the top left of the image might be cut and may not be printed depending on your printer model. ➢ The printed image may be printed. Turn your printer's power on the remote control. ➢ Note that you have installed. (Refer to... Do you can send photo images from the memory device directly to the printer with PictBridge support (sold separately) between the PictBridge jack on the TV and the USB jack on the printer. 3. Icon Current OSD Zoom (x 2) Zoom (x 3) Zoom (x 4) Zoom (x 1) Function Zoom-in to display the option (Slide...
User Manual (ENGLISH)
Page 71
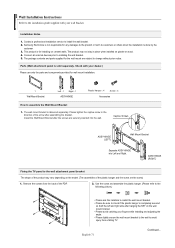
Connect all external devices prior to install the wall bracket. 2. Remove the screws from a falling TV. Installation Notes 1. The product may vary depending on the model. (The assemblies of the arrow after assembling the bracket. Install the Wall Mount Bracket after hanging the SET on ... hanger is for the wall mount are the same) 1. Wall Installation Instructions Refer to the installation guide supplied with your wall bracket. Samsung Electronics is done by the customer. 3. Check with your dealer.) Please use only the parts and components provided for any damages to...
Connect all external devices prior to install the wall bracket. 2. Remove the screws from a falling TV. Installation Notes 1. The product may vary depending on the model. (The assemblies of the arrow after assembling the bracket. Install the Wall Mount Bracket after hanging the SET on ... hanger is for the wall mount are the same) 1. Wall Installation Instructions Refer to the installation guide supplied with your wall bracket. Samsung Electronics is done by the customer. 3. Check with your dealer.) Please use only the parts and components provided for any damages to...
User Manual (ENGLISH)
Page 73
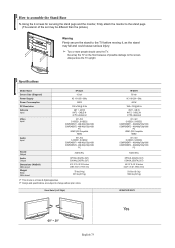
... fall and could cause serious injury. ➢ Two or more people should carry the TV. Always store the TV upright. AIR IN ANT 2 - AIR IN ANT 2 - Stand Swivel (Left / Right) -20° ~ 20° English-73 HP-S5073 50 inch AC 110-120V~ 60Hz 480 W 1360 x 768 @ 60 Hz ANT 1 - CABLE IN 75... the floor because of the set may be different than the picture.) Warning Firmly secure the stand to the screen. Specifications Model Name Screen Size (Diagonal) Power Supply Power Consumption PC Resolution Antenna Input Video Input Audio Input HP-S4273 42 inch AC 110-120V~ 60Hz 380 W ...
... fall and could cause serious injury. ➢ Two or more people should carry the TV. Always store the TV upright. AIR IN ANT 2 - AIR IN ANT 2 - Stand Swivel (Left / Right) -20° ~ 20° English-73 HP-S5073 50 inch AC 110-120V~ 60Hz 480 W 1360 x 768 @ 60 Hz ANT 1 - CABLE IN 75... the floor because of the set may be different than the picture.) Warning Firmly secure the stand to the screen. Specifications Model Name Screen Size (Diagonal) Power Supply Power Consumption PC Resolution Antenna Input Video Input Audio Input HP-S4273 42 inch AC 110-120V~ 60Hz 380 W ...


