User Manual (ENGLISH)
Page 4
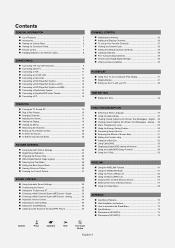
Analog ... 49 Menu Transparency Level 50 Using the Energy Saving Feature 50 Preventing Screen Burn-in 51 Reducing the Effects of Screen Burn 51 Setting the Function Help 52 Setting the Blue Eye 52 Using CableCARD ... Instructions 71 How to the Sound of Features 5 Accessories 5 Viewing the Control Panel 6 Viewing the Connection Panel 7 Remote Control 8 Installing Batteries in the Remote Control 9 CONNECTIONS Connecting VHF and UHF Antennas 9 Connecting Cable TV 10 Connecting a VCR 11 Connecting an S-VHS VCR 11 Connecting a Camcorder 12 Connecting a DVD Player/Set-Top Box...
Analog ... 49 Menu Transparency Level 50 Using the Energy Saving Feature 50 Preventing Screen Burn-in 51 Reducing the Effects of Screen Burn 51 Setting the Function Help 52 Setting the Blue Eye 52 Using CableCARD ... Instructions 71 How to the Sound of Features 5 Accessories 5 Viewing the Control Panel 6 Viewing the Connection Panel 7 Remote Control 8 Installing Batteries in the Remote Control 9 CONNECTIONS Connecting VHF and UHF Antennas 9 Connecting Cable TV 10 Connecting a VCR 11 Connecting an S-VHS VCR 11 Connecting a Camcorder 12 Connecting a DVD Player/Set-Top Box...
User Manual (ENGLISH)
Page 5
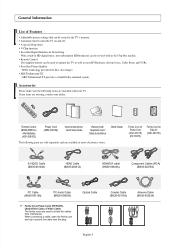
... / Registration Card / Safety Guide Manual The following items are used to operate the TV as well as most electronics stores. Remote Control The supplied remote can be used to turn the TV on and off. Accessories Please make sure the following parts are sold separately and are... missing, contact your TV. When connecting a cable, open the ferrite core and clip it around...
... / Registration Card / Safety Guide Manual The following items are used to operate the TV as well as most electronics stores. Remote Control The supplied remote can be used to turn the TV on and off. Accessories Please make sure the following parts are sold separately and are... missing, contact your TV. When connecting a cable, open the ferrite core and clip it around...

User Manual (ENGLISH)
Page 6
... towards this spot on and off when the power is on the remote control. ¨ CH Press to see an on-screen menu of the Panel The buttons on the lower-right panel control your TV's features. ˇ + VOL - To use the more advanced features, you would use the + ...VOL - Press to turn the TV on the TV. ∏ Speakers English-6 and † buttons on the remote control. ˆ (ENTER) Press to confirm a selection. Ø...
... towards this spot on and off when the power is on the remote control. ¨ CH Press to see an on-screen menu of the Panel The buttons on the lower-right panel control your TV's features. ˇ + VOL - To use the more advanced features, you would use the + ...VOL - Press to turn the TV on the TV. ∏ Speakers English-6 and † buttons on the remote control. ˆ (ENTER) Press to confirm a selection. Ø...
User Manual (ENGLISH)
Page 8
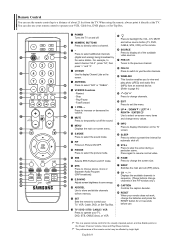
...® STILL Press to select on-screen menu items and change menu values. - Remote Control You can also use the remote control up to operate your TV, DVD, STB, CABLE (box), or VCR. ➢ This is a special remote control for the visually impaired person, and has Braille points on the Power, Channel, ...198; E.SAVING Adjusts screen brightness to save energy. ı ADD/DEL Use to store and delete channels to/from memory. ˜ SET Sets the remote to control your TV, VCR, Cable, DVD, or Set-Top Box. ∑ P.SIZE Press to change the screen size. µ SWAP Switches the main and sub ...
...® STILL Press to select on-screen menu items and change menu values. - Remote Control You can also use the remote control up to operate your TV, DVD, STB, CABLE (box), or VCR. ➢ This is a special remote control for the visually impaired person, and has Braille points on the Power, Channel, ...198; E.SAVING Adjusts screen brightness to save energy. ı ADD/DEL Use to store and delete channels to/from memory. ˜ SET Sets the remote to control your TV, VCR, Cable, DVD, or Set-Top Box. ∑ P.SIZE Press to change the screen size. µ SWAP Switches the main and sub ...
User Manual (ENGLISH)
Page 9
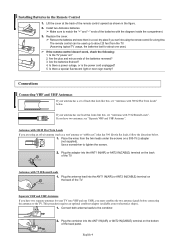
... lead that looks like this , see "Separate VHF and UHF Antennas". Are the plus and minus ends of the TV. If you won't be used up to about one year.) ➢ If the remote control doesn't work, check the following: 1. Plug the antenna lead into the ANT1 IN(AIR) or ANT2 IN...
... lead that looks like this , see "Separate VHF and UHF Antennas". Are the plus and minus ends of the TV. If you won't be used up to about one year.) ➢ If the remote control doesn't work, check the following: 1. Plug the antenna lead into the ANT1 IN(AIR) or ANT2 IN...

User Manual (ENGLISH)
Page 15
...; The default selection is "Home". ➢ We recommend setting the TV to Dynamic (Home) mode. 3. Operation Turning the TV On and Off Press the POWER button on the remote control. Press the POWER button on the remote control. Press the ENTER button, then "Select Home Mode when installing ...this TV at Start home." To memorize the channels, press the ... Menu Language...
...; The default selection is "Home". ➢ We recommend setting the TV to Dynamic (Home) mode. 3. Operation Turning the TV On and Off Press the POWER button on the remote control. Press the POWER button on the remote control. Press the ENTER button, then "Select Home Mode when installing ...this TV at Start home." To memorize the channels, press the ... Menu Language...

User Manual (ENGLISH)
Page 16
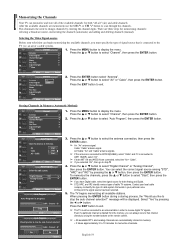
Air : 9 , Cable : 5. The TV will automatically disappear after several seconds. is displayed, then go to set the month, day, year, hour and minute directly by pressing the ... Move Adjust ... begin memorizing all the available channels are stored, the Auto program menu reappears. When you select "Auto", "Set to the appropriate time zone on the remote control. 8. Month ... -- † Hour -- "Select the time zone in progress. Press the ... English-16 Press the œ or √ button to move the highlight to...
Air : 9 , Cable : 5. The TV will automatically disappear after several seconds. is displayed, then go to set the month, day, year, hour and minute directly by pressing the ... Move Adjust ... begin memorizing all the available channels are stored, the Auto program menu reappears. When you select "Auto", "Set to the appropriate time zone on the remote control. 8. Month ... -- † Hour -- "Select the time zone in progress. Press the ... English-16 Press the œ or √ button to move the highlight to...
User Manual (ENGLISH)
Page 18
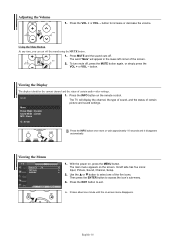
...takes about one of certain audio-video settings. English-18 Press MUTE and the sound cuts off the sound using the MUTE button. 1. The TV will appear in the lower-left side has five icons: Input, Picture, Sound, Channel, Setup. 2. Then press the ENTER button to increase..., or simply press the VOL + or VOL - Viewing the Menus TV Input Source List : TV Edit Name WISELINK Move Enter √ √ √ Return 1. Press the EXIT button to select one minute until the on the remote control. Press the INFO button on -screen menu disappears. button. Adjusting...
...takes about one of certain audio-video settings. English-18 Press MUTE and the sound cuts off the sound using the MUTE button. 1. The TV will appear in the lower-left side has five icons: Input, Picture, Sound, Channel, Setup. 2. Then press the ENTER button to increase..., or simply press the VOL + or VOL - Viewing the Menus TV Input Source List : TV Edit Name WISELINK Move Enter √ √ √ Return 1. Press the EXIT button to select one minute until the on the remote control. Press the INFO button on -screen menu disappears. button. Adjusting...
User Manual (ENGLISH)
Page 19
... can select the correct signal source among "STD", "HRC" and "IRC" by pressing the ... Memorizing the Channels Your TV can always tune to that channel directly by using the number buttons on the remote control. ➢ • All available DTV and analog channels are automatically stored in memory. • It takes approximately...
... can select the correct signal source among "STD", "HRC" and "IRC" by pressing the ... Memorizing the Channels Your TV can always tune to that channel directly by using the number buttons on the remote control. ➢ • All available DTV and analog channels are automatically stored in memory. • It takes approximately...

User Manual (ENGLISH)
Page 20
.... Press the POWER button on the remote control. Setting Up the Remote to Operate Your VCR 1. Press the SET button on your TV's remote control. 4. Press the VCR button on your TV's remote control. 3. Your VCR should turn on Using Remote Control Modes: Cable Box When your remote control is in "VCR" mode, ..., Cable, DVD, or Set-Top Box. If your cable box does not turn on if your TV's volume. Press the POWER button on the remote control. Turn off your TV's remote control. 4. Note on after set-up, repeat steps 2, 3 and 4, but try each code, 000 through 080. Make sure ...
.... Press the POWER button on the remote control. Setting Up the Remote to Operate Your VCR 1. Press the SET button on your TV's remote control. 4. Press the VCR button on your TV's remote control. 3. Your VCR should turn on Using Remote Control Modes: Cable Box When your remote control is in "VCR" mode, ..., Cable, DVD, or Set-Top Box. If your cable box does not turn on if your TV's volume. Press the POWER button on the remote control. Turn off your TV's remote control. 4. Note on after set-up, repeat steps 2, 3 and 4, but try each code, 000 through 080. Make sure ...

User Manual (ENGLISH)
Page 21
... (If more than one code is listed, try the first one .) 5. Turn off your TV's remote control. 4. If your STB does not turn on your TV's remote control. 3. Press the SET button on if your remote is set -up correctly. Make sure you enter three digits of the other codes listed for ...your TV's volume. Press the DVD button on your DVD. 2. Turn off your TV's volume. Press the SET ...
... (If more than one code is listed, try the first one .) 5. Turn off your TV's remote control. 4. If your STB does not turn on your TV's remote control. 3. Press the SET button on if your remote is set -up correctly. Make sure you enter three digits of the other codes listed for ...your TV's volume. Press the DVD button on your DVD. 2. Turn off your TV's volume. Press the SET ...

User Manual (ENGLISH)
Page 25
... Return Press the SOURCE button on and connected via HDMI. ➢ You can only be selected when the external device is turned on the remote control to the TV. To Edit the Input Source Name Name the device connected to the input jacks to select "Input". √ Press the ... Move Enter Return...
... Return Press the SOURCE button on and connected via HDMI. ➢ You can only be selected when the external device is turned on the remote control to the TV. To Edit the Input Source Name Name the device connected to the input jacks to select "Input". √ Press the ... Move Enter Return...

User Manual (ENGLISH)
Page 26
... button. Press the P.MODE button on the remote control to decrease or increase the value of the standard picture settings. TV Mode Mode Contrast Brightness Sharpness Color Tint G 50 Color Tone Reset : Dynamic 100 45 75 55 R 50 : Cool1 Move Enter Return Contrast 100 3.... select "Contrast", "Brightness", "Sharpness", "Color", or "Tint", then press the ENTER button. 4. Picture Control Using Automatic Picture Settings Your TV has four automatic picture settings ("Dynamic", "Standard", "Movie", and "Custom") that are preset at the factory. Choose Movie when watching movies....
... button. Press the P.MODE button on the remote control to decrease or increase the value of the standard picture settings. TV Mode Mode Contrast Brightness Sharpness Color Tint G 50 Color Tone Reset : Dynamic 100 45 75 55 R 50 : Cool1 Move Enter Return Contrast 100 3.... select "Contrast", "Brightness", "Sharpness", "Color", or "Tint", then press the ENTER button. 4. Picture Control Using Automatic Picture Settings Your TV has four automatic picture settings ("Dynamic", "Standard", "Movie", and "Custom") that are preset at the factory. Choose Movie when watching movies....
User Manual (ENGLISH)
Page 28
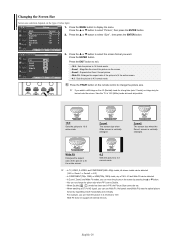
or † button to display the menu. Move Enter TV Size 16:9 Zoom1 Zoom2 Wide Fit 4:3 Move Enter Return Return 3. Press the ... Press the P.SIZE button on the remote control to change the picture size when PIP is set to Double. • When Double ( , ) mode has been set . ... fit the entire screen. 4:3 Sets the picture to 16:9. Press the ... Horizontal zoom(Wide Fit) sets the optical picture format by pressing the ... English-28 TV Mode Size Digital NR DNIe Film Mode Blue Screen PIP Picture : Dynamic √ : 16:9 √ : On √ : On √ : Off √...
or † button to display the menu. Move Enter TV Size 16:9 Zoom1 Zoom2 Wide Fit 4:3 Move Enter Return Return 3. Press the ... Press the P.SIZE button on the remote control to change the picture size when PIP is set to Double. • When Double ( , ) mode has been set . ... fit the entire screen. 4:3 Sets the picture to 16:9. Press the ... Horizontal zoom(Wide Fit) sets the optical picture format by pressing the ... English-28 TV Mode Size Digital NR DNIe Film Mode Blue Screen PIP Picture : Dynamic √ : 16:9 √ : On √ : On √ : Off √...

User Manual (ENGLISH)
Page 30
... † button to function in the same mode. You can serve different source selections based on the remote control to select the PIP picture sound.) ➢ While V-Chip is set to simultaneously watch one TV channel in the main screen, and a different one built-in tuner, which does not allow PIP to...
... † button to function in the same mode. You can serve different source selections based on the remote control to select the PIP picture sound.) ➢ While V-Chip is set to simultaneously watch one TV channel in the main screen, and a different one built-in tuner, which does not allow PIP to...

User Manual (ENGLISH)
Page 31
...PIP Window TV PIP Source Swap Size Position Channel PIP : On : TV : : : DTV Air 3 - 0 5. Move Enter Return Changing the PIP Channel TV PIP Source Swap Size Position Channel PIP : On : TV : : ▲ : DTVDDTTVVAAiirr33--00 - 0 ▲ Move Enter Return 7. or † button at the bottom of the remote to select...10146; If main picture is in PC mode, Swap is not available. √ √ Move Enter Return Press the SWAP button on the remote control to exit. or † button to select "Swap", then press the ENTER button. √ The image in the PIP window will ...
...PIP Window TV PIP Source Swap Size Position Channel PIP : On : TV : : : DTV Air 3 - 0 5. Move Enter Return Changing the PIP Channel TV PIP Source Swap Size Position Channel PIP : On : TV : : ▲ : DTVDDTTVVAAiirr33--00 - 0 ▲ Move Enter Return 7. or † button at the bottom of the remote to select...10146; If main picture is in PC mode, Swap is not available. √ √ Move Enter Return Press the SWAP button on the remote control to exit. or † button to select "Swap", then press the ENTER button. √ The image in the PIP window will ...

User Manual (ENGLISH)
Page 32
...... Multi-Track Options √ Auto Volume : Off √ Internal Mute : Off √ † More Move Enter Return TV Equalizer R+ + 3. TV Sound Resetting the Equalizer Settings to display the menu. Move Enter Return ➢ The equalizer resets to increase or decrease the level ..."Sound", then press the ENTER button. 2. or † button to display the menu. Press the ... Press the S.MODE button on the remote control to page 47) : On √ : Main √ 1. Press the ... More Melody Sound Select Reset To operate the Reset function,...
...... Multi-Track Options √ Auto Volume : Off √ Internal Mute : Off √ † More Move Enter Return TV Equalizer R+ + 3. TV Sound Resetting the Equalizer Settings to display the menu. Move Enter Return ➢ The equalizer resets to increase or decrease the level ..."Sound", then press the ENTER button. 2. or † button to display the menu. Press the ... Press the S.MODE button on the remote control to page 47) : On √ : Main √ 1. Press the ... More Melody Sound Select Reset To operate the Reset function,...

User Manual (ENGLISH)
Page 33
...: OOfff On : Off : Off 1. Move Enter Return Press the SRS button on the remote control to select "Sound", then press the ENTER button. 2. Digital The digital-TV transmission system is capable of simultaneous transmission of many audio tracks (for example, simultaneous translations of..." depends upon the program. The availability of playing 5.1 multichannel content over two speakers. Press the MTS button on the remote control to exit. TruSurround delivers a compelling, virtual surround sound experience through any two-speaker playback system, including internal television ...
...: OOfff On : Off : Off 1. Move Enter Return Press the SRS button on the remote control to select "Sound", then press the ENTER button. 2. Digital The digital-TV transmission system is capable of simultaneous transmission of many audio tracks (for example, simultaneous translations of..." depends upon the program. The availability of playing 5.1 multichannel content over two speakers. Press the MTS button on the remote control to exit. TruSurround delivers a compelling, virtual surround sound experience through any two-speaker playback system, including internal television ...

User Manual (ENGLISH)
Page 34
... receiving a stereo signal. • Choose Stereo for channels that are broadcasting in volume level among broadcasters. Move Enter Return TV Sound 3. or † button to display the menu. Automatic Volume Control Reduces the difference in stereo. Move Enter Return ..."Off" or "On", then press the ENTER button. Analog Depending on the remote control to Mono, Stereo or SAP. Press the ... Move Enter Return TV Multi-Track Options Preferred Language : English 3. TV Sound Mode : Custom √ Equalizer √ SRS TruSurround XT : Off ...
... receiving a stereo signal. • Choose Stereo for channels that are broadcasting in volume level among broadcasters. Move Enter Return TV Sound 3. or † button to display the menu. Automatic Volume Control Reduces the difference in stereo. Move Enter Return ..."Off" or "On", then press the ENTER button. Analog Depending on the remote control to Mono, Stereo or SAP. Press the ... Move Enter Return TV Multi-Track Options Preferred Language : English 3. TV Sound Mode : Custom √ Equalizer √ SRS TruSurround XT : Off ...

User Manual (ENGLISH)
Page 36
... the ENTER button. √ √ 2. or † button to select "Channel Manager", then press the √ ENTER button. √ √ Move Enter Return TV Channel Manager All √ Added √ Favorite √ Default List Mode : All √ 3. or † button to select "Channel", then press the ENTER button...IN(AIR) and ANT2 IN(CABLE) are connected, select the antenna input you want . Move Enter Return Press the ANTENNA button on the remote control to select Air or Cable. ➢ If the antenna is connected to ANT1 IN(AIR), select "Air" and if it is ...
... the ENTER button. √ √ 2. or † button to select "Channel Manager", then press the √ ENTER button. √ √ Move Enter Return TV Channel Manager All √ Added √ Favorite √ Default List Mode : All √ 3. or † button to select "Channel", then press the ENTER button...IN(AIR) and ANT2 IN(CABLE) are connected, select the antenna input you want . Move Enter Return Press the ANTENNA button on the remote control to select Air or Cable. ➢ If the antenna is connected to ANT1 IN(AIR), select "Air" and if it is ...


