User Manual (ENGLISH)
Page 4
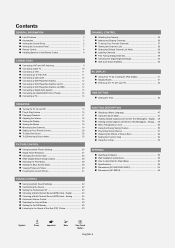
Analog ... 49 Menu Transparency Level 50 Using the Energy Saving Feature 50 Preventing Screen Burn-in -Picture 30 Freezing...Connection Panel 7 Remote Control 8 Installing Batteries in the Remote Control 9 CONNECTIONS Connecting VHF and UHF Antennas 9 Connecting Cable TV 10 Connecting a VCR 11 Connecting an S-VHS VCR 11 Connecting a Camcorder 12 Connecting a DVD Player/Set-Top Box... Channels 39 Checking the Digital-Signal Strength 40 LNA (Low Noise Amplifier 40 PC DISPLAY Using Your TV as a Computer (PC) Display 41 Display Modes 41 Setting up the TV with your PC 42 TIME ...
Analog ... 49 Menu Transparency Level 50 Using the Energy Saving Feature 50 Preventing Screen Burn-in -Picture 30 Freezing...Connection Panel 7 Remote Control 8 Installing Batteries in the Remote Control 9 CONNECTIONS Connecting VHF and UHF Antennas 9 Connecting Cable TV 10 Connecting a VCR 11 Connecting an S-VHS VCR 11 Connecting a Camcorder 12 Connecting a DVD Player/Set-Top Box... Channels 39 Checking the Digital-Signal Strength 40 LNA (Low Noise Amplifier 40 PC DISPLAY Using Your TV as a Computer (PC) Display 41 Display Modes 41 Setting up the TV with your PC 42 TIME ...
User Manual (ENGLISH)
Page 9
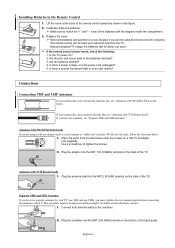
...there a special fluorescent light or neon sign nearby? Place the wires from the TV. (Assuming typical TV usage, the batteries last for about one UHF), you must combine the two antenna signals before connecting the antennas to the TV. Use a screwdriver to the combiner. The remote control can be using an... off-air antenna (such as shown in the figure. 2. Are the plus and minus ends of the TV. ANT 1 IN (CALBE) Antennas ...
...there a special fluorescent light or neon sign nearby? Place the wires from the TV. (Assuming typical TV usage, the batteries last for about one UHF), you must combine the two antenna signals before connecting the antennas to the TV. Use a screwdriver to the combiner. The remote control can be using an... off-air antenna (such as shown in the figure. 2. Are the plus and minus ends of the TV. ANT 1 IN (CALBE) Antennas ...
User Manual (ENGLISH)
Page 11
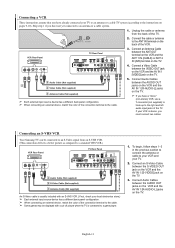
... Cable between the VIDEO OUT jack on the VCR and the AV IN 1 [VIDEO] jack on the TV. 3. If your local electronics store.) ➢ Each external input source device has a different back panel configuration... is connected to the cable. 1. Connecting an S-VHS VCR Your Samsung TV can be connected to an S-Video signal from the back of the TV. English-11 Connect an S-Video Cable between the AUDIO OUT jacks... on the VCR and the AV IN 1 [R-AUDIO-L] jacks on the TV. 4. To...
... Cable between the VIDEO OUT jack on the VCR and the AV IN 1 [VIDEO] jack on the TV. 3. If your local electronics store.) ➢ Each external input source device has a different back panel configuration... is connected to the cable. 1. Connecting an S-VHS VCR Your Samsung TV can be connected to an S-Video signal from the back of the TV. English-11 Connect an S-Video Cable between the AUDIO OUT jacks... on the VCR and the AV IN 1 [R-AUDIO-L] jacks on the TV. 4. To...
User Manual (ENGLISH)
Page 13
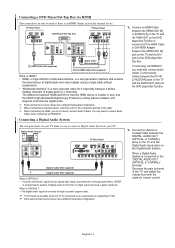
... 5.1CH. ➢ Each external input source device has a different back panel configuration. 1. What is COAXIAL:? • The digital audio signal is received through glass fibers. When a Digital Audio System is a next-generation interface that uses a glass conductor. You only need to connect...it through a coaxial copper cable. ➢ 5.1CH audio is possible when the TV is an HDMI Output jack on your TV. S/PDIF is OPTICAL? • Converts the electric signal into an optical light signal, and transmits it easy to connect a Digital Audio System to the cable. &#...
... 5.1CH. ➢ Each external input source device has a different back panel configuration. 1. What is COAXIAL:? • The digital audio signal is received through glass fibers. When a Digital Audio System is a next-generation interface that uses a glass conductor. You only need to connect...it through a coaxial copper cable. ➢ 5.1CH audio is possible when the TV is an HDMI Output jack on your TV. S/PDIF is OPTICAL? • Converts the electric signal into an optical light signal, and transmits it easy to connect a Digital Audio System to the cable. &#...

User Manual (ENGLISH)
Page 14
... match the color of the connection terminal to the cable. 1. Internal Speakers Audio Out (Optical, Coaxial, L/R Out) TV AV, S-Video Component, PC, HDMI TV AV, S-Video Component, PC, HDMI Internal Mute Off Speaker Output Speaker Output Speaker Output Sound Output Sound Output Sound Output ...Internal Mute On Mute Mute Mute Sound Output Sound Output Sound Output Video No Signal Mute Mute Mute Mute Mute Mute...
... match the color of the connection terminal to the cable. 1. Internal Speakers Audio Out (Optical, Coaxial, L/R Out) TV AV, S-Video Component, PC, HDMI TV AV, S-Video Component, PC, HDMI Internal Mute Off Speaker Output Speaker Output Speaker Output Sound Output Sound Output Sound Output ...Internal Mute On Mute Mute Mute Sound Output Sound Output Sound Output Video No Signal Mute Mute Mute Mute Mute Mute...
User Manual (ENGLISH)
Page 15
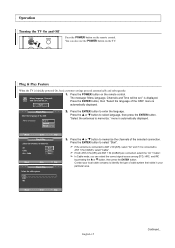
... and ANT 1 IN (CABLE) are connected, select the "Air + Cable". ➢ In Cable mode, you can also use the POWER button on the TV. Move Enter Skip English-15 Continued... i Menu language, Channels and Time will be set ." "Select the antennas to memorize the channels of the OSD" menu.... is initially powered On, basic customer settings proceed automatically and subsequently: 1. or † button to memorize. You can select the correct signal source among STD, HRC, and IRC by pressing the ... Plug & Play Select the language of cable system that exists in your local ...
... and ANT 1 IN (CABLE) are connected, select the "Air + Cable". ➢ In Cable mode, you can also use the POWER button on the TV. Move Enter Skip English-15 Continued... i Menu language, Channels and Time will be set ." "Select the antennas to memorize the channels of the OSD" menu.... is initially powered On, basic customer settings proceed automatically and subsequently: 1. or † button to memorize. You can select the correct signal source among STD, HRC, and IRC by pressing the ... Plug & Play Select the language of cable system that exists in your local ...
User Manual (ENGLISH)
Page 17
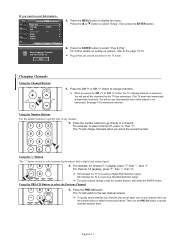
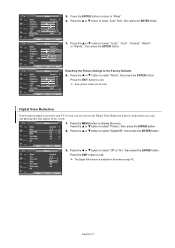
... to select the Previous Channel 1. Press the ENTER button to quickly alternate between two channels that broadcast both a digital and analog signal. 1. For further details on setting up options, refer to select stations that are far apart, tune to one channel, then ... 7-2 (analog), press "7", then "-", then "2". ➢ HD indicates the TV is receiving a Standard Definition signal. ➢ For quick channel change channels when you press the second number. SD indicates the TV is receiving a Digital High Definition signal. Using the PRE-CH Button to select the second channel. The...
... to select the Previous Channel 1. Press the ENTER button to quickly alternate between two channels that broadcast both a digital and analog signal. 1. For further details on setting up options, refer to select stations that are far apart, tune to one channel, then ... 7-2 (analog), press "7", then "-", then "2". ➢ HD indicates the TV is receiving a Standard Definition signal. ➢ For quick channel change channels when you press the second number. SD indicates the TV is receiving a Digital High Definition signal. Using the PRE-CH Button to select the second channel. The...
User Manual (ENGLISH)
Page 19
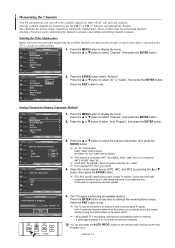
... select "Auto Program", then press the ENTER button. 3. Press the ... Press the EXIT button to exit. ➢ The TV must specify the type of signal source that exists in order to identify the type of the available channels for memorizing channels: selecting a broadcast source, memorizing the channels... channel is deleted from the memory, you must be connected to an antenna in your local cable company to receive digital TV signals. You can begin memorizing the available channels, you can memorize and store all available stations. Press the ... Cable: "Cable" antenna...
... select "Auto Program", then press the ENTER button. 3. Press the ... Press the EXIT button to exit. ➢ The TV must specify the type of signal source that exists in order to identify the type of the available channels for memorizing channels: selecting a broadcast source, memorizing the channels... channel is deleted from the memory, you must be connected to an antenna in your local cable company to receive digital TV signals. You can begin memorizing the available channels, you can memorize and store all available stations. Press the ... Cable: "Cable" antenna...

User Manual (ENGLISH)
Page 25
Press the ENTER button to select signal source, then press the ENTER button. or † button to select "Source List". TV Input Source List : TV Edit Name 1. Press the EXIT button to the TV. Move Enter Return TV Edit Name † AV1 AV2 S-Video1 S-Video2 Component1 † More : : AV ...those external devices that are connected to exit. Press the MENU button to display the menu. √ Press the ENTER button to view an external signal source. Press the MENU button to display the menu. √ Press the ENTER button to select "AV1", "AV2", "S-Video1", "S-Video2", "...
Press the ENTER button to select signal source, then press the ENTER button. or † button to select "Source List". TV Input Source List : TV Edit Name 1. Press the EXIT button to the TV. Move Enter Return TV Edit Name † AV1 AV2 S-Video1 S-Video2 Component1 † More : : AV ...those external devices that are connected to exit. Press the MENU button to display the menu. √ Press the ENTER button to view an external signal source. Press the MENU button to display the menu. √ Press the ENTER button to select "AV1", "AV2", "S-Video1", "S-Video2", "...
User Manual (ENGLISH)
Page 27
... Dynamic √ 100 45 75 55 R 50 : Cool1 √ 6. or † button to select "Cool2", "Cool1", "Normal", "Warm1", or "Warm2", then press the ENTER button. Move Enter Return Digital Noise Reduction If the broadcast signal received by your TV is available in all modes except PC. Press...button to select "Off" or "On", then press the ENTER button. TV Mode 5. Move Enter Return TV Mode Mode Contrast Brightness Sharpness Color Tint G 50 Color Tone Reset : Dynamic 100 Cool2 45 Cool1 75 Normal55 Warm1R 50 : Warm2 7. or † button to select "Reset", then press the...
... Dynamic √ 100 45 75 55 R 50 : Cool1 √ 6. or † button to select "Cool2", "Cool1", "Normal", "Warm1", or "Warm2", then press the ENTER button. Move Enter Return Digital Noise Reduction If the broadcast signal received by your TV is available in all modes except PC. Press...button to select "Off" or "On", then press the ENTER button. TV Mode 5. Move Enter Return TV Mode Mode Contrast Brightness Sharpness Color Tint G 50 Color Tone Reset : Dynamic 100 Cool2 45 Cool1 75 Normal55 Warm1R 50 : Warm2 7. or † button to select "Reset", then press the...

User Manual (ENGLISH)
Page 29
...Blue Screen PIP Picture : Dynamic √ : 16:9 √ : On √ : On √ : Off √ : Off √ 1. Move Enter Return TV Picture 3. Mode Size Digital NR DNIe Film Mode Blue Screen PIP : Dynamic : 16:9 : On : On : OOfff : OOfnf Press the EXIT button to select "Blue...Move Enter Return English-29 or † button to display the menu. Move Enter Return Setting the Blue Screen Mode If no signal from all sources and adjusts the picture for demonstration purposes. Press the MENU button to select "Picture", then press the ENTER button. ...
...Blue Screen PIP Picture : Dynamic √ : 16:9 √ : On √ : On √ : Off √ : Off √ 1. Move Enter Return TV Picture 3. Mode Size Digital NR DNIe Film Mode Blue Screen PIP : Dynamic : 16:9 : On : On : OOfff : OOfnf Press the EXIT button to select "Blue...Move Enter Return English-29 or † button to display the menu. Move Enter Return Setting the Blue Screen Mode If no signal from all sources and adjusts the picture for demonstration purposes. Press the MENU button to select "Picture", then press the ENTER button. ...
User Manual (ENGLISH)
Page 30
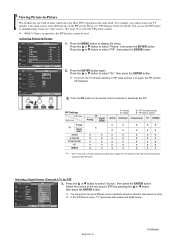
...and does not allow PIP to display the menu. TV PIP Source Swap Size Position Channel PIP : OTnV : TAAVVV12 S-Video1 : S-Video2 : Component1 : DCToVmApior n3e-n0t2 HDMI1 HDMI2 3. Press the MENU button to function in the same mode. Selecting a Signal Source (External A/V) for details. Viewing Picture-in...-Picture This product has one built-in tuner, which does not allow you cannot watch one TV channel in the main screen, and a different one in the PIP ...
...and does not allow PIP to display the menu. TV PIP Source Swap Size Position Channel PIP : OTnV : TAAVVV12 S-Video1 : S-Video2 : Component1 : DCToVmApior n3e-n0t2 HDMI1 HDMI2 3. Press the MENU button to function in the same mode. Selecting a Signal Source (External A/V) for details. Viewing Picture-in...-Picture This product has one built-in tuner, which does not allow you cannot watch one TV channel in the main screen, and a different one in the PIP ...

User Manual (ENGLISH)
Page 34
... "Multi-Track Options", then press the ENTER button. or † button to select "Sound", then press the ENTER button. 2. Move Enter Return TV Multi-Track Options Preferred Language : English 3. or † button to exit. Automatic Volume Control Reduces the difference in stereo. Press the ... Press the... the ENTER button. 2. Press the MTS buttons on the particular program being broadcast, you are having difficulty receiving a stereo signal. • Choose Stereo for channels that are broadcasting in volume level among broadcasters. or † button to Mono, Stereo or SAP...
... "Multi-Track Options", then press the ENTER button. or † button to select "Sound", then press the ENTER button. 2. Move Enter Return TV Multi-Track Options Preferred Language : English 3. or † button to exit. Automatic Volume Control Reduces the difference in stereo. Press the ... Press the... the ENTER button. 2. Press the MTS buttons on the particular program being broadcast, you are having difficulty receiving a stereo signal. • Choose Stereo for channels that are broadcasting in volume level among broadcasters. or † button to Mono, Stereo or SAP...

User Manual (ENGLISH)
Page 36
... button to return. If the antenna input is connected to display the channels you want only. Press the ... TV Channel Antenna : Air Auto Program Channel Manager Name Fine Tune Signal Strength † More 1. or † button to select "Channel Manager", then press the √ ENTER ... . or † button to select "Added", then press the ENTER button. Channel Control Selecting the Antenna TV Channel Antenna Auto Program Channel Manager Name Fine Tune Signal Strength † More : Air Cable 1. Press the ENTER button to exit. Press the ... Press the ...
... button to return. If the antenna input is connected to display the channels you want only. Press the ... TV Channel Antenna : Air Auto Program Channel Manager Name Fine Tune Signal Strength † More 1. or † button to select "Channel Manager", then press the √ ENTER ... . or † button to select "Added", then press the ENTER button. Channel Control Selecting the Antenna TV Channel Antenna Auto Program Channel Manager Name Fine Tune Signal Strength † More : Air Cable 1. Press the ENTER button to exit. Press the ... Press the ...

User Manual (ENGLISH)
Page 37
... ENTER button. or † button to display the next channel list page. 5. or † button to add the channel. TV Channel Antenna : Air Auto Program Channel Manager Name Fine Tune Signal Strength † More 1. Press the ... Air 2 Air 2 Air 3 Air 4 Air 5 Air 6 Air 7 Air ...Delete All Return 4. Press the buttons to select "Channel Manager", then press the ENTER button. √ √ √ Move Enter Return TV Channel Manager All √ Added √ Favorite √ Default List mode : All √ 3. Press the ... To select the favorite channels...
... ENTER button. or † button to display the next channel list page. 5. or † button to add the channel. TV Channel Antenna : Air Auto Program Channel Manager Name Fine Tune Signal Strength † More 1. Press the ... Air 2 Air 2 Air 3 Air 4 Air 5 Air 6 Air 7 Air ...Delete All Return 4. Press the buttons to select "Channel Manager", then press the ENTER button. √ √ √ Move Enter Return TV Channel Manager All √ Added √ Favorite √ Default List mode : All √ 3. Press the ... To select the favorite channels...

User Manual (ENGLISH)
Page 38
...or favorite channels, use the red (P.MODE) button on the remote control. To toggle between your favorite channels. TV Channel Antenna : Air Auto Program Channel Manager Name Fine Tune Signal Strength † More 1. MGR button. Press the MENU button to bring up the Channel Lists. Press the...the CH. Press the CH MGR button on the remote control to display the menu. √ Press the ... TV Channel Antenna : Air Auto Program Channel Manager Name Fine Tune Signal Strength † More 1. or † button to select "All", "Added" or "Favorite", then press the...
...or favorite channels, use the red (P.MODE) button on the remote control. To toggle between your favorite channels. TV Channel Antenna : Air Auto Program Channel Manager Name Fine Tune Signal Strength † More 1. MGR button. Press the MENU button to bring up the Channel Lists. Press the...the CH. Press the CH MGR button on the remote control to display the menu. √ Press the ... TV Channel Antenna : Air Auto Program Channel Manager Name Fine Tune Signal Strength † More 1. or † button to select "All", "Added" or "Favorite", then press the...

User Manual (ENGLISH)
Page 39
... † button to select "Channel", then press the ENTER button. √ Press the ... Labeling Channels TV Channel Antenna : Air Auto Program Channel Manager Name Fine Tune Signal Strength † More 1. or † button to select "Reset", then press the ENTER button. or ... menu. √ Press the ... Press the œ or √ button to assign the new name. TV Channel Antenna : Air Auto Program Channel Manager Name Fine Tune Signal Strength † More 1. To store the fine tuning setting in this sequence: A...Z, 0...9 blank). When you ...
... † button to select "Channel", then press the ENTER button. √ Press the ... Labeling Channels TV Channel Antenna : Air Auto Program Channel Manager Name Fine Tune Signal Strength † More 1. or † button to select "Reset", then press the ENTER button. or ... menu. √ Press the ... Press the œ or √ button to assign the new name. TV Channel Antenna : Air Auto Program Channel Manager Name Fine Tune Signal Strength † More 1. To store the fine tuning setting in this sequence: A...Z, 0...9 blank). When you ...
User Manual (ENGLISH)
Page 40
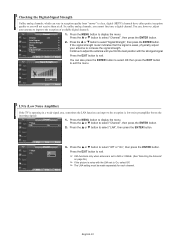
... have either perfect reception quality or you cannot fine tune a digital channel. OK Enter Return LNA (Low Noise Amplifier) If the TV is noisy with the strongest signal. Press the MENU button to select "Channel", then press the ENTER button. √ 2. Press the ... or † button...OK then press the EXIT button to select "Channel", then press the ENTER button. √ √ 2. TV Channel Antenna : Air Auto Program Channel Manager Name Fine Tune Signal Strength † More 1. Move Enter Return English-40 So, unlike analog channels, you will not receive them ...
... have either perfect reception quality or you cannot fine tune a digital channel. OK Enter Return LNA (Low Noise Amplifier) If the TV is noisy with the strongest signal. Press the MENU button to select "Channel", then press the ENTER button. √ 2. Press the ... or † button...OK then press the EXIT button to select "Channel", then press the ENTER button. √ √ 2. TV Channel Antenna : Air Auto Program Channel Manager Name Fine Tune Signal Strength † More 1. Move Enter Return English-40 So, unlike analog channels, you will not receive them ...
User Manual (ENGLISH)
Page 41
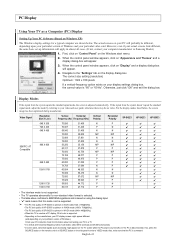
... x 768@60Hz). • The PC text quality of SP-S4223 is optimum in almost all cases. (If not, contact your computer manufacturer or Samsung Dealer.) 1. For the display modes listed below . English-41 The actual screens on your PC will appear. 3. When the control panel window appears,... display dialog-box. Navigate to enter a VIDEO mode. Display Modes If the signal from the system doesn't equal the standard signal mode, adjust the mode by referring to your videocard user guide; PC Display Using Your TV as a Computer (PC) Display Setting Up Your PC Software (Based on Windows...
... x 768@60Hz). • The PC text quality of SP-S4223 is optimum in almost all cases. (If not, contact your computer manufacturer or Samsung Dealer.) 1. For the display modes listed below . English-41 The actual screens on your PC will appear. 3. When the control panel window appears,... display dialog-box. Navigate to enter a VIDEO mode. Display Modes If the signal from the system doesn't equal the standard signal mode, adjust the mode by referring to your videocard user guide; PC Display Using Your TV as a Computer (PC) Display Setting Up Your PC Software (Based on Windows...
User Manual (ENGLISH)
Page 42
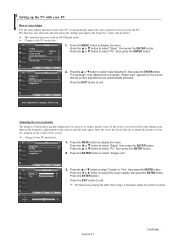
...MENU button to exit. Press the ENTER button to adjust the screen quality, then press the ENTER button. Move Enter Return TV Coarse Fine Image Lock 50 0 3. Press the ENTER button. TV Setup ... Press the ... Press the ... The message "Auto Adjustment in progress. After the noise has been reduced, re... picture quality adjustment is to remove or reduce picture noise. Setting up the TV with your PC How to Auto Adjust Use the Auto Adjust function to have the TV set automatically adjust the video signals it is not removed by fine tuning alone, then do the frequency adjustments ...
...MENU button to exit. Press the ENTER button to adjust the screen quality, then press the ENTER button. Move Enter Return TV Coarse Fine Image Lock 50 0 3. Press the ENTER button. TV Setup ... Press the ... Press the ... The message "Auto Adjustment in progress. After the noise has been reduced, re... picture quality adjustment is to remove or reduce picture noise. Setting up the TV with your PC How to Auto Adjust Use the Auto Adjust function to have the TV set automatically adjust the video signals it is not removed by fine tuning alone, then do the frequency adjustments ...


