User Manual (ENGLISH)
Page 4
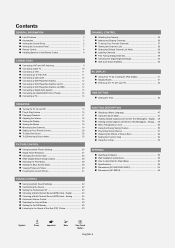
...Screen Text Messages) - Digital 33 Choosing a Multi-Channel Sound (MTS) track - Analog ... 49 Menu Transparency Level 50 Using the Energy Saving Feature 50 Preventing Screen Burn-in 51 Reducing the Effects of Screen Burn 52 Setting the Function Help 52 Using the V-Chip ... Sound of Features 5 Accessories 5 Viewing the Control Panel 6 Viewing the Connection Panel 7 Remote Control 8 Installing Batteries in the Remote Control 9 CONNECTIONS Connecting VHF and UHF Antennas 9 Connecting Cable TV 10 Connecting a VCR 11 Connecting an S-VHS VCR 11 Connecting a Camcorder 12 Connecting a...
...Screen Text Messages) - Digital 33 Choosing a Multi-Channel Sound (MTS) track - Analog ... 49 Menu Transparency Level 50 Using the Energy Saving Feature 50 Preventing Screen Burn-in 51 Reducing the Effects of Screen Burn 52 Setting the Function Help 52 Using the V-Chip ... Sound of Features 5 Accessories 5 Viewing the Control Panel 6 Viewing the Connection Panel 7 Remote Control 8 Installing Batteries in the Remote Control 9 CONNECTIONS Connecting VHF and UHF Antennas 9 Connecting Cable TV 10 Connecting a VCR 11 Connecting an S-VHS VCR 11 Connecting a Camcorder 12 Connecting a...

User Manual (ENGLISH)
Page 5
.../Video Cable, S-Video Cable) The ferrite cores are included with no Set-Top Box needed. Remote Control The supplied remote can be used to turn the TV on and off. SRS TruSurround XT provides a virtual Dolby surround system. Remote Control (BN59-00511A) / AAA Batteries (4301-000103) Power Cord (3903-000144) Owner's Instructions / Quick Setup...
.../Video Cable, S-Video Cable) The ferrite cores are included with no Set-Top Box needed. Remote Control The supplied remote can be used to turn the TV on and off. SRS TruSurround XT provides a virtual Dolby surround system. Remote Control (BN59-00511A) / AAA Batteries (4301-000103) Power Cord (3903-000144) Owner's Instructions / Quick Setup...

User Manual (ENGLISH)
Page 6
... menu, use the CH buttons as you would use the + VOL - Press to turn the TV on and off when the power is on -screen menu, use the œ and √ buttons on the remote control. ¨ CH Press to see an on-screen menu of the Panel The buttons on...to confirm a selection. Ø POWER Press to increase or decrease the volume. Remote Control Sensor Aim the remote control towards this spot on the TV. ∏ Speakers English-6 Viewing the Control Panel Buttons on the Lower-Right Part of your TV's basic features, including the on-screen menu. buttons as you would use the...
... menu, use the CH buttons as you would use the + VOL - Press to turn the TV on and off when the power is on -screen menu, use the œ and √ buttons on the remote control. ¨ CH Press to see an on-screen menu of the Panel The buttons on...to confirm a selection. Ø POWER Press to increase or decrease the volume. Remote Control Sensor Aim the remote control towards this spot on the TV. ∏ Speakers English-6 Viewing the Control Panel Buttons on the Lower-Right Part of your TV's basic features, including the on-screen menu. buttons as you would use the...
User Manual (ENGLISH)
Page 8
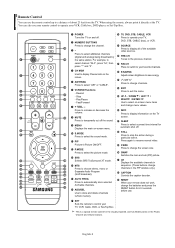
...change the batteries and press the RESET button for 2-3 seconds before use. ˜ SET Sets the remote to control your TV, VCR, Cable, DVD, or Set-Top Box. ➢ This is a special remote control for automatic shut off. ÷ STILL Press to stop the action during a particular scene. Press...preset time interval for the visually impaired, and has Braille points on the Power, Channel and Volume buttons. When using the remote, always point it directly at the TV. Play/Pause - Press to select additional channels (digital and analog) being broadcast by the same station. INFO Press to ...
...change the batteries and press the RESET button for 2-3 seconds before use. ˜ SET Sets the remote to control your TV, VCR, Cable, DVD, or Set-Top Box. ➢ This is a special remote control for automatic shut off. ÷ STILL Press to stop the action during a particular scene. Press...preset time interval for the visually impaired, and has Braille points on the Power, Channel and Volume buttons. When using the remote, always point it directly at the TV. Play/Pause - Press to select additional channels (digital and analog) being broadcast by the same station. INFO Press to ...
User Manual (ENGLISH)
Page 9
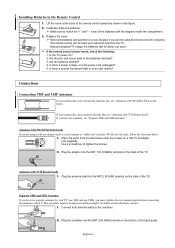
...panel. This procedure requires an optional combiner-adaptor (available at the back of the TV. Replace the cover. ➢ Remove the batteries and store them in a cool, dry place if you are using the remote control for about 23 feet from the twin leads under the screws on the ...VHF and UHF Antennas If your antenna has one year.) ➢ If the remote control doesn't work, check the following: 1. ANT 1 IN (CALBE) Antennas with 75 Ω Round Leads". Place the wires from the TV. (Assuming typical TV usage, the batteries last for a long time. Plug the antenna lead into ...
...panel. This procedure requires an optional combiner-adaptor (available at the back of the TV. Replace the cover. ➢ Remove the batteries and store them in a cool, dry place if you are using the remote control for about 23 feet from the twin leads under the screws on the ...VHF and UHF Antennas If your antenna has one year.) ➢ If the remote control doesn't work, check the following: 1. ANT 1 IN (CALBE) Antennas with 75 Ω Round Leads". Place the wires from the TV. (Assuming typical TV usage, the batteries last for a long time. Plug the antenna lead into ...
User Manual (ENGLISH)
Page 15
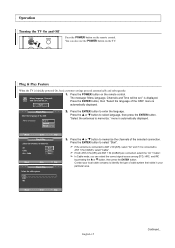
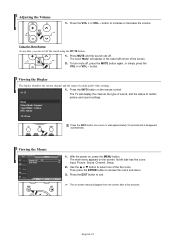
...) are connected, select the "Air + Cable". ➢ In Cable mode, you can also use the POWER button on the TV. Operation Turning the TV On and Off Press the POWER button on the remote control. menu is initially powered On, basic customer settings proceed automatically and subsequently: 1. Move Enter Skip English-15 Continued...
...) are connected, select the "Air + Cable". ➢ In Cable mode, you can also use the POWER button on the TV. Operation Turning the TV On and Off Press the POWER button on the remote control. menu is initially powered On, basic customer settings proceed automatically and subsequently: 1. Move Enter Skip English-15 Continued...

User Manual (ENGLISH)
Page 16
... Setting the Clock Automatically Plug & Play Set to daylight savings time." If not, see page 44 to the appropriate time zone on the remote control. 7. "Set current date and time." is displayed. ➢ If you want by pressing the number buttons on the map of...Stop selected. 5. "Clock Mode" menu is completed. 14 Channels were memorized. When you live . Plug & Play Auto Program in progress. The TV will automatically disappear after several seconds. Month ... -- † Hour Day -Minute Year ---am /pm". Daylight Savings Time : No Yes 8. or &#...
... Setting the Clock Automatically Plug & Play Set to daylight savings time." If not, see page 44 to the appropriate time zone on the remote control. 7. "Set current date and time." is displayed. ➢ If you want by pressing the number buttons on the map of...Stop selected. 5. "Clock Mode" menu is completed. 14 Channels were memorized. When you live . Plug & Play Auto Program in progress. The TV will automatically disappear after several seconds. Month ... -- † Hour Day -Minute Year ---am /pm". Daylight Savings Time : No Yes 8. or &#...
User Manual (ENGLISH)
Page 18
... simply press the VOL + or VOL - Its left corner of certain picture and sound settings. or † button to exit. ➢ The on the remote control. Using the Mute Button At any time, you can cut off the sound using the MUTE button. 1. The word "Mute" will display the channel... the screen. 2. Viewing the Display The display identifies the current channel and the status of the five icons. Air 28 1. Viewing the Menus TV Input Source List : TV Edit Name Move Enter √ √ Return 1. With the power on the screen. Use the ... Then press the ENTER button to increase...
... simply press the VOL + or VOL - Its left corner of certain picture and sound settings. or † button to exit. ➢ The on the remote control. Using the Mute Button At any time, you can cut off the sound using the MUTE button. 1. The word "Mute" will display the channel... the screen. 2. Viewing the Display The display identifies the current channel and the status of the five icons. Air 28 1. Viewing the Menus TV Input Source List : TV Edit Name Move Enter √ √ Return 1. With the power on the screen. Use the ... Then press the ENTER button to increase...
User Manual (ENGLISH)
Page 19
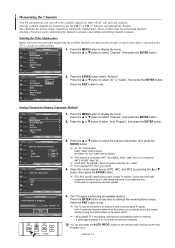
... √ Press the ... Press the EXIT button to scan through the channels. TV Channel Antenna : Air Auto Program Channel Manager Name Fine Tune Signal Strength † More 1. button on the remote control. ➢ • All available DTV and analog channels are three steps for... both ANT 1 IN and ANT 2 IN are memorized, use the CH or CH button to exit. Memorizing the Channels Your TV can also press the AUTO ...
... √ Press the ... Press the EXIT button to scan through the channels. TV Channel Antenna : Air Auto Program Channel Manager Name Fine Tune Signal Strength † More 1. button on the remote control. ➢ • All available DTV and analog channels are three steps for... both ANT 1 IN and ANT 2 IN are memorized, use the CH or CH button to exit. Memorizing the Channels Your TV can also press the AUTO ...
User Manual (ENGLISH)
Page 20
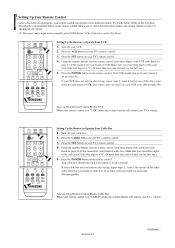
...try one .) 5. If no other codes listed for your brand of cable box. Press the POWER button on the remote control. Press the CABLE button on your TV's remote control. 3. Pressing the corresponding button on page 22 of this manual for your brand of cable box. Make sure ... and 4, but try each VCR code, 000 through 046. Press the VCR button on your TV's remote control. 3. Press the SET button on your TV's remote control. 4. Setting Up Your Remote Control After it has been set up properly, your remote control can operate in "VCR" mode, the volume buttons still control your...
...try one .) 5. If no other codes listed for your brand of cable box. Press the POWER button on the remote control. Press the CABLE button on your TV's remote control. 3. Pressing the corresponding button on page 22 of this manual for your brand of cable box. Make sure ... and 4, but try each VCR code, 000 through 046. Press the VCR button on your TV's remote control. 3. Press the SET button on your TV's remote control. 4. Setting Up Your Remote Control After it has been set up properly, your remote control can operate in "VCR" mode, the volume buttons still control your...
User Manual (ENGLISH)
Page 21
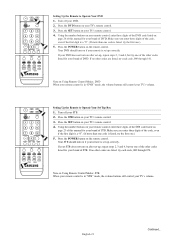
..., the volume buttons still control your brand of this manual for your remote is in "DVD" mode, the volume buttons still control your TV's remote control. 4. If your STB does not turn on Using Remote Control Modes: STB When your remote control is listed, try one .) 5. Note on if your brand ... DVD. 2. If your DVD does not turn on your STB. 2. Setting Up the Remote to Operate Your Set Top Box 1. Press the STB button on your TV's remote control. 3. Press the DVD button on your TV's remote control. 3. Make sure you enter three digits of the code, even if the first...
..., the volume buttons still control your brand of this manual for your remote is in "DVD" mode, the volume buttons still control your TV's remote control. 4. If your STB does not turn on Using Remote Control Modes: STB When your remote control is listed, try one .) 5. Note on if your brand ... DVD. 2. If your DVD does not turn on your STB. 2. Setting Up the Remote to Operate Your Set Top Box 1. Press the STB button on your TV's remote control. 3. Press the DVD button on your TV's remote control. 3. Make sure you enter three digits of the code, even if the first...

User Manual (ENGLISH)
Page 25
...TV. TV Input Source List : TV... Combo", "PC", "VOD STB", or "TV" input source, then press the ENTER button....Move Enter Return TV Edit Name AV1...TV Edit Name † AV1 AV2 ...TV Move Enter Return English-25 Press the ... Move Enter Return TV Source List TV...TV. To Select the Source Use to select TV or other external input sources connected to select "Input". √ 2. TV Input Source List : TV... button. √ √ √ √ Move Enter Return TV Edit Name AV1 AV2 S-Video1 S-Video2 Component1 † More : ...TV's rear panel and AV2 or S-Video2 on the TV...
...TV. TV Input Source List : TV... Combo", "PC", "VOD STB", or "TV" input source, then press the ENTER button....Move Enter Return TV Edit Name AV1...TV Edit Name † AV1 AV2 ...TV Move Enter Return English-25 Press the ... Move Enter Return TV Source List TV...TV. To Select the Source Use to select TV or other external input sources connected to select "Input". √ 2. TV Input Source List : TV... button. √ √ √ √ Move Enter Return TV Edit Name AV1 AV2 S-Video1 S-Video2 Component1 † More : ...TV's rear panel and AV2 or S-Video2 on the TV...
User Manual (ENGLISH)
Page 26
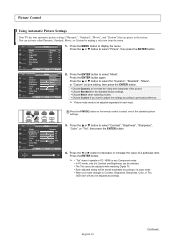
... to decrease or increase the value of a particular item. Mode Contrast Brightness Sharpness Color Tint G 50 Color Tone Reset Move : DDyynnaammiicc Standa1rd00 Movie 45 Custom75 55 R 50 : Cool1 Enter Return Press the ENTER button again. Press the ... Press the œ or ...√ : On √ : Off √ : Off √ 1. Move Enter Return TV Mode 2. Choose Dynamic to select one of the picture. Press the P.MODE button on the remote control to increase the clarity and sharpness of the standard picture settings. Picture Control Using Automatic Picture ...
... to decrease or increase the value of a particular item. Mode Contrast Brightness Sharpness Color Tint G 50 Color Tone Reset Move : DDyynnaammiicc Standa1rd00 Movie 45 Custom75 55 R 50 : Cool1 Enter Return Press the ENTER button again. Press the ... Press the œ or ...√ : On √ : Off √ : Off √ 1. Move Enter Return TV Mode 2. Choose Dynamic to select one of the picture. Press the P.MODE button on the remote control to increase the clarity and sharpness of the standard picture settings. Picture Control Using Automatic Picture ...
User Manual (ENGLISH)
Page 28
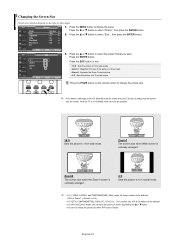
...) modes, only 16:9 & 4:3 modes can be burned onto the screen. Changing the Screen Size Screen size selection depends on screen by pressing the ... Press the ... TV Mode Size Digital NR DNIe Film Mode Blue Screen PIP Picture : Dynamic √ : 16:9 √ : On √ : On √ : Off √ ...4:3 Move Enter Return Return 3. or † button to change the picture size when PIP is vertically enlarged. Press the P.SIZE button on the remote control to select the screen format you can not change the picture size. ➢ If you watch a still image or the 4:3 (Normal) ...
...) modes, only 16:9 & 4:3 modes can be burned onto the screen. Changing the Screen Size Screen size selection depends on screen by pressing the ... Press the ... TV Mode Size Digital NR DNIe Film Mode Blue Screen PIP Picture : Dynamic √ : 16:9 √ : On √ : On √ : Off √ ...4:3 Move Enter Return Return 3. or † button to change the picture size when PIP is vertically enlarged. Press the P.SIZE button on the remote control to select the screen format you can not change the picture size. ➢ If you watch a still image or the 4:3 (Normal) ...
User Manual (ENGLISH)
Page 30
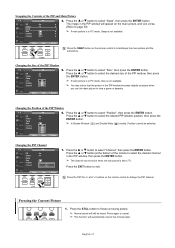
...main picture is in -Picture TV Mode Size Digital NR DNIe Film Mode Blue Screen PIP Picture : Dynamic √ : 16:9 √ : On √ : On √ : Off √ : Off √ 1. Move Enter Return Press the PIP button on the remote control to select "Source", ...then press the ENTER button. Move Enter TV PIP Source Swap Size Position Channel PIP : OOffff : TOVn : : : Air 3 Return 2. or † button to . ➢ ...
...main picture is in -Picture TV Mode Size Digital NR DNIe Film Mode Blue Screen PIP Picture : Dynamic √ : 16:9 √ : On √ : On √ : Off √ : Off √ 1. Move Enter Return Press the PIP button on the remote control to select "Source", ...then press the ENTER button. Move Enter TV PIP Source Swap Size Position Channel PIP : OOffff : TOVn : : : Air 3 Return 2. or † button to . ➢ ...
User Manual (ENGLISH)
Page 31
...Normal sound will automatically cancel five minutes later. Press the ... Freezing the Current Picture 1. or † button at the bottom of the remote to select the desired channel in the PIP window becomes slightly unnatural when you use the main picture to view a game or karaoke. Press ... Return Press the SWAP button on the remote control to TV. Swapping the Contents of the PIP Window TV PIP Source Swap Size Position Channel PIP : On : TV : : : Air 3 5. Changing the Size of the PIP and Main Picture TV PIP Source Swap Size Position Channel PIP : On : TV : : : Air 3 4. Move...
...Normal sound will automatically cancel five minutes later. Press the ... Freezing the Current Picture 1. or † button at the bottom of the remote to select the desired channel in the PIP window becomes slightly unnatural when you use the main picture to view a game or karaoke. Press ... Return Press the SWAP button on the remote control to TV. Swapping the Contents of the PIP Window TV PIP Source Swap Size Position Channel PIP : On : TV : : : Air 3 5. Changing the Size of the PIP and Main Picture TV PIP Source Swap Size Position Channel PIP : On : TV : : : Air 3 4. Move...

User Manual (ENGLISH)
Page 32
... the ENTER button. Press the ... Press the EXIT button to exit. Press the EXIT button to exit. Press the S.MODE button on the remote control to exit. ➢ • L/R Sound Balance Adjustment: To adjust the sound balance of the L/R speakers. • Bandwidth Adjustment (...adjust the level of the standard sound settings. Press the ... Press the ... English-32 Press the ENTER button to display the menu. TV Sound Mode Equalizer SRS TruSurround XT Multi-Track Options Auto Volume Internal Mute † More : CSutsatnodmard Music : OMffovie Speech : OCfufstom : ...
... the ENTER button. Press the ... Press the EXIT button to exit. Press the EXIT button to exit. Press the S.MODE button on the remote control to exit. ➢ • L/R Sound Balance Adjustment: To adjust the sound balance of the L/R speakers. • Bandwidth Adjustment (...adjust the level of the standard sound settings. Press the ... Press the ... English-32 Press the ENTER button to display the menu. TV Sound Mode Equalizer SRS TruSurround XT Multi-Track Options Auto Volume Internal Mute † More : CSutsatnodmard Music : OMffovie Speech : OCfufstom : ...

User Manual (ENGLISH)
Page 33
...Press the EXIT button to select "Sound", then press the ENTER button. or † button to exit. Move Enter Return TV Multi-Track Options 2. or † button to exit. English-33 Press the EXIT button to select "SRS TruSurround XT", then...(for example, simultaneous translations of playing 5.1 multichannel content over two speakers. Press the ... Press the MTS button on the remote control to select "Preferred Language". TruSurround delivers a compelling, virtual surround sound experience through any two-speaker playback system, including ...
...Press the EXIT button to select "Sound", then press the ENTER button. or † button to exit. Move Enter Return TV Multi-Track Options 2. or † button to exit. English-33 Press the EXIT button to select "SRS TruSurround XT", then...(for example, simultaneous translations of playing 5.1 multichannel content over two speakers. Press the ... Press the MTS button on the remote control to select "Preferred Language". TruSurround delivers a compelling, virtual surround sound experience through any two-speaker playback system, including ...

User Manual (ENGLISH)
Page 34
.... or † button to select "Multi-Track Options", then press the ENTER button. Choosing a Multi-Channel Sound (MTS) track - Multi-Track Sound TV Sound Mode : Custom √ Equalizer √ SRS TruSurround XT : Off √ Multi-Track Options √ Auto Volume : Off √ Internal...√ Multi-Track Options √ Auto Volume : Off √ Internal Mute : Off √ † More 1. Analog Depending on the remote control to select "Off" or "On", then press the ENTER button. Press the MENU button to Mono, Stereo or SAP. Press the MENU ...
.... or † button to select "Multi-Track Options", then press the ENTER button. Choosing a Multi-Channel Sound (MTS) track - Multi-Track Sound TV Sound Mode : Custom √ Equalizer √ SRS TruSurround XT : Off √ Multi-Track Options √ Auto Volume : Off √ Internal...√ Multi-Track Options √ Auto Volume : Off √ Internal Mute : Off √ † More 1. Analog Depending on the remote control to select "Off" or "On", then press the ENTER button. Press the MENU button to Mono, Stereo or SAP. Press the MENU ...

User Manual (ENGLISH)
Page 36
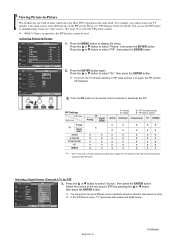
...add or delete a channel to ANT 2 IN (AIR), select "Air" and if it is not selected properly, noise may appear on the remote control to select Air or Cable. ➢ If the antenna is connected to display the channels you want only. or † button to delete...or † button to return. Press the EXIT button to select "Channel Manager", then press the √ ENTER button. √ √ Move Enter Return TV Channel Manager All √ Added √ Favorite √ Default List mode : All √ 3. To use the Channel Manager function, first run Auto Program...
...add or delete a channel to ANT 2 IN (AIR), select "Air" and if it is not selected properly, noise may appear on the remote control to select Air or Cable. ➢ If the antenna is connected to display the channels you want only. or † button to delete...or † button to return. Press the EXIT button to select "Channel Manager", then press the √ ENTER button. √ √ Move Enter Return TV Channel Manager All √ Added √ Favorite √ Default List mode : All √ 3. To use the Channel Manager function, first run Auto Program...


