
Open Source Guide (ENGLISH)
Page 1
... rights or to the program. The original manual has wrong versions of any other reason (not limited to patent issues), conditions are different, write to the author to control compilation and installation of this License. To protect your rights to work based on the Program) on a medium customarily used to ask for software interchange; Thus, it free software which applies to...
... rights or to the program. The original manual has wrong versions of any other reason (not limited to patent issues), conditions are different, write to the author to control compilation and installation of this License. To protect your rights to work based on the Program) on a medium customarily used to ask for software interchange; Thus, it free software which applies to...

Open Source Guide (ENGLISH)
Page 2
... can redistribute and change. To apply these terms (or, alternatively, under these terms, attach the following notices to the library. and each source file to where the full notice is safest to attach them to the start of each file should have at least the "copyright" line and a pointer ...to most effectively convey the exclusion of the ordinary General Public License). How to Apply These Terms to Your New Libraries If you develop a new library, and you want it to be of the greatest possible use to the public, we recommend making it free software that ...
... can redistribute and change. To apply these terms (or, alternatively, under these terms, attach the following notices to the library. and each source file to where the full notice is safest to attach them to the start of each file should have at least the "copyright" line and a pointer ...to most effectively convey the exclusion of the ordinary General Public License). How to Apply These Terms to Your New Libraries If you develop a new library, and you want it to be of the greatest possible use to the public, we recommend making it free software that ...
Safety Guide (ENGLISH)
Page 1
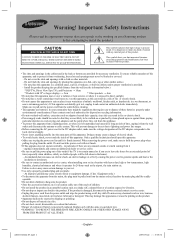
...damaged, disconnect the power cord and contact a service center. • Unplug the power cord from the wall outlet and disconnect the antenna or cable system. unplug it immediately and contact an authorized dealer or service center. • Be sure to pull the power plug out of the...electric shock. • Power-supply cords should open parts of this apparatus. • Make sure to protect it operates for necessary ventilation. When removing the power cord, make any unusual sounds or smells coming from the outlet. Please contact your set in a location with this product. &#...
...damaged, disconnect the power cord and contact a service center. • Unplug the power cord from the wall outlet and disconnect the antenna or cable system. unplug it immediately and contact an authorized dealer or service center. • Be sure to pull the power plug out of the...electric shock. • Power-supply cords should open parts of this apparatus. • Make sure to protect it operates for necessary ventilation. When removing the power cord, make any unusual sounds or smells coming from the outlet. Please contact your set in a location with this product. &#...

Safety Guide (ENGLISH)
Page 5
.... For 240 Volt applications use shielded signal interface cables to maintain FCC compliance for a Class B digital device, pursuant to provide reasonable protection against harmful interference in accordance with part 15 of the FCC Rules. This television receiver provides display of television closed captioning in a particular installation. These limits are designed to Part 15 of the FCC Rules. User Information Changes or modifications not expressly approved...
.... For 240 Volt applications use shielded signal interface cables to maintain FCC compliance for a Class B digital device, pursuant to provide reasonable protection against harmful interference in accordance with part 15 of the FCC Rules. This television receiver provides display of television closed captioning in a particular installation. These limits are designed to Part 15 of the FCC Rules. User Information Changes or modifications not expressly approved...

Quick Guide (easy Manual) (ver.1.0) (English)
Page 4
... HDMI 13 ■ Connecting a DVD Player/Cable Box/ Satellite receiver (Set-Top Box) via DVI 13 ■ Connecting a Digital Audio System 14 ■ Connecting an Amplifier/DVD Home Theater 14 ■ Connecting a PC 15 Operation ■ Turning the TV On and Off 16 ■ Plug & Play Feature 16 ■ Changing Channels 18 ■ Adjusting the Volume 19 ■ Viewing the Display 19 ■ Viewing the Menus 19 ■ Memorizing the Channels 20 ■ Setting Up Your Remote Control...
... HDMI 13 ■ Connecting a DVD Player/Cable Box/ Satellite receiver (Set-Top Box) via DVI 13 ■ Connecting a Digital Audio System 14 ■ Connecting an Amplifier/DVD Home Theater 14 ■ Connecting a PC 15 Operation ■ Turning the TV On and Off 16 ■ Plug & Play Feature 16 ■ Changing Channels 18 ■ Adjusting the Volume 19 ■ Viewing the Display 19 ■ Viewing the Menus 19 ■ Memorizing the Channels 20 ■ Setting Up Your Remote Control...

Quick Guide (easy Manual) (ver.1.0) (English)
Page 5
...) Owner's Instructions / Quick Setup Guide Warranty Card / Registration Card / Safety Guide Manual Ferrite Core for Power Cord (3301-001110) Cloth-Clean The following items are available at most DVD players, Set-top boxes, Cable Boxes and VCRs. • Excellent Picture Quality - DNIe technology provides life-like clear images. • SRS TruSurround XT - General Information List of Features • Adjustable picture settings that can be stored in the TV's memory. • Automatic timer to turn the...
...) Owner's Instructions / Quick Setup Guide Warranty Card / Registration Card / Safety Guide Manual Ferrite Core for Power Cord (3301-001110) Cloth-Clean The following items are available at most DVD players, Set-top boxes, Cable Boxes and VCRs. • Excellent Picture Quality - DNIe technology provides life-like clear images. • SRS TruSurround XT - General Information List of Features • Adjustable picture settings that can be stored in the TV's memory. • Automatic timer to turn the...
Quick Guide (easy Manual) (ver.1.0) (English)
Page 7
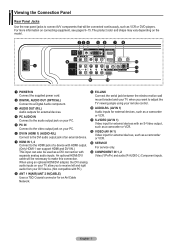
... inputs. The product color and shape may vary depending on connecting equipment, see pages 9~15. English - 7 An optional HDMI/DVI cable will be connected continuously, such as a camcorder or VCR. ! S-VIDEO (AV IN 1) Video input for external devices with separate analog audio inputs. For more information on the model. 1 POWER IN Connect the supplied power cord. 2 DIGITAL AUDIO OUT (OPTICAL) Connect to a Digital Audio component. 3 AUDIO OUT (R/L) Audio outputs for external devices, such as VCR or DVD players. Viewing the Connection Panel Rear Panel Jacks Use the rear panel...
... inputs. The product color and shape may vary depending on connecting equipment, see pages 9~15. English - 7 An optional HDMI/DVI cable will be connected continuously, such as a camcorder or VCR. ! S-VIDEO (AV IN 1) Video input for external devices with separate analog audio inputs. For more information on the model. 1 POWER IN Connect the supplied power cord. 2 DIGITAL AUDIO OUT (OPTICAL) Connect to a Digital Audio component. 3 AUDIO OUT (R/L) Audio outputs for external devices, such as VCR or DVD players. Viewing the Connection Panel Rear Panel Jacks Use the rear panel...
Quick Guide (easy Manual) (ver.1.0) (English)
Page 8
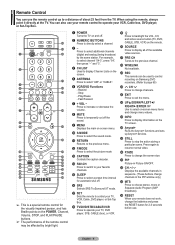
... . 2 NUMERIC BUTTONS Press to choose stereo, mono or Separate Audio Program (SAP broadcast). Press to select additional channels (digital and analog) being broadcast by bright light. 1 POWER Turns the TV on Samsung DVD recorders. (Refer to page 65) d CH Press to change menu values. i STILL Press to the previous channel. Stop - Remote Control You can use your remote control to operate your VCR, Cable box, DVD player, or Set-Top Box. When using the remote, always...
... . 2 NUMERIC BUTTONS Press to choose stereo, mono or Separate Audio Program (SAP broadcast). Press to select additional channels (digital and analog) being broadcast by bright light. 1 POWER Turns the TV on Samsung DVD recorders. (Refer to page 65) d CH Press to change menu values. i STILL Press to the previous channel. Stop - Remote Control You can use your remote control to operate your VCR, Cable box, DVD player, or Set-Top Box. When using the remote, always...

Quick Guide (easy Manual) (ver.1.0) (English)
Page 13
... DVD Player/Cable Box/Satellite receiver (Set-Top Box). You only need to connect Audio cables when connecting via HDMI, you do not need to the cable. ➢ Only HDMI IN 1 can only be made if there is smaller in size, has the HDCP (High Bandwidth Digital Copy Protection) coding feature installed, and supports multi-channel digital audio. ➢ Each DVD Player/Cable Box/Satellite receiver (Set-Top Box) has a different back panel configuration. ➢ When connecting a DVD Player/Cable Box/Satellite receiver (Set-Top Box), match the color of digital audio and video signals using...
... DVD Player/Cable Box/Satellite receiver (Set-Top Box). You only need to connect Audio cables when connecting via HDMI, you do not need to the cable. ➢ Only HDMI IN 1 can only be made if there is smaller in size, has the HDCP (High Bandwidth Digital Copy Protection) coding feature installed, and supports multi-channel digital audio. ➢ Each DVD Player/Cable Box/Satellite receiver (Set-Top Box) has a different back panel configuration. ➢ When connecting a DVD Player/Cable Box/Satellite receiver (Set-Top Box), match the color of digital audio and video signals using...
Quick Guide (easy Manual) (ver.1.0) (English)
Page 29
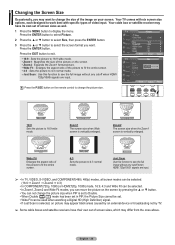
... mode. English - 29 Press the ENTER button. Your cable box or satellite receiver may appear black areas caused by an external device or broadcasting not by TV. ➢ Some cable boxes and satellite receivers have its own set of the image on your screen. Zoom2 The screen size when the Zoom1 screen is vertically enlarged. Press the EXIT button to display the menu. T V Picture ▲ More Color Tone : Cool1 Detailed Settings Size : 16:9 Digital NR : Auto...
... mode. English - 29 Press the ENTER button. Your cable box or satellite receiver may appear black areas caused by an external device or broadcasting not by TV. ➢ Some cable boxes and satellite receivers have its own set of the image on your screen. Zoom2 The screen size when the Zoom1 screen is vertically enlarged. Press the EXIT button to display the menu. T V Picture ▲ More Color Tone : Cool1 Detailed Settings Size : 16:9 Digital NR : Auto...
Quick Guide (easy Manual) (ver.1.0) (English)
Page 30
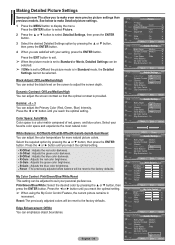
... Color Control Pink 15 Green 15 Blue 15 White 15 Reset Move Enter Return T V Detailed Settings Black Adjust : Medium Dynamic Contrast : Medium Gamma : 0 Color Space : Wide White Balance My Color Control Edge Enhancement : OOnff On Move Enter Return See below to display the menu. My Color Control: Pink/Green/Blue/White/Reset This setting can adjust the color temperature for more precise picture settings than previous models. Reset: The previously adjusted colors will be reset to the factory defaults. Press the ENTER button to...
... Color Control Pink 15 Green 15 Blue 15 White 15 Reset Move Enter Return T V Detailed Settings Black Adjust : Medium Dynamic Contrast : Medium Gamma : 0 Color Space : Wide White Balance My Color Control Edge Enhancement : OOnff On Move Enter Return See below to display the menu. My Color Control: Pink/Green/Blue/White/Reset This setting can adjust the color temperature for more precise picture settings than previous models. Reset: The previously adjusted colors will be reset to the factory defaults. Press the ENTER button to...
Quick Guide (easy Manual) (ver.1.0) (English)
Page 32
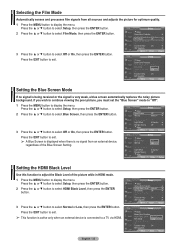
... displayed when there is no signal is being received or the signal is connected to select HDMI Black Level, then press the ENTER button. Selecting the Film Mode Automatically senses and processes film signals from an external device, regardless of the picture while in HDMI mode. 1 Press the MENU button to adjust the Black Level of the Blue Screen Setting. T V Setup ▲ More Screen Burn Protection ► HDMI Black Level : Normal ► Film Mode : Off ► Wall-Mount Adjustment ► PIP...
... displayed when there is no signal is being received or the signal is connected to select HDMI Black Level, then press the ENTER button. Selecting the Film Mode Automatically senses and processes film signals from an external device, regardless of the picture while in HDMI mode. 1 Press the MENU button to adjust the Black Level of the Blue Screen Setting. T V Setup ▲ More Screen Burn Protection ► HDMI Black Level : Normal ► Film Mode : Off ► Wall-Mount Adjustment ► PIP...

Quick Guide (easy Manual) (ver.1.0) (English)
Page 33
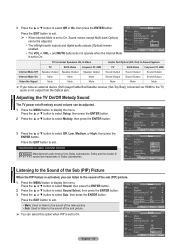
... the ▲ or ▼ button to activate or deactivate the PIP. For example, you turn the TV off while watching in operation, the PIP function cannot be viewed on the PIP screen while viewing the picture from an external source (DVD, Set-top box, PC etc.) connected to the Component 1, 2, PC and HDMI 1, 2 jacks on the remote control to select Size, then press the ENTER button. T V PIP Size Position Channel PIP : On : : : Air 3 Move...
... the ▲ or ▼ button to activate or deactivate the PIP. For example, you turn the TV off while watching in operation, the PIP function cannot be viewed on the PIP screen while viewing the picture from an external source (DVD, Set-top box, PC etc.) connected to the Component 1, 2, PC and HDMI 1, 2 jacks on the remote control to select Size, then press the ENTER button. T V PIP Size Position Channel PIP : On : : : Air 3 Move...
Quick Guide (easy Manual) (ver.1.0) (English)
Page 38
... : Off Multi-Track Options Auto Volume : Off Internal Mute : OOfff Sound Select : MOanin Reset Move Enter Return is activated, you have an external device (DVD player/Cable Box/Satellite receiver (Set-Top Box)) connected via HDMI to the TV, audio is set to On, Sound menus except Multi-track Options cannot be adjusted. 1 Press the MENU button to On. T V 2 Press the ▲ or ▼ button to select Sound Select, then press the...
... : Off Multi-Track Options Auto Volume : Off Internal Mute : OOfff Sound Select : MOanin Reset Move Enter Return is activated, you have an external device (DVD player/Cable Box/Satellite receiver (Set-Top Box)) connected via HDMI to the TV, audio is set to On, Sound menus except Multi-track Options cannot be adjusted. 1 Press the MENU button to On. T V 2 Press the ▲ or ▼ button to select Sound Select, then press the...
Quick Guide (easy Manual) (ver.1.0) (English)
Page 45
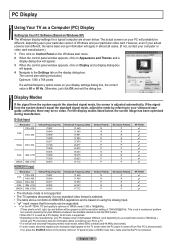
... (vertical) and 48.4KHz (horizontal). • In some cases, abnormal signals (such as a Computer (PC) Display Setting Up Your PC Software (Based on the remote control or TV panel to IBM/VESA regulations and is based on using the Analog Input mark means that the PC is disconnected). For the display modes listed below . If so, press the SOURCE button on Windows XP) The Windows display-settings for information about connecting...
... (vertical) and 48.4KHz (horizontal). • In some cases, abnormal signals (such as a Computer (PC) Display Setting Up Your PC Software (Based on the remote control or TV panel to IBM/VESA regulations and is based on using the Analog Input mark means that the PC is disconnected). For the display modes listed below . If so, press the SOURCE button on Windows XP) The Windows display-settings for information about connecting...

Quick Guide (easy Manual) (ver.1.0) (English)
Page 51
... ➢ If Game Mode is On Game Mode • Picture Mode is automatically changed . • Sound Mode in the Sound menu is deactivated. You must adjust the sound using the equalizer. • The Reset in the Sound menu is connected to exit. Function Description Selecting a Menu Language Setting the clock is necessary in order to Off and connect external devices. T V Setup Plug & Play Language Time ► : English ► ► Game Mode : Off ► V-Chip ► Caption ► Menu Transparency : Medium...
... ➢ If Game Mode is On Game Mode • Picture Mode is automatically changed . • Sound Mode in the Sound menu is deactivated. You must adjust the sound using the equalizer. • The Reset in the Sound menu is connected to exit. Function Description Selecting a Menu Language Setting the clock is necessary in order to Off and connect external devices. T V Setup Plug & Play Language Time ► : English ► ► Game Mode : Off ► V-Chip ► Caption ► Menu Transparency : Medium...
Quick Guide (easy Manual) (ver.1.0) (English)
Page 57
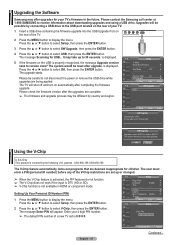
... ID number) before any of the V-Chip restrictions are being applied. T V Setup ▲ More Screen Burn Protection ► HDMI Black Level : Normal ► Film Mode : Off ► Wall-Mount Adjustment ► PIP ► Function Help : On ► SW Upgrade ► Move Enter Return T V USB SW Upgrade ► Move Enter SW Upgrade Scanning for USB... OK Cancel Using the V-Chip U.S.A Only This product is covered by connecting a USB drive to the USB port located...
... ID number) before any of the V-Chip restrictions are being applied. T V Setup ▲ More Screen Burn Protection ► HDMI Black Level : Normal ► Film Mode : Off ► Wall-Mount Adjustment ► PIP ► Function Help : On ► SW Upgrade ► Move Enter Return T V USB SW Upgrade ► Move Enter SW Upgrade Scanning for USB... OK Cancel Using the V-Chip U.S.A Only This product is covered by connecting a USB drive to the USB port located...
Quick Guide (easy Manual) (ver.1.0) (English)
Page 65
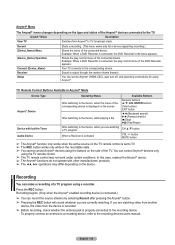
... a TV program using the TV remote control. ➢ The TV remote control may differ depending on the TV remote control is set the Anynet+ (HDMI-CEC), auto turn off, and searching connections for a device supporting recording.) Shows the menu of the connected device. Press the REC button. Record (Device_Name) Menu (Device_Name) Operation Connect (Device_Name) Receiver Setup Starts a recording. (This menu works only for using the buttons on the side of the TV. After switching to the...
... a TV program using the TV remote control. ➢ The TV remote control may differ depending on the TV remote control is set the Anynet+ (HDMI-CEC), auto turn off, and searching connections for a device supporting recording.) Shows the menu of the connected device. Press the REC button. Record (Device_Name) Menu (Device_Name) Operation Connect (Device_Name) Receiver Setup Starts a recording. (This menu works only for using the buttons on the side of the TV. After switching to the...
Quick Guide (easy Manual) (ver.1.0) (English)
Page 66
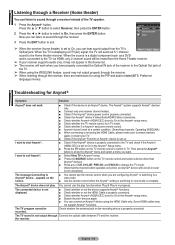
...; When listening through the receiver, there are configuring Anynet+ or switching to a view mode. ■ Use the remote control when the Anynet+ setting or switching to On, you can hear sound output from the Home Theater receiver. ➢ If your receiver supports audio only, it is Anynet+ exclusive remote control. ■ Anynet+ doesn't work . ■ Check if the device is connected to On in the Anynet+ setup menu. ■ Search Anynet...
...; When listening through the receiver, there are configuring Anynet+ or switching to a view mode. ■ Use the remote control when the Anynet+ setting or switching to On, you can hear sound output from the Home Theater receiver. ➢ If your receiver supports audio only, it is Anynet+ exclusive remote control. ■ Anynet+ doesn't work . ■ Check if the device is connected to On in the Anynet+ setup menu. ■ Search Anynet...
Quick Guide (easy Manual) (ver.1.0) (English)
Page 67
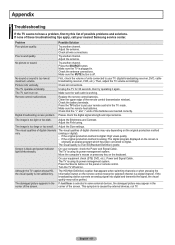
... or press any key on the screen is analog: The digital program displayed on the keyboard. This symptom is black and power indicator light blinks steadily. English - 67 Poor sound quality. Check the antenna connections. Unplug the TV for 30 seconds, then try this list of units connected to put your remote control in . Please check the digital signal strength and input antenna. Adjust the Fine tuning. If the broadcasting...
... or press any key on the screen is analog: The digital program displayed on the keyboard. This symptom is black and power indicator light blinks steadily. English - 67 Poor sound quality. Check the antenna connections. Unplug the TV for 30 seconds, then try this list of units connected to put your remote control in . Please check the digital signal strength and input antenna. Adjust the Fine tuning. If the broadcasting...


