
User Manual (ENGLISH)
Page 4
... On/Off Melody 72 Selecting the Internal Mute 73 Sound Reset 74 Operation Turning the TV On and Off 32 Viewing the Menus and Displays 36 Memorizing the Channels 37 Setting Up Your Remote Control 41 Viewing an External Signal Source 48 Channel Control Selecting the Antenna 76 ...85 LNA (Low Noise Amplifier 86 4 Digital 69 Choosing a Multi-Channel Sound (MTS) track - Table of Contents General Information Your New Plasma Display Panel 8 Remote Control Buttons 11 Wall Installation Instructions 13 How to assemble the Stand-Base 17 Connections Connecting VHF and UHF Antennas 20 ...
... On/Off Melody 72 Selecting the Internal Mute 73 Sound Reset 74 Operation Turning the TV On and Off 32 Viewing the Menus and Displays 36 Memorizing the Channels 37 Setting Up Your Remote Control 41 Viewing an External Signal Source 48 Channel Control Selecting the Antenna 76 ...85 LNA (Low Noise Amplifier 86 4 Digital 69 Choosing a Multi-Channel Sound (MTS) track - Table of Contents General Information Your New Plasma Display Panel 8 Remote Control Buttons 11 Wall Installation Instructions 13 How to assemble the Stand-Base 17 Connections Connecting VHF and UHF Antennas 20 ...
User Manual (ENGLISH)
Page 5
...HP-S4253 137 Dimensions (HP-S5053 139 Note • The information contained in these Owner's Instructions is subject to change without prior notice for improvement, and may vary depending on the version of the Image 92 Picture Quality Adjustment 93 Image Reset 95 Time Setting Setting the Clock 98 Setting... Reduction 105 Selecting the Film Mode 106 Setting the Blue Screen 107 Using Game Mode 108 Viewing Closed Captions (On-Screen Text Messages) - Connecting a PC and Operation Connecting a PC 88 Changing the Position of the TV's software and the regional conditions. 5 Analog...
...HP-S4253 137 Dimensions (HP-S5053 139 Note • The information contained in these Owner's Instructions is subject to change without prior notice for improvement, and may vary depending on the version of the Image 92 Picture Quality Adjustment 93 Image Reset 95 Time Setting Setting the Clock 98 Setting... Reduction 105 Selecting the Film Mode 106 Setting the Blue Screen 107 Using Game Mode 108 Viewing Closed Captions (On-Screen Text Messages) - Connecting a PC and Operation Connecting a PC 88 Changing the Position of the TV's software and the regional conditions. 5 Analog...

User Manual (ENGLISH)
Page 12
...take out the batteries and press the reset button for the visually impaired, and has Braille points on the Power, Channel and Volume buttons. Re-insert the batteries and try using the remote control again. ≥ SET button Used during set up of this Samsung remote control, so that it will work... (Refer to page 56) ∑ PIP control buttons SWAP: Interchange the main and sub picture. alkaline and manganese. 3 Close the cover as shown in the TV's memory. (Refer to page 81) ÷ STILL button Press to pause the current screen. ® P.SIZE button Select Picture size. (Refer to page 68...
...take out the batteries and press the reset button for the visually impaired, and has Braille points on the Power, Channel and Volume buttons. Re-insert the batteries and try using the remote control again. ≥ SET button Used during set up of this Samsung remote control, so that it will work... (Refer to page 56) ∑ PIP control buttons SWAP: Interchange the main and sub picture. alkaline and manganese. 3 Close the cover as shown in the TV's memory. (Refer to page 81) ÷ STILL button Press to pause the current screen. ® P.SIZE button Select Picture size. (Refer to page 68...

User Manual (ENGLISH)
Page 35
Press the ▲ or ▼ button to select "Setup", then press the ENTER button. 2 Press the ENTER button to the previous page. Note • Plug and Play can only be set. Start 3 For further details on setting up options, refer to select "Plug & Play". To reset this feature... 1 Press the MENU button. TV Plug & Play Language Time Game Mode V-Chip Caption † More Setup √ : English √ √ : Off √ √ √ Move Enter Return i Menu language, Channels and Time will be accessed in the TV mode. 35
Press the ▲ or ▼ button to select "Setup", then press the ENTER button. 2 Press the ENTER button to the previous page. Note • Plug and Play can only be set. Start 3 For further details on setting up options, refer to select "Plug & Play". To reset this feature... 1 Press the MENU button. TV Plug & Play Language Time Game Mode V-Chip Caption † More Setup √ : English √ √ : Off √ √ √ Move Enter Return i Menu language, Channels and Time will be accessed in the TV mode. 35

User Manual (ENGLISH)
Page 52
... can select the type of picture which best corresponds to personal preference (see "Customizing the Picture Settings", page 53). 52 TV Mode Mode Contrast Brightness Sharpness Color Tint G 50 Color Tone Reset : DDyynnaammiicc Standa1rd00 Movie 45 Custom75 55 R 50 : Cool1 Move Enter Return 4 Press the... when viewing the movie. • Choose Custom if you want to adjust the settings according to your viewing requirements. 1 Press the MENU button. TV Mode Mode Contrast Brightness Sharpness Color Tint G 50 Color Tone Reset : Dynamic √ 100 45 75 55 R 50 : Cool1 √ Move...
... can select the type of picture which best corresponds to personal preference (see "Customizing the Picture Settings", page 53). 52 TV Mode Mode Contrast Brightness Sharpness Color Tint G 50 Color Tone Reset : DDyynnaammiicc Standa1rd00 Movie 45 Custom75 55 R 50 : Cool1 Move Enter Return 4 Press the... when viewing the movie. • Choose Custom if you want to adjust the settings according to your viewing requirements. 1 Press the MENU button. TV Mode Mode Contrast Brightness Sharpness Color Tint G 50 Color Tone Reset : Dynamic √ 100 45 75 55 R 50 : Cool1 √ Move...

User Manual (ENGLISH)
Page 53
...item. • You can select "Standard" which automatically recalls your personalized picture settings. 1 Press the MENU button. Customizing the Picture Settings You can be adjusted while watching Digital TV. • In PC mode, only the Contrast and Brightness can use the ... Off √ Move Enter Return TV Mode Mode Contrast Brightness Sharpness Color Tint G 50 Color Tone Reset : Dynamic √ 100 45 75 55 R 50 : Cool1 √ Move Enter Return TV Mode Mode Contrast Brightness Sharpness Color Tint G 50 Color Tone Reset : DDyynnaammiicc Standa1rd00 Movie 45 Custom75 55...
...item. • You can select "Standard" which automatically recalls your personalized picture settings. 1 Press the MENU button. Customizing the Picture Settings You can be adjusted while watching Digital TV. • In PC mode, only the Contrast and Brightness can use the ... Off √ Move Enter Return TV Mode Mode Contrast Brightness Sharpness Color Tint G 50 Color Tone Reset : Dynamic √ 100 45 75 55 R 50 : Cool1 √ Move Enter Return TV Mode Mode Contrast Brightness Sharpness Color Tint G 50 Color Tone Reset : DDyynnaammiicc Standa1rd00 Movie 45 Custom75 55...

User Manual (ENGLISH)
Page 54
...80 50 50 50 R 50 : Cool1 √ Move Enter Return TV Mode Mode Contrast Brightness Sharpness Color Tint G 50 Color Tone Reset : Custom 80 Cool2 50 Cool1 50 Normal50 Warm1R 50 : CWoaorl1m2 Move Enter Return Resetting the Picture Settings to select a particular option (Cool2, Cool1, Normal, Warm1, or Warm2...the ENTER button. 6 Press the ▲ or ▼ button to the Factory Defaults 7 To return the factory defaults, select "Reset" by pressing the ▲ or ▼ button. Press the ENTER button. • The previously adjusted settings will be reset to the factory defaults.
...80 50 50 50 R 50 : Cool1 √ Move Enter Return TV Mode Mode Contrast Brightness Sharpness Color Tint G 50 Color Tone Reset : Custom 80 Cool2 50 Cool1 50 Normal50 Warm1R 50 : CWoaorl1m2 Move Enter Return Resetting the Picture Settings to select a particular option (Cool2, Cool1, Normal, Warm1, or Warm2...the ENTER button. 6 Press the ▲ or ▼ button to the Factory Defaults 7 To return the factory defaults, select "Reset" by pressing the ▲ or ▼ button. Press the ENTER button. • The previously adjusted settings will be reset to the factory defaults.

User Manual (ENGLISH)
Page 65
Digital 69 Choosing a Multi-Channel Sound (MTS) track - Analog 70 Using the Auto Volume 71 Setting the On/Off Melody 72 Selecting the Internal Mute 73 Sound Reset 74 PLASMA DISPLAY PANEL Sound Control Customizing the Sound 66 Using Automatic Sound Settings 67 Setting the TruSurround XT 68 Choosing a Multi-Channel Sound (MTS) track -
Digital 69 Choosing a Multi-Channel Sound (MTS) track - Analog 70 Using the Auto Volume 71 Setting the On/Off Melody 72 Selecting the Internal Mute 73 Sound Reset 74 PLASMA DISPLAY PANEL Sound Control Customizing the Sound 66 Using Automatic Sound Settings 67 Setting the TruSurround XT 68 Choosing a Multi-Channel Sound (MTS) track -

User Manual (ENGLISH)
Page 72
... √ † More Move Enter Return TV Sound ... Press the ▲ or ▼ button to select "Melody", then press the ENTER button. Move Enter Return 72 Setting the On/Off Melody A melody sound can be set to exit. More Melody Sound Select Reset : OOnff : MOanin 3 Press the EXIT... button to come on when the TV is powered On or Off. 1 Press the MENU button.
... √ † More Move Enter Return TV Sound ... Press the ▲ or ▼ button to select "Melody", then press the ENTER button. Move Enter Return 72 Setting the On/Off Melody A melody sound can be set to exit. More Melody Sound Select Reset : OOnff : MOanin 3 Press the EXIT... button to come on when the TV is powered On or Off. 1 Press the MENU button.
User Manual (ENGLISH)
Page 74
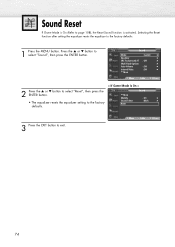
...; button to the factory defaults. TV ... More Sound Melody : On √ • The equalizer resets the equalizer setting to select "Sound", then press the ENTER button. Move Enter Return 74 Selecting the Reset function after setting the equalizer resets the equalizer to page 108), the Reset Sound function is activated. Sound Reset If Game Mode is On (Refer...
...; button to the factory defaults. TV ... More Sound Melody : On √ • The equalizer resets the equalizer setting to select "Sound", then press the ENTER button. Move Enter Return 74 Selecting the Reset function after setting the equalizer resets the equalizer to page 108), the Reset Sound function is activated. Sound Reset If Game Mode is On (Refer...

User Manual (ENGLISH)
Page 84
To store the fine tuning setting in the TV's memory, press the ENTER button. TV Antenna Channel : Air √ Auto Program √ Channel Manager √ Name √ Fine Tune √ Signal Strength √ † More Move Enter Return 2 Press the ▲ or ▼ button to select "Reset", then press the ENTER button. Air 4 * Adjust Fine...
To store the fine tuning setting in the TV's memory, press the ENTER button. TV Antenna Channel : Air √ Auto Program √ Channel Manager √ Name √ Fine Tune √ Signal Strength √ † More Move Enter Return 2 Press the ▲ or ▼ button to select "Reset", then press the ENTER button. Air 4 * Adjust Fine...
User Manual (ENGLISH)
Page 95
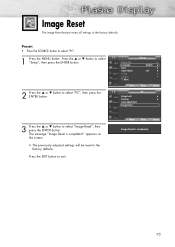
...to the factory defaults. appears on the screen. • The previously adjusted settings will be reset to select "Setup", then press the ENTER button. TV PC Image Lock √ Position √ Auto Adjustment Image Reset 3 Press the ▲ or ▼ button to select "PC". ... Preset: • Press the SOURCE button to select "Image Reset", then press the ENTER button. The message "Image Reset is completed. 95 Image Reset The Image Reset feature resets all settings to select "PC", then press the ENTER button. TV Plug & Play Language Time Game Mode V-Chip Caption †...
...to the factory defaults. appears on the screen. • The previously adjusted settings will be reset to select "Setup", then press the ENTER button. TV PC Image Lock √ Position √ Auto Adjustment Image Reset 3 Press the ▲ or ▼ button to select "PC". ... Preset: • Press the SOURCE button to select "Image Reset", then press the ENTER button. The message "Image Reset is completed. 95 Image Reset The Image Reset feature resets all settings to select "PC", then press the ENTER button. TV Plug & Play Language Time Game Mode V-Chip Caption †...
User Manual (ENGLISH)
Page 108
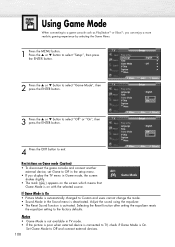
Using Game Mode When connecting to the factory defaults. Selecting the Reset function after setting the equalizer resets the equalizer setting to a game console such as PlayStationTM or XboxTM, you display the TV menu in the Sound menu is on the screen which means that Game Mode is .... • If the picture is poor when external device is connected to TV, check if Game Mode is activated. Set Game Mode to exit. Adjust the sound using the equalizer. • The Reset Sound function is On. TV Plug & Play Language Time Game Mode V-Chip Caption † More Setup &#...
Using Game Mode When connecting to the factory defaults. Selecting the Reset function after setting the equalizer resets the equalizer setting to a game console such as PlayStationTM or XboxTM, you display the TV menu in the Sound menu is on the screen which means that Game Mode is .... • If the picture is poor when external device is connected to TV, check if Game Mode is activated. Set Game Mode to exit. Adjust the sound using the equalizer. • The Reset Sound function is On. TV Plug & Play Language Time Game Mode V-Chip Caption † More Setup &#...

User Manual (ENGLISH)
Page 118
...to 0-0-0-0 : Power Off. ➔ Mute ➔ 8 ➔ 2 ➔ 4 ➔ Power On. 118 As soon as the 4 digits are set is not available in the following sequence, which resets the pin to select "Setup", then press the ENTER button. Note • If you forget the PIN, press the remote-control... buttons in HDMI or component mode. Press the ▲ or ▼ button to exit. Choose any of a new TV set up or changed....
...to 0-0-0-0 : Power Off. ➔ Mute ➔ 8 ➔ 2 ➔ 4 ➔ Power On. 118 As soon as the 4 digits are set is not available in the following sequence, which resets the pin to select "Setup", then press the ENTER button. Note • If you forget the PIN, press the remote-control... buttons in HDMI or component mode. Press the ▲ or ▼ button to exit. Choose any of a new TV set up or changed....

User Manual (ENGLISH)
Page 124
...buttons in HDMI or Component mode. TV Change PIN Enter New PIN Confirm New PIN 4 The Change PIN screen will appear. Enter PIN **** Note • The default PIN of the V-Chip restrictions are set is not available in the following sequence, which resets the pin to select "Setup", then... press the ENTER button. The user must enter a PIN (personal ID number) before any 4 digits for your 4 digit PIN. Choose any of a new TV set up or changed. Press the...
...buttons in HDMI or Component mode. TV Change PIN Enter New PIN Confirm New PIN 4 The Change PIN screen will appear. Enter PIN **** Note • The default PIN of the V-Chip restrictions are set is not available in the following sequence, which resets the pin to select "Setup", then... press the ENTER button. The user must enter a PIN (personal ID number) before any 4 digits for your 4 digit PIN. Choose any of a new TV set up or changed. Press the...
User Manual (ENGLISH)
Page 4
... (MTS) track - Table of Contents General Information Your New Plasma Display Panel 8 Remote Control Buttons 11 Wall Installation Instructions 13 How to assemble the Stand-Base 17 Connections Connecting VHF and UHF Antennas 20 Connecting Cable TV 21 Connecting a VCR 23 Connecting a Camcorder 24 Connecting a ...Sound 66 Using Automatic Sound Settings 67 Setting the TruSurround XT 68 Choosing a Multi-Channel Sound (MTS) track - Analog 70 Using the Auto Volume 71 Setting the On/Off Melody 72 Selecting the Internal Mute 73 Sound Reset 74 Operation Turning the TV On and Off 32 ...
... (MTS) track - Table of Contents General Information Your New Plasma Display Panel 8 Remote Control Buttons 11 Wall Installation Instructions 13 How to assemble the Stand-Base 17 Connections Connecting VHF and UHF Antennas 20 Connecting Cable TV 21 Connecting a VCR 23 Connecting a Camcorder 24 Connecting a ...Sound 66 Using Automatic Sound Settings 67 Setting the TruSurround XT 68 Choosing a Multi-Channel Sound (MTS) track - Analog 70 Using the Auto Volume 71 Setting the On/Off Melody 72 Selecting the Internal Mute 73 Sound Reset 74 Operation Turning the TV On and Off 32 ...

User Manual (ENGLISH)
Page 5
...Changing the Position of the TV's software and the regional conditions. 5 Digital 110 Menu Transparency Level 112 Using the Energy Saving Feature 113 Preventing Screen Burn-in 114 Reducing the Effects of Screen Burn 115 Setting the Function Help 116 Setting the Blue Eye 117 ...HP-S4253 137 Dimensions (HP-S5053 139 Note • The information contained in these Owner's Instructions is subject to change without prior notice for improvement, and may vary depending on the version of the Image 92 Picture Quality Adjustment 93 Image Reset 95 Time Setting Setting the Clock 98 Setting...
...Changing the Position of the TV's software and the regional conditions. 5 Digital 110 Menu Transparency Level 112 Using the Energy Saving Feature 113 Preventing Screen Burn-in 114 Reducing the Effects of Screen Burn 115 Setting the Function Help 116 Setting the Blue Eye 117 ...HP-S4253 137 Dimensions (HP-S5053 139 Note • The information contained in these Owner's Instructions is subject to change without prior notice for improvement, and may vary depending on the version of the Image 92 Picture Quality Adjustment 93 Image Reset 95 Time Setting Setting the Clock 98 Setting...
User Manual (ENGLISH)
Page 12
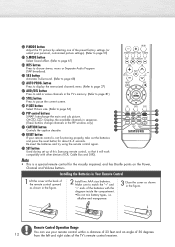
... use your remote control within a distance of 23 feet and an angle of 30 degrees 12 from the left and right sides of this Samsung remote control, so that it will work compatibly with the diagram inside the compartment. •Do not mix battery types, i.e. AUTO PROG.... decoder. ¥ RESET button If your remote control is a special remote control for about 2~3 seconds. alkaline and manganese. 3 Close the cover as shown in the figure. Make sure to page 68) - ˛ P.MODE button Adjust the TV picture by selecting one of the preset factory settings (or select your ...
... use your remote control within a distance of 23 feet and an angle of 30 degrees 12 from the left and right sides of this Samsung remote control, so that it will work compatibly with the diagram inside the compartment. •Do not mix battery types, i.e. AUTO PROG.... decoder. ¥ RESET button If your remote control is a special remote control for about 2~3 seconds. alkaline and manganese. 3 Close the cover as shown in the figure. Make sure to page 68) - ˛ P.MODE button Adjust the TV picture by selecting one of the preset factory settings (or select your ...

User Manual (ENGLISH)
Page 35
Note • Plug and Play can only be set. Start 3 For further details on setting up options, refer to select "Plug & Play". Press the ▲ or ▼ button to select "Setup", then press the ENTER button. 2 Press the ENTER button to the previous page. To reset this feature... 1 Press the MENU button. TV Plug & Play Language Time Game Mode V-Chip Caption † More Setup √ : English √ √ : Off √ √ √ Move Enter Return i Menu language, Channels and Time will be accessed in the TV mode. 35
Note • Plug and Play can only be set. Start 3 For further details on setting up options, refer to select "Plug & Play". Press the ▲ or ▼ button to select "Setup", then press the ENTER button. 2 Press the ENTER button to the previous page. To reset this feature... 1 Press the MENU button. TV Plug & Play Language Time Game Mode V-Chip Caption † More Setup √ : English √ √ : Off √ √ √ Move Enter Return i Menu language, Channels and Time will be accessed in the TV mode. 35

User Manual (ENGLISH)
Page 52
... of picture which best corresponds to select "Mode". TV Mode Size Digital NR ➤ Quick way to personal preference (see "Customizing the Picture Settings", page 53). 52 TV Mode Mode Contrast Brightness Sharpness Color Tint G 50 Color Tone Reset : Dynamic √ 100 45 75 55 R... 50 : Cool1 √ Move Enter Return 3 Press the ENTER button. TV Mode Mode Contrast Brightness Sharpness Color ...
... of picture which best corresponds to select "Mode". TV Mode Size Digital NR ➤ Quick way to personal preference (see "Customizing the Picture Settings", page 53). 52 TV Mode Mode Contrast Brightness Sharpness Color Tint G 50 Color Tone Reset : Dynamic √ 100 45 75 55 R... 50 : Cool1 √ Move Enter Return 3 Press the ENTER button. TV Mode Mode Contrast Brightness Sharpness Color ...


